
How to Connect ChatDaddy to Claude Code with the ChatDaddy MCP Server (Full Setup Guide)
Step-by-step: create an API token, register the @chatdaddytech/mcp-server package in Claude Code, connect a WhatsApp channel, and let Claude send messages, manage contacts, run campaigns and bots for you.
Also searched as: How to Connect ChatDaddy to Claude Code with the ChatDaddy MCP Server (Full Setup Guide), Step 1: Check that Node.js 18 or newer is installed, Step 2: Create a ChatDaddy API token, Step 3: Find the package on npm (optional check), Step 4: Register the server in Claude Code, Step 5: Check that Claude Code can see ChatDaddy, Step 6: Connect a WhatsApp channel (only if you need one), Other channel types, Step 7: Make your first request, Step 8: Send a message (and read the approval prompt), What you can ask Claude, All 50 tools, Safety rules, Limits, Updating to a new version
The ChatDaddy MCP Server (@chatdaddytech/mcp-server on npm) connects your ChatDaddy team to Claude Code. Once it is set up you can ask Claude in plain English and it does the work in your ChatDaddy team: it sends WhatsApp messages, finds and tags contacts, runs campaigns and bots, sets keyword replies, and manages CRM tickets and webhooks.
⏱️ Setup takes about 10 minutes. Everything Claude does happens in a real ChatDaddy team, on real WhatsApp numbers, so start with a test team and your own numbers while you learn it.
🔒 Phone numbers, channel IDs, API tokens, team-member names and the QR code are blurred in every screenshot in this guide.
Before you start
You need four things:
- Claude Code, installed and signed in. See Claude Code setup.
- Node.js 18 or newer (Step 1 shows how to check).
- A ChatDaddy team you are allowed to work in, ideally a test team.
- Permission to create an API token in that team (Settings → Developer). Buying a plan upgrade from Claude needs the team Owner or Admin.
Step 1: Check that Node.js 18 or newer is installed
Open Terminal (Mac) or PowerShell (Windows) and run:
node -v
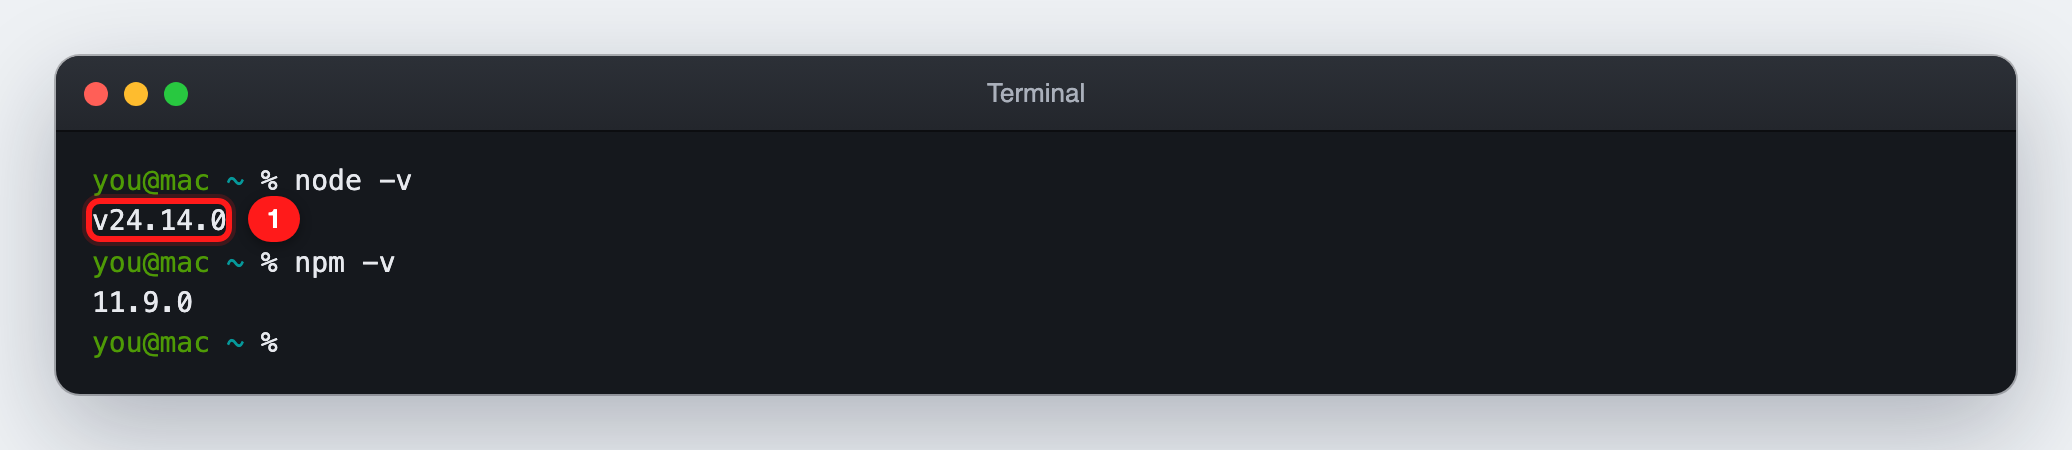
① The version must be v18 or higher. If the command is not found or the version is lower, install the LTS version from nodejs.org first.
ℹ️
npxships with Node.js, so you do not need to install anything else. The ChatDaddy MCP Server downloads itself the first time it runs.
Step 2: Create a ChatDaddy API token
The token tells the MCP server which team to work in and what it is allowed to do. Create it inside the team you want Claude to work in.
- Log in to app.chatdaddy.tech and click the Settings gear at the bottom of the left sidebar ①.
- Open Developer ② and make sure the API Token tab ③ is selected.
- Click + Create ④.
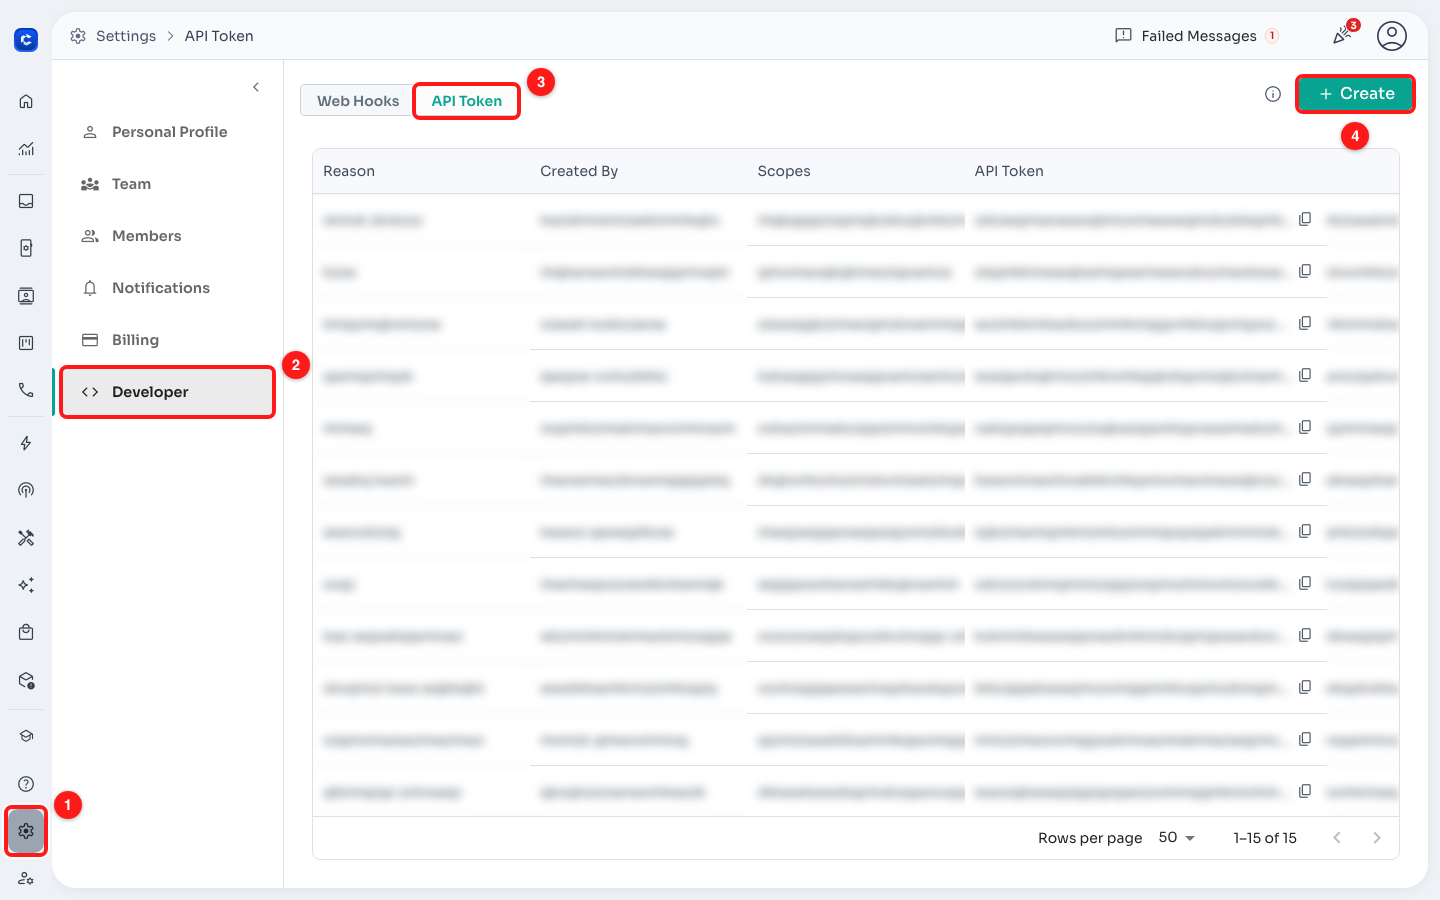
Settings ① → Developer ② → API Token ③ → + Create ④
- Type a Reason so you recognise the token later, for example
Claude Code MCP①. - Open Select access options for API token ② to choose scopes, or click Select All ③ to give the token every scope.
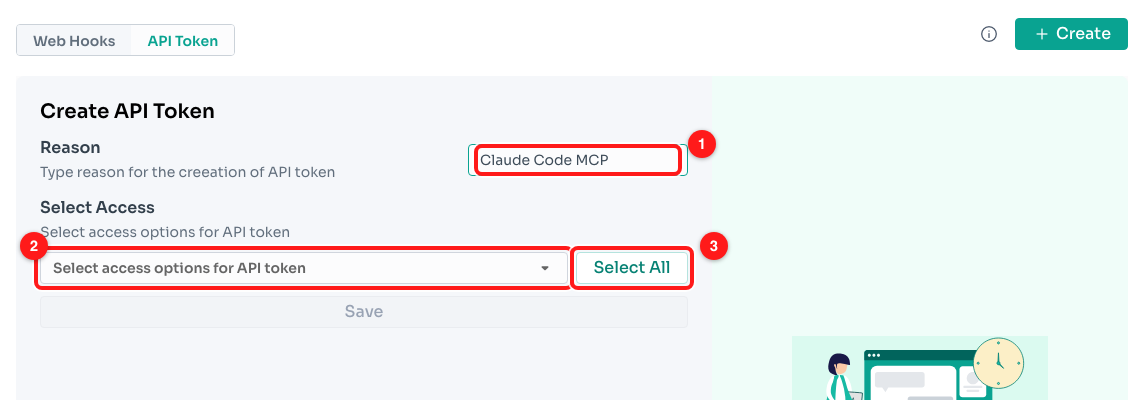
Name the token ①, then pick scopes ② or click Select All ③
- Tick the scopes for everything you want Claude to do. Each scope shows its code underneath the name, for example TEMPLATES_READ. These are the ones people most often miss ①:
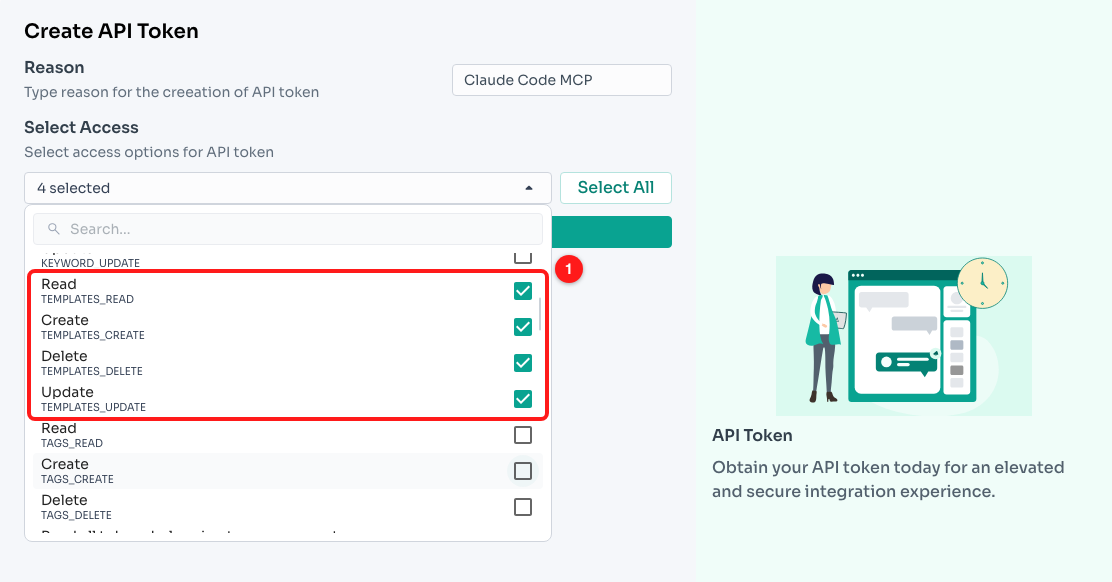
① The four bot scopes (TEMPLATES_READ / CREATE / DELETE / UPDATE) ticked
| To let Claude… | Tick these scopes |
|---|---|
| Create, edit, delete and send bots | TEMPLATES_READ, TEMPLATES_CREATE, TEMPLATES_UPDATE, TEMPLATES_DELETE |
| Manage keyword replies and the offline bot | KEYWORD_READ, KEYWORD_CREATE, KEYWORD_UPDATE |
| List and create campaigns | CAMPAIGNS_READ, CAMPAIGNS_CREATE |
| Send a bot to many contacts at once | MESSAGES_SEND_TO_ALL (or MESSAGES_SEND_TO_ASSIGNED) |
| Connect a WhatsApp channel by QR | ACCOUNT_CREATE, ACCOUNT_PATCH |
| Read the plan and credit balance | PAYMENTS_READ |
| Upgrade the plan (Owner/Admin only) | PAYMENTS_UPDATE |
⚠️ If Claude later answers with 403 or "forbidden", the token is missing the scope for that action. Create a new token with it and re-register (see Troubleshooting).
- Close the list and click Save ①.
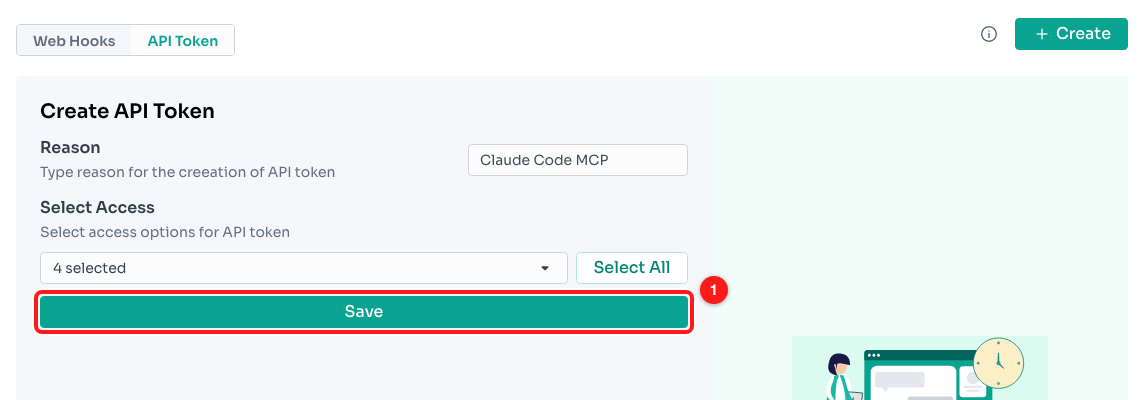
① Save becomes active once a Reason and at least one scope are set
- Your new token appears in the list. Click the copy icon in the API Token column ① to copy it. It starts with
apit_.
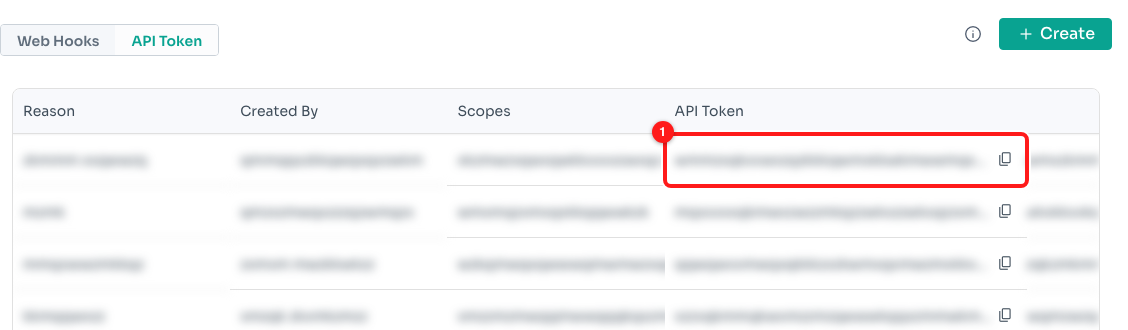
① Copy the token from the API Token column (tokens are blurred here)
🔑 Keep the token private. Anyone who has it can act in your team. Never paste it into a chat, a ticket, an email or a code commit. If it leaks, delete it in this list and create a new one.
Step 3: Find the package on npm (optional check)
The server is published on npm as @chatdaddytech/mcp-server. You do not need to run npm i yourself. Claude Code runs it through npx, which downloads it automatically.
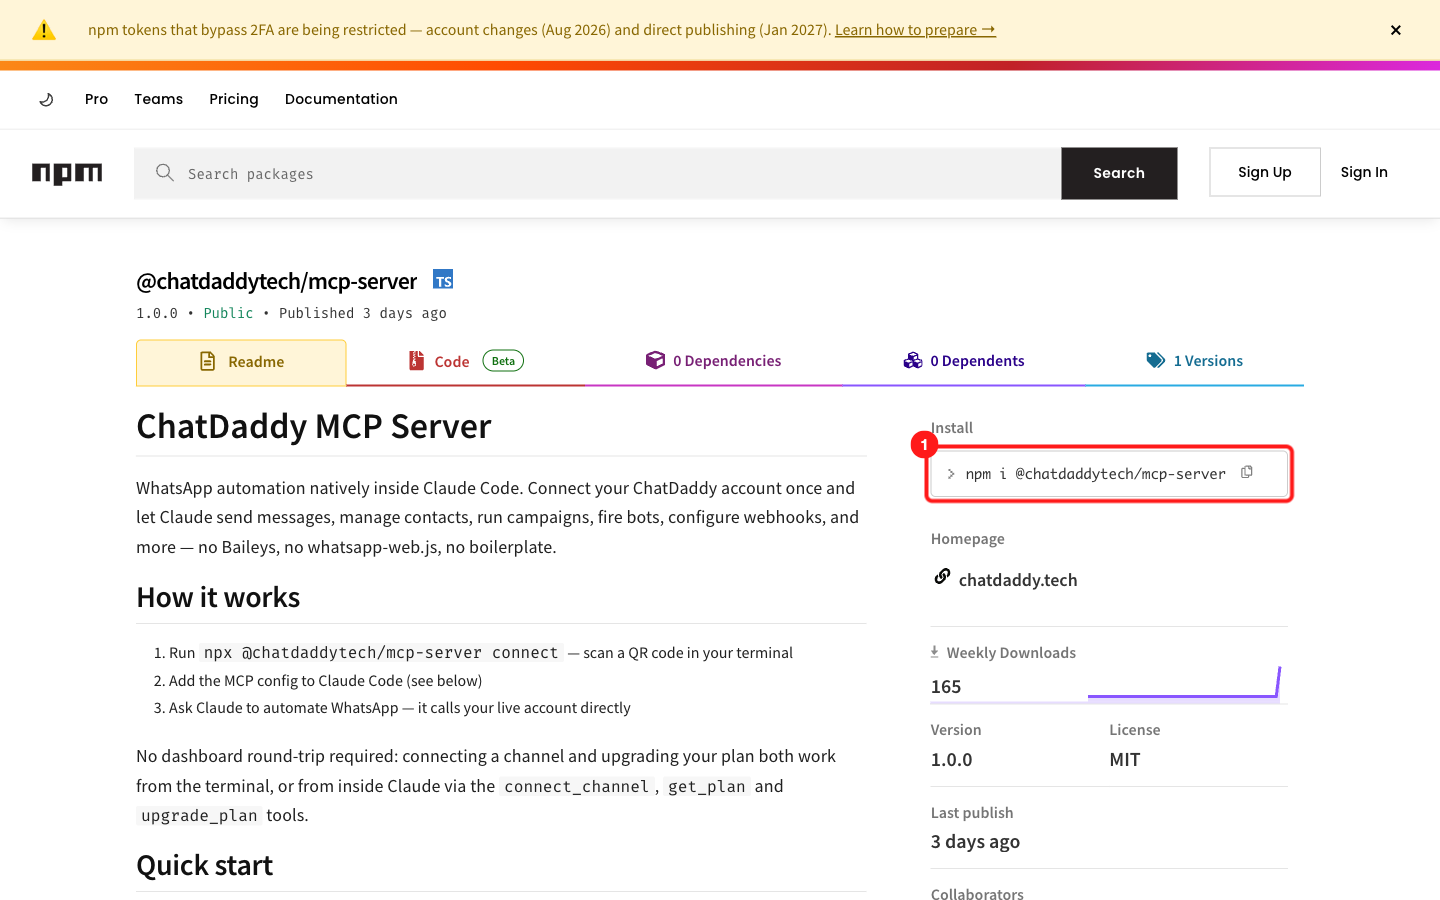
① The package name you will use in the next steps: @chatdaddytech/mcp-server
To confirm your token works before involving Claude, put it in your terminal session ① and run the built-in status command ②:
export CHATDADDY_API_KEY=apit_your_token
npx -y @chatdaddytech/mcp-server status
On Windows PowerShell, set the variable with $env:CHATDADDY_API_KEY="apit_your_token" instead of export.
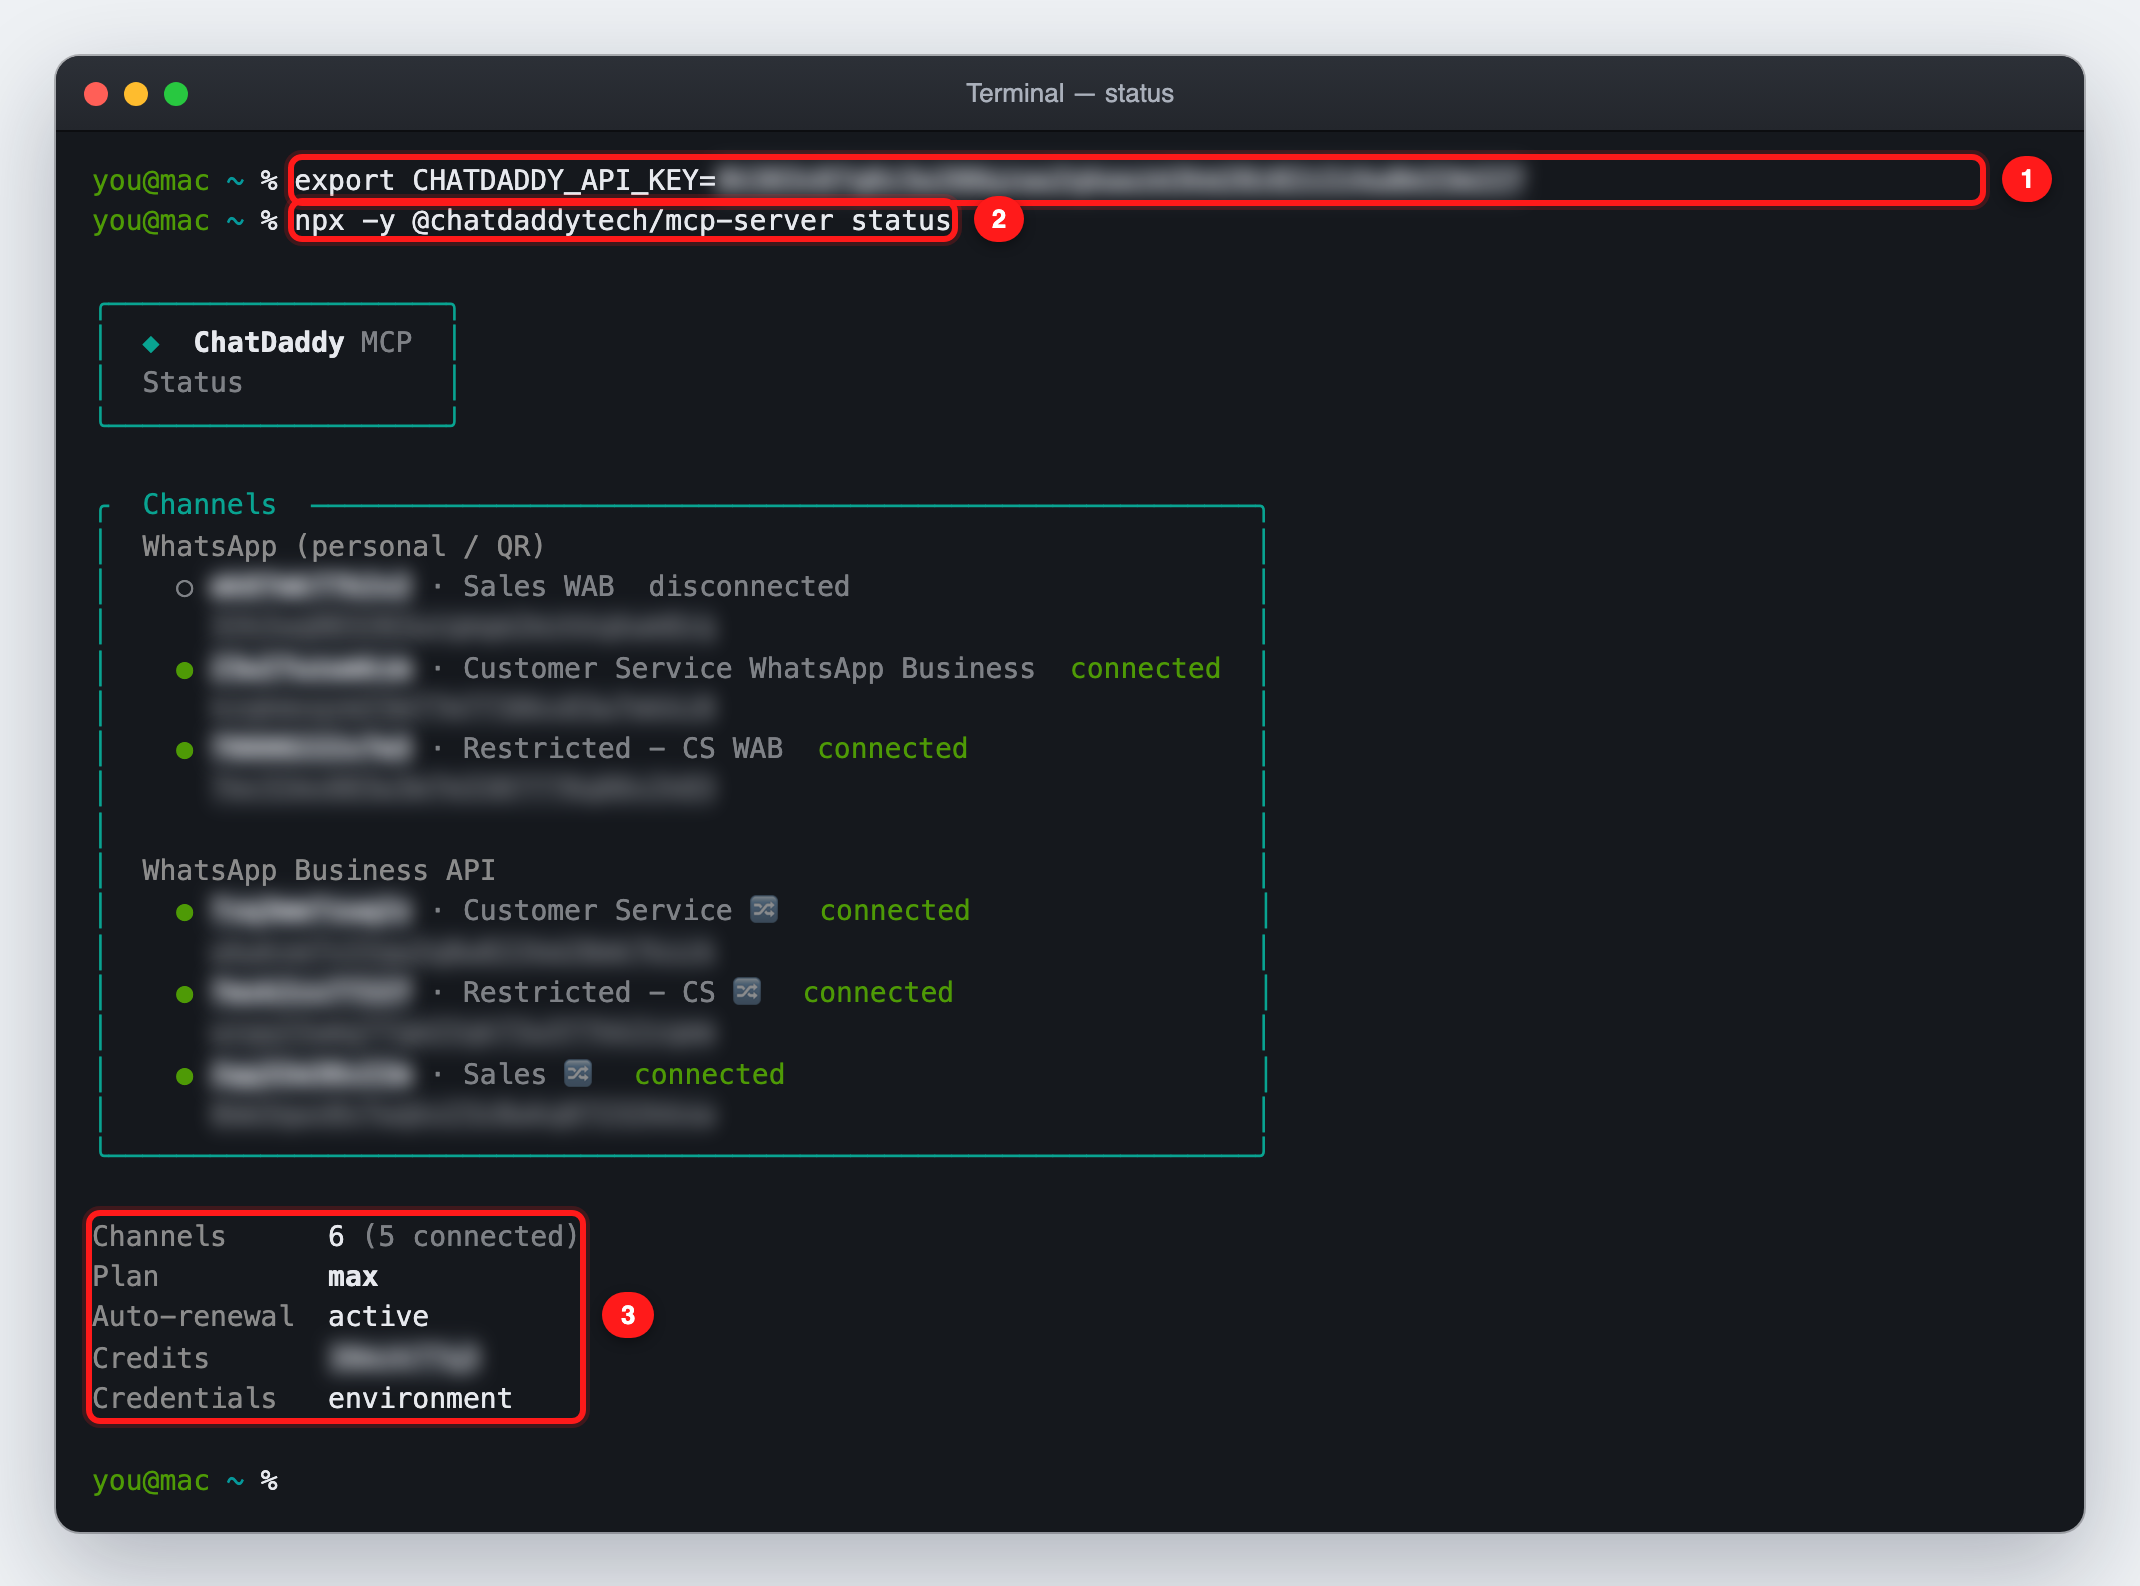
① Token set for this terminal session ② status command ③ Summary: channels, plan, auto-renewal, credits and where the credentials came from
You should see your team's channels grouped by type (● connected, ○ disconnected), followed by a summary ③. If you see an authentication error instead, the token is wrong or was deleted.
Step 4: Register the server in Claude Code
Run this single command in your terminal. Replace apit_your_token with the token you copied in Step 2:
claude mcp add chatdaddy -s user --env CHATDADDY_API_KEY=apit_your_token -- npx -y @chatdaddytech/mcp-server

① The command (token blurred) ② Claude Code confirms: "Added stdio MCP server chatdaddy … to user config"
What each part means:
| Part | What it does |
|---|---|
chatdaddy | The name of the server inside Claude Code. Tools appear as mcp__chatdaddy__…. |
-s user | Makes ChatDaddy available in every folder you open Claude Code in. Without it, it only loads in the folder where you ran the command. |
--env CHATDADDY_API_KEY=… | Stores your token in Claude Code's config so the server can use it. |
-- npx -y @chatdaddytech/mcp-server | How Claude Code starts the server. -y lets npx download the package without stopping to ask. |
🪟 The same command works in Windows PowerShell. Using a different MCP client (Claude Desktop, Cursor and others)? Add this to its MCP config file instead:
{
  "mcpServers": {
    "chatdaddy": {
      "command": "npx",
      "args": [
        "-y",
        "@chatdaddytech/mcp-server"
      ],
      "env": {
        "CHATDADDY_API_KEY": "apit_your_token"
      }
    }
  }
}
Step 5: Check that Claude Code can see ChatDaddy
In the terminal, run:
claude mcp list

① chatdaddy shows ✔ Connected
Next, open a new Claude Code session (type claude) and enter /mcp. chatdaddy should show a ✔ and 50 tools ①.
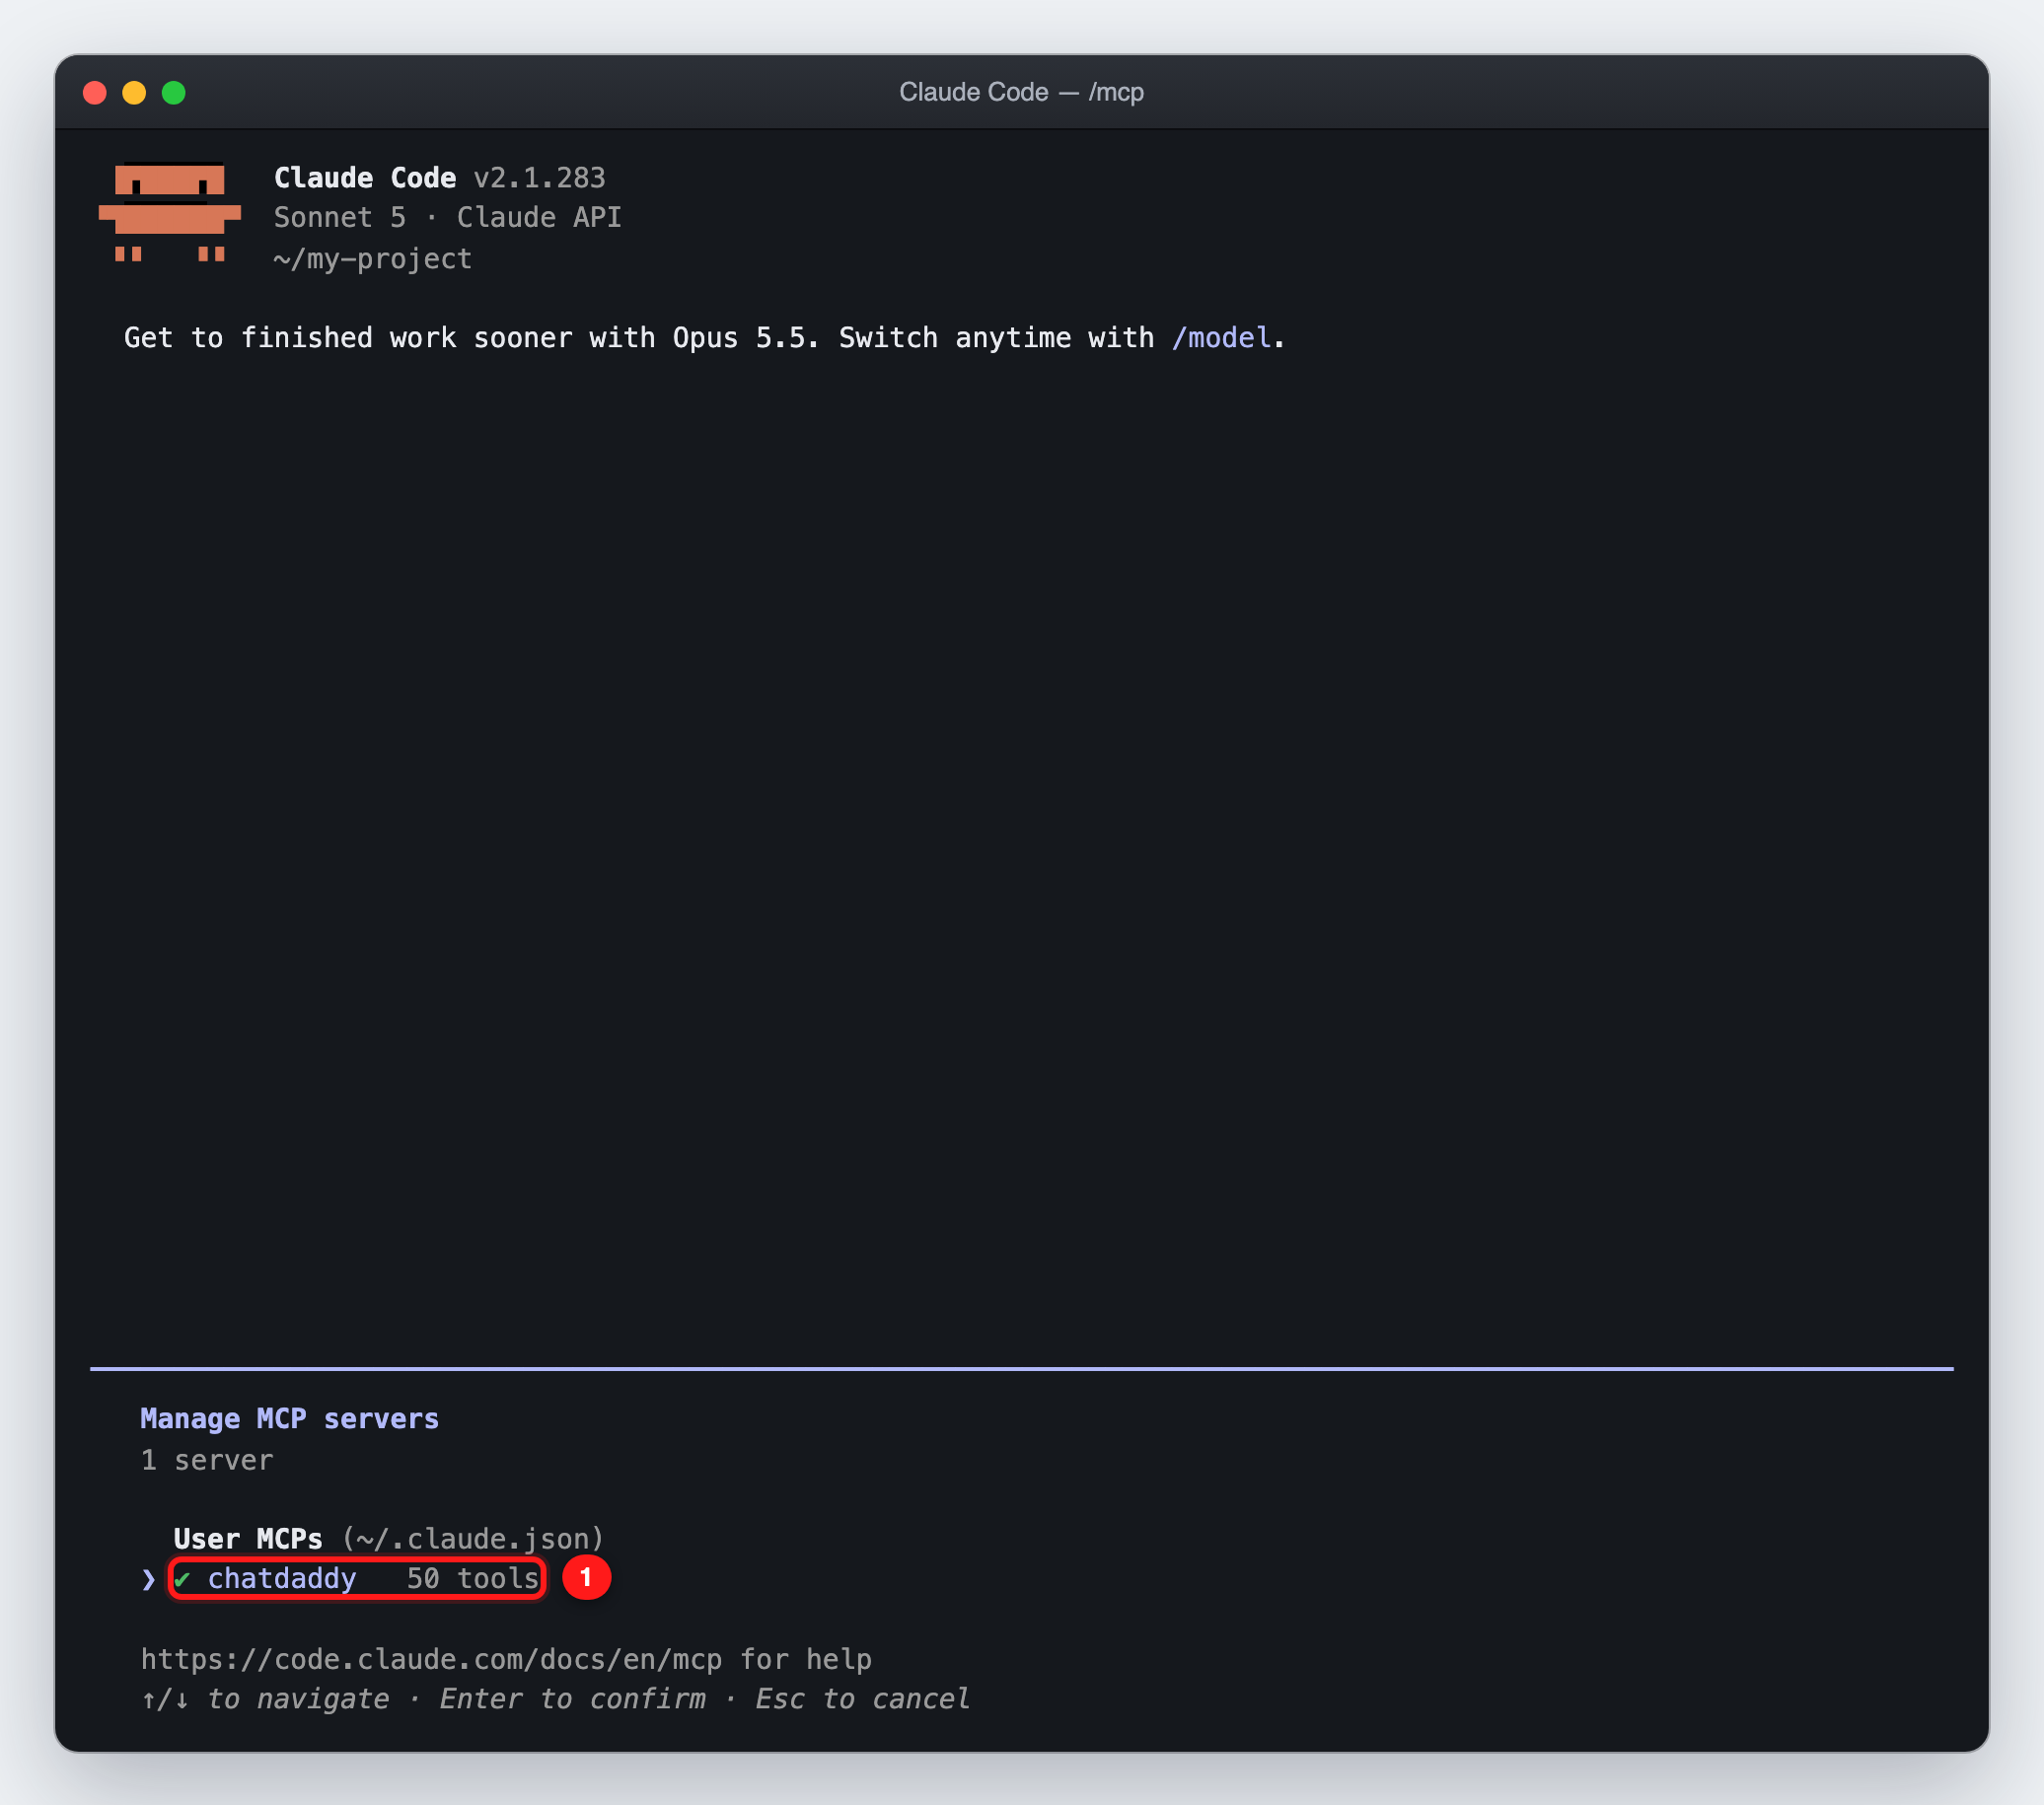
① /mcp lists chatdaddy under User MCPs with 50 tools
Press Enter on chatdaddy to see its details. Status should read connected ①. Reconnect ② is what you use after updating the server or changing the token.
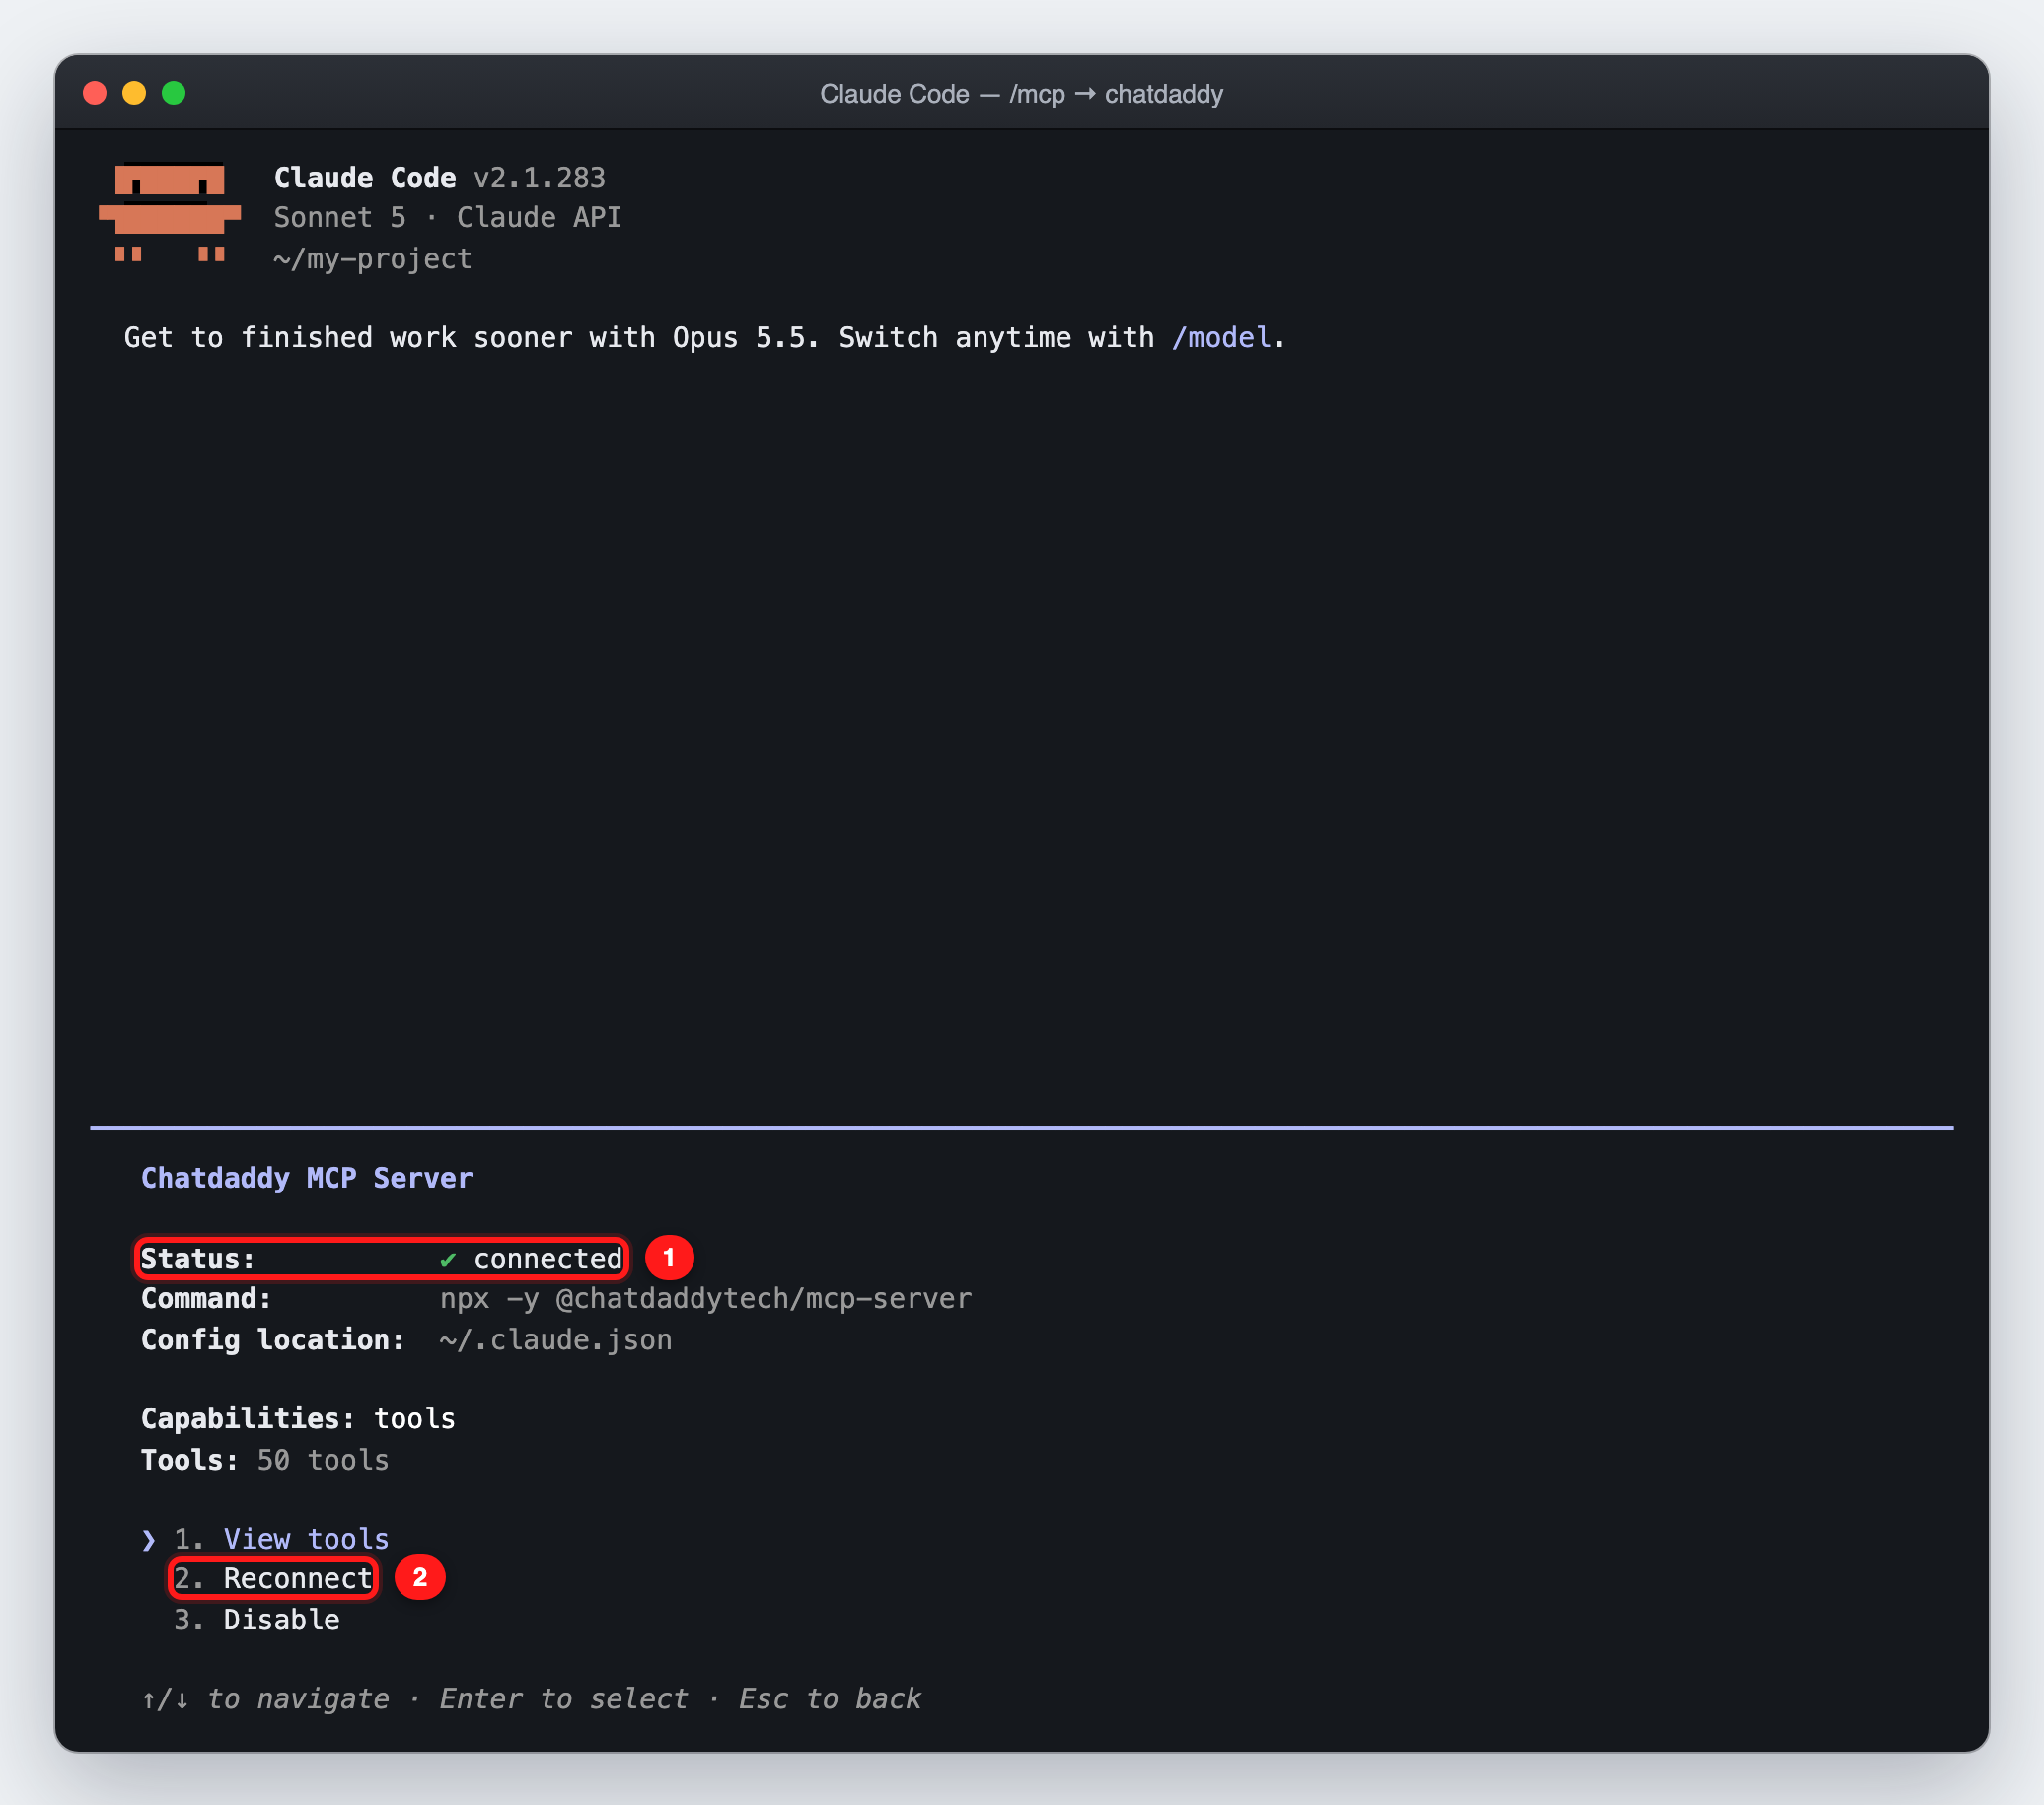
① Status: connected ② Reconnect
Step 6: Connect a WhatsApp channel (only if you need one)
Skip this step if your team already has a connected channel. A personal WhatsApp (QR) channel can be connected straight from the terminal:
npx -y @chatdaddytech/mcp-server connect
The command lists the channels your team already has and asks Which channel do you want to connect? ①. Use the ↑ ↓ keys and Enter to pick one:
- Choose a disconnected channel to re-link the same number.
- Choose an already-connected channel to make it the default channel on this computer.
- Choose + New WhatsApp (personal / QR) — scan here ② to add a new number. This uses one channel slot on your plan.
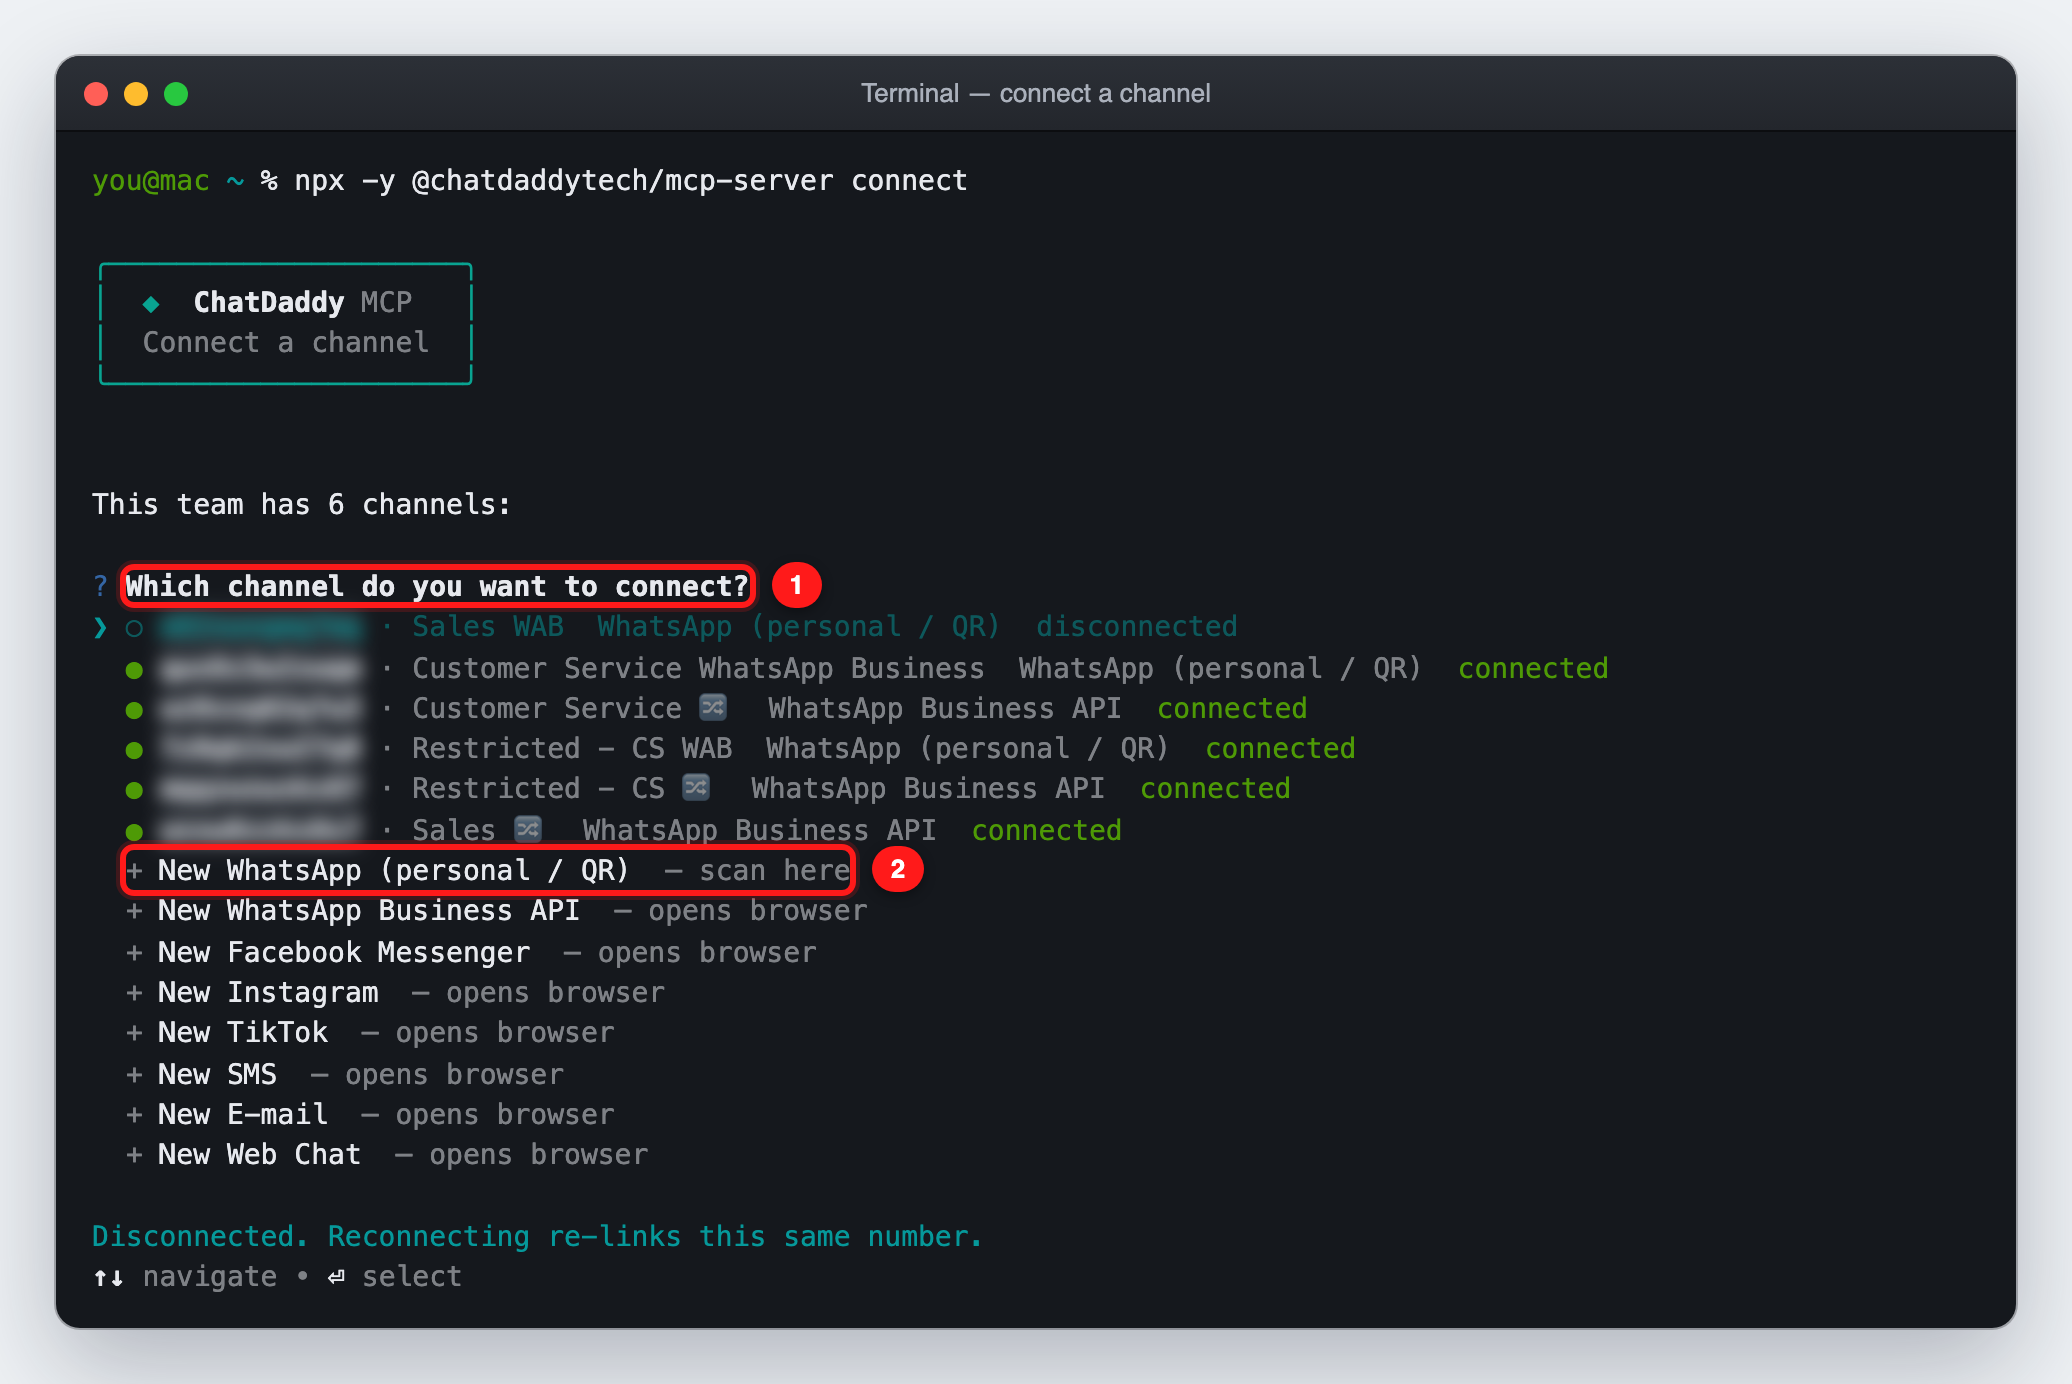
① The channel picker ② Add a new personal WhatsApp number by QR
A QR code appears in the terminal. On your phone, open WhatsApp → Settings → Linked Devices → Link a device and scan it ①.
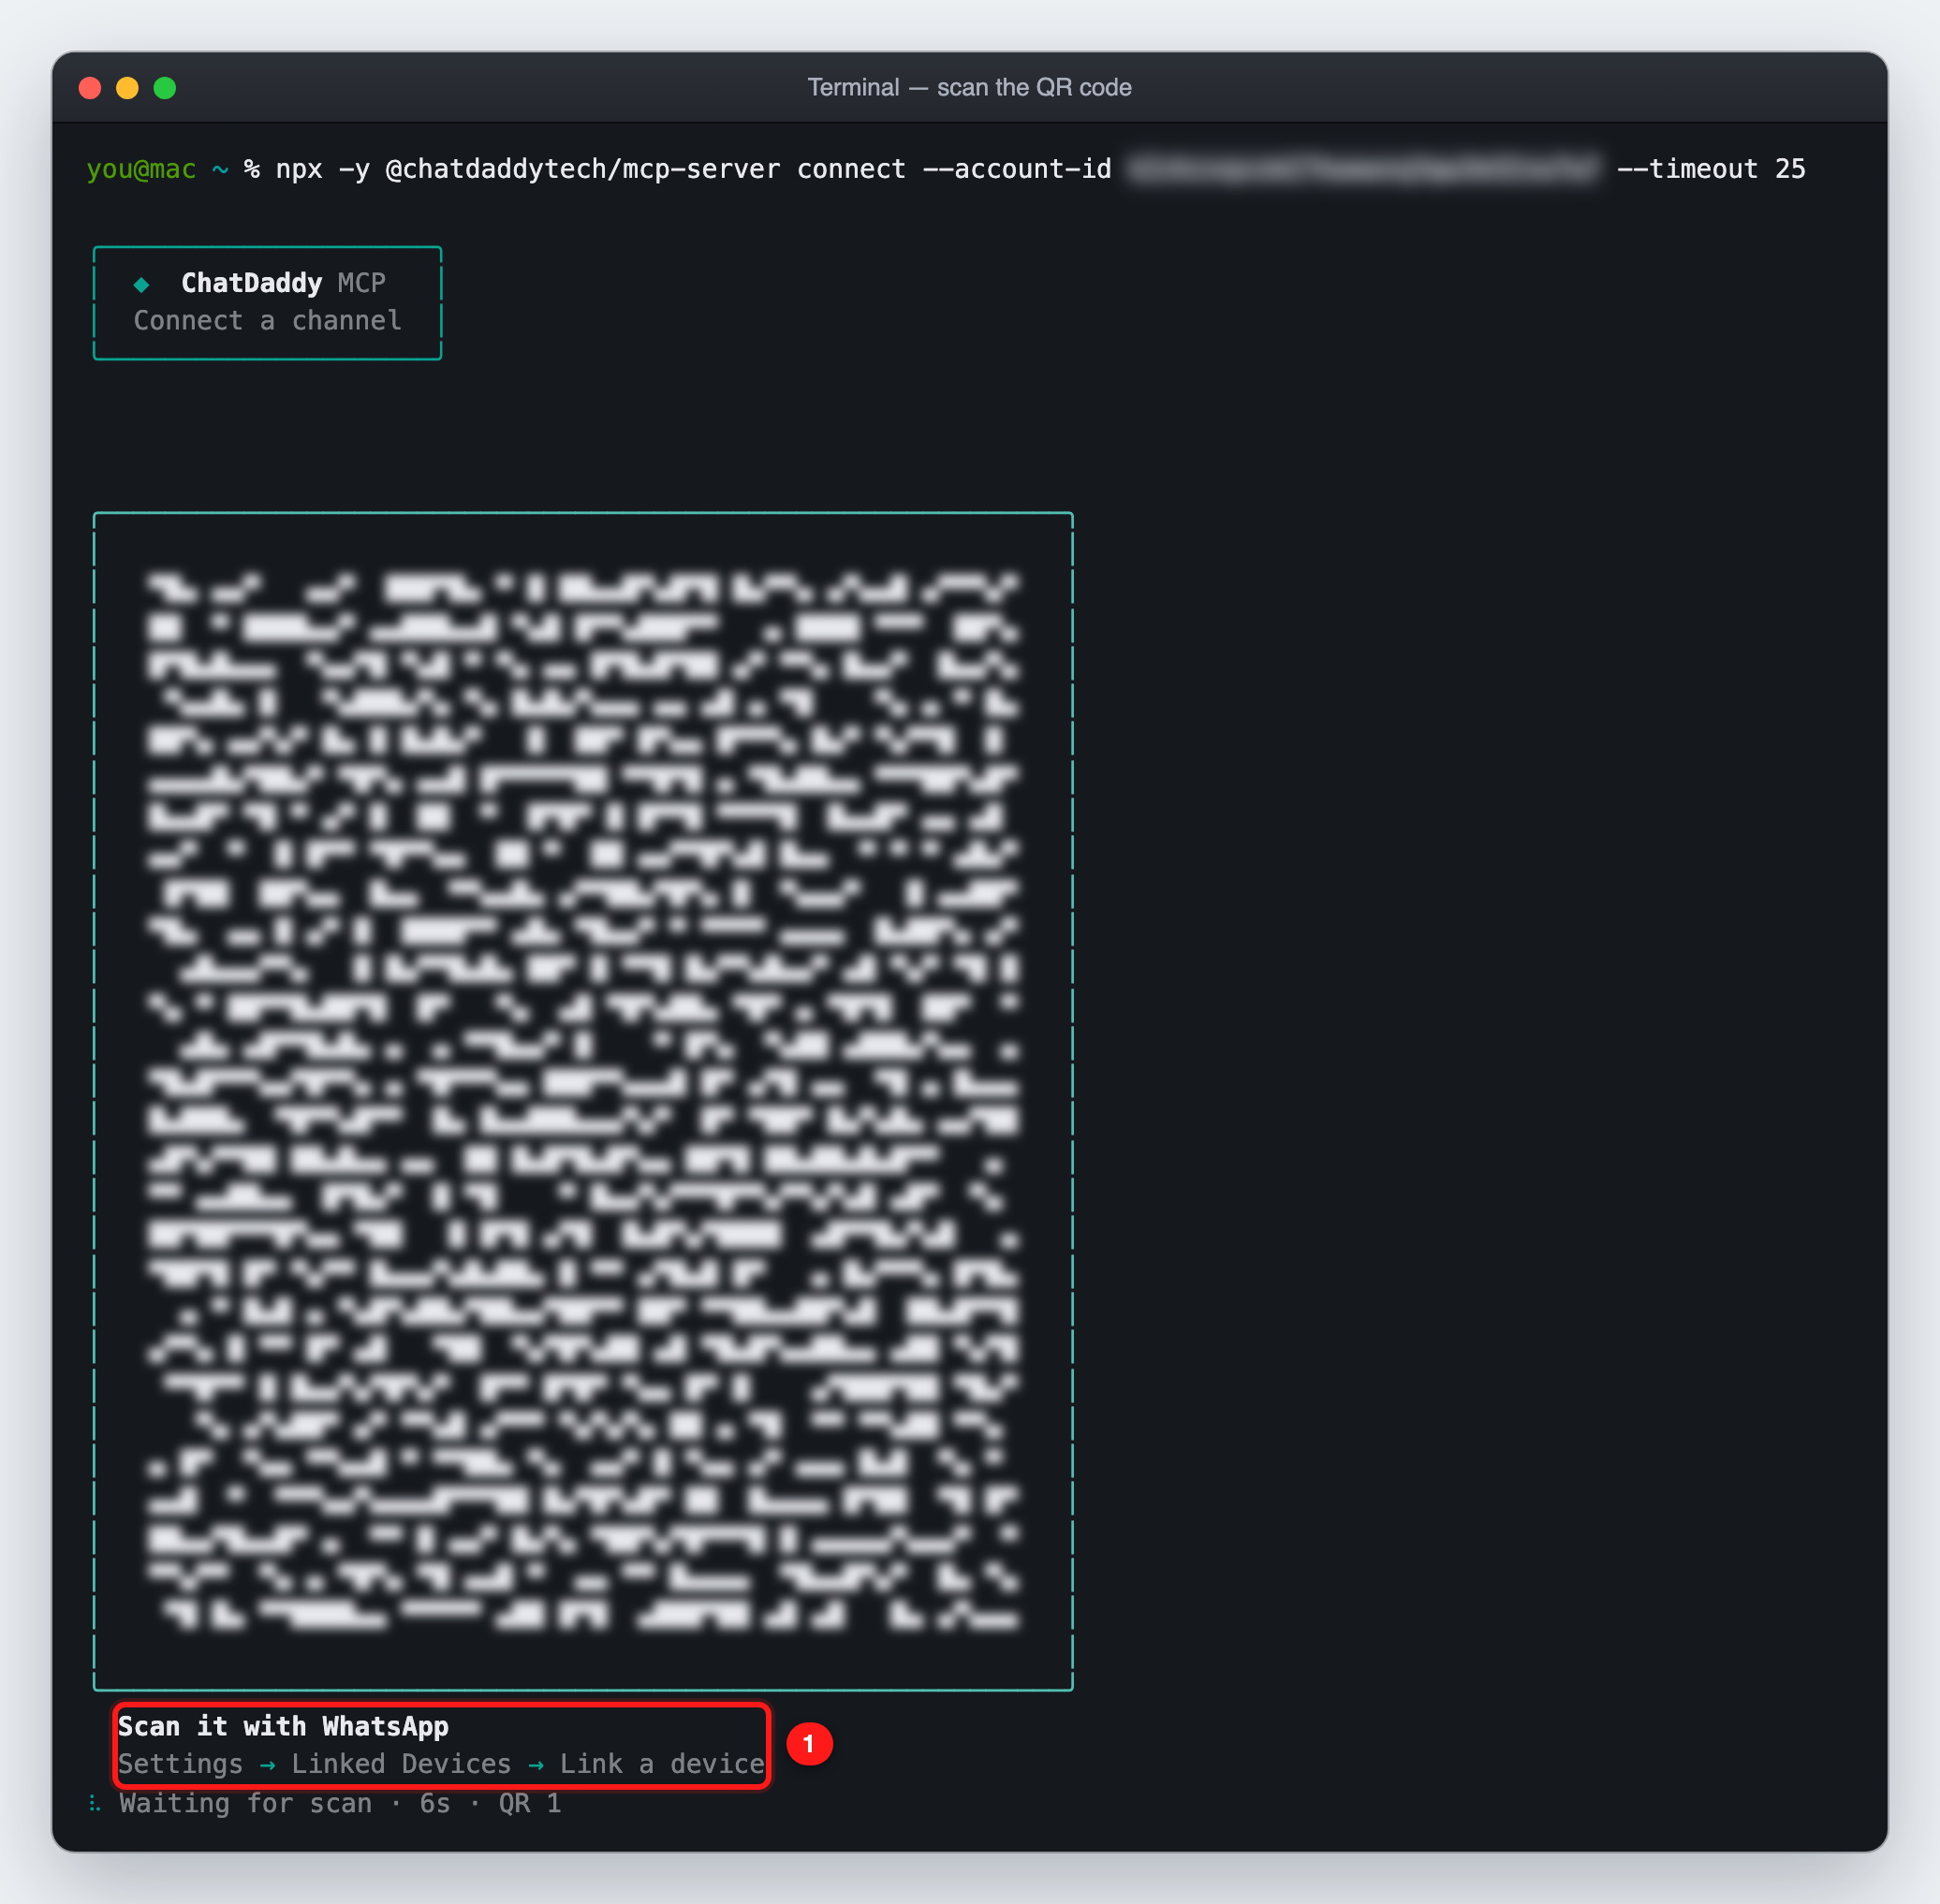
① Scan with WhatsApp → Settings → Linked Devices → Link a device (QR blurred)
⏳ The QR refreshes about every 20 seconds, and the command waits up to 180 seconds for a scan. Change that with
--timeout <seconds>. If time runs out, nothing is left half-connected. Just run the command again. When the scan works you will see ✓ Channel connected, and the channel is saved as this computer's default in~/.chatdaddy/config.json.
You can also do this from inside Claude by asking "connect WhatsApp". Claude shows the same QR code in the conversation.
Other channel types
WhatsApp Business API, Messenger, Instagram, TikTok, SMS, e-mail and Web Chat all finish in a browser (Meta, TikTok, carrier or mailbox verification), so they cannot be connected from a terminal. Picking one prints the steps and a link to Channels in the dashboard ①:
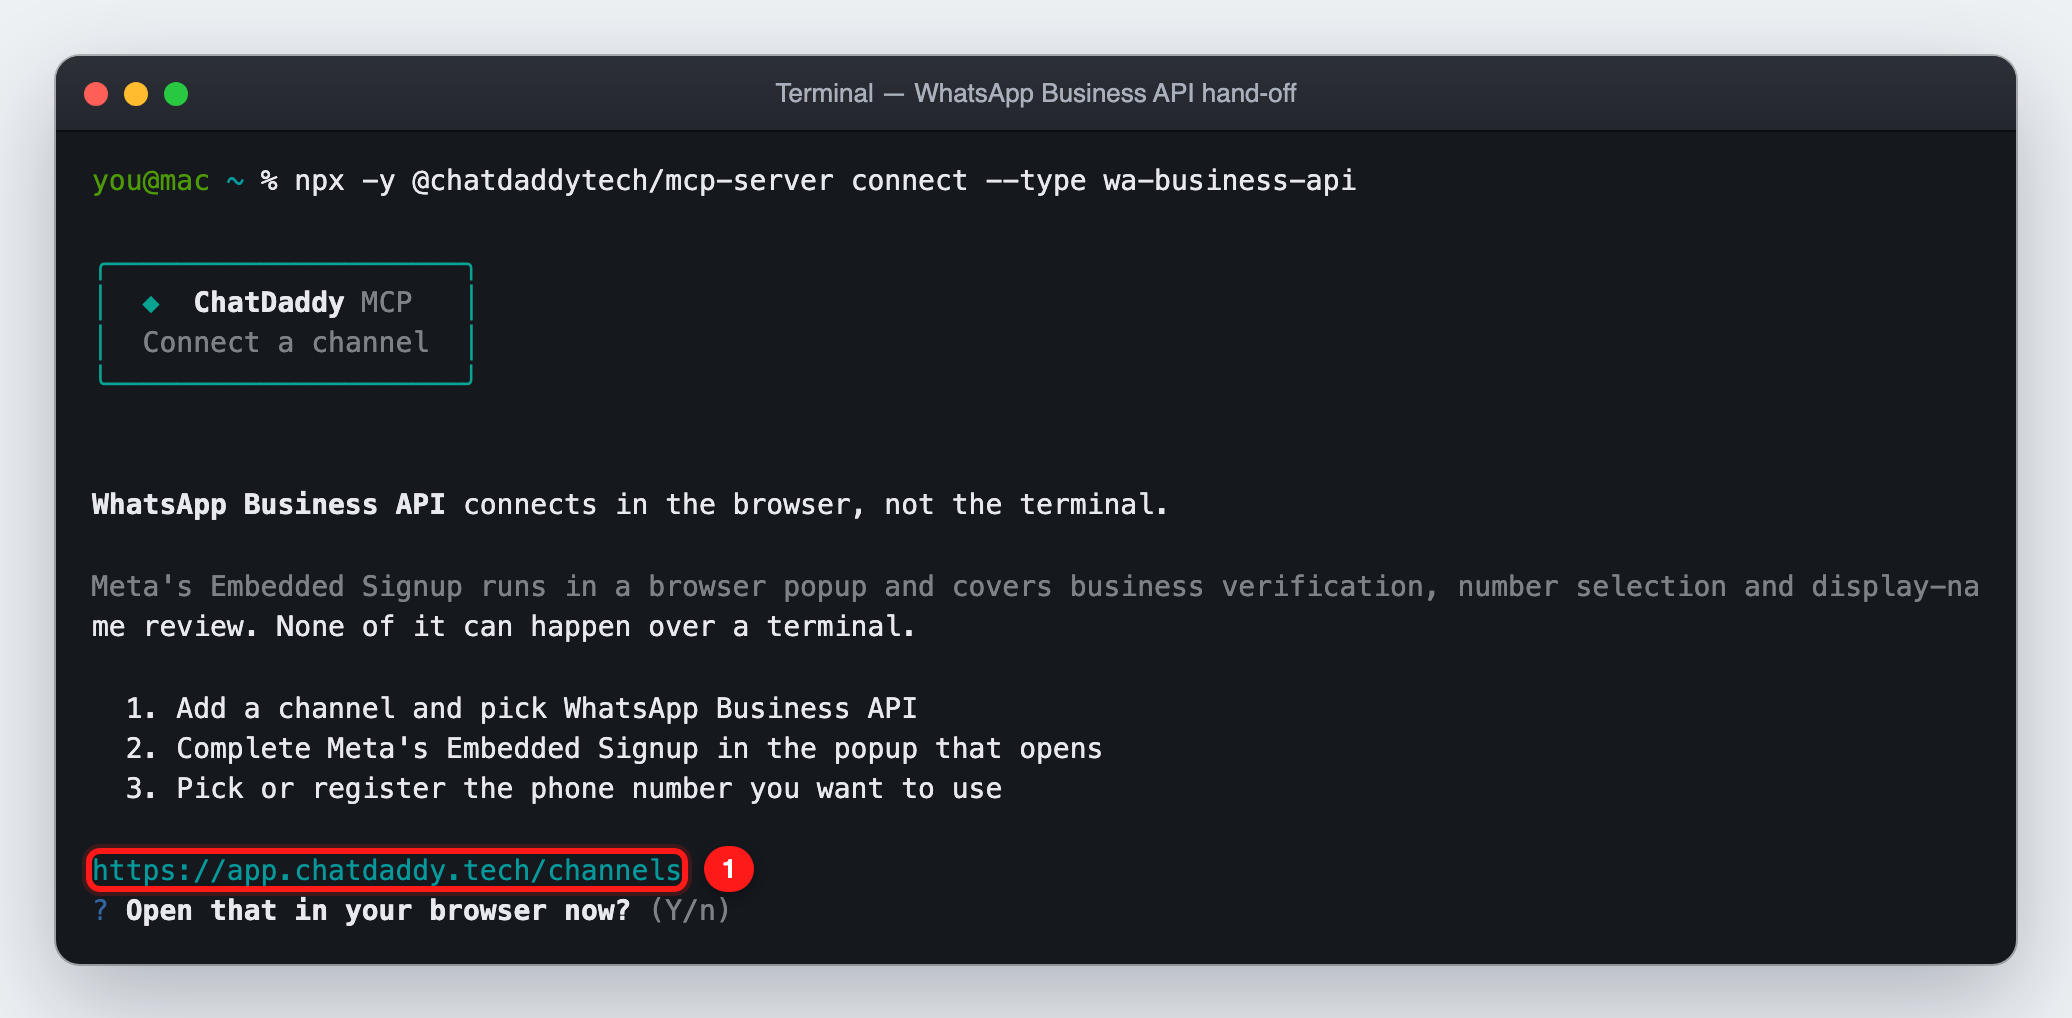
① Business API and other channel types are connected in the dashboard
Step 7: Make your first request
In Claude Code, type:
list my ChatDaddy channels
Before any ChatDaddy tool runs, Claude Code asks for your permission ②. Look-ups like this one are safe to approve. Choose 1. Yes.
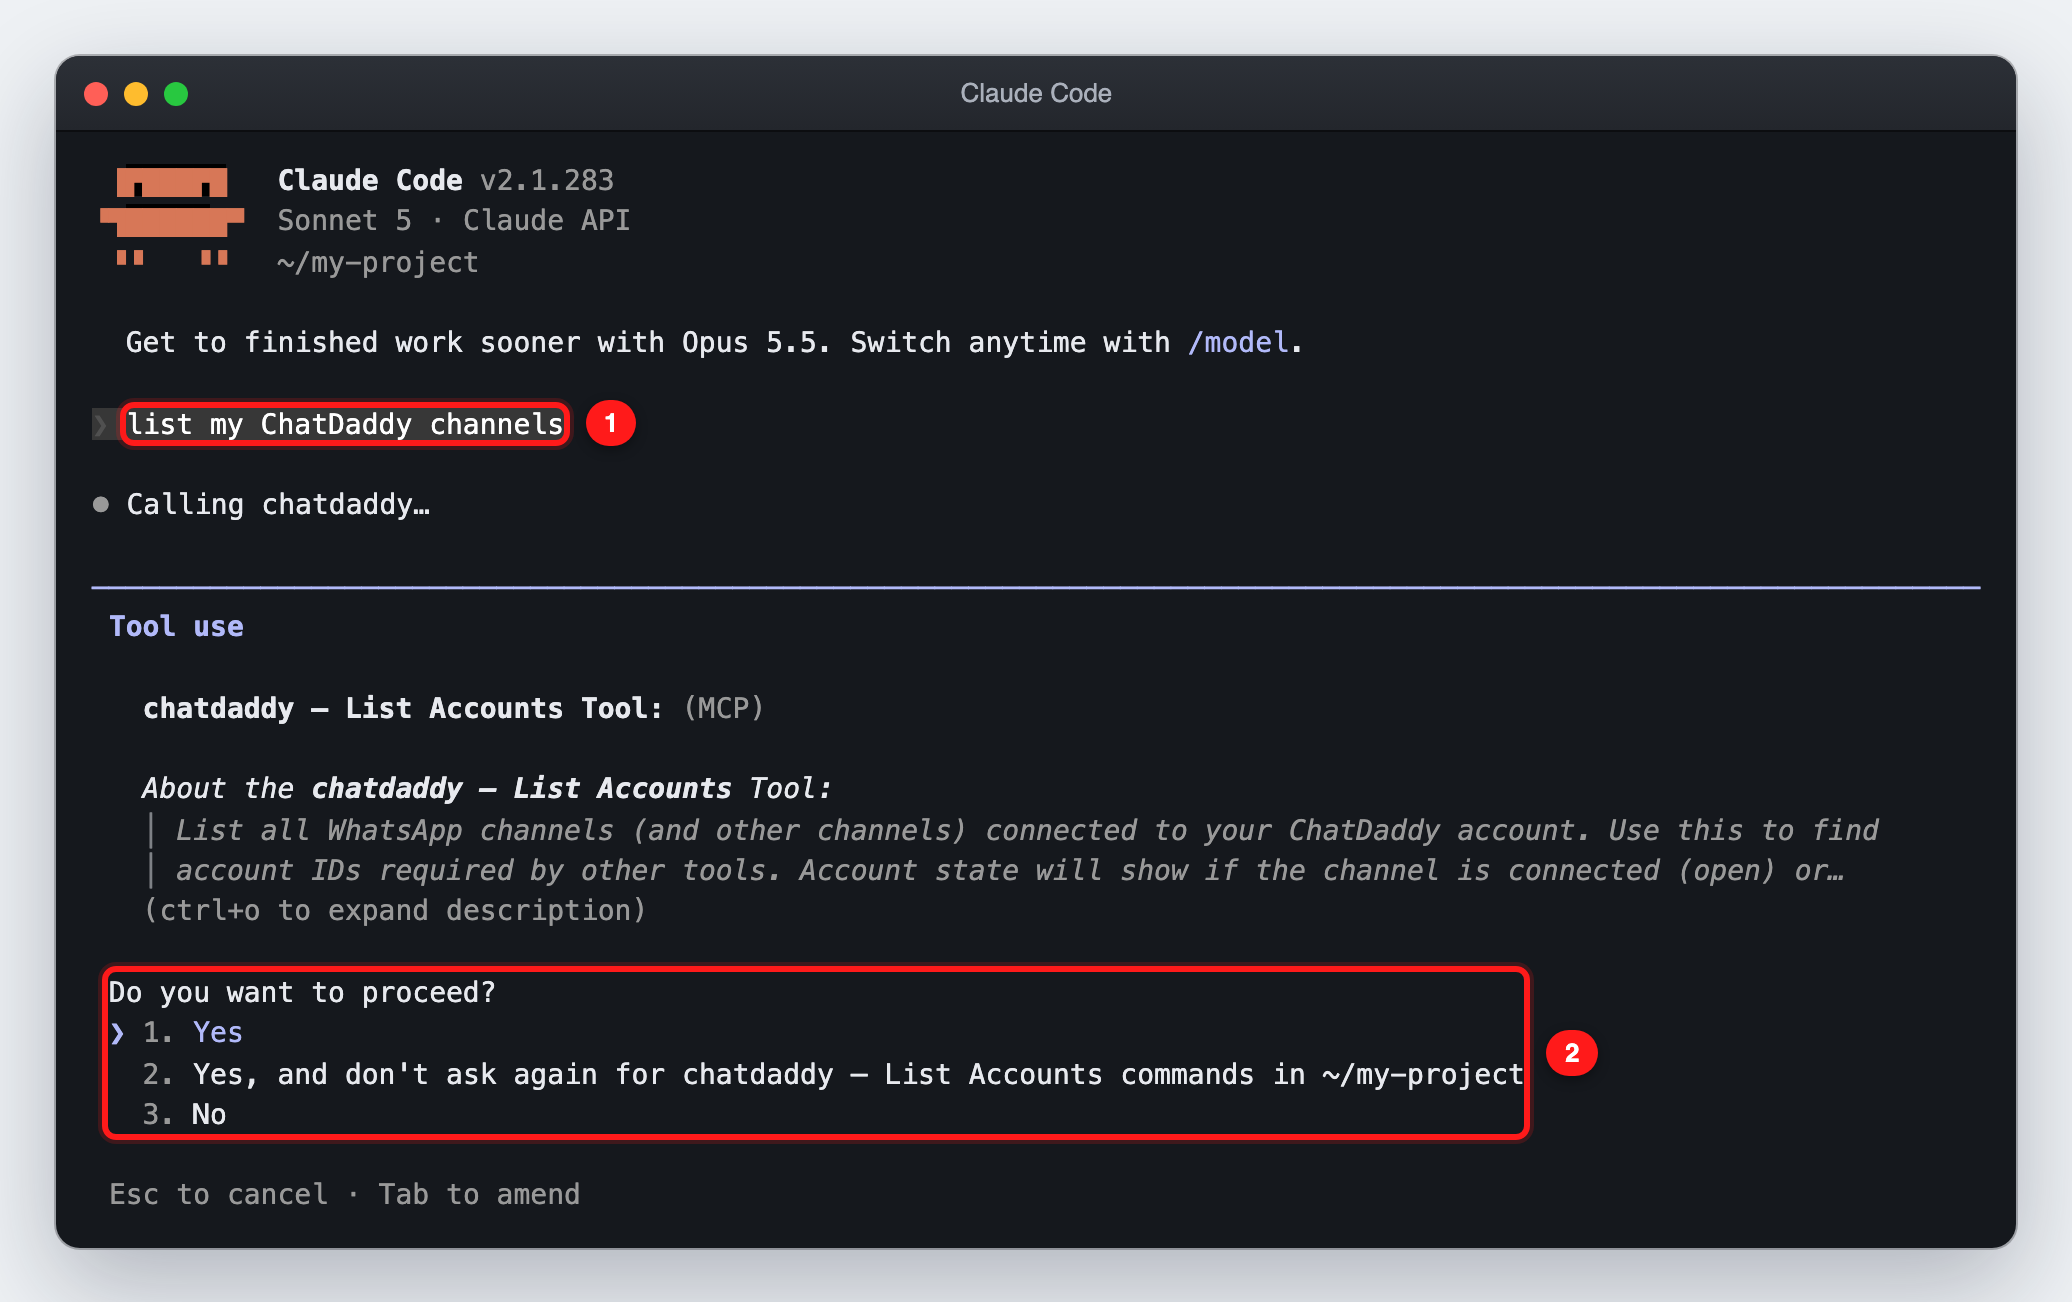
① Your request ② The approval prompt for the "List Accounts" tool
Claude answers with your channels, their type, phone number, state and any connection problems ①:
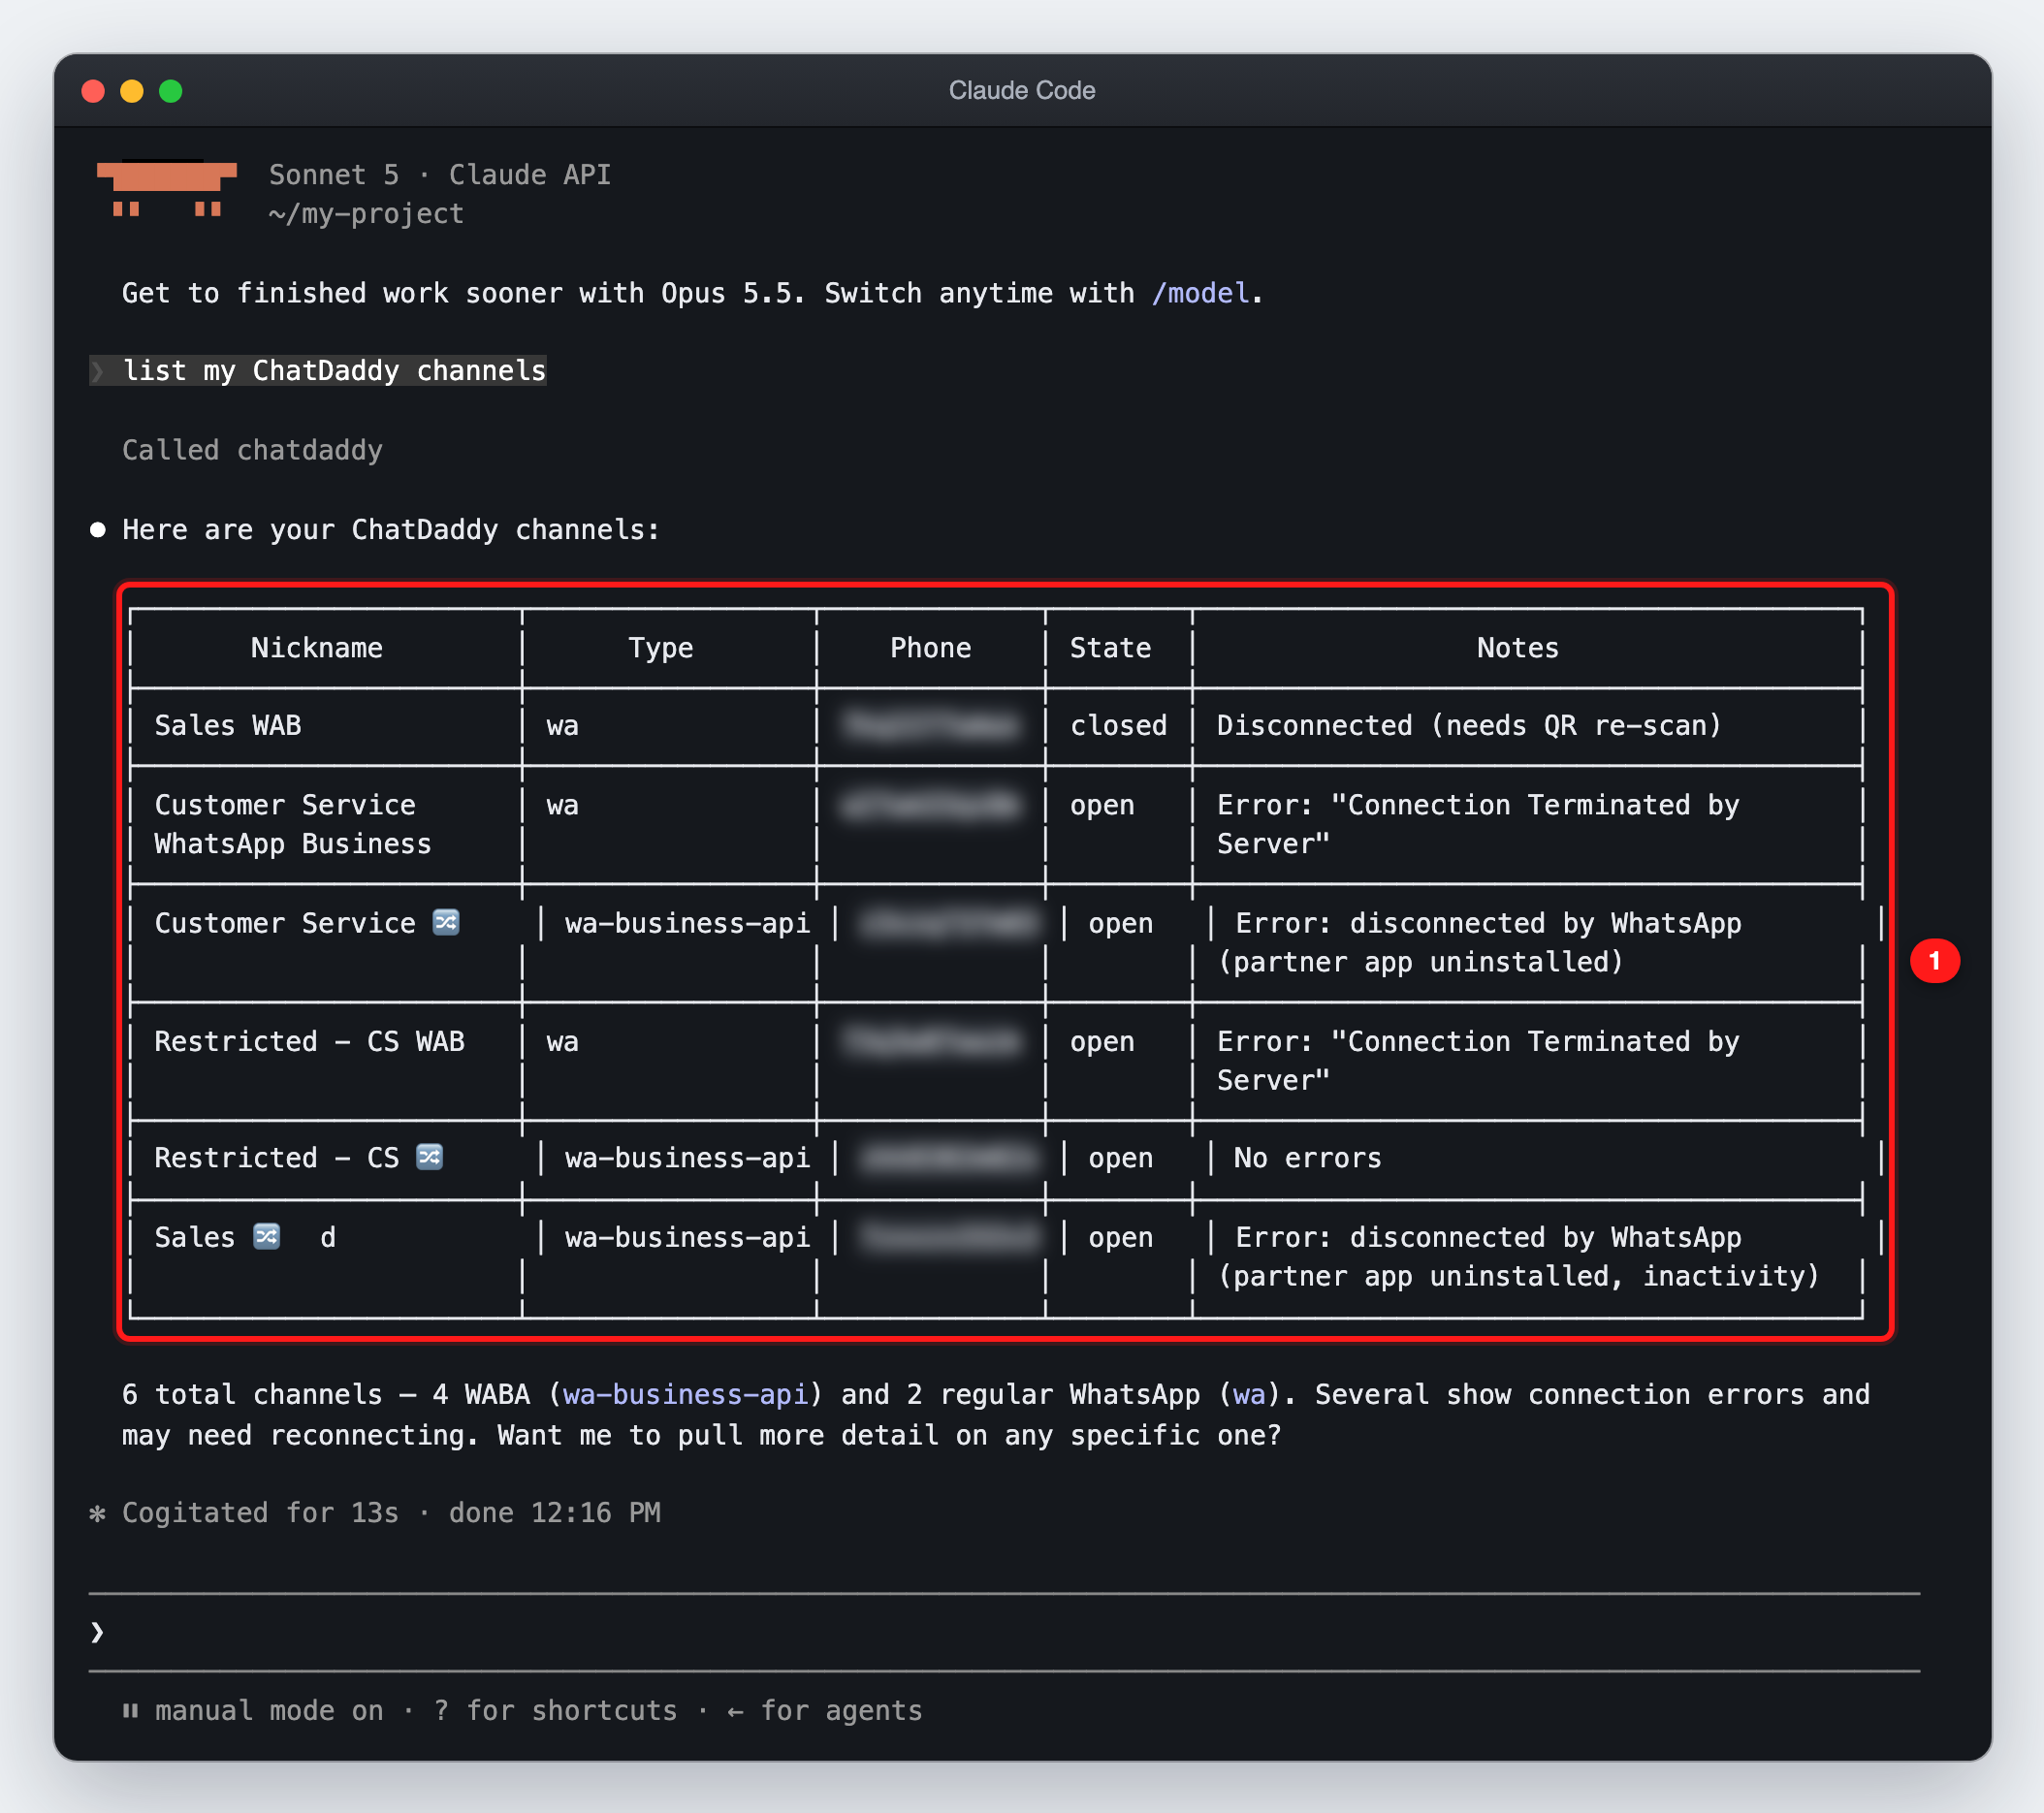
① Your team's channels, read live from ChatDaddy (phone numbers blurred)
✅ Look-up tools are safe to allow permanently. Run
/permissionsin Claude Code and allow, for example,mcp__chatdaddy__list_accounts,mcp__chatdaddy__list_chatsormcp__chatdaddy__search_contacts, or pick option 2 in the prompt.
Step 8: Send a message (and read the approval prompt)
Now try an action that changes something. Name the channel whenever your team has more than one:
send "Hi! Your order has shipped." to 60123456789 from the Restricted - CS WhatsApp Business API channel
Claude looks up the channel ID for you, then shows exactly what it is about to send ①. Check the channel, the number and the text before you approve ②.
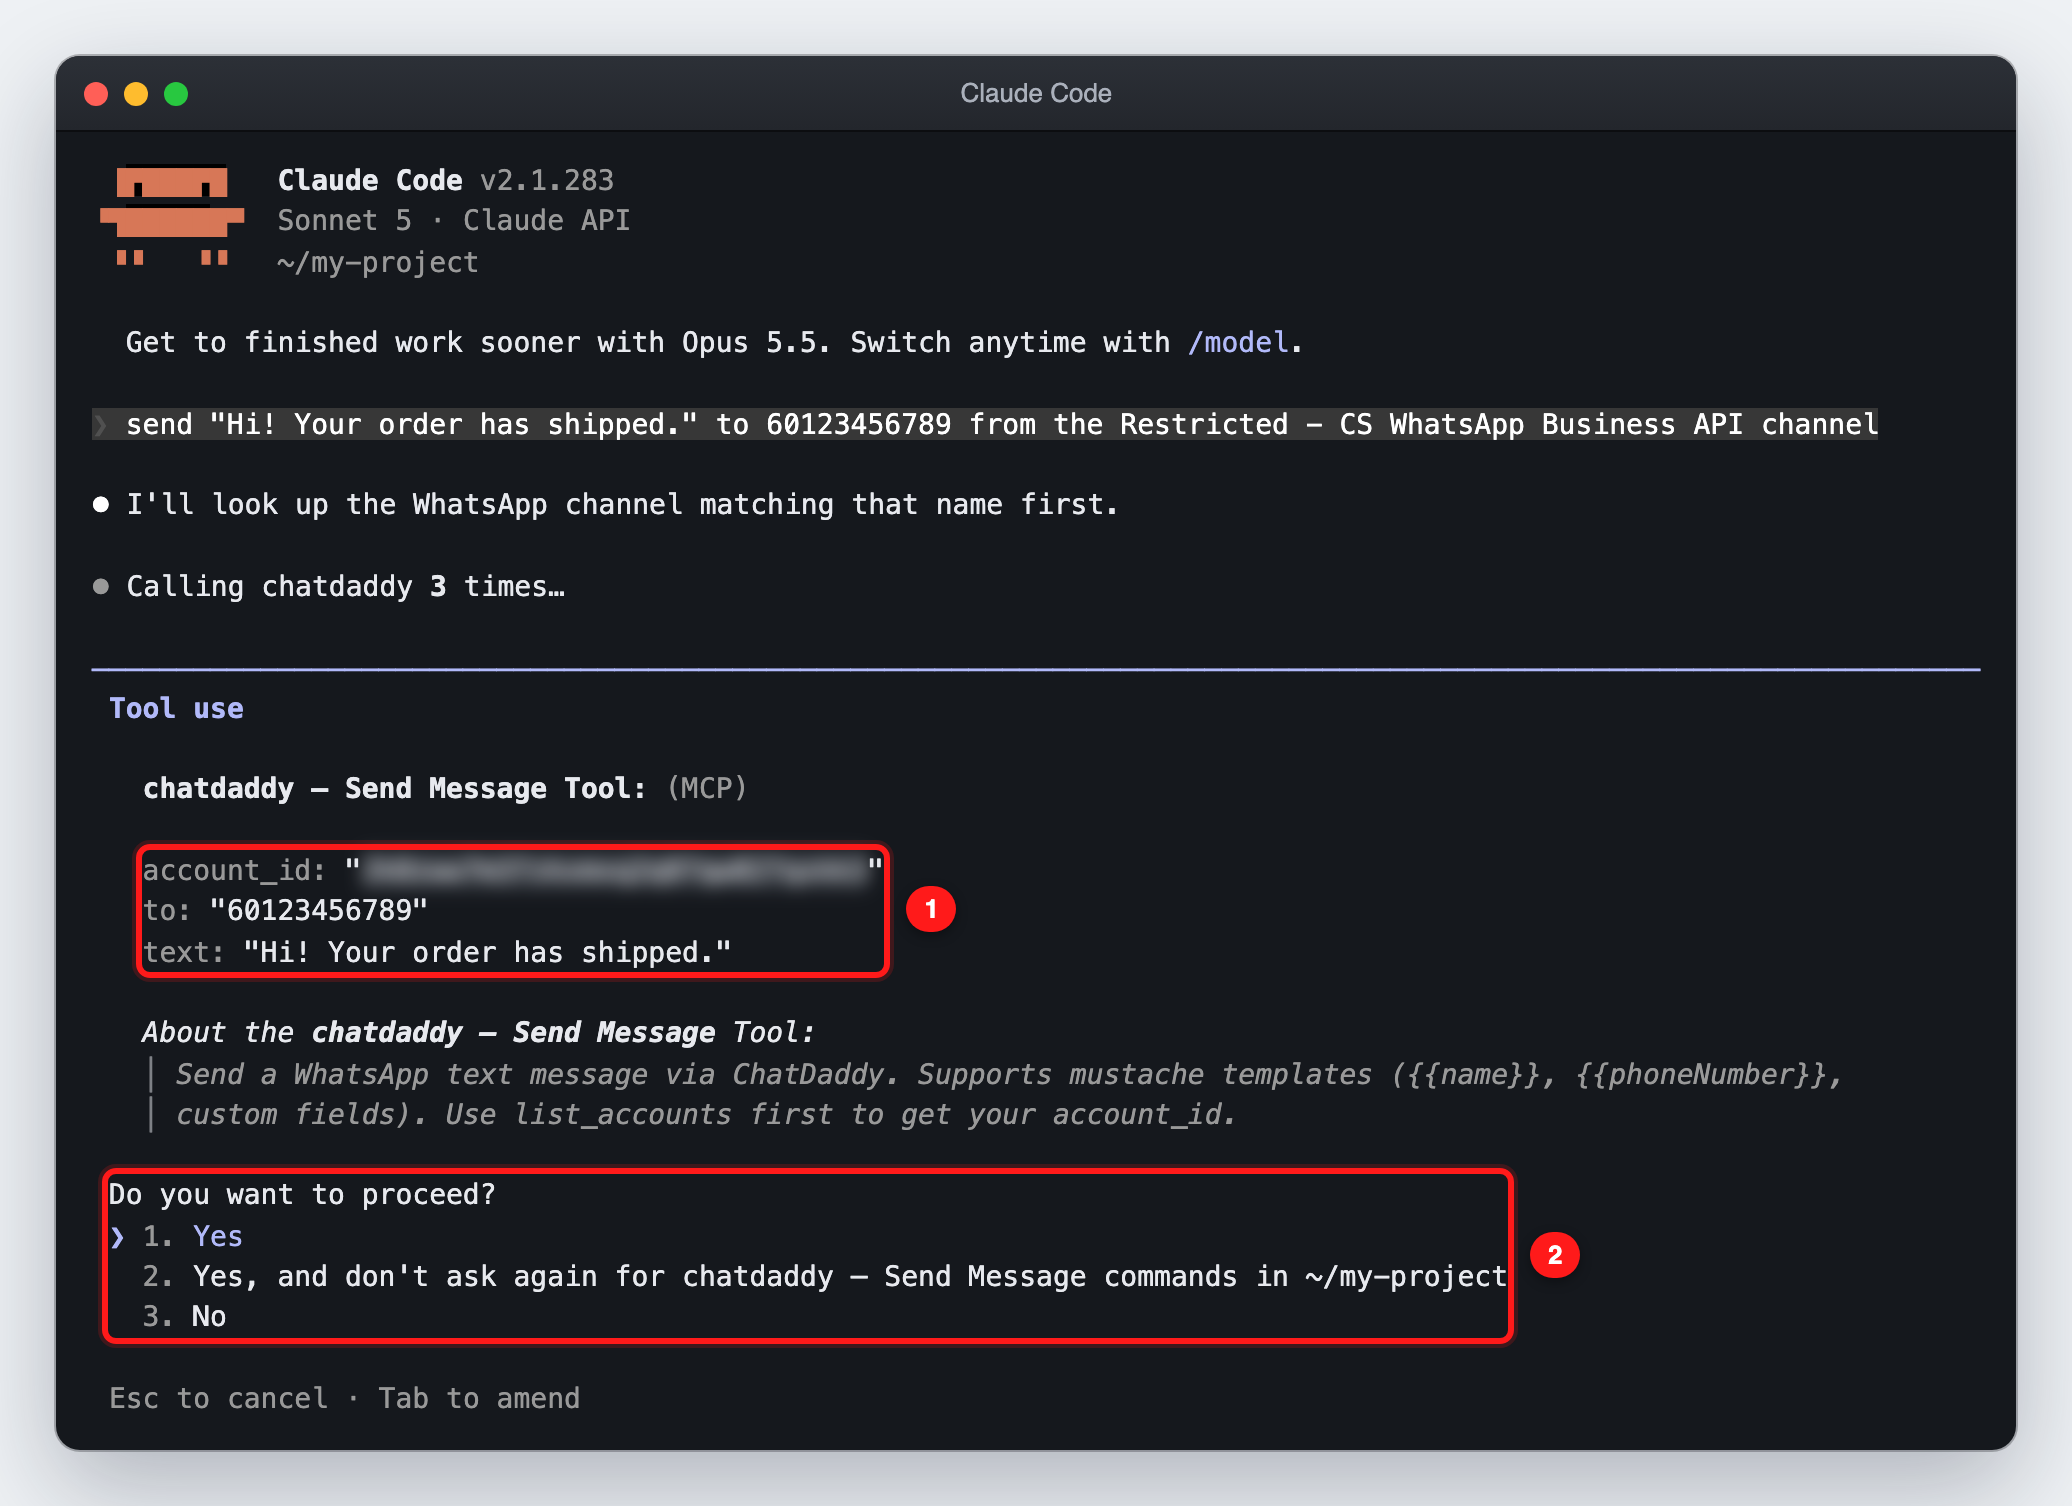
① The exact channel, recipient and text ② Yes / Yes and don't ask again / No
Choose 1. Yes to send it. To stop, press Esc or choose 3. No. Nothing is sent, and Claude asks what to do instead ①:
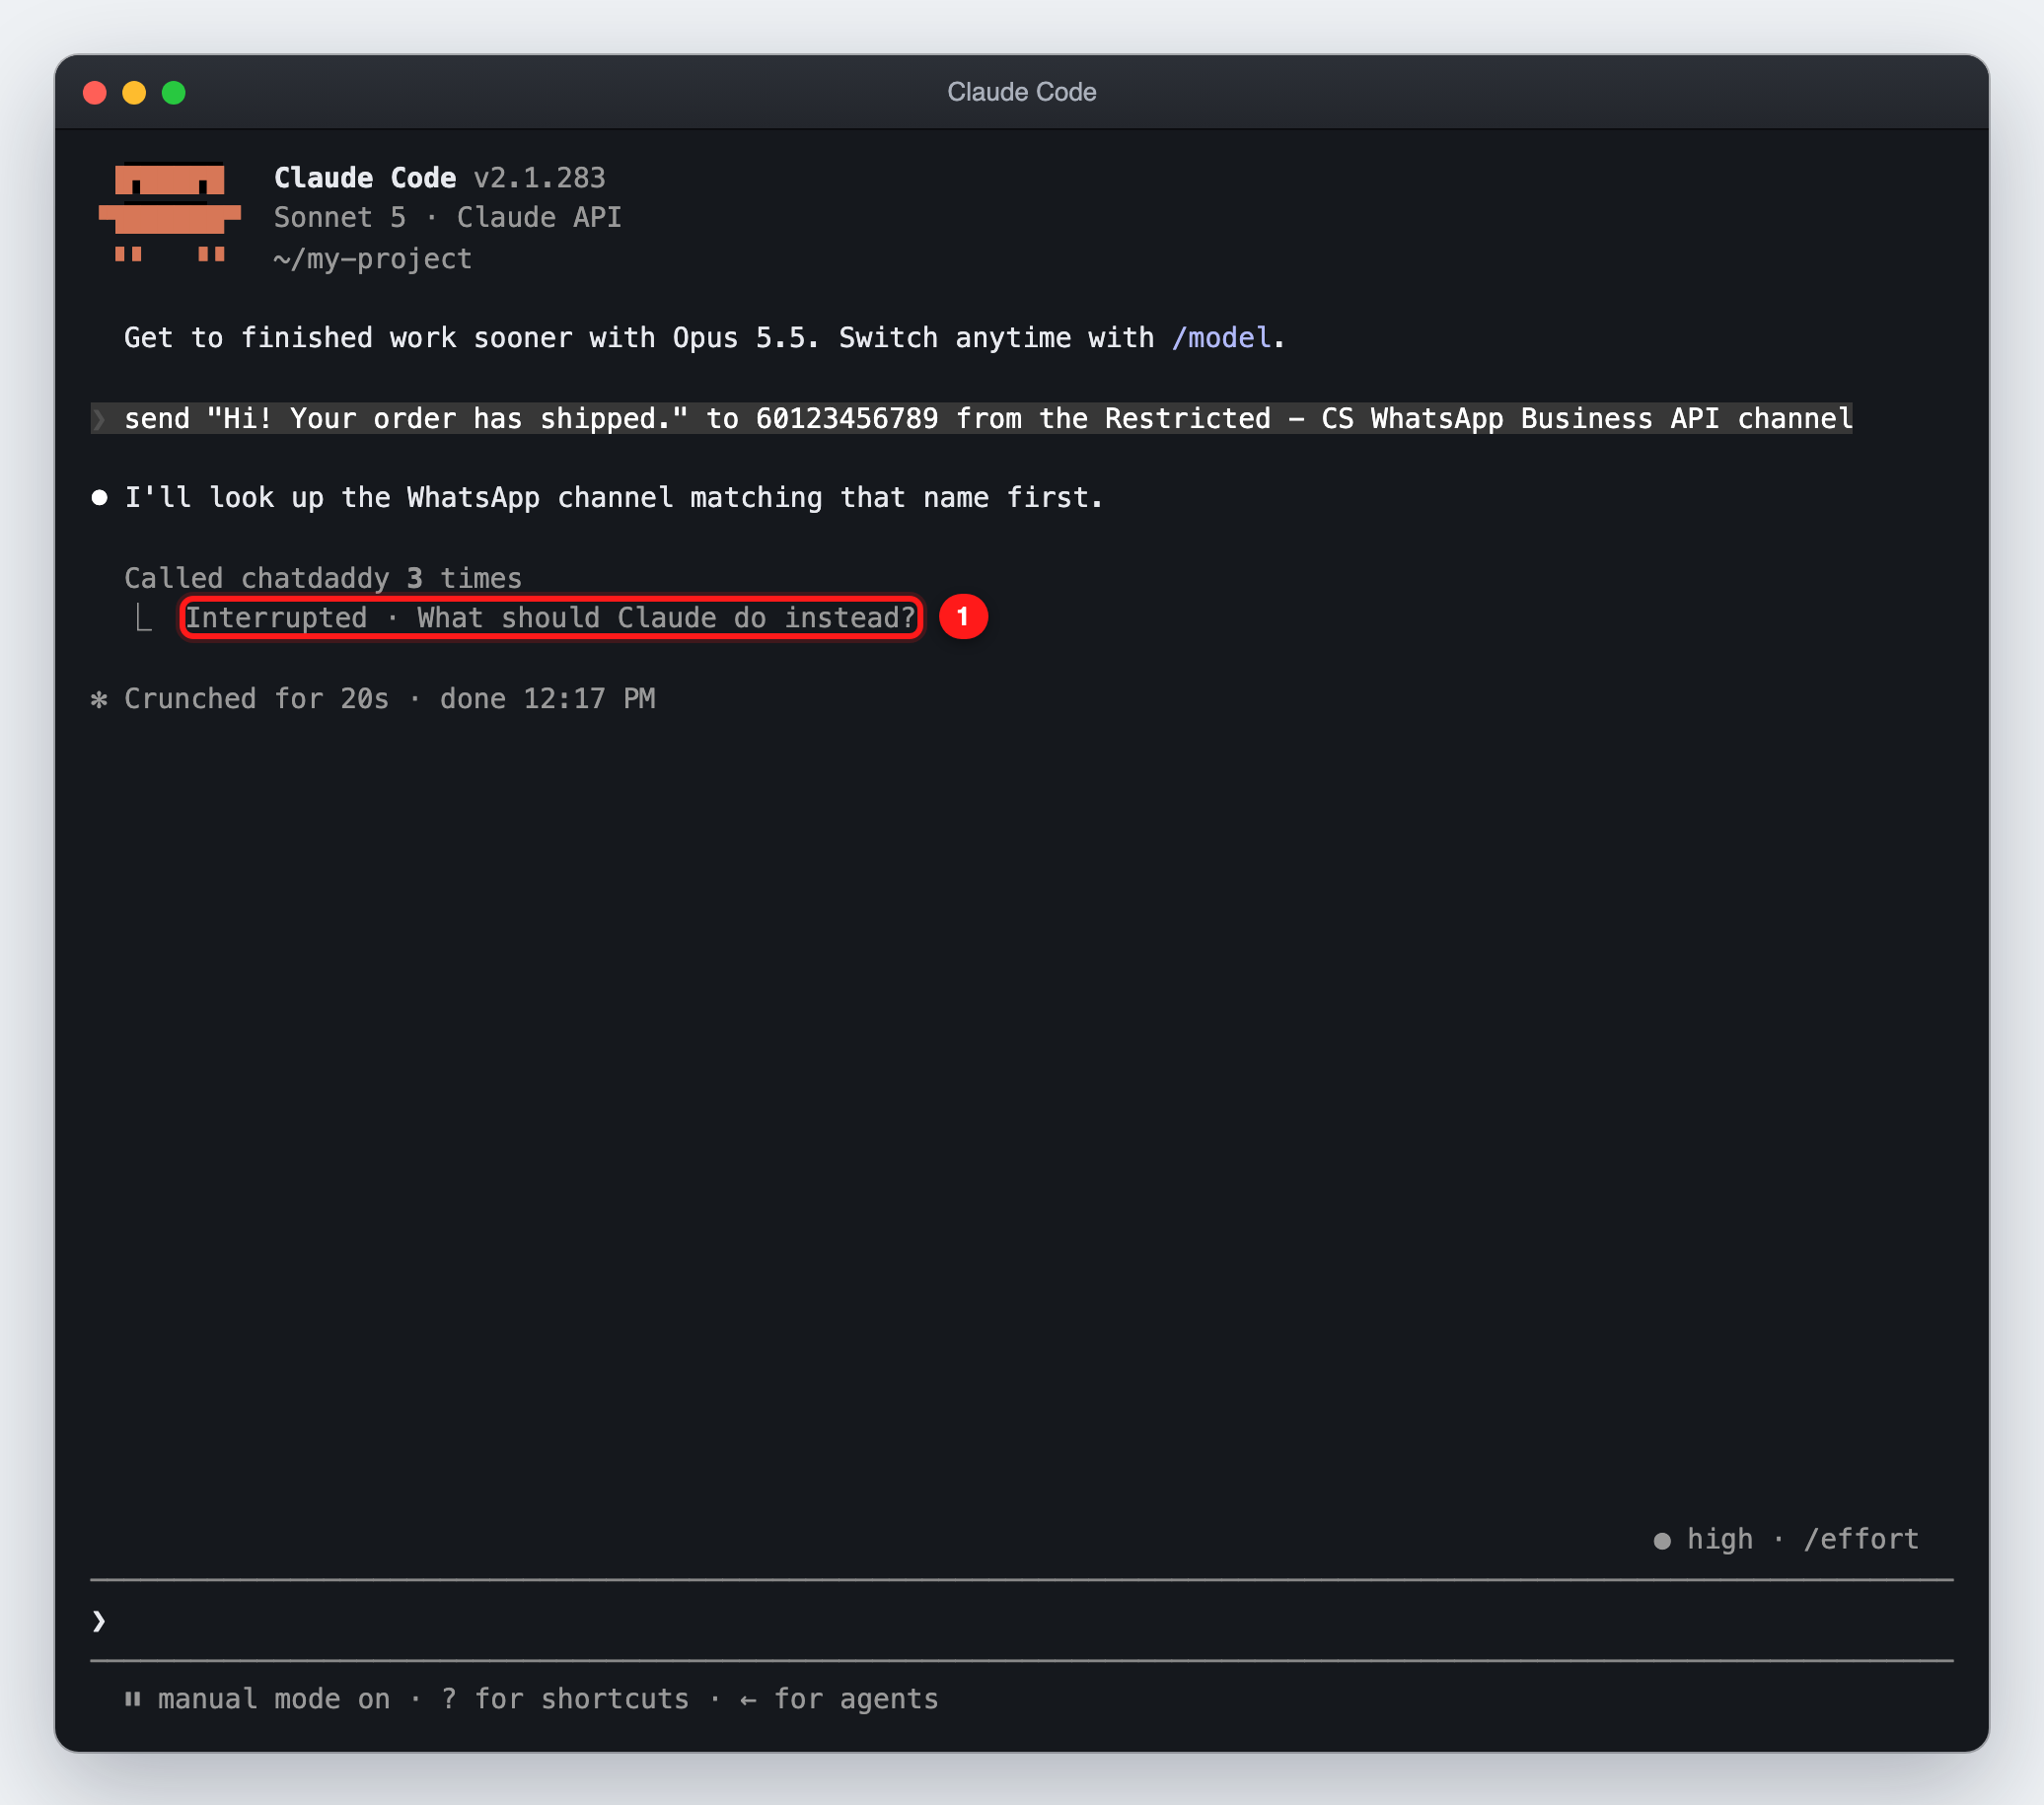
① Declined: the message was not sent
🛑 Never choose "Yes, and don't ask again" for tools that send, change or delete things. Keep that prompt as your safety net.
What you can ask Claude
Just say what you want. Claude finds the IDs and picks the right tool. Some examples:
| Area | Example requests |
|---|---|
| Messages | send "your order has shipped" to 6591234567 from WhatsApp 7 · send this PDF to 6591234567: /Users/me/invoice.pdf · show my last 20 messages with 6591234567 · retry all failed messages on WhatsApp 7, 5 seconds apart |
| Contacts, chats & tags | find contacts named Priya and tag them vip · add a contact Jane Doe, 6598765432 · show unread chats on WhatsApp 7 · which tags are used the most? |
| Bots | create a bot called Thanks that says "Thanks, we'll reply soon" · send the Welcome bot to 6591234567 and 6598765432 · who has the Welcome bot been sent to, and did it deliver? |
| Keyword replies & offline bot | when someone sends "price", reply with the Pricing bot on WhatsApp 7 · show my keyword replies · set the offline bot to Away, open 9am–6pm Mon–Fri, Asia/Singapore |
| Campaigns | create a campaign with the Promo bot on WhatsApp 7 to everyone tagged vip, 5 seconds apart, on 1 Oct 10am SGT · list my campaigns · stop the October Promo campaign |
| CRM, webhooks & plan | create a ticket "Refund request" for 6591234567 on the Support board · send new messages on WhatsApp 7 to https://example.com/hook · what plan are we on and how many credits are left? |
All 50 tools
| Group | Tools |
|---|---|
| Messages | send_message, send_media, upload_file, get_messages, search_messages, forward_message, edit_message, delete_message, bulk_message_action, list_templates |
| Contacts, chats & tags | search_contacts, upsert_contacts, update_contact, list_accounts, list_chats, update_chat, list_tags, create_tag, update_tag, delete_tag, tag_usage |
| Bots | list_bots, get_bot, create_bot, update_bot, delete_bot, fire_bot, bulk_fire_bot, list_bot_fire_records |
| Keyword replies & offline bot | list_keyword_replies, create_keyword_reply, stop_keyword_reply, get_offline_bot, set_offline_bot |
| Campaigns | list_campaigns, create_campaign, start_campaign, stop_campaign |
| CRM | list_crm_boards, list_tickets, create_ticket, update_ticket, delete_ticket |
| Webhooks | list_subscriptions, create_subscription, update_subscription, delete_subscription |
| Channels & plan | connect_channel, get_plan, upgrade_plan |
Safety rules
Claude acts on real customers. Read every approval prompt before you say yes.
- ✅ Use a test team and your own numbers while you learn.
- ✅ Allowing look-up tools without asking is fine (see Step 7).
- ⚠️ A keyword reply goes live at once, on every channel unless you name one.
- ⚠️ A team has only one offline bot. Changing it changes it for everyone, so ask Claude to show it first so you can put it back.
- ⚠️ A campaign with a date sends by itself at that time. If plans change, delete or reschedule it in the dashboard before then.
- ❌ Never always-allow tools that send, change or delete.
- ❌ Deletes cannot be undone. Deleting a tag removes it from every contact.
- ❌ Do not approve a plan upgrade unless you mean to pay. A price quote is free;
upgrade_planwith confirmation charges the card. - ❌ Never paste your API token in a chat, a ticket or a commit.
Limits
Some things still need the ChatDaddy dashboard:
- Channels: only personal WhatsApp can be connected from Claude or the terminal (by QR). All other channel types are connected in the dashboard.
- Bots: Claude creates one-message bots and edits a message's text. Flows with buttons, conditions or several steps are built in the Flow Builder.
- Keyword replies: Claude can create, list and stop them. Editing one is done in the dashboard.
- Campaigns: reach only people who already have a chat on the sending channel (up to 100 numbers per request, or anyone by tag). To message new numbers, ask Claude to send a bot to them instead.
- WhatsApp Business API templates: outside the 24-hour window, a template is required. Ask Claude to
list templatesand it will use the right one. - One team per token. To work in another team, register a second server with that team's token under a different name, e.g.
claude mcp add chatdaddy-test -s user --env CHATDADDY_API_KEY=apit_other_token -- npx -y @chatdaddytech/mcp-server.
Updating to a new version
When a new version of the package is released, re-register the server with @latest so npx fetches the newest release:
claude mcp remove chatdaddy -s user
claude mcp add chatdaddy -s user --env CHATDADDY_API_KEY=apit_your_token -- npx -y @chatdaddytech/mcp-server@latest
Then, in Claude Code: /mcp → chatdaddy → Reconnect, and start a new conversation with /clear so Claude sees the new tool list. An old conversation keeps using the old tool list.
Troubleshooting
| You see | Do this |
|---|---|
chatdaddy missing or failed in /mcp | Run claude mcp list to see what is registered. Check node -v is 18+. Remove and add the server again (Step 4). |
| 401, "auth failed" or "jwt" | The token is wrong or was deleted. Create a new one (Step 2), then run claude mcp remove chatdaddy -s user and add it again. |
| 403 or "forbidden" | The token is missing a scope for that action. Create a new token that includes it (see the scope table in Step 2). |
| Claude says it cannot do something this guide says it can | It is using an old tool list. Update (see above), reconnect in /mcp, then /clear. |
| "Channel disconnected" or sends fail | Reconnect the channel in the dashboard, or ask Claude to connect WhatsApp and scan the QR. |
| Campaign: "None of these numbers has a chat" | Those people have not chatted with that channel yet. Ask Claude to send the bot to them directly instead. |
| "Plan limit reached" when connecting | Your plan has no free channel slot. Ask Claude what plan are we on?; upgrading needs an Owner or Admin. |
FAQ
Does Claude send anything without asking me?
No. Claude Code asks before every ChatDaddy tool call unless you have chosen "don't ask again" for that tool. Only do that for look-up tools.
Which team does Claude work in?
The team the API token was created in. The token decides the team, so to switch teams you use a different token (see Limits).
Where is my token stored?
In Claude Code's user config (~/.claude.json) when you use claude mcp add --env, and in ~/.chatdaddy/config.json if you ran the connect command. Treat both files as private.
Do I need to install the package with npm i?
No. npx -y @chatdaddytech/mcp-server downloads and runs it automatically. Claude Code starts it for you each session.
Can I use it outside Claude Code?
Yes. Any MCP client that supports stdio servers works. Use the JSON config shown in Step 4.