
Academy Module 1 — Getting Started: Your First Hour in ChatDaddy
The written walkthrough of Academy Module 1. Tour the dashboard, connect your first WhatsApp channel, invite your team with the right roles, and turn on the notifications that make sure a customer message never sits unread.
Also searched as: Academy Module 1 — Getting Started: Your First Hour in ChatDaddy, What this module covers, Open the Academy and find your module, Take the tour of your dashboard, Choose how to connect WhatsApp, Manage your channels from one page, Find your team settings, Understand roles before you invite anyone, Invite your teammates, Turn on the notifications that matter, The six video lessons in this module, Common questions, Academy, Module, Getting
🎓 Part 1 of 11 — ChatDaddy Academy. This is the written version of the Getting started module: six video lessons, about 14 minutes of watching, turned into steps you can follow on screen. You can read this on its own, or keep it open beside the videos on the Academy page.
By the end of this module you will have a working ChatDaddy workspace: one live WhatsApp channel, your teammates invited with the right level of access, and alerts switched on so incoming messages actually reach somebody. Everything after this — the Inbox, broadcasts, automations — is built on top of these four things.
What this module covers
- Where the Academy lives and how to work through it
- A tour of the dashboard — what each area of the left rail is for
- Connecting your first WhatsApp channel (QR or Business API)
- Inviting teammates and choosing between Owner, Admin, Editor and Agent
- Turning on email, push and SMS notifications so nothing is missed
⏱️ Time needed: about 20 minutes to read and do, plus however long WhatsApp takes to verify your number. You need: a ChatDaddy account and, for the channel step, the phone that holds the WhatsApp number you want to connect.
Step-by-step
Step 1 — Open the Academy and find your module
Click the graduation-cap icon in the left rail to open Academy. The course is organised into 11 modules that follow the product's own navigation, so you can jump straight to the screen you are stuck on rather than watching from the start.
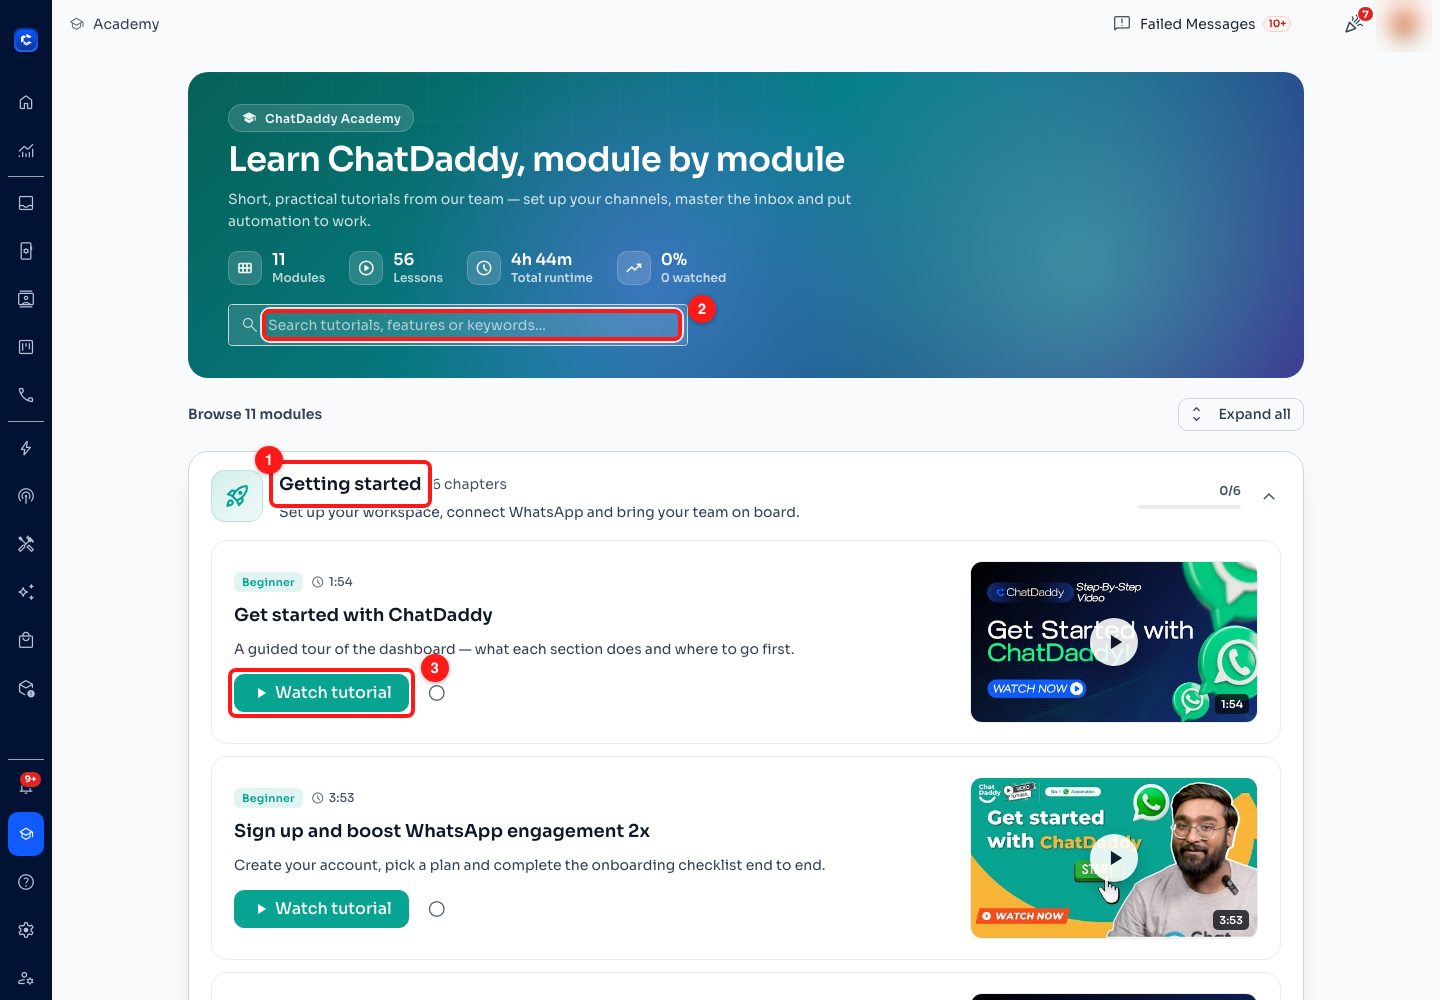
Step 1 — (1) the module you are in now, (2) search across every lesson by title or keyword, (3) Watch tutorial opens the video without leaving ChatDaddy.
- Modules expand and collapse — click a module header to open its chapter list, or use Expand all at the top right to see all 56 lessons at once.
- The circle beside each lesson marks it watched. Your progress bar and the 0 watched figure in the header update as you tick them off.
- The search box looks at lesson titles, descriptions and keywords, so searching "ban", "coexistence" or "tags" finds the right video across all modules.
Step 2 — Take the tour of your dashboard
Getting Started is the home screen — the house icon at the top of the left rail. It is both your dashboard and your setup checklist. Three things are worth knowing before you go anywhere else.
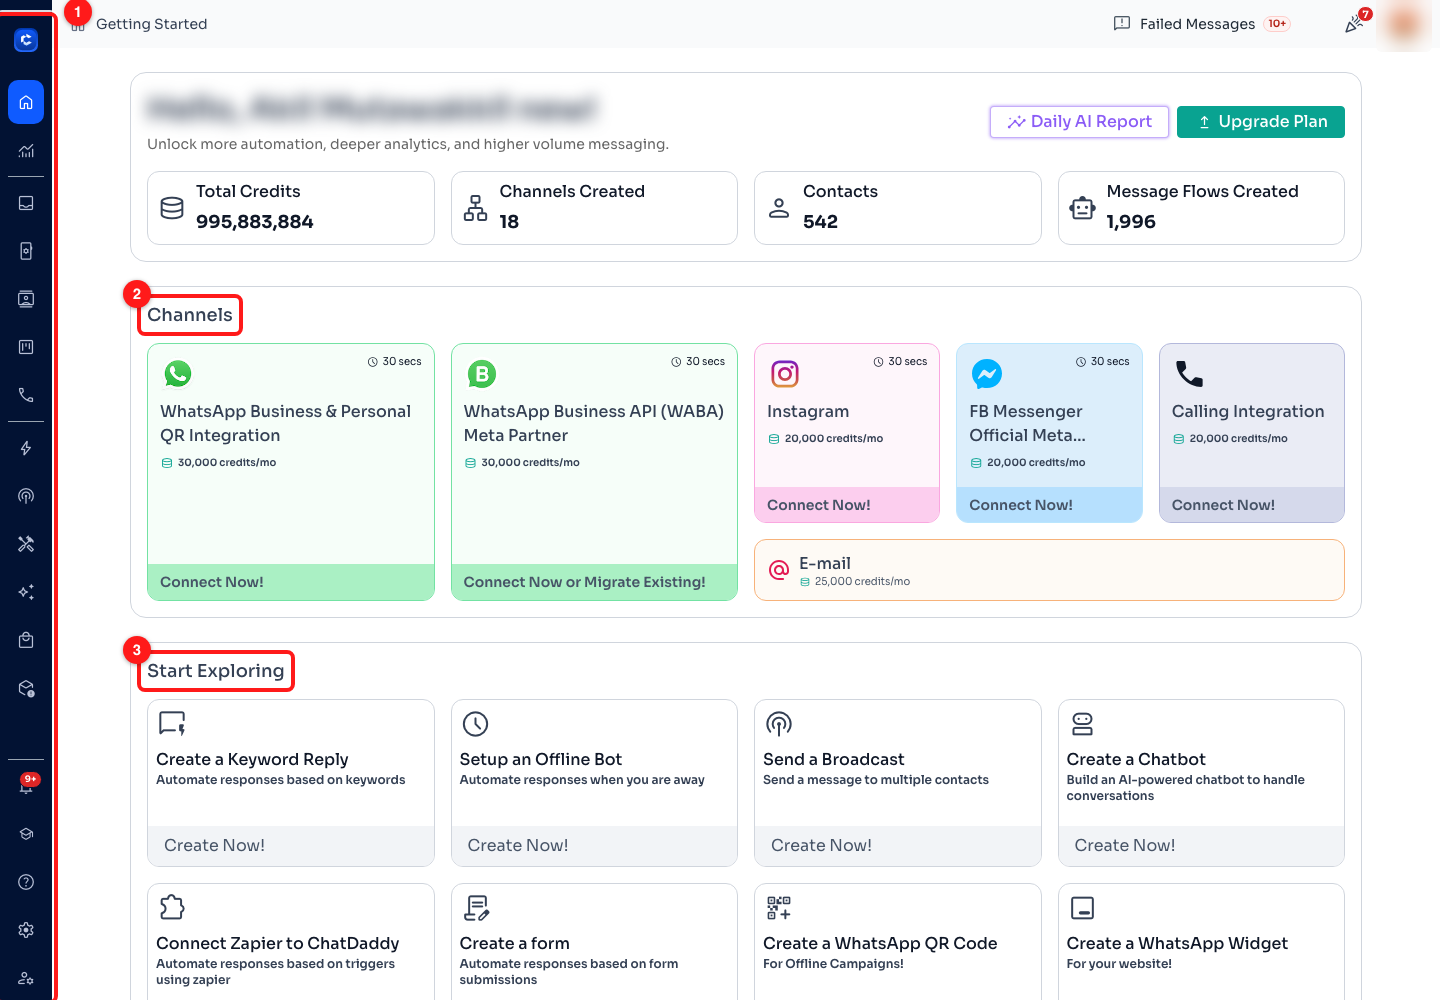
Step 2 — (1) the left rail is the whole product, (2) the Channels row is where you connect a number, (3) Start Exploring holds one-click starters for the features covered later in this course.
- (1) The left rail — every module of this course maps to an icon here: Analytics, Inbox, Channels, Contacts, CRM, Calls, Automation, Marketing, Tools, AI, Shop and the App Store. Hover any icon to see its name.
- (2) The Channels row — the connect cards for WhatsApp, Instagram, Messenger, calling and e-mail, each showing what it costs in credits per month.
- (3) Start Exploring — shortcuts that create your first keyword reply, offline bot, broadcast, chatbot, form or QR code. These are the same features Modules 4, 5 and 6 cover in depth.
📊 The four figures across the top — credits, channels created, contacts and message flows — are your workspace at a glance. A brand-new workspace shows zeros; the numbers in these screenshots come from a test workspace.
Step 3 — Choose how to connect WhatsApp
ChatDaddy offers two ways to bring WhatsApp in, and picking the right one matters more than anything else in this module. Both cards sit in the Channels row on Getting Started.
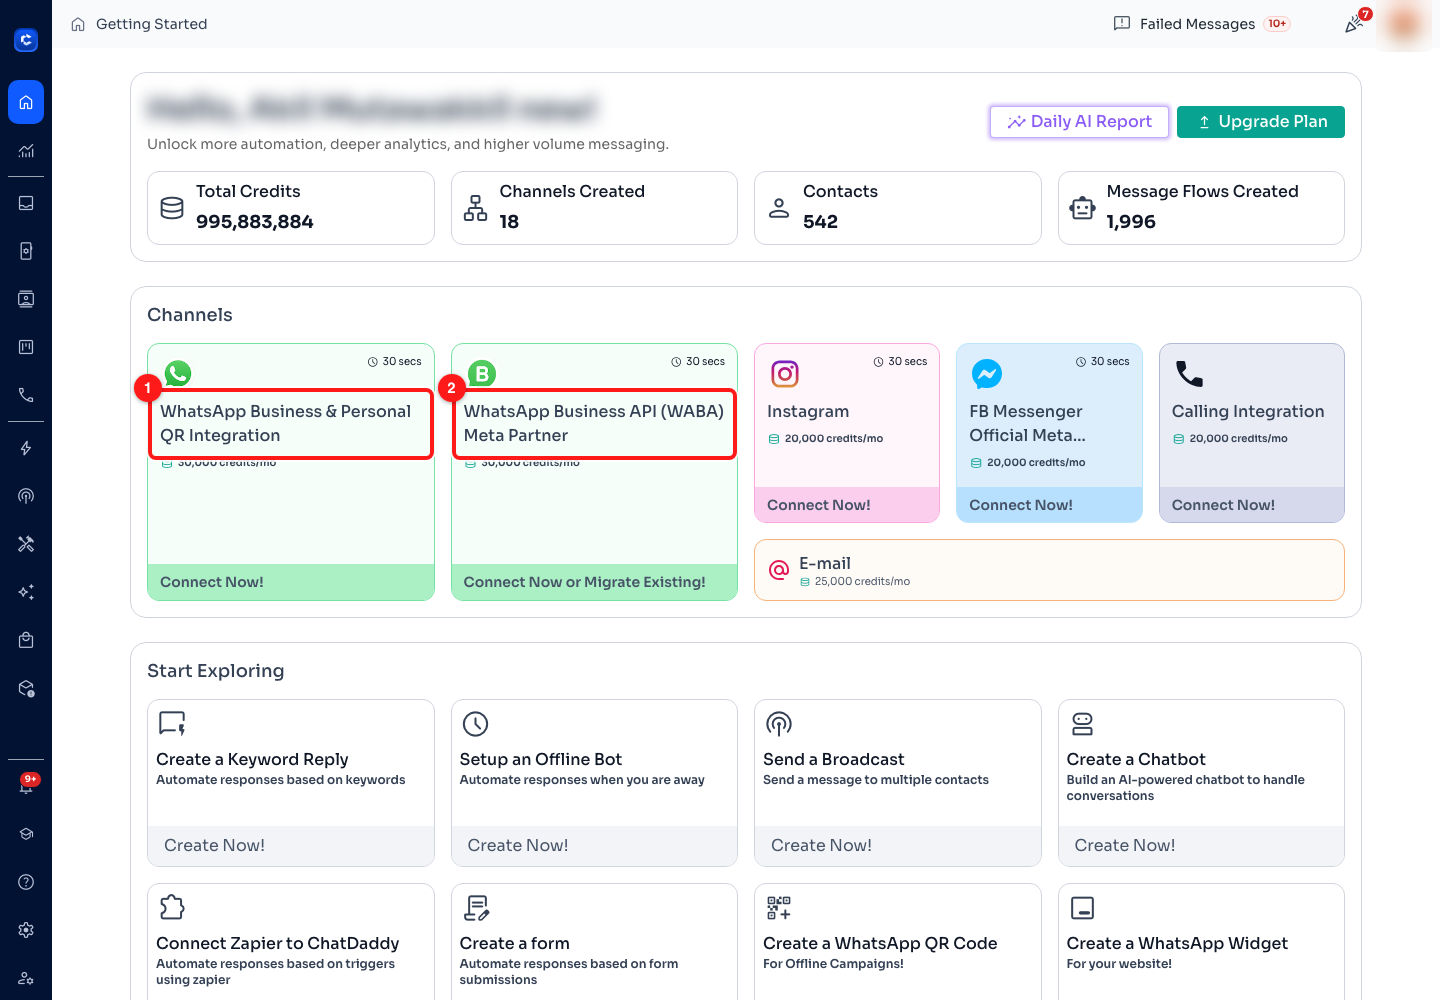
Step 3 — (1) QR integration for a personal or Business-app number, (2) the official WhatsApp Business API through ChatDaddy as a Meta partner.
- (1) WhatsApp Business & Personal QR Integration — scan a QR code with the phone that holds the number, exactly like WhatsApp Web. Fastest to set up (about 30 seconds) and good for trying things out. The phone has to stay online.
- (2) WhatsApp Business API (WABA), Meta Partner — the official API. No phone needed, higher sending limits, multiple agents, message templates and broadcasts. This is what you want for anything at scale, and what Modules 2 and 4 assume you are on.
⚠️ A number can only live in one place at a time. If you are moving a number that is already in the WhatsApp Business app, use Connect Now or Migrate Existing! on the WABA card, or look at Coexistence in Module 2 — it lets you keep using the Business app on your phone while ChatDaddy runs on the same number.
Click Connect Now! on the card you want and follow the prompts. The full walkthrough for each connection type — including migration, reconnection and what to do when a channel goes inactive — is Module 2 of this course.
Step 4 — Manage your channels from one page
Once a channel exists it lives on the Channels page (the phone icon in the left rail). This is where you add more numbers and where you come back when something stops working.
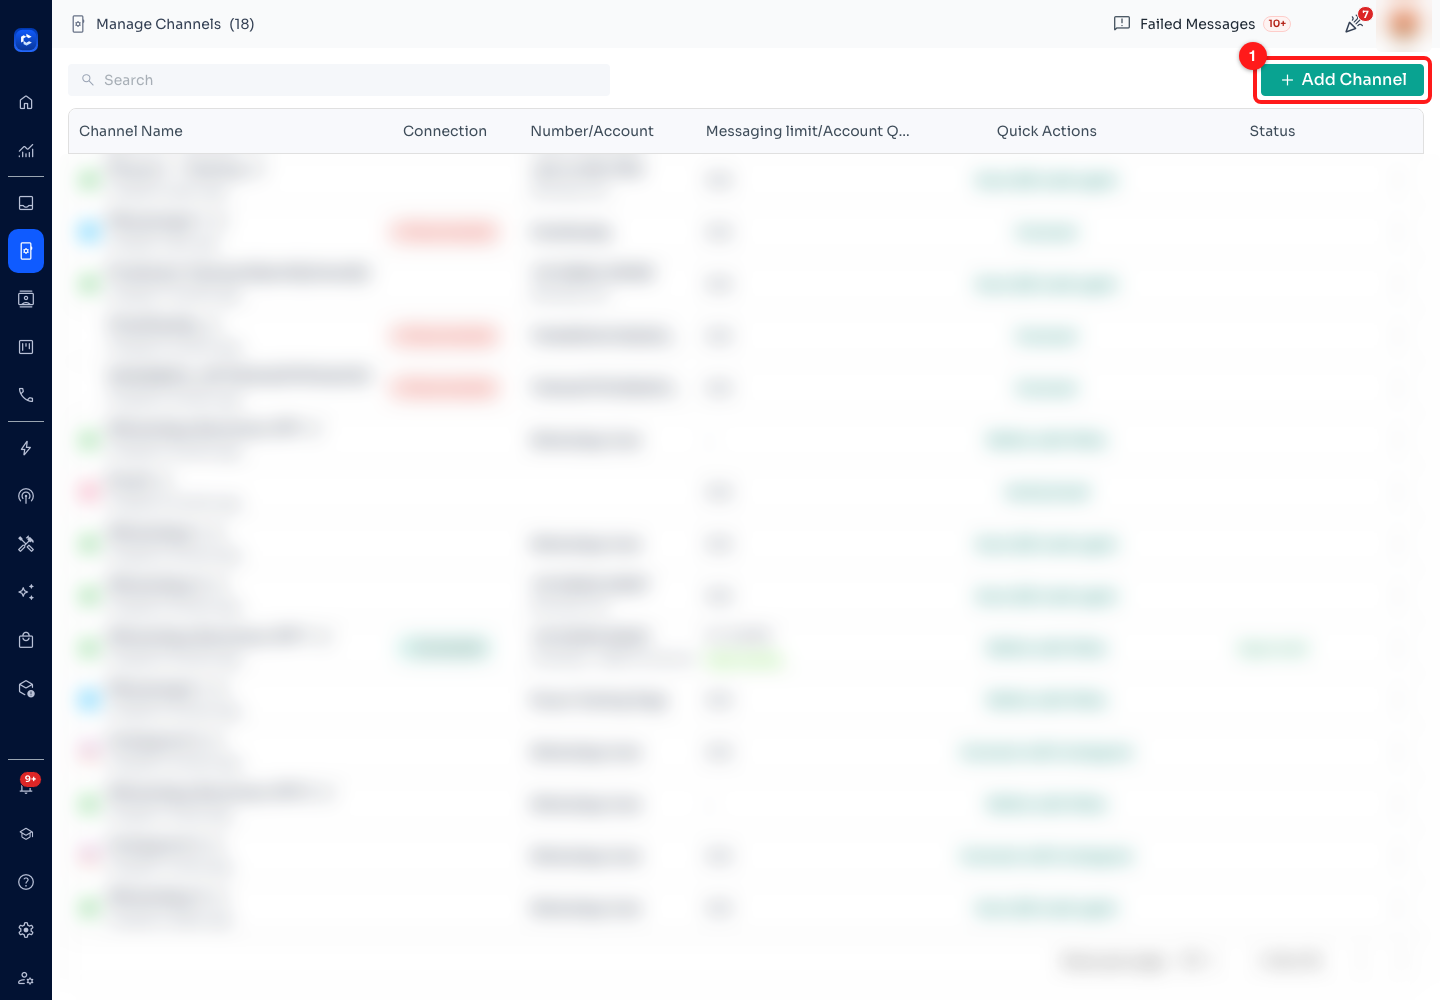
Step 4 — (1) Add Channel. Channel names and numbers are blurred here; on your own screen you will see each one in full.
- Connection tells you whether a channel is live; a red chip means it needs attention.
- Messaging limit / Account Quality is your Meta sending tier — Module 2 explains how to raise it and how to keep it healthy.
- Quick Actions offers the fix for whatever state a channel is in: Scan QR code again, Connect, Relink with Meta or Verify Email.
Step 5 — Find your team settings
Click the gear icon at the bottom of the left rail to open Settings. Three of its sections matter for this module.
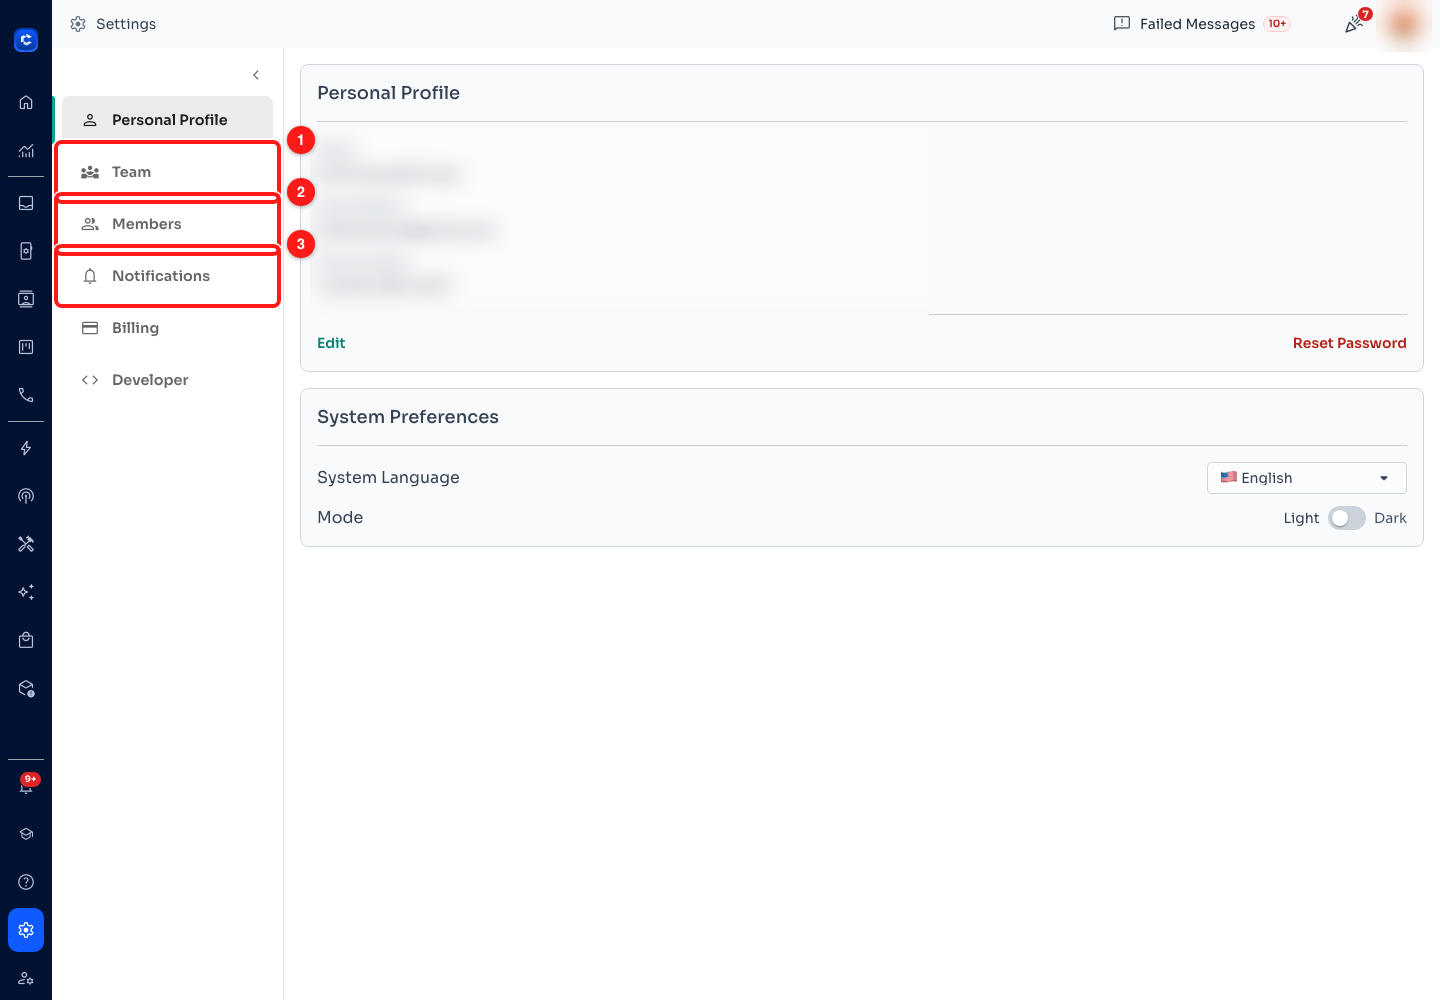
Step 5 — (1) Team, (2) Members, (3) Notifications. Personal details are blurred.
- (1) Team — your workspace itself: its name, and the settings that apply to everyone.
- (2) Members — who is in the workspace and what each person may do.
- (3) Notifications — which events reach you, and by which route.
Step 6 — Understand roles before you invite anyone
Open Members. Every teammate has a role, and the role decides what they can see and change. Set this correctly the first time — it is much harder to unpick a workspace where everyone is an Admin.
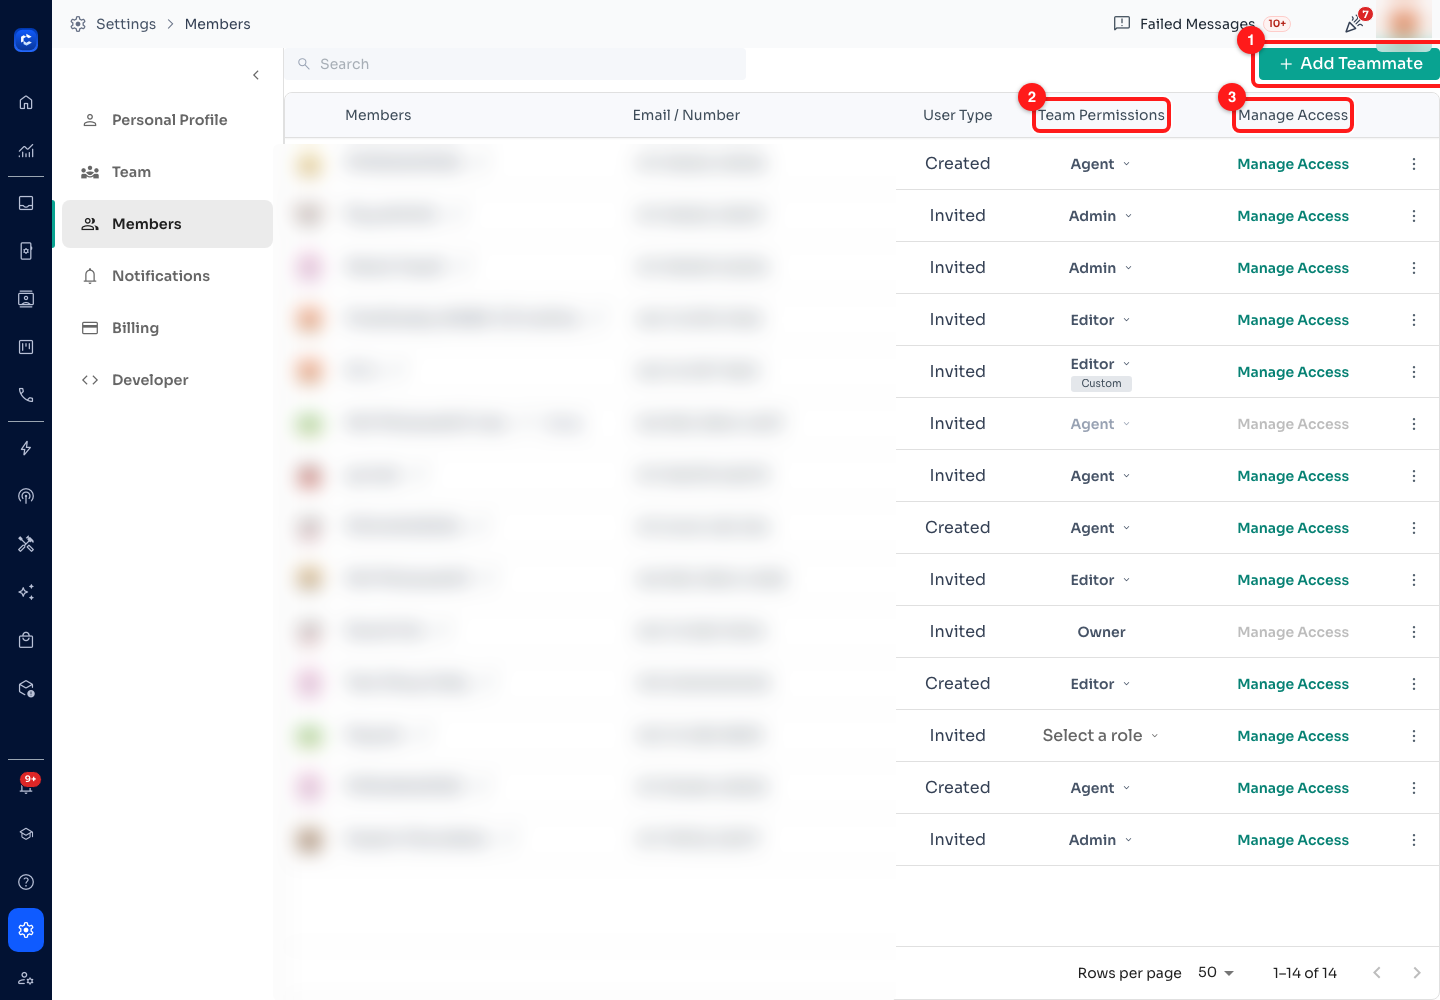
Step 6 — (1) Add Teammate, (2) the role on each row, (3) Manage Access for per-person fine-tuning. Names and phone numbers are blurred.
- Owner — the account holder. One per workspace, and the role cannot be reassigned from this table.
- Admin — full run of the workspace including billing, members and channels.
- Editor — builds and edits: flows, broadcasts, templates and contacts, but not the workspace itself.
- Agent — works the Inbox. The right role for most front-line staff.
🔐 Manage Access goes finer than the four roles: use it to limit a person to specific channels, so an agent handling one brand's number never sees another's conversations. A member with tailored permissions shows a small Custom tag under their role.
The User Type column tells you where someone came from — Invited means they were sent a link, Created means the account was made for them.
Step 7 — Invite your teammates
Click + Add Teammate. There are three ways in, and they suit different situations.
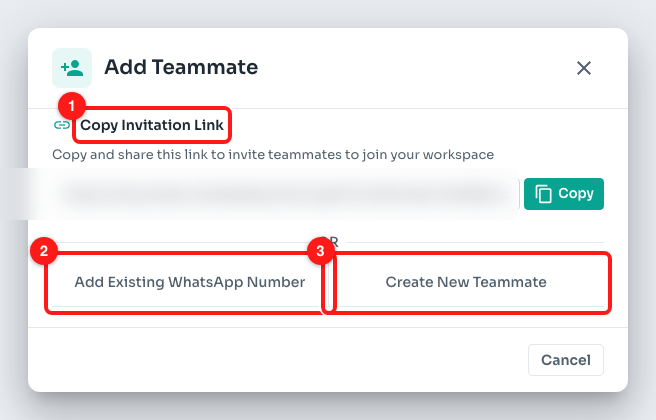
Step 7 — (1) a shareable invitation link, (2) add an existing WhatsApp number, (3) create the account yourself. The live invite link is blurred.
- Copy Invitation Link — one link, share it in your team chat, everyone who opens it joins this workspace. Fastest for onboarding several people at once. Treat the link as a key to your workspace and only share it internally.
- Add Existing WhatsApp Number — invite someone by the WhatsApp number they already use.
- Create New Teammate — you set up the account and hand over the credentials. Useful when a shared or front-desk login is needed.
✅ After someone joins, go back to Members and set their role. New members do not arrive with the permissions you want by default — a row still reading Select a role is somebody who cannot do their job yet.
Step 8 — Turn on the notifications that matter
Open Settings → Notifications. This is a grid: each row is an event, each column is a delivery route, and each switch is one combination of the two. The last two Academy lessons in this module are about exactly this screen — it is the difference between a customer waiting two minutes and waiting a day.
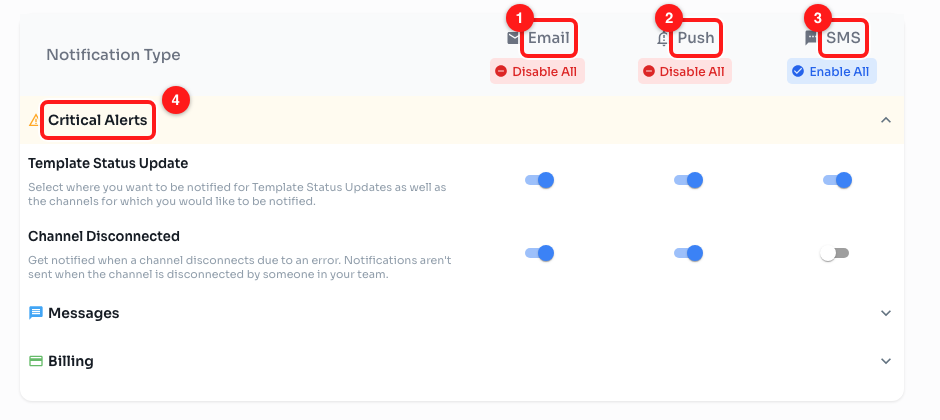
Step 8 — (1) Email, (2) Push, (3) SMS, (4) the Critical Alerts group, expanded.
- (1) Email — a message in your inbox. Good for things you can deal with later.
- (2) Push — a browser or mobile-app alert. This is the one that gets an agent to reply quickly; your browser will ask permission the first time.
- (3) SMS — a text message. Reserve it for genuinely urgent events; there are only a few worth waking someone for.
- (4) Critical Alerts — Template Status Update (Meta approved or rejected a message template) and Channel Disconnected (a channel dropped because of an error, not because a teammate disconnected it). Leave both on.
The Messages and Billing groups below expand the same way. Disable All / Enable All at the top of each column flips a whole route at once — handy for silencing SMS while keeping email and push.
🔔 Push notifications need two yeses: the switch here, and your browser's own permission prompt. If you dismissed that prompt, ChatDaddy cannot alert you no matter what this page says. Re-enable it in your browser's site settings for ChatDaddy.
The six video lessons in this module
Each lesson opens inside ChatDaddy from the Academy page, or on YouTube using the links below.
- Get started with ChatDaddy · 1:54 · a guided tour of the dashboard — matches Step 2 above.
- Sign up and boost WhatsApp engagement 2x · 3:53 · creating the account and finishing onboarding.
- Connect WhatsApp to ChatDaddy · 1:16 · the fastest route to a live channel — Steps 3 and 4.
- Invite your team · 4:28 · members, roles and who can see which chats — Steps 6 and 7.
- Turn on your notifications · 1:32 · browser, desktop and mobile alerts — Step 8.
- Set up push notifications · 1:05 · getting agents pinged the moment a customer replies.
Common questions
Which WhatsApp connection should I choose?
If you are evaluating ChatDaddy or running a single number from one phone, start with the QR integration — it takes half a minute and you can change your mind later. If you send broadcasts, need more than one agent replying, or cannot keep a phone online, go straight to the WhatsApp Business API. Module 2 covers migrating from one to the other.
I invited someone but they cannot see any chats.
Two likely causes. Their role may still be unset — check the Members table for a row reading "Select a role". Or their access is limited to channels they were not given: open Manage Access on their row and confirm which channels are ticked.
Can I change the Owner of a workspace?
Not from the Members table — the Owner row has no role dropdown and no Manage Access link. Contact ChatDaddy support to transfer ownership.
Why am I not getting push notifications?
Check three things in order: the Push switch for that event in Settings → Notifications; your browser's notification permission for ChatDaddy (a blocked prompt overrides the app); and, on mobile, whether the ChatDaddy app has notification permission from the operating system.
➡️ Next: Module 2 — Channels & WhatsApp API. Nine lessons on connecting and migrating numbers, what the Business API actually changes, 2026 pricing and Coexistence, and how to keep your numbers from being banned.