
Academy Module 10 — Growth Playbooks: Turn WhatsApp Into a Channel That Sells
The written walkthrough of Academy Module 10. Build the door that puts ad, poster and website traffic into your WhatsApp with the right words already typed, catch those arrivals automatically, and run a seasonal offer end to end with coupon campaigns — including one unique redeem link per customer.
Also searched as: Academy Module 10 — Growth Playbooks: Turn WhatsApp Into a Channel That Sells, What this module covers, Build the door: a link that opens WhatsApp mid-sentence, Size the code for the place it is going, Put the same door on your website, Install it once, then keep editing it, Find the rule that catches the campaign, Read who the campaign actually brought in, Build the seasonal offer: what the customer will be holding, Load the codes, decide who may redeem, set the expiry, Publish it, then watch the redemption count, Give every customer their own redeem link, Knowing whether it worked, The five video lessons in this module, Common questions
🎓 Part 10 of 11 — ChatDaddy Academy. This is the written version of the Growth Playbooks module: five video lessons, a little over one hour and forty minutes of watching, turned into steps you can follow on screen. You can read this on its own, or keep it open beside the videos on the Academy page.
Modules 1 to 9 built the machine. This one is about pointing it at revenue, and it introduces almost no new screens for their own sake. A growth playbook is three things joined up: a door that puts a stranger into a WhatsApp chat with you, a rule that answers them the second they arrive, and an offer you can count. ChatDaddy has a specific tool for each, and they are the ones people never find: the QR generator and the widget builder under Tools, and coupon campaigns under Marketing.
The thread running through all of it is the pre-filled message. Every door ChatDaddy builds — QR code, website widget, the link you paste into an ad — opens WhatsApp with a sentence already typed in the customer's box. You choose that sentence. Because you chose it, you know exactly what the first message will say, which means a keyword rule can match it exactly, greet that person, and tell you afterwards how many people came through that particular door. That is the whole trick, and everything below is a variation of it.
What this module covers
- The QR generator: a wa.me link with your campaign's words pre-filled, sized for the placement it is going into
- The website widget: the same door on your own site, and the snippet that installs it
- Reading a campaign from the rule that catches it — who arrived, what they sent, when
- Turning those arrivals into an audience you can message again
- Coupon campaigns: building the coupon, loading the codes, capping who may redeem
- One unique redeem link per customer, exported as a contact-import file
- Which numbers to trust when you want to know whether a campaign worked
⏱️ Time needed: about 20 minutes to put up a QR and the rule behind it; about an hour for a full seasonal campaign, most of it spent deciding the offer rather than clicking. You need: a connected WhatsApp channel (Module 2), a message flow to answer with (Module 6), and tags on your contacts (Module 7). This module assumes you have already sent a broadcast (Module 4) — it does not repeat the broadcast builder.
🧭 Do the boring half first. The Build a strong marketing foundation lesson is seven minutes of the thing nobody wants to do: decide who the campaign is for, what the offer actually is, and how often you are willing to message. Write those three down before you open ChatDaddy. Every screen below asks you for one of them, and a campaign assembled without them is just a faster way to burn a list.
Step-by-step
Step 1 — Build the door: a link that opens WhatsApp mid-sentence
Open Tools in the left rail and pick the QR Generator tab. Despite the name, the useful output here is not really the picture — it is the link underneath it. ChatDaddy builds a standard wa.me address from the channel you pick and the message you type, then draws that address as a QR code. The link works anywhere: a Facebook ad, an Instagram bio, an e-mail signature, a button on your site.
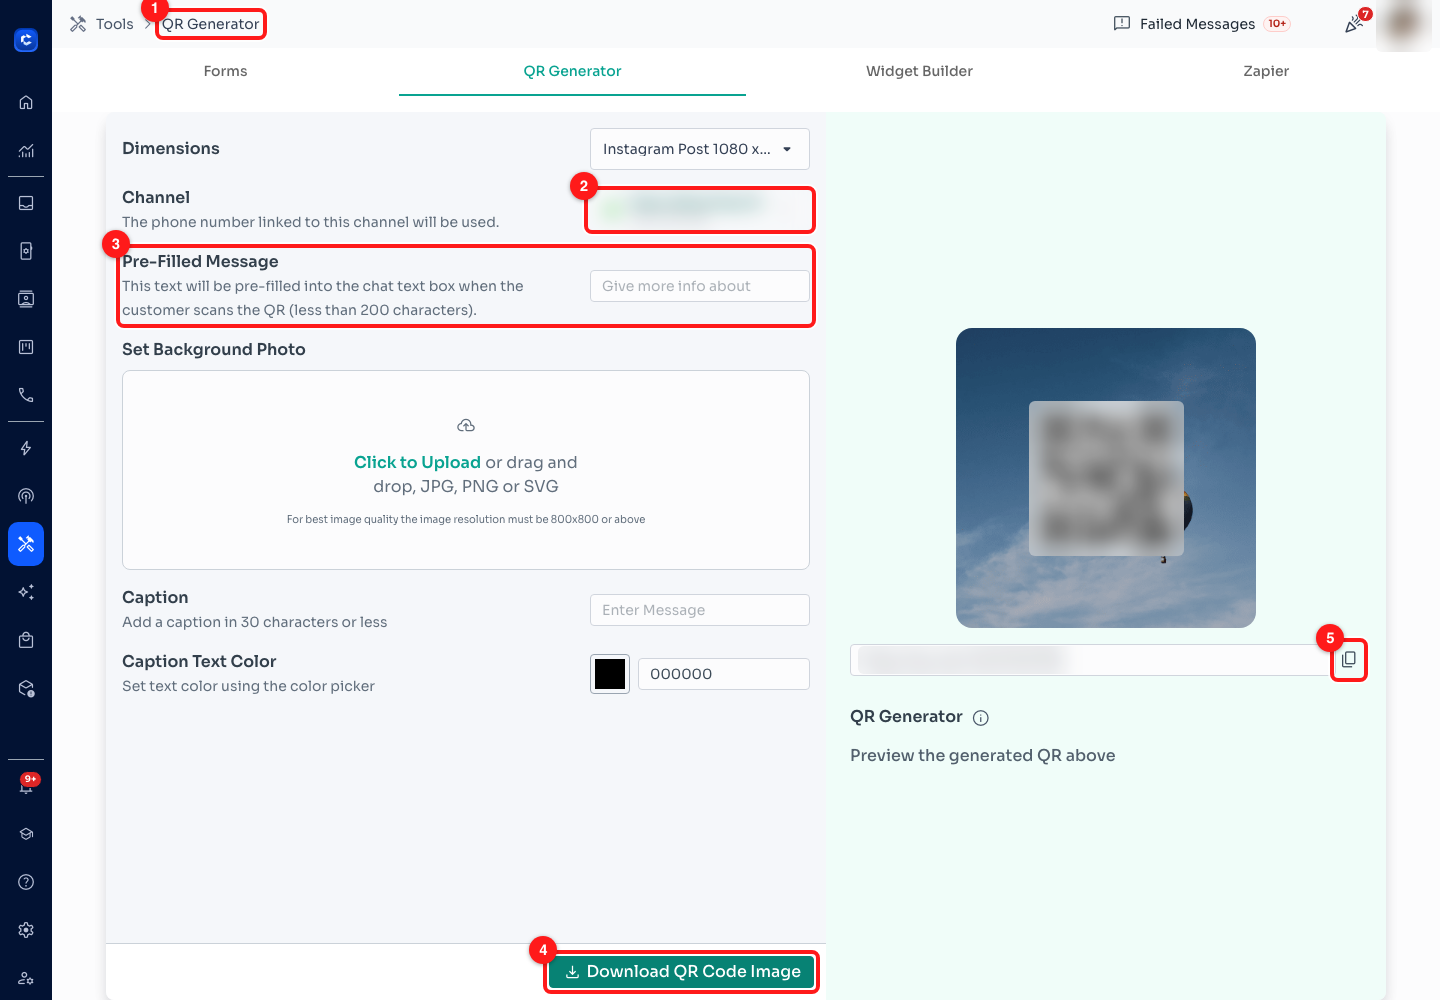
Step 1 — (1) the QR Generator tab under Tools, (2) Channel, (3) Pre-Filled Message, (4) Download QR Code Image, (5) the copy button, which copies the link itself. The channel, the QR and the link are frosted here because they carry a real phone number; on your own screen they show in full.
- (2) Channel — the phone number linked to this channel will be used. Pick the number you actually want these conversations landing on. If your team splits sales and support across two numbers, this is where that decision gets made.
- (3) Pre-Filled Message — the text that appears already typed in the customer's message box when they scan or click. Under 200 characters; the field stops accepting input at that point. This is the most important field on the page and Step 5 explains why: it is the phrase your automation will match on.
- (4) Download QR Code Image — the poster-ready picture, at the size chosen in Step 2.
- (5) The copy button copies the underlying
wa.melink. Use this for anything digital — it is the same destination as the QR, without making somebody photograph their screen. - Set Background Photo, Caption (30 characters) and Caption Text Color dress the downloaded image up so it can go straight onto a poster or a story without a designer.
💬 Write the pre-filled message as something a customer is happy to send, not as a code. "Hi, I'd like the October offer" works; "PROMO-OCT-2025" makes people feel like they are filling in a form, and some will delete it and type their own question — which is exactly the case your keyword rule will miss.
Step 2 — Size the code for the place it is going
Open the Dimensions dropdown at the top. The four presets are named after the placements people actually use, so you do not have to think in pixels.
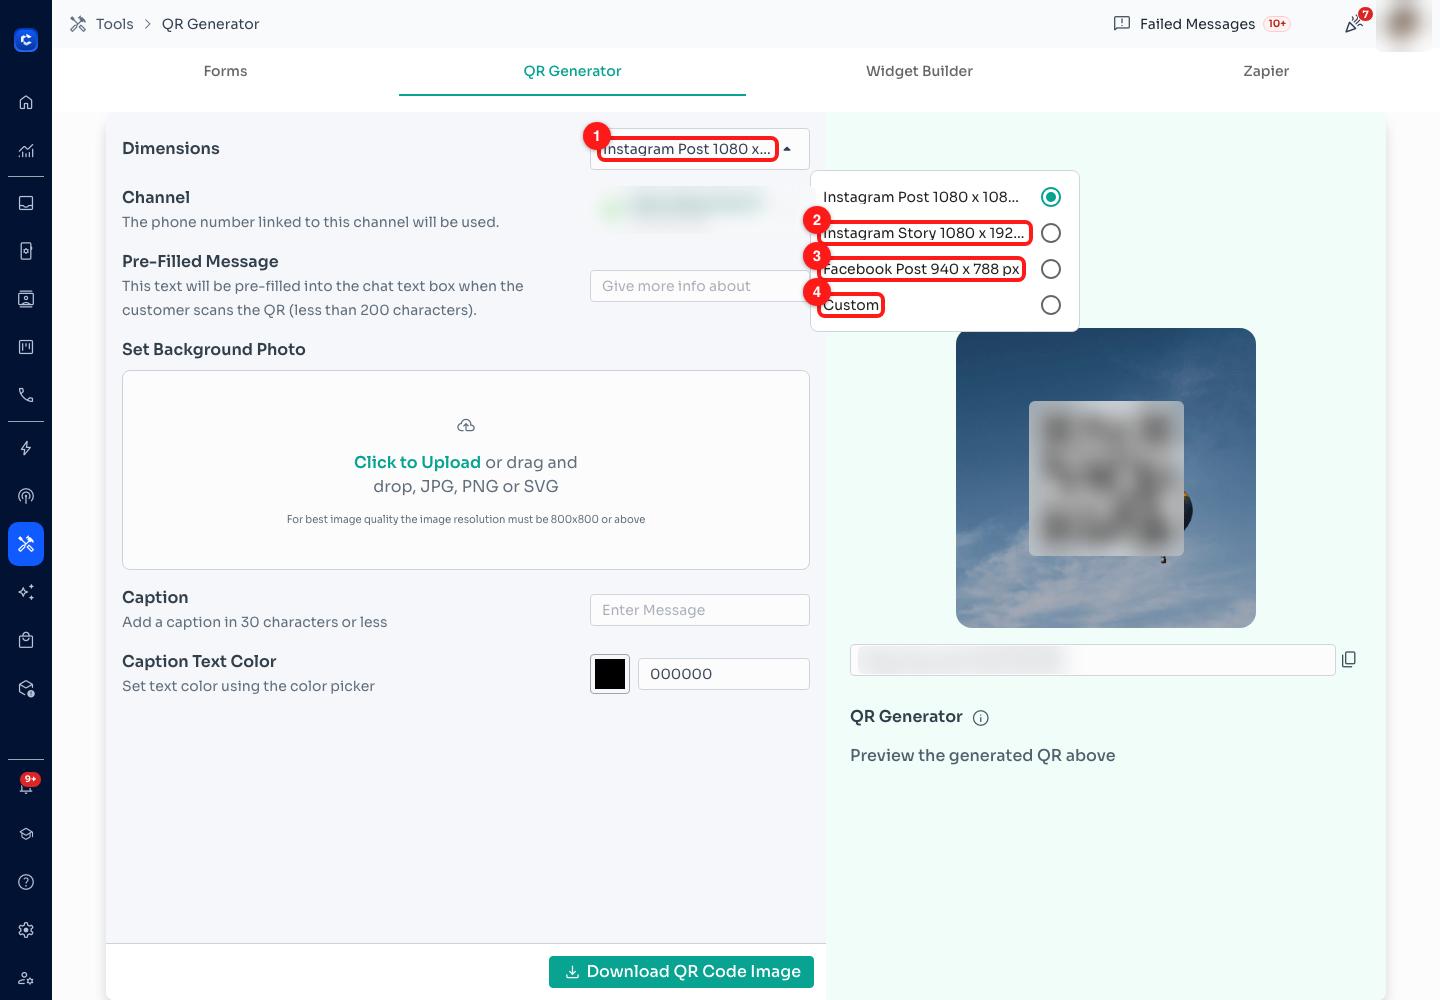
Step 2 — (1) the Dimensions dropdown, (2) Instagram Story, (3) Facebook Post, (4) Custom. Instagram Post is the default and is already selected at the top of the list.
- Instagram Post — 1080 x 1080 px (the default), Instagram Story — 1080 x 1920 px, Facebook Post — 940 x 788 px, and Custom for anything else, including print.
- Changing the size re-draws the preview immediately, so you can see whether your caption still fits before you download.
- For a printed poster or a table card, use Custom and go large: a QR that scans from across a room needs more pixels than one on a phone screen.
🖨️ Scan your own QR with your own phone before it goes anywhere — especially before it goes to a printer. You are checking two things: that it opens a chat with the right number, and that the pre-filled sentence arrives intact. A QR is the one piece of marketing you cannot correct after it is on a thousand flyers.
Step 3 — Put the same door on your website
Next tab along: Widget Builder. This is the floating chat button that sits in the corner of your website, and it works on the same principle as the QR — a visitor clicks it and lands in WhatsApp with a sentence already typed. The form is four numbered sections; the first one is the one that matters.
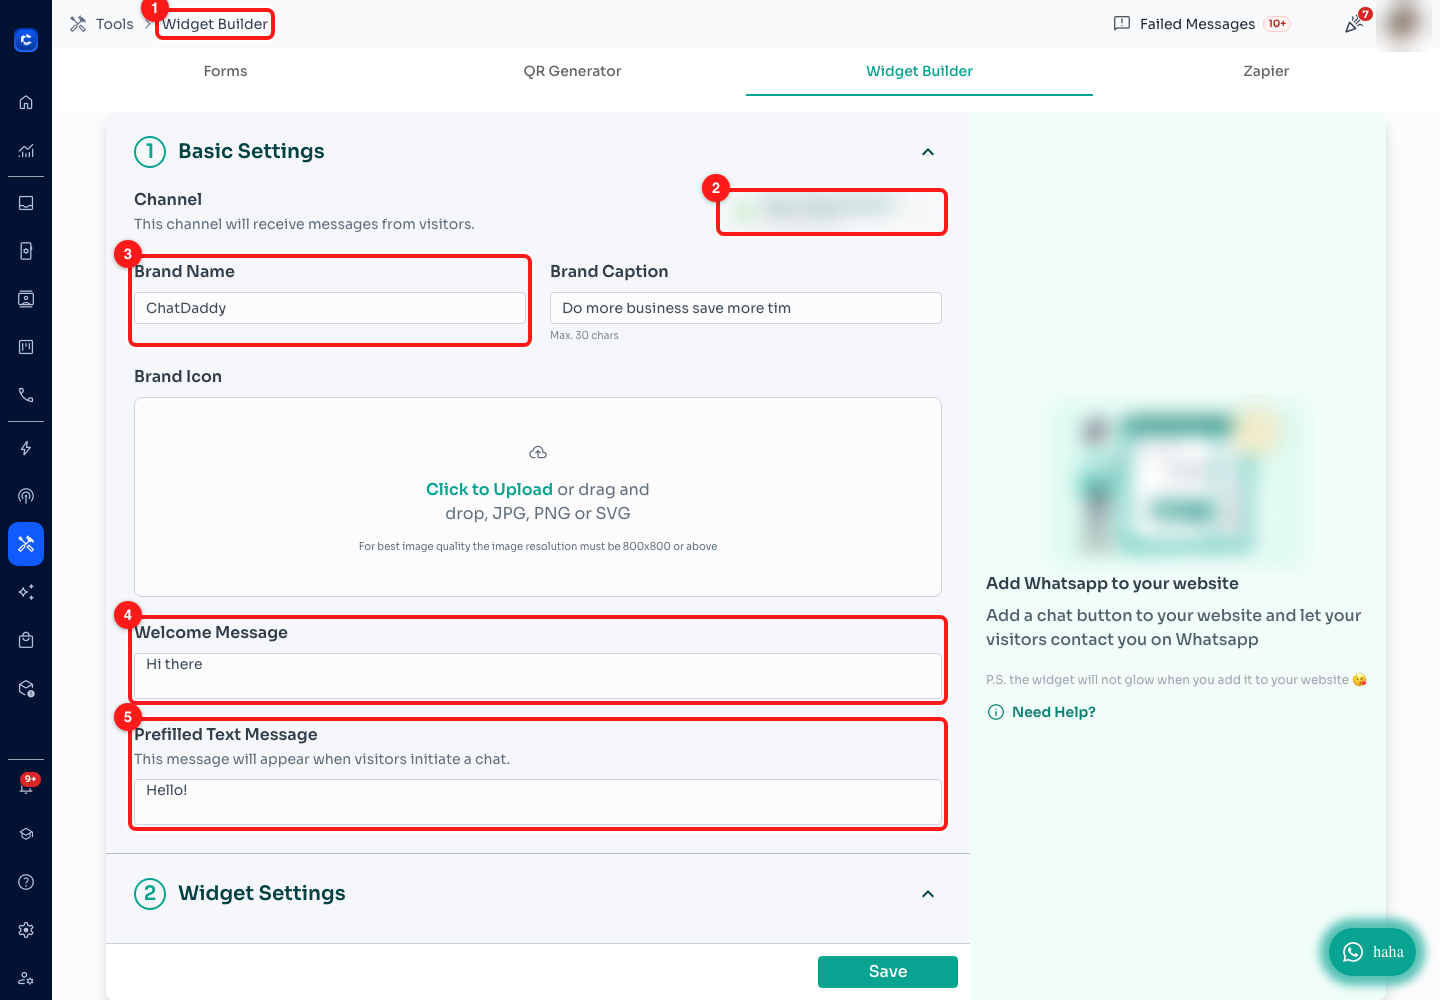
Step 3 — (1) the Widget Builder tab, (2) Channel, (3) Brand Name, (4) Welcome Message, (5) Prefilled Text Message. The channel and the live preview are frosted here; the preview on the right updates as you type.
- (2) Channel — this channel will receive messages from visitors. Same decision as Step 1, made again for web traffic. It does not have to be the same number.
- (3) Brand Name and Brand Caption (30 characters) are the header of the little chat card. The caption is where the honest expectation goes — "Typically replies within a day" is the default, and it is worth changing to something true.
- (4) Welcome Message — up to 150 characters — is what the visitor reads inside the widget before they click through. It is not sent to anybody.
- (5) Prefilled Text Message is what the visitor sends you when they do click through. This is the field that pairs with a keyword rule, exactly as in Step 1. Give the widget a different phrase from your QR and you can tell website traffic from poster traffic without any other tooling.
- Sections 2 Widget Settings and 3 Button Settings are appearance only: header and CTA colours, the button icon, its text (20 characters) and whether it sits Bottom Left or Bottom Right.
Step 4 — Install it once, then keep editing it
Scroll to section 4 Embed Widget. Copy the snippet and paste it into your website's <head> tag — once, ever. After that the widget reads its configuration from ChatDaddy, so changing the colours or the pre-filled message here updates the live site without anybody touching the code again.
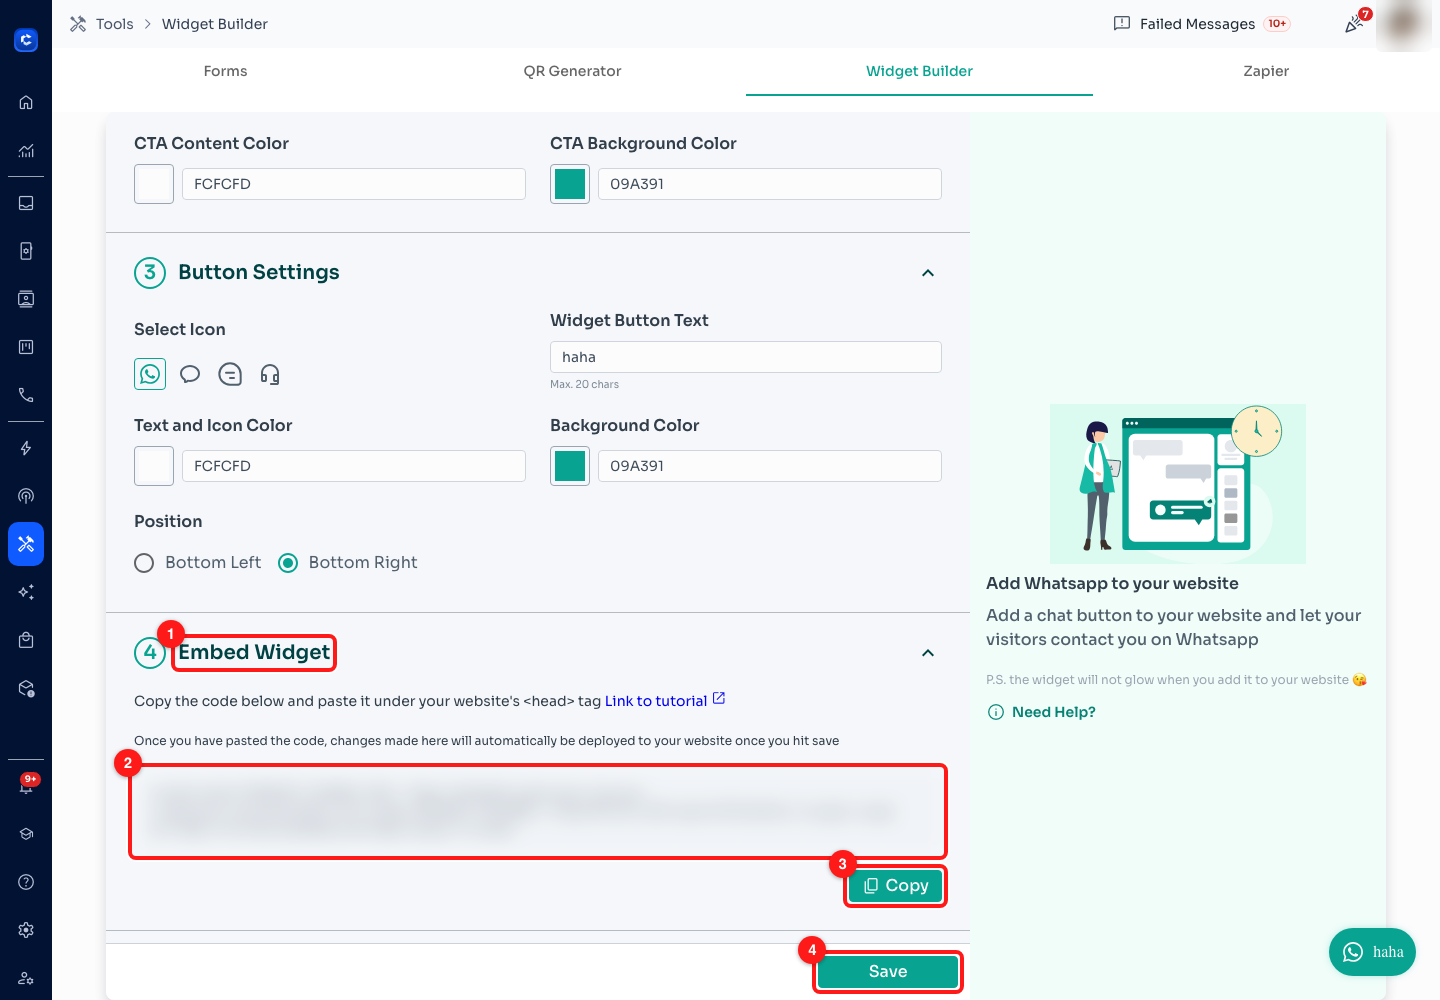
Step 4 — (1) the Embed Widget section, (2) the snippet, frosted here because it carries this workspace's team id, (3) Copy, (4) Save.
- (2) The snippet is two
<script>tags: one setting your widget configuration URL and team id, one loading ChatDaddy's widget script. It goes under<head>, and the panel links out to a written tutorial if whoever maintains the site wants one. - (3) Copy — use the button rather than selecting the text by hand.
- (4) Save is what deploys your changes. The page says it plainly: once you have pasted the code, changes made here will automatically be deployed to your website once you hit save. Nothing you change on this screen reaches visitors until you press it.
⚠️ Because Save publishes straight to the live site, the widget builder is not a good place to experiment. Decide the wording and the colours first, change them in one pass, then save once. And remember the pre-filled message is now live copy: change it and every keyword rule matching the old phrase silently stops matching.
Step 5 — Find the rule that catches the campaign
A door with nobody behind it is a missed lead. The rule that answers is a keyword reply, built in Automation → Keyword Reply — Module 6, Steps 9 to 12, covers building one. For a campaign, use Message Exactly Is and paste in the pre-filled phrase from Step 1 or Step 3: you wrote the sentence, so you know it will arrive letter for letter, and an exact match cannot ambush anybody else.
What Module 6 did not cover is the ⋮ menu at the end of each rule's row, which is where a campaign becomes measurable.
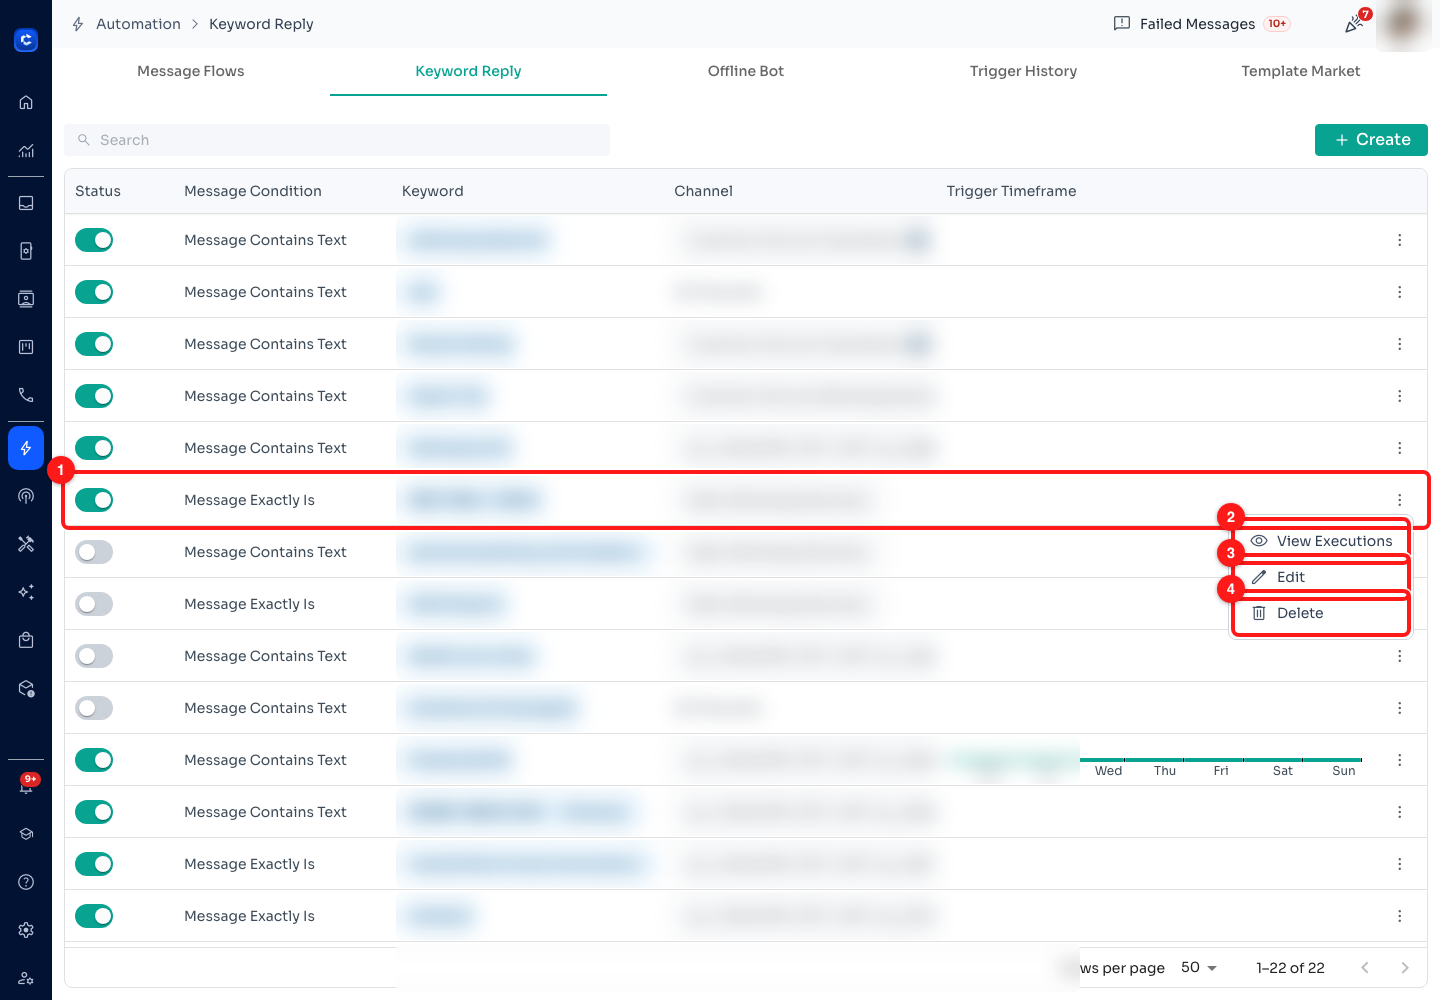
Step 5 — (1) one rule: an exact-match campaign phrase, (2) View Executions, (3) Edit, (4) Delete. The Keyword and Channel columns are frosted because these are real customers' campaign phrases.
- (2) View Executions is the one people miss. It is the log of every time this particular rule fired — Step 6.
- (3) Edit opens the rule. (4) Delete removes it, and takes the execution log with it: if a campaign is over, switch the rule off from the Status toggle on the left of the row instead, and you keep the history.
- One rule per campaign, per door. It is tempting to reuse a rule and change its keyword when the next promotion starts — do not. You lose the ability to compare October with November, and that comparison is the entire point of the exercise.
Step 6 — Read who the campaign actually brought in
View Executions answers the question every ad spend eventually comes down to: did anybody come through this door, and who were they? The title names the rule — condition and keyword — so there is no doubt which campaign you are looking at.
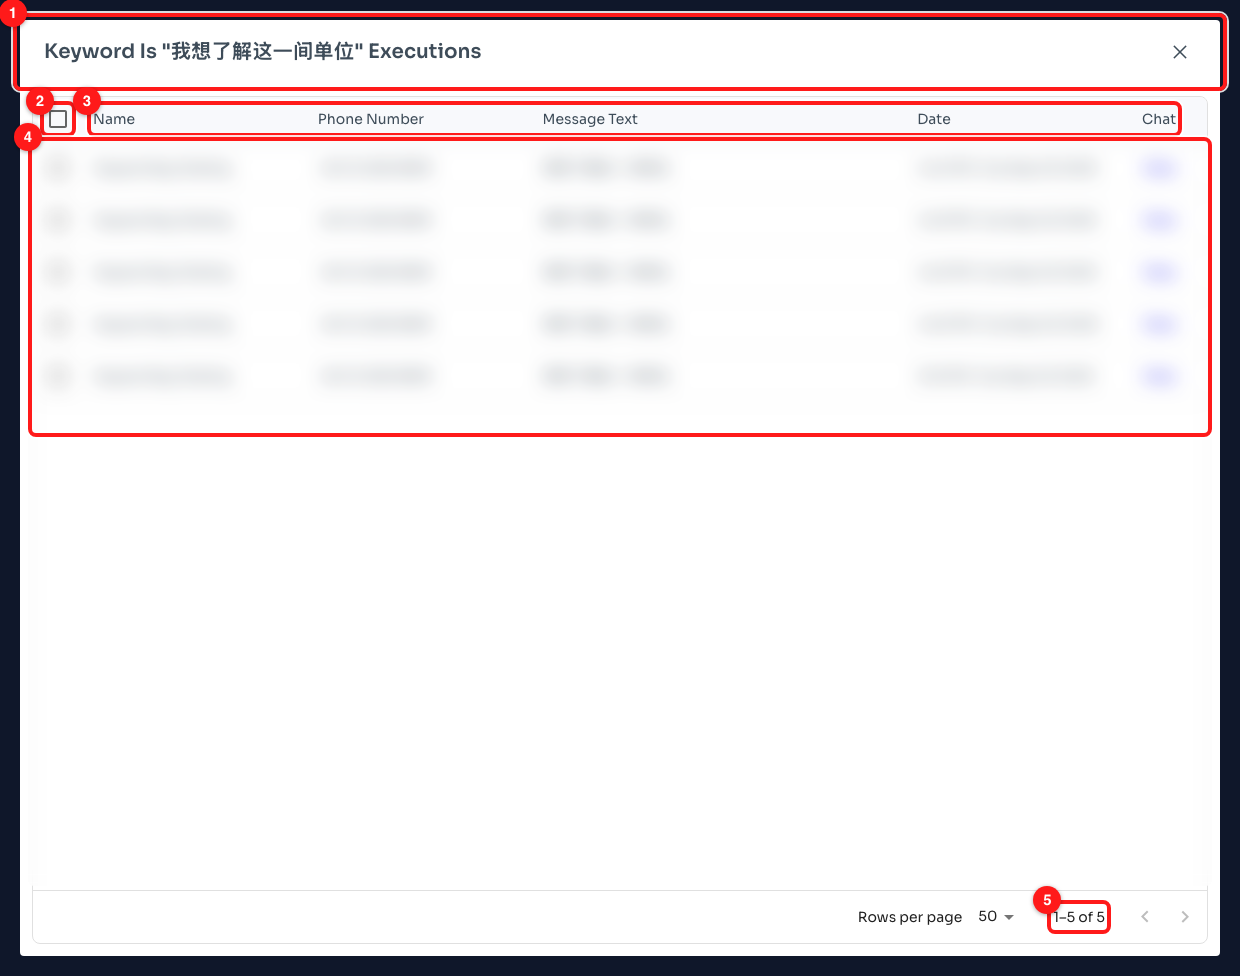
Step 6 — (1) the rule this log belongs to, (2) the select-all checkbox, (3) the columns: Name, Phone Number, Message Text, Date, Chat, (4) the rows, frosted here because they are five real customers, (5) the count — five people have sent this exact phrase.
- (3) The columns give you one row per firing: who sent it, from what number, the exact message text, when, and a Chat link that opens that conversation in the Inbox.
- (5) The count at the bottom right is your campaign's response number. Compare it across rules and you are comparing doors: how many people the poster produced against how many the website widget did.
- (2) Selecting rows — tick individual rows or the header checkbox — reveals two actions above the table: Export, which downloads the selection, and Tag These Contacts, which applies a tag to every person in it. That tag is the bridge to Module 7: it turns "people who responded to the October poster" into a segment you can broadcast to.
- A rule showing 0–0 of 0 has never fired. Either nobody has used that door yet, or the phrase you are matching is not the phrase people are sending — check the rule's keyword against the pre-filled message character for character.
🏠 The property playbook is this step, repeated. Agents run one listing per ad, so give each listing its own pre-filled phrase and its own exact-match rule. The rule answers with the flow that qualifies — budget, timeline, financing — and the execution log for that listing tells you which unit is pulling enquiries and which advert is wasting money. Tag the respondents per listing and the follow-up broadcast writes itself.
Step 7 — Build the seasonal offer: what the customer will be holding
For a sale period you need more than a message — you need something redeemable that you can count afterwards. That is Marketing → Campaigns, which is coupon campaigns and nothing to do with broadcasts. Click Create. The builder is three sections with a live preview beside it, and section 1 is purely what the customer sees.
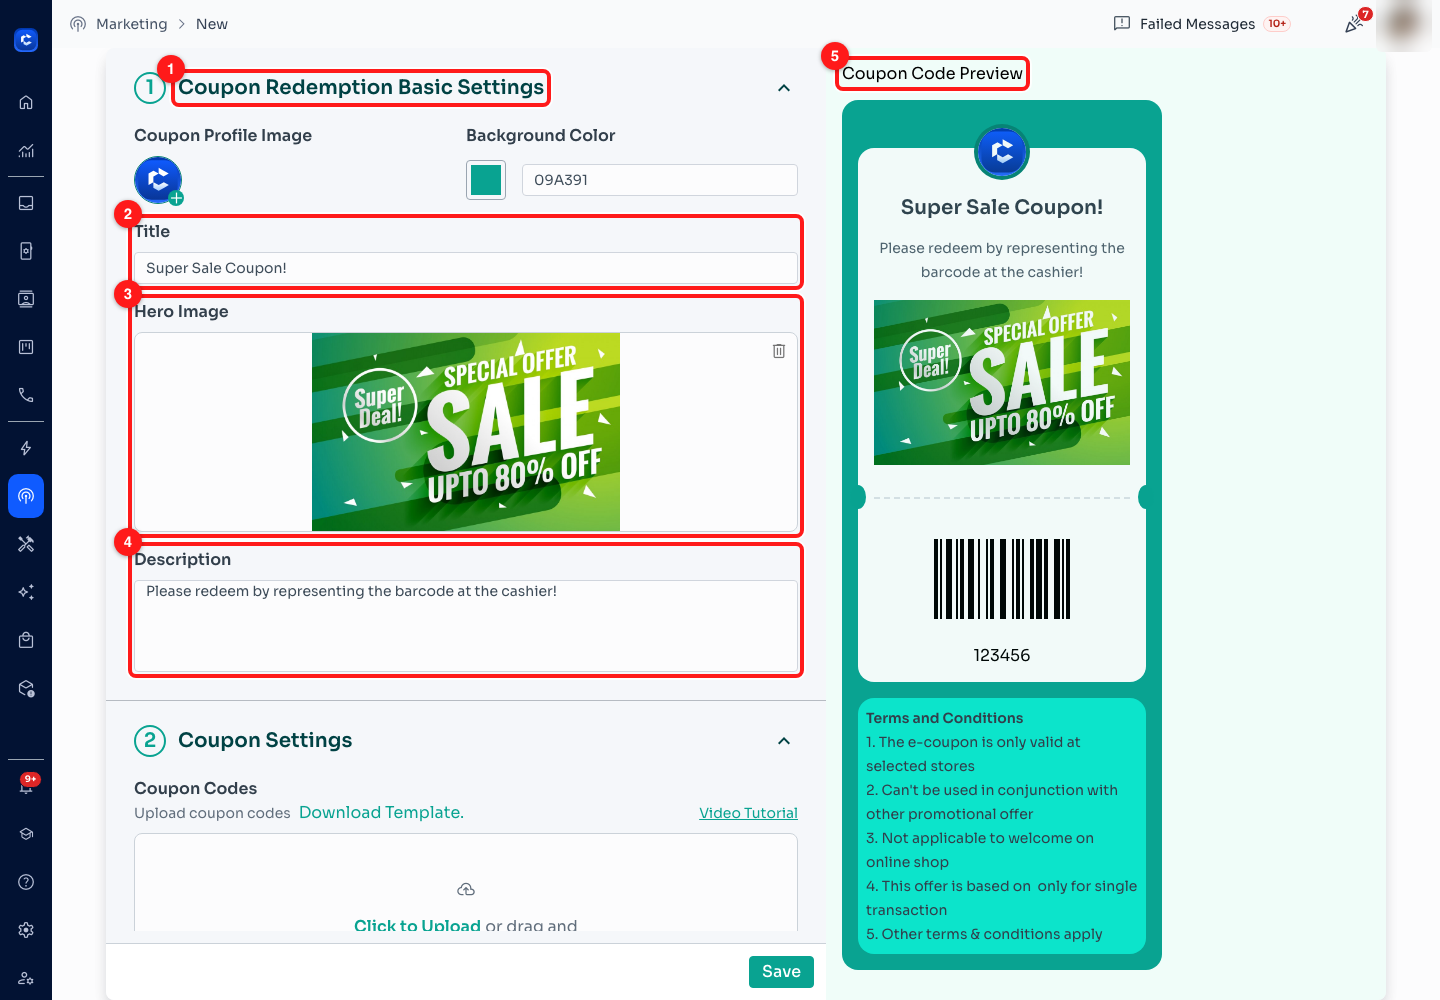
Step 7 — (1) section 1, Coupon Redemption Basic Settings, (2) Title, (3) Hero Image, (4) Description, (5) the live preview of the coupon itself.
- (2) Title is the offer's name and it is required — saving without one gives you "Please enter a campaign title". It is also the name you will be looking for in the list later, so put the month in it.
- (3) Hero Image is the banner across the middle of the coupon, and Coupon Profile Image and Background Color at the top are your logo and the card colour.
- (4) Description is the line under the title — this is where you tell people how to redeem: "show this at the counter", "quote the code when you order".
- (5) The preview on the right is exactly what the customer opens on their phone, including the barcode and the terms. Read it as they would before you go any further.
Step 8 — Load the codes, decide who may redeem, set the expiry
Section 2 Coupon Settings is the mechanical half, and it is where a campaign is made safe. Three decisions.
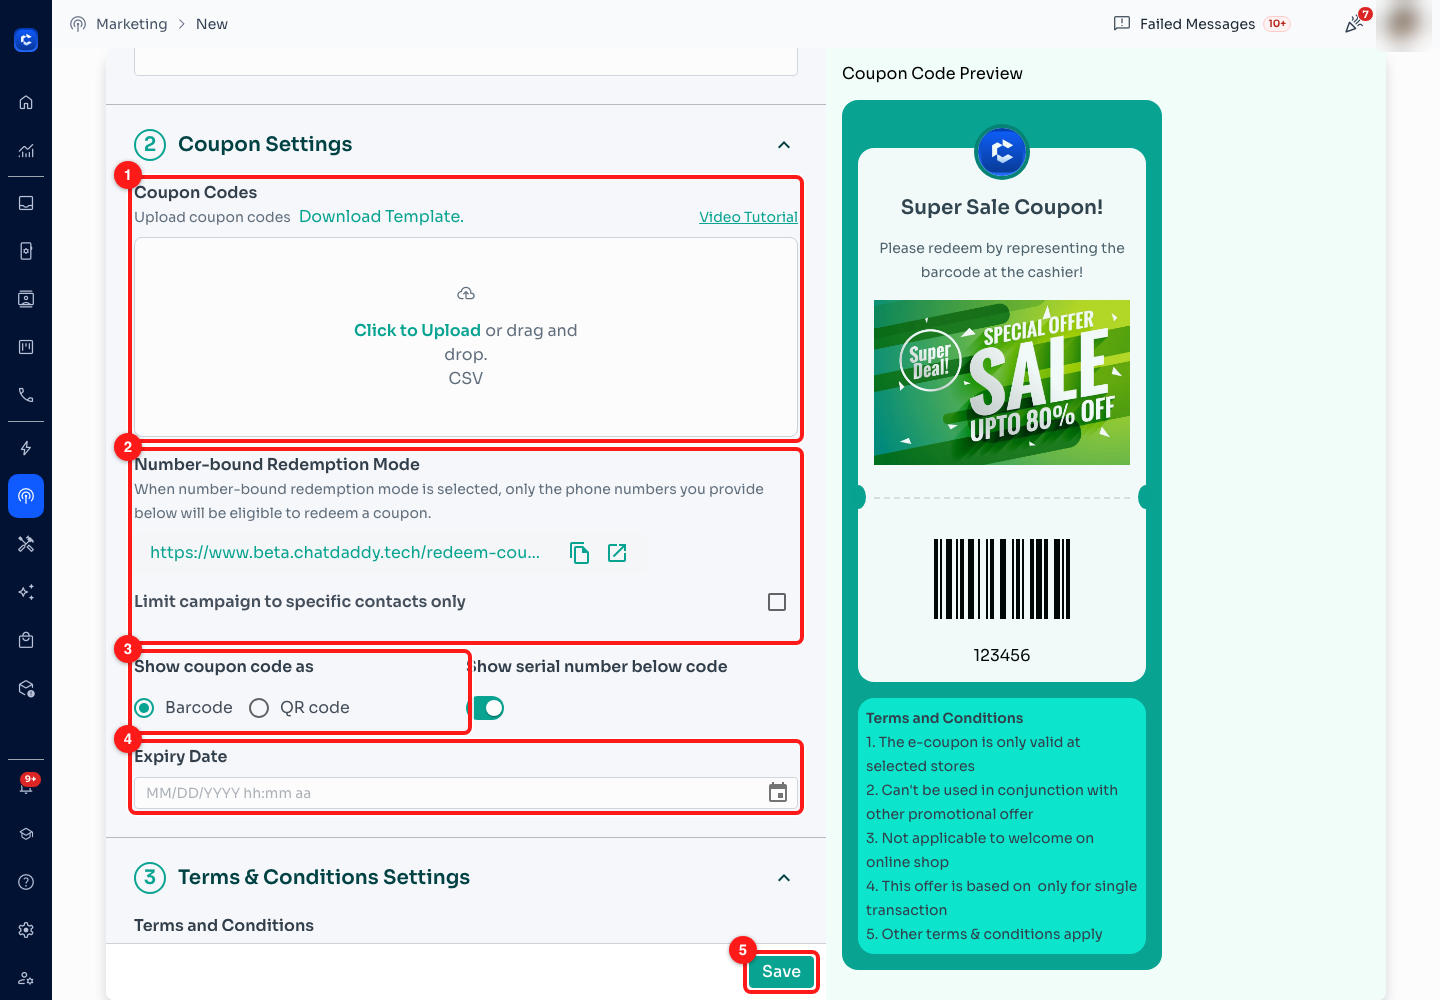
Step 8 — (1) Coupon Codes, with Download Template and the CSV dropzone, (2) Number-bound Redemption Mode, holding the public link and the contact limit, (3) Show coupon code as — Barcode or QR code, (4) Expiry Date, (5) Save.
- (1) Coupon Codes — upload a CSV of the codes themselves. Download Template gives you the shape: one code per line in the first column, with a header row that is ignored. Codes come from whatever redeems them — your POS, your online shop — so generate them there and upload them here. There is a Video Tutorial link beside it.
- (2) Number-bound Redemption Mode carries the campaign's public link — the address anybody can open to claim a coupon — with buttons to copy it or open it. Underneath, Limit campaign to specific contacts only turns the campaign from open-to-everyone into invitation-only: tick it and you get a second CSV upload, with its own template, for the contacts allowed to redeem. The count of selected contacts shows above it.
- (3) Show coupon code as — Barcode or QR code, whichever your till can read — and Show serial number below code, which prints the code in plain text underneath for staff who end up typing it in.
- (4) Expiry Date is the one field people leave empty and regret. A seasonal offer that never expires is a permanent discount you have forgotten about.
- Section 3 Terms & Conditions Settings is free text and comes pre-filled with a sensible five-line default. Edit it rather than deleting it.
🔢 The number of codes you upload is your campaign cap. Upload two hundred codes and no more than two hundred people can ever redeem, whatever the offer does on social media. That is the cheapest protection there is against a promotion going better than your margins can survive.
Step 9 — Publish it, then watch the redemption count
Saving returns you to the Campaigns list. Each row is one campaign, and between them the columns answer how it is going.
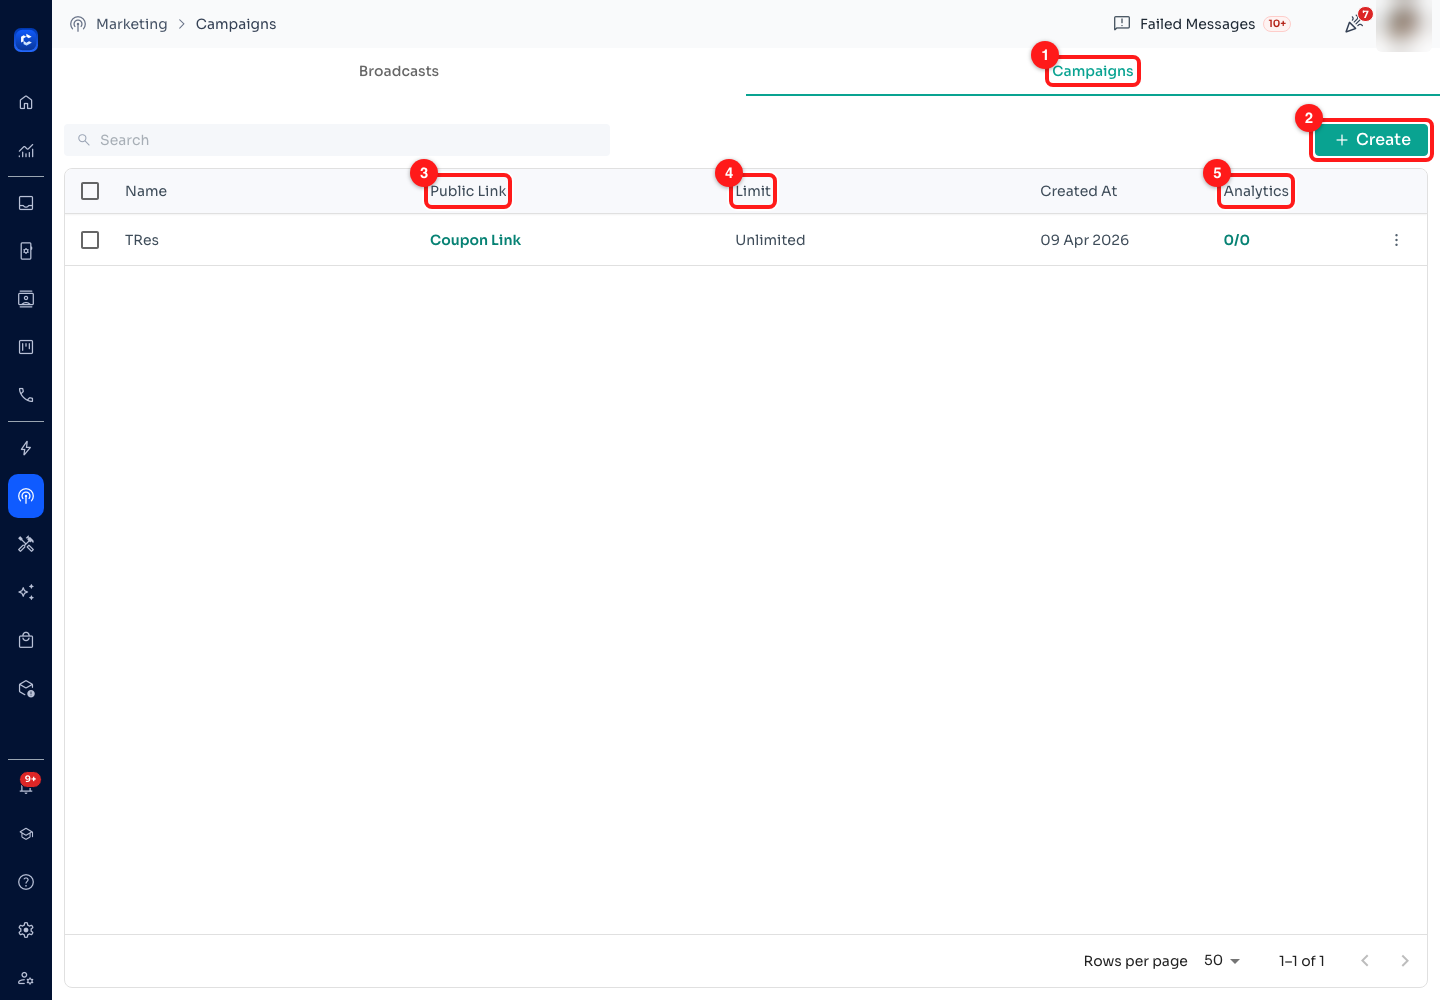
Step 9 — (1) the Campaigns tab, beside Broadcasts, (2) Create, (3) Public Link, (4) Limit, (5) Analytics — redeemed against total codes.
- (3) Public Link opens this campaign's Coupon Link in a new tab — the same address from Step 8. This is what goes in the broadcast, the ad, the story, the QR's pre-filled message. Open it yourself once to see what a customer sees.
- (4) Limit reads Unlimited or Limited, and it is reporting one thing only: whether you ticked limit campaign to specific contacts only in Step 8.
- (5) Analytics is the number that matters — redeemed / total codes uploaded. A campaign reading 0/200 has had no takers; 180/200 means you are nearly out of codes and should think about what happens to customer 201.
- Distribution is a broadcast, and that is Module 4 — segment first (Module 7), then send the coupon link to that segment. Nothing about a coupon campaign sends itself.
Step 10 — Give every customer their own redeem link
One public link for everyone is fine for a shop-window offer. For a broadcast to a list you already own, there is something better hidden in the row menu: Export Urls builds a file with one unique redeem address per code.
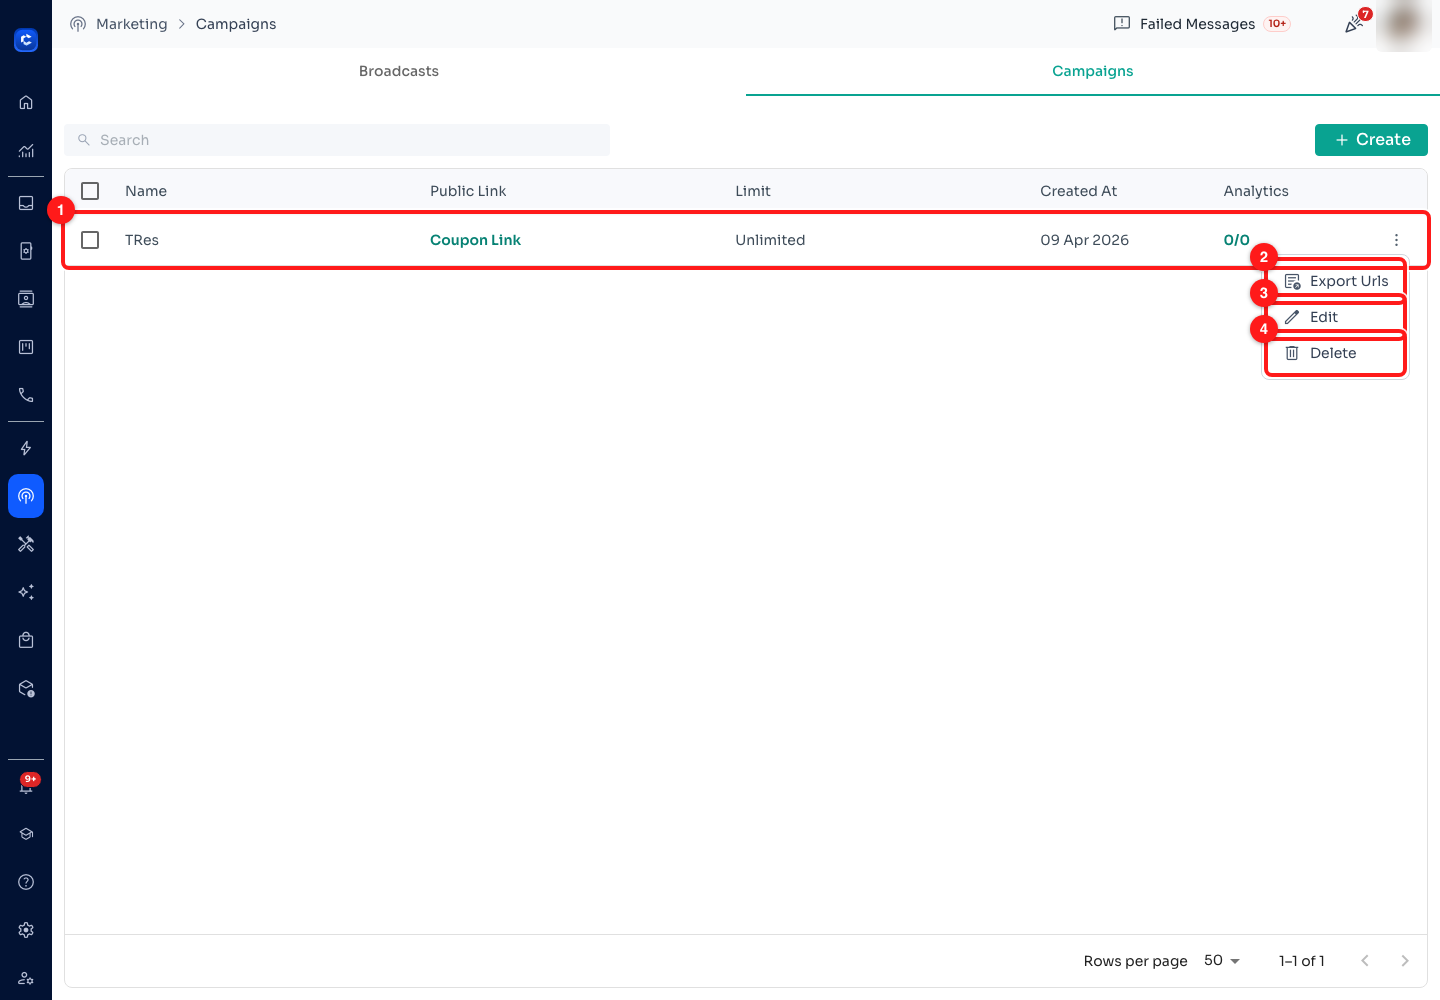
Step 10 — (1) the campaign row, (2) Export Urls, (3) Edit, (4) Delete.
- (2) Export Urls downloads a CSV of every code in the campaign, each as its own address, one per row. The file is named after the campaign.
- Its columns are deliberately those of the contact import file — id, phone number, name, tags, assignee and the coupon URL — with only the URL column filled in. It is meant to be filled out with your recipients and imported back into Contacts (Module 7, Step 11), so each contact carries their own coupon.
- Then broadcast to those contacts and put the coupon field in the message. Every customer gets a link only they can use, which means the redemption count in Step 9 tells you who redeemed rather than just how many.
- (4) Delete removes the campaign and its codes. The public link dies with it, including on anything already printed.
Knowing whether it worked
The growth formula lesson is a minute long because the idea is small: pick one number per door and watch it move. Four of them are trustworthy today, and they are all above.
- How many people came through a door — the execution count on that door's keyword rule (Step 6).
- How many of them are worth messaging again — tag them from the execution log and read the segment size in Contacts (Module 7).
- How many took the offer — the redeemed/total figure on the campaign row (Step 9).
- Whether the send itself worked — the per-broadcast progress bar in Marketing → Broadcasts: successful, failed and pending, with percentages (Module 4).
🐞 Do not build your reporting on the Broadcast Overview dashboard. On the workspace these screenshots come from — ninety-five broadcasts, hundreds of thousands of delivered messages — every card on it still reads 0, and two of its Cost & Value figures render their untranslated keys. This is a known defect, documented in Module 4, Step 16. The per-broadcast numbers beside each row are accurate; the roll-up is not.
The five video lessons in this module
Two of these are full workshops rather than tutorials — set aside real time for them. All five open inside ChatDaddy from the Academy page, or on YouTube using the links below.
- How to run WhatsApp ads · 40:33 · advanced · the full workshop on Facebook ads that drive WhatsApp conversations. The ad itself is built in Meta Ads Manager, not in ChatDaddy — Module 9, Step 13 covers that hand-off. The ChatDaddy half is Steps 1, 2, 5 and 6 here.
- Golden sales period: double your sales · 56:41 · advanced · planning, sequencing and closing a seasonal campaign — Steps 7 to 10, with the sending itself in Module 4.
- Build a strong marketing foundation · 7:31 · intermediate · audience, offer and cadence, decided before you automate anything — the planning callout at the top of this article.
- The formula to grow your business · 1:02 · beginner · the one-minute version of what to measure — "Knowing whether it worked", above.
- WhatsApp automation for property businesses · 1:02 · beginner · qualifying and following up on listing enquiries — Steps 5 and 6, and the property callout beneath Step 6.
Common questions
Can I build the Facebook ad itself inside ChatDaddy?
No, and nothing in ChatDaddy claims otherwise. A click-to-WhatsApp ad is created in Meta Ads Manager: objective Messages, destination WhatsApp, and you choose which of your numbers it opens a chat with. ChatDaddy owns everything after the click — the number the ad points at, the rule that greets the arrival, the flow that qualifies them, the tag that keeps them. Module 9, Step 13 covers checking the number is in good standing before you spend anything, which is the one preparation step people skip.
How do I tell poster leads apart from ad leads and website leads?
Give each door a different pre-filled message, and each phrase its own exact-match keyword rule. The QR on the poster says one sentence, the widget says another, the ad link says a third. Three rules, three execution logs, three counts you can compare — and no extra tooling. Leads arriving from a Meta ad additionally carry an Ad ID chip on their first message, which tells you which creative produced them (Module 9).
My keyword rule shows 0 executions but people are definitely messaging.
Almost always the phrase drifted. Compare the rule's keyword with the current pre-filled message character for character — a changed word, a stray full stop or an edited widget message will break an exact match while everything still looks correct. Check the rule is switched on in the Status column, and check its Channel: a rule scoped to one number will not answer somebody who messaged a different one. If the match is right but the phrasing invites people to write their own question, loosen the rule to Message Contains Text on a distinctive word instead.
What is the difference between the two Campaigns things in Marketing?
There is only one Campaigns tab, and it is coupons — a redeemable offer with codes, a public link and a redemption count. Broadcasts, on the other tab, is how messages get sent. A seasonal promotion normally uses both: build the coupon campaign, then broadcast its link to a segment. Neither one sends anything on its own.
Can I change the widget after it is installed on my site?
Yes — that is the point of the snippet. It only carries your team id and a configuration URL, so colours, wording, position and even the receiving channel are read from ChatDaddy each time it loads. Change them in the Widget Builder, press Save, and the live site follows. The code goes into your <head> once and never needs touching again. Be aware that Save publishes immediately, so make your edits in one pass rather than experimenting on a live site.
How many coupon codes should I upload?
Exactly as many as you are willing to honour, because that number is the hard cap — the campaign cannot issue a code it does not have. Work backwards from margin rather than from ambition: what is the largest number of these discounts you could serve in the promotion window without losing money or running out of stock? Upload that many, set an expiry date, and watch the redeemed/total figure on the Campaigns list as it fills.
➡️ Next: Module 11 — Customer Stories. Four businesses that run the machinery from Modules 1 to 10, and how to rebuild what worked for them on your own workspace.