
Academy Module 11 — Customer Stories: Rebuild What Worked for Them
The written walkthrough of Academy Module 11. Four ChatDaddy customers describe what they changed — keyword replies and flows, one shared inbox with an offline bot, tagged segments instead of blanket sends, and an AI chatbot on the repetitive half — and this article shows you where each piece lives in the app.
Also searched as: Academy Module 11 — Customer Stories: Rebuild What Worked for Them, What this module covers, Open the module and watch in order, Komi: catch the words that start a sale, Komi: hand the conversation to a flow, Sugarscarf: put the whole team on one queue, Sugarscarf: cover the hours nobody is working, MekarEmas: stop messaging everybody, MekarEmas: send to the segment, then read the result, KTIC Group: give the repetitive half to the AI, Check whether any of it actually worked, The four video lessons in this module, Common questions, Academy, Module
🎓 Part 11 of 11 — ChatDaddy Academy. This is the written version of the Customer Stories module: four video lessons, about 14 minutes of watching. Unlike the ten modules before it, this one teaches no new screen. It takes four customers' accounts of what they changed and points you at the page where each change is made. Watch the interviews on the Academy page and use this as the map.
Komi, Sugarscarf, MekarEmas and KTIC Group run very different businesses — a sales team, a retail brand, a jewellery retailer and a marketing agency. They arrived at strikingly similar setups. Each of them moved the repetitive part of the conversation off a person and onto something that runs on its own, then pointed the people who were freed up at the conversations that actually needed them. This article walks that same path in the order the four interviews take it, so you finish with a checklist rather than an impression.
📌 About the numbers in this module. 50% lower costs, 70% higher conversion, 10x more clients and 5x sales are figures the customers themselves give in their interviews. They are those businesses' own reported results, measured their own way, in their own market. They are not a ChatDaddy benchmark and nothing here promises you the same. What is worth copying is the setup behind them, which is what the rest of this article documents.
What this module covers
- Komi — catching a buying signal with a keyword reply, then handing it to a message flow
- Sugarscarf — one shared inbox for the whole team, and an offline bot for the hours nobody is working
- MekarEmas — tagging contacts into segments so a campaign goes to the right people instead of everybody
- KTIC Group — putting an AI chatbot on the repetitive half of the questions
- Reading whether any of it worked, on the Analytics dashboard
⏱️ Time needed: about 25 minutes to read, plus the videos. You need: a connected channel (Module 2) to try any of it, and a contact list worth segmenting (Module 7) for the MekarEmas steps. Every screen below is one you have already met earlier in the course — this module is where they get assembled.
Step-by-step
Step 1 — Open the module and watch in order
Click the graduation-cap icon in the left rail, then open Customer Stories at the bottom of the module list. The four interviews run 2:37 to 4:41 and are all marked Beginner — they describe decisions rather than demonstrate screens, which is why this written companion exists.
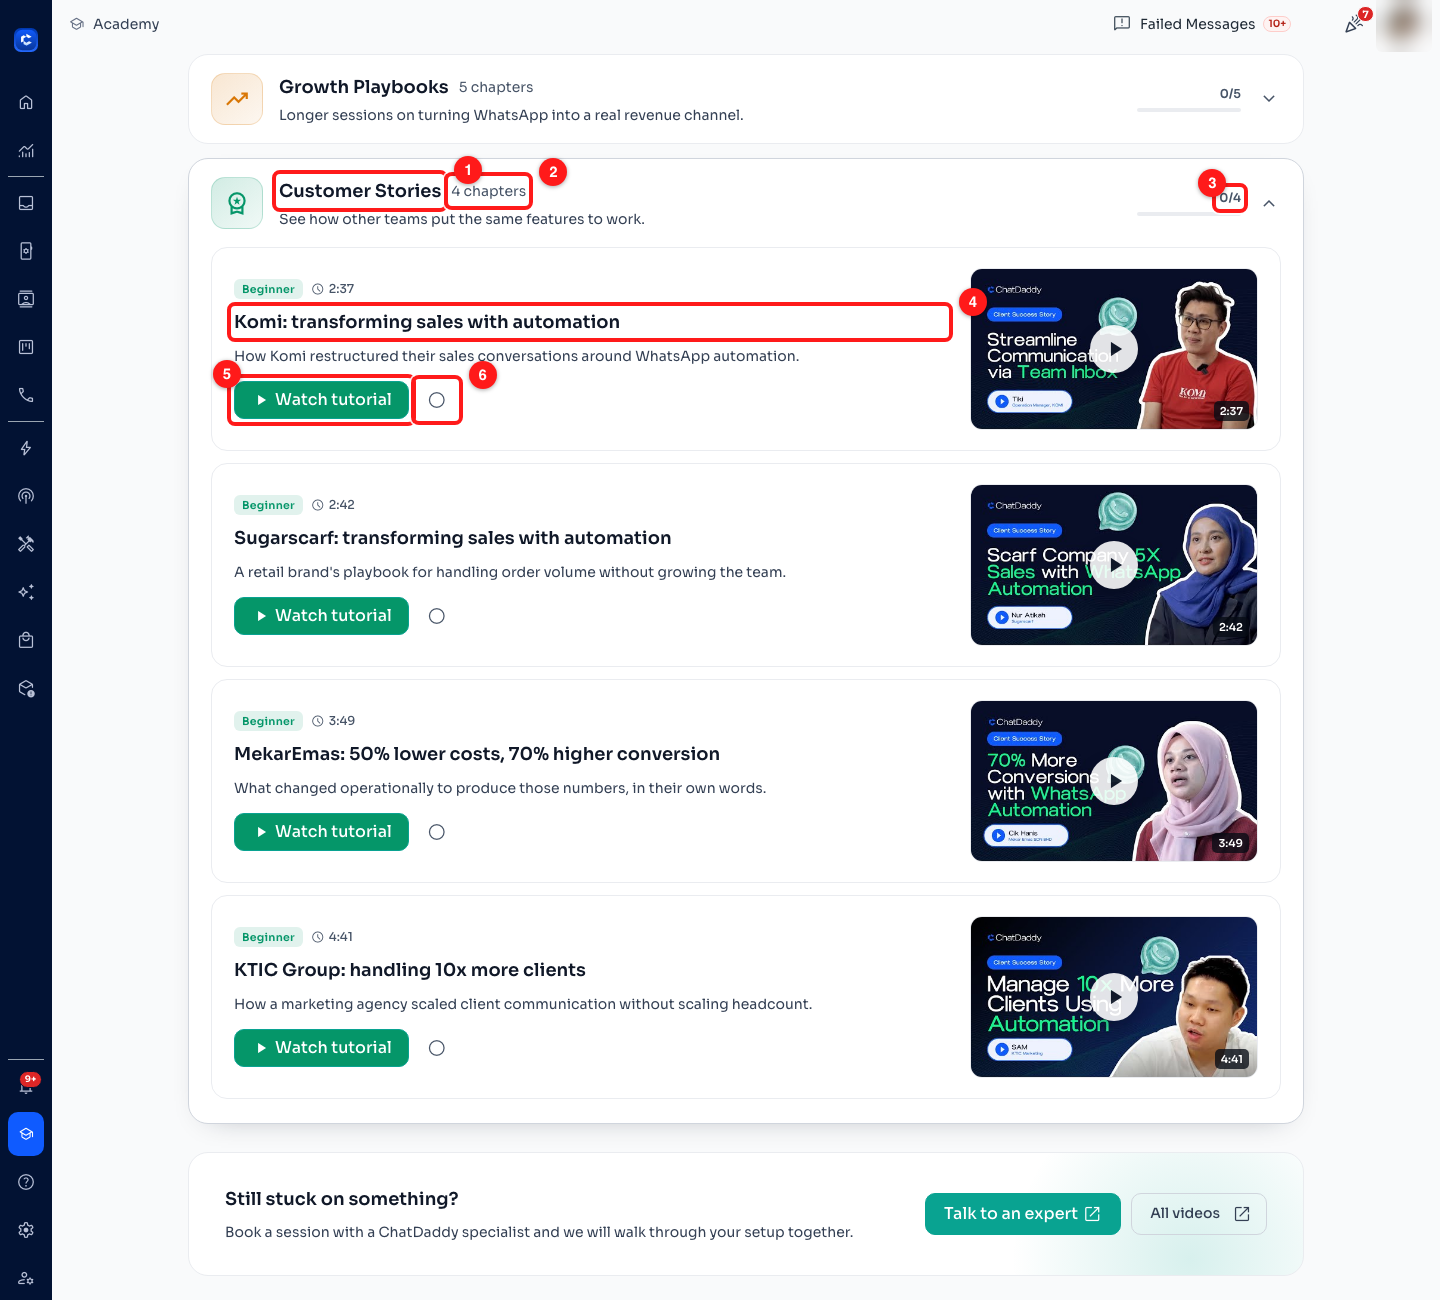
Step 1 — (1) the module, (2) it holds four chapters, (3) your progress through them, (4) the first interview, (5) Watch tutorial plays it without leaving ChatDaddy, (6) the circle marks a lesson watched.
- (3) 0/4 is your progress. It only moves when you tick (6) the circle beside a lesson — playing a video does not tick it for you.
- (5) Watch tutorial opens the interview in place. The same videos are linked at the bottom of this article if you would rather watch them on YouTube.
- Take them in the listed order. Komi and Sugarscarf set up the automation the later two stories assume is already running.
Step 2 — Komi: catch the words that start a sale
Komi's account is about response time. Their sales conversations kept dying in the gap between a customer asking a price and somebody being free to answer. The first half of their fix is the cheapest automation in ChatDaddy: a keyword reply that answers the question the moment it is asked. Open Automation in the left rail and choose the Keyword Reply tab.
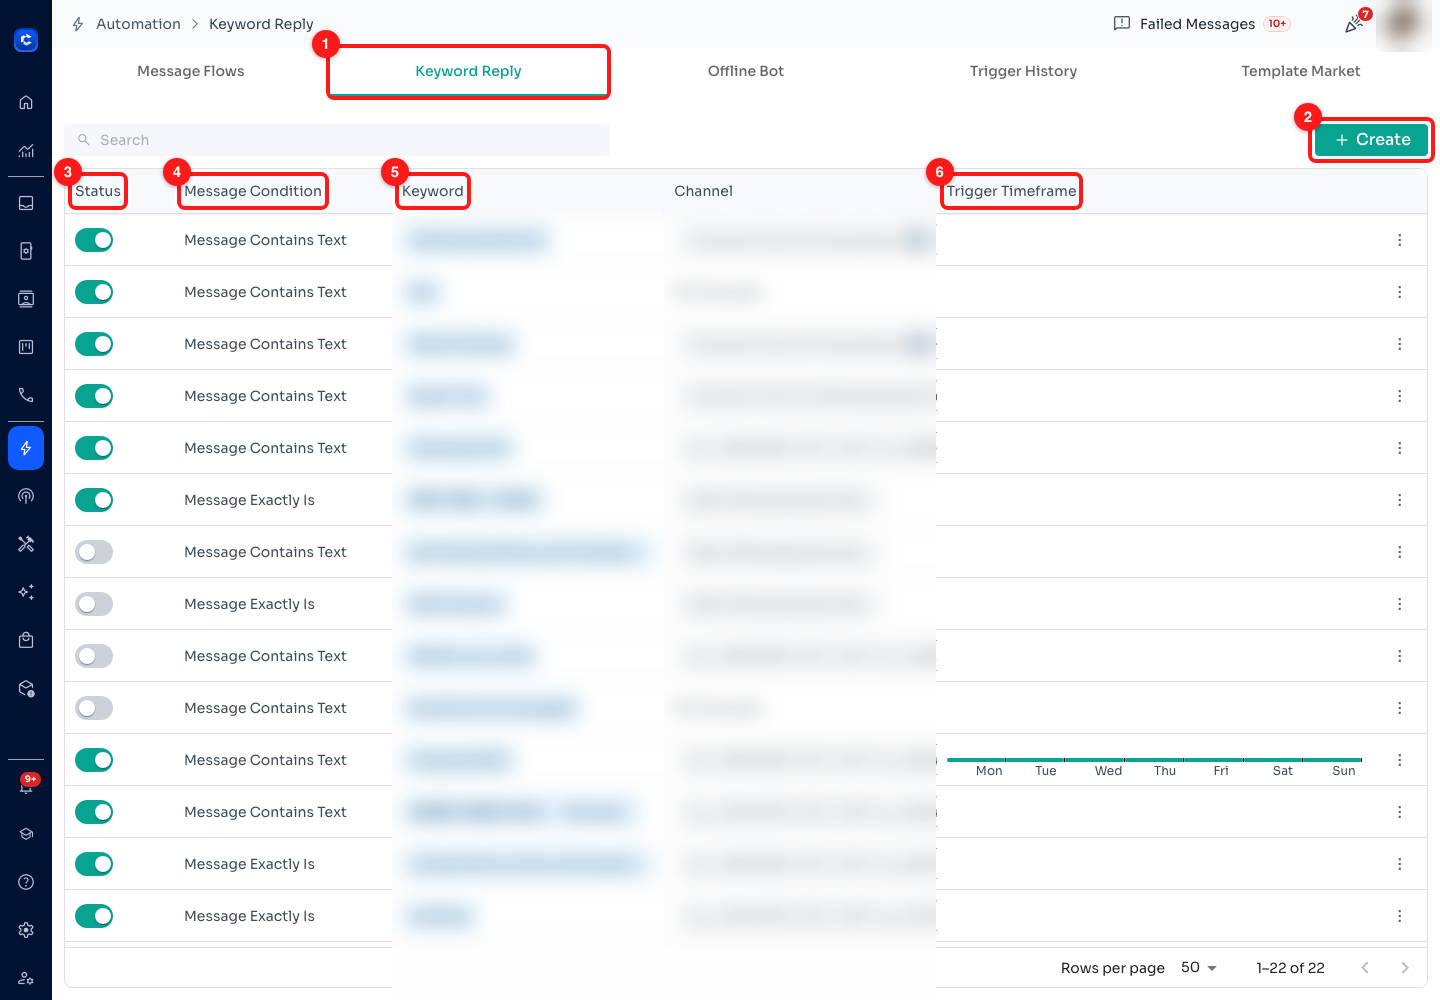
Step 2 — (1) the Keyword Reply tab, (2) Create a new one, (3) the on/off switch per rule, (4) Message Condition, (5) the Keyword column, (6) Trigger Timeframe. Keywords and channel names are blurred — they are this team's live rules.
- (4) Message Condition decides how strictly the rule matches. Message Contains Text fires when the words appear anywhere in the message; Message Exactly Is fires only on an exact match. Contains is what you want for a price enquiry, because nobody types the same sentence twice.
- (5) Keyword holds the words themselves — one rule can carry a whole list of them, so a single rule can cover price, how much, pm and details at once.
- (6) Trigger Timeframe limits a rule to certain days and hours. Leave it empty and the rule is always live.
- (3) The switch turns a rule off without deleting it. Useful when a promotion ends and you want the rule back next month.
💡 Start with the questions your team answers most often, not the ones you wish customers asked. Look through a week of your own inbox and count. The three or four phrases that keep recurring are your first three or four rules, and they are usually about price, stock, opening hours and location.
Step 3 — Komi: hand the conversation to a flow
A one-line reply answers a question. It does not move a sale forward. The second half of Komi's change is that the keyword hands over to a message flow — a sequence that asks the qualifying questions, waits for answers and only then involves a person. Open the Message Flows tab.
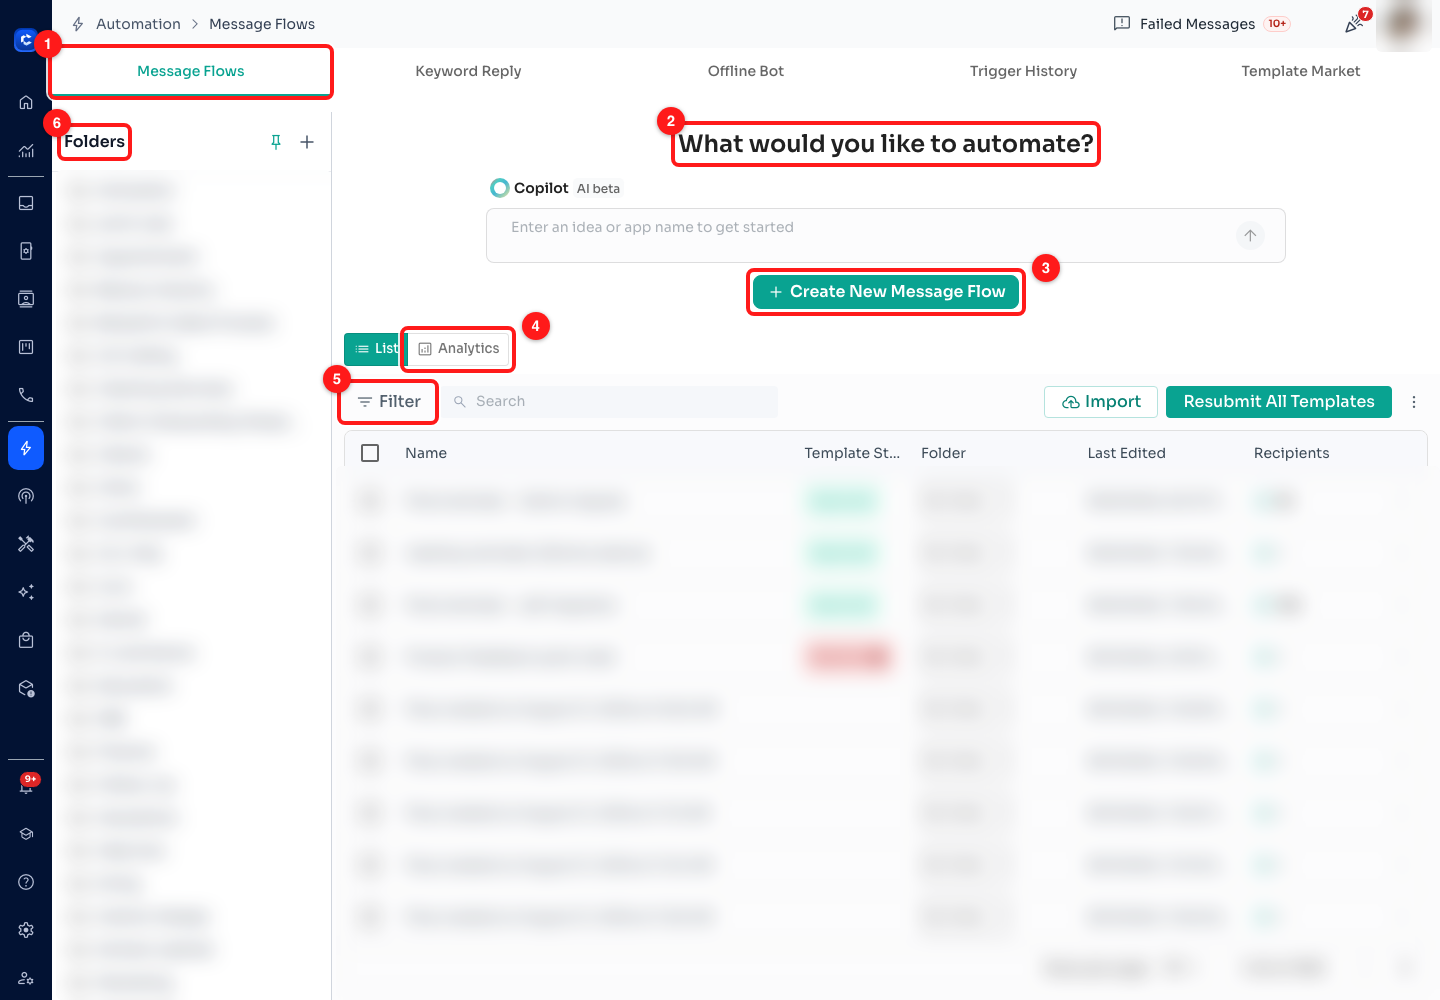
Step 3 — (1) the Message Flows tab, (2) the Copilot prompt, (3) Create New Message Flow, (4) the Analytics view, (5) Filter, (6) the Folders panel. Flow names and folder names are blurred.
- (3) Create New Message Flow opens the builder covered in full in Module 6. This module is only concerned with what you point the flow at.
- (2) Copilot (marked AI beta) takes a plain-English description of what you want to automate and drafts the flow for you. A reasonable first draft to edit, not a finished flow to switch on unread.
- (4) Analytics switches the list into a performance view, so you can see which flows people actually complete. This is the honest test of a flow — one that everybody abandons at question three is worse than no flow.
- (6) Folders keep flows organised once there are more than a handful. Worth doing early; the list grows faster than you expect.
⚠️ A flow that is live is talking to real customers. Build and test on a channel or a contact you control before you attach it to a keyword that fires on your busiest question — a flow with a wrong turn in it will run that wrong turn hundreds of times before anybody notices.
Step 4 — Sugarscarf: put the whole team on one queue
Sugarscarf's problem was volume, not speed. Orders arrived faster than the team could grow, and the number sat on one phone that one person had to hold. The change that made the rest possible was moving to the shared Inbox, where the same conversation list is visible to everybody and each chat can be assigned to a named person.
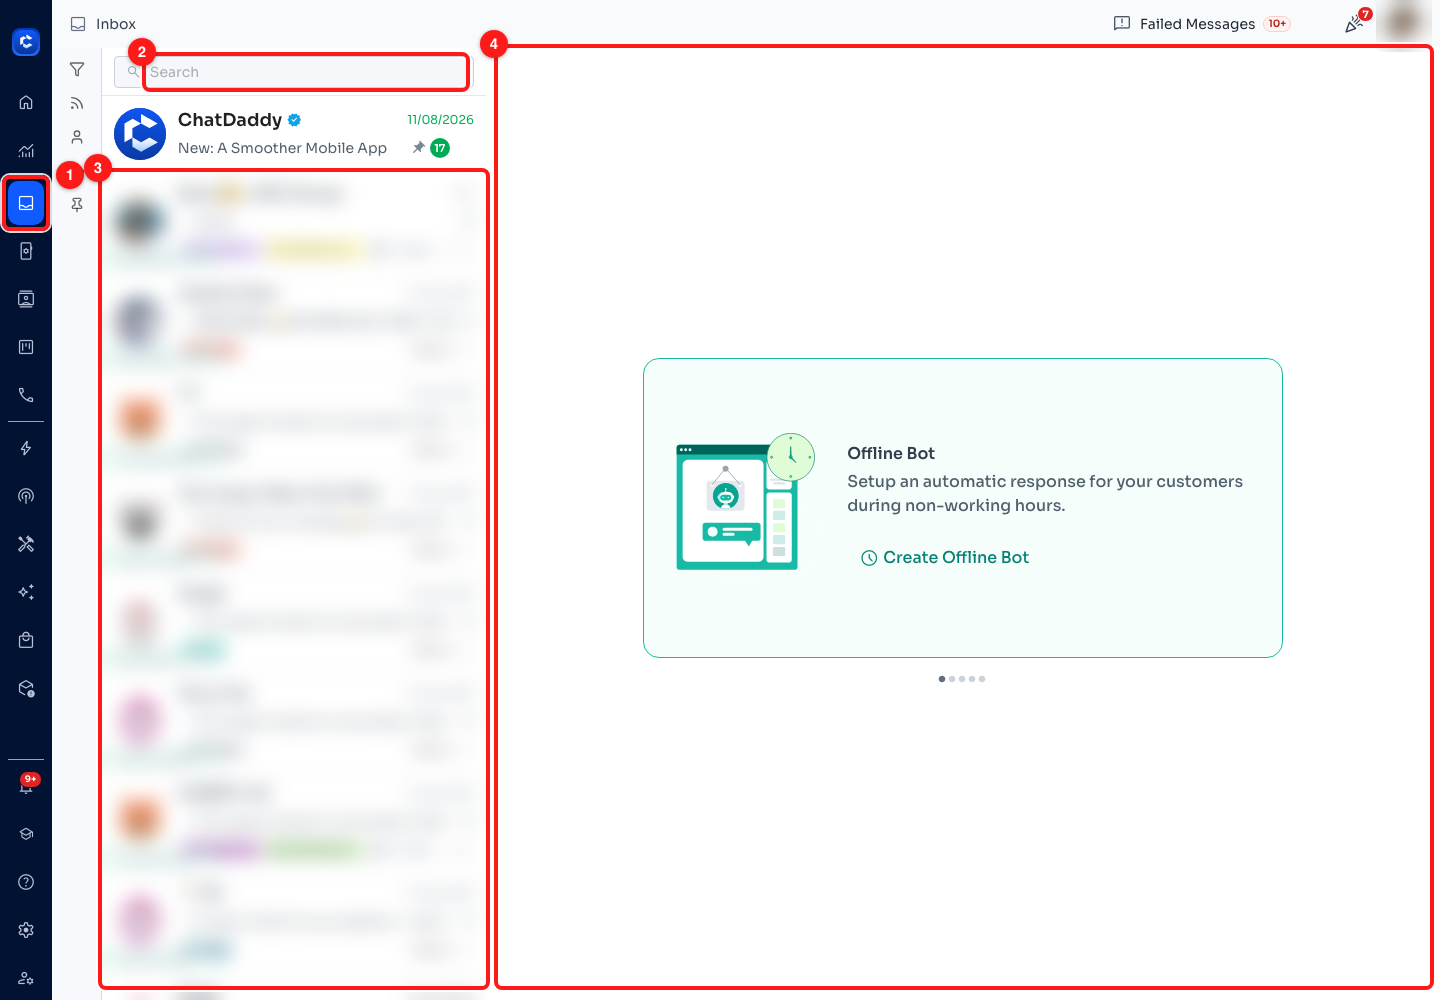
Step 4 — (1) Inbox in the left rail, (2) search across conversations, (3) the shared conversation list, (4) the reading pane, shown here with nothing selected. Every conversation in the list is blurred — it is live customer traffic.
- (3) The conversation list is the queue. It is the same list for every teammate, which is the entire point: no chat lives on one person's phone any more.
- Each row carries its tags and an Assign control, so a conversation can be routed to a person and labelled for later without opening it.
- (2) Search looks across conversations — the fastest way back to a customer whose name you half-remember.
- Assignment, tagging, canned replies and the rest of the day-to-day Inbox craft are Module 3 of this course. Sugarscarf's story is simply the argument for using it.
Step 5 — Sugarscarf: cover the hours nobody is working
A shared queue only helps while somebody is watching it. The second half of Sugarscarf's setup is the Offline Bot, which replies outside your business hours so an overnight enquiry is answered rather than found stale the next morning. Open Automation → Offline Bot.
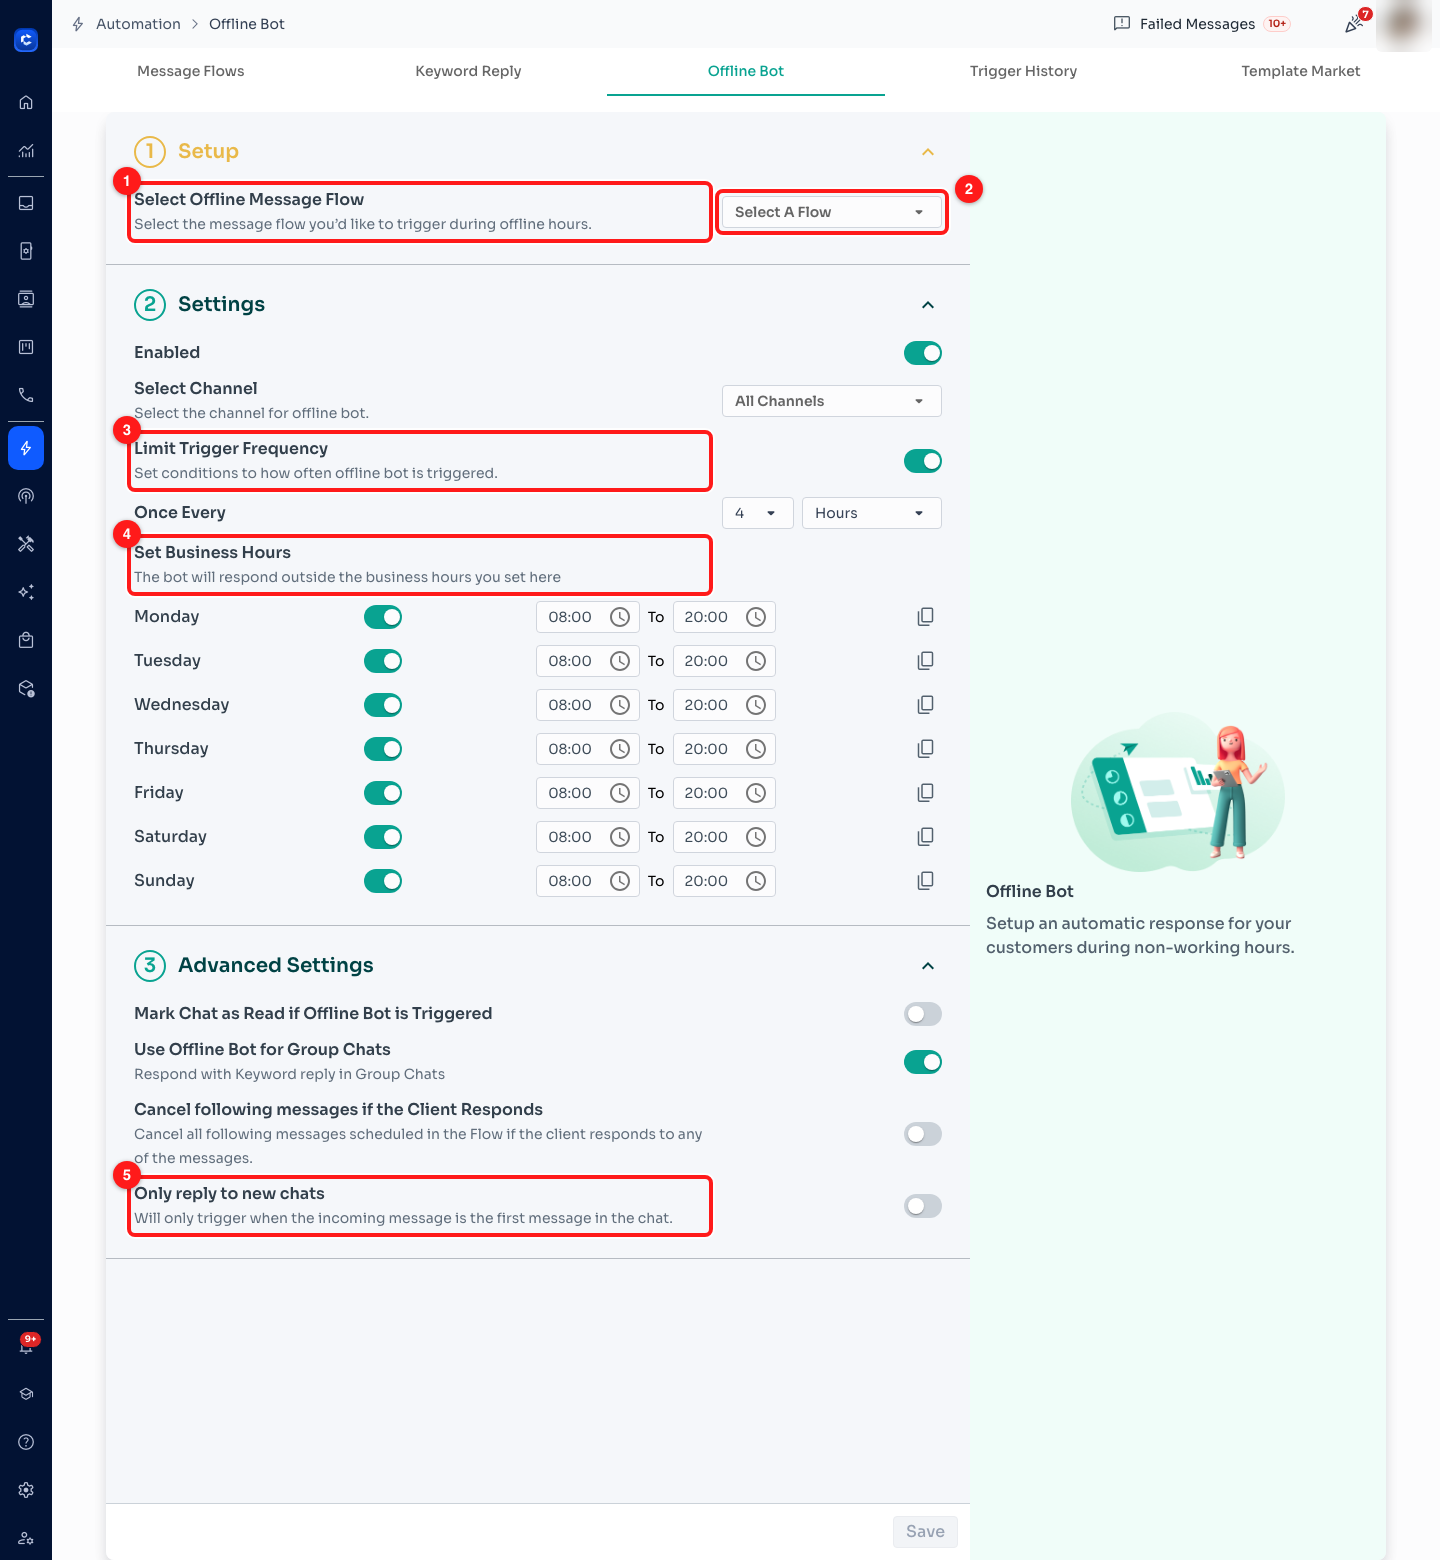
Step 5 — (1) the flow that runs when you are closed, (2) the flow picker, (3) Limit Trigger Frequency, (4) Set Business Hours, (5) Only reply to new chats.
- (1) and (2) Select Offline Message Flow — the offline bot does not hold its own message text. It triggers a message flow you have already built, so write that flow first or the picker has nothing to offer.
- (4) Set Business Hours is the part everyone gets backwards: the bot replies outside the hours you set here, so these are the hours you are open. Each weekday has its own switch and its own from/to times, and the copy button beside a row applies that row's times to the others. A bot you have never configured starts at 08:00 to 20:00, all seven days — which is what this screenshot shows, so change every row that is not actually your week.
- (3) Limit Trigger Frequency caps how often the bot fires again, so a burst of midnight messages does not produce a burst of identical auto-replies. It arrives switched on at once every 4 hours, which is a sensible place to leave it.
- (5) Only reply to new chats restricts the bot to the first message in a chat, so a returning customer is not greeted with the out-of-hours notice again.
🕐 The hours are saved with a time-zone offset attached, so they mean what they meant on the machine that set them — not what they would mean to a customer in another country. If you sell across time zones, decide whose working day the bot is describing, and say so in the message: "we are closed" is confusing to somebody for whom it is the middle of the afternoon.
🔁 One small trap on this page: if you switch Limit Trigger Frequency off and then back on again, it comes back at once every 1 hour, not the 4 hours it started on. The switch does not remember what you had. Check the number after you flick it, not just the switch.
👥 Advanced Settings holds three more switches worth a look: Use Offline Bot for Group Chats, Mark Chat as Read if Offline Bot is Triggered and Cancel following messages if the Client Responds. The last one is the kind one — it stops the rest of a scheduled sequence the moment a real person replies.
Step 6 — MekarEmas: stop messaging everybody
MekarEmas frame their change as a cost change. Sending on the WhatsApp Business API is not free, and a campaign blasted at your whole list costs you for every recipient — including everyone who was never going to buy. Their fix was to send less, to better-chosen people, which starts on the Contacts page with tags.
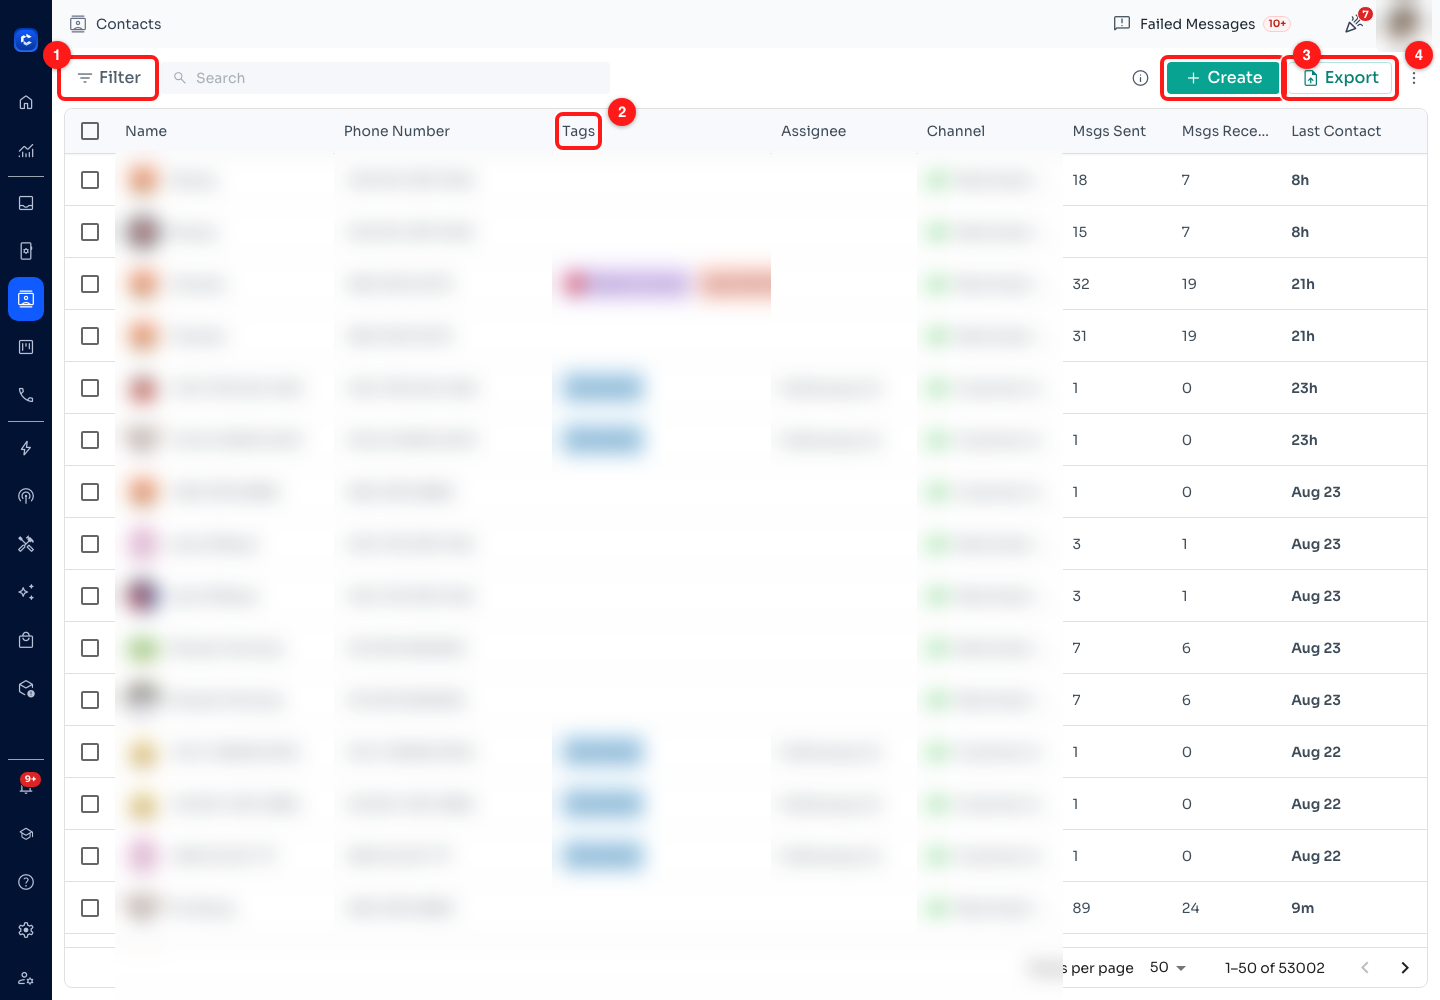
Step 6 — (1) Filter, (2) the Tags column, (3) Create a contact, (4) Export. Names, phone numbers, tag values, assignees and channels are all blurred.
- (2) Tags are the labels you group people by — bought-before, asked-about-price, trial-expired. A contact can carry as many as you like.
- (1) Filter turns those tags into a segment: everybody with this tag, on that channel, last contacted within so many days. That filtered set is what a broadcast sends to.
- The list also shows Msgs Sent, Msgs Received and Last Contact per contact — enough on its own to separate people who talk to you from people who never reply.
- Tags, custom fields, importing and the tag-by-message-history tool are Module 7 in full. If your contacts are untagged today, that is the module to do before this step means anything.
Step 7 — MekarEmas: send to the segment, then read the result
With a segment defined, the send itself happens under Marketing → Broadcasts. The half of this screen that matters for MekarEmas' story is not the Create button — it is the Progress column, which is where you find out whether the segment was any good.
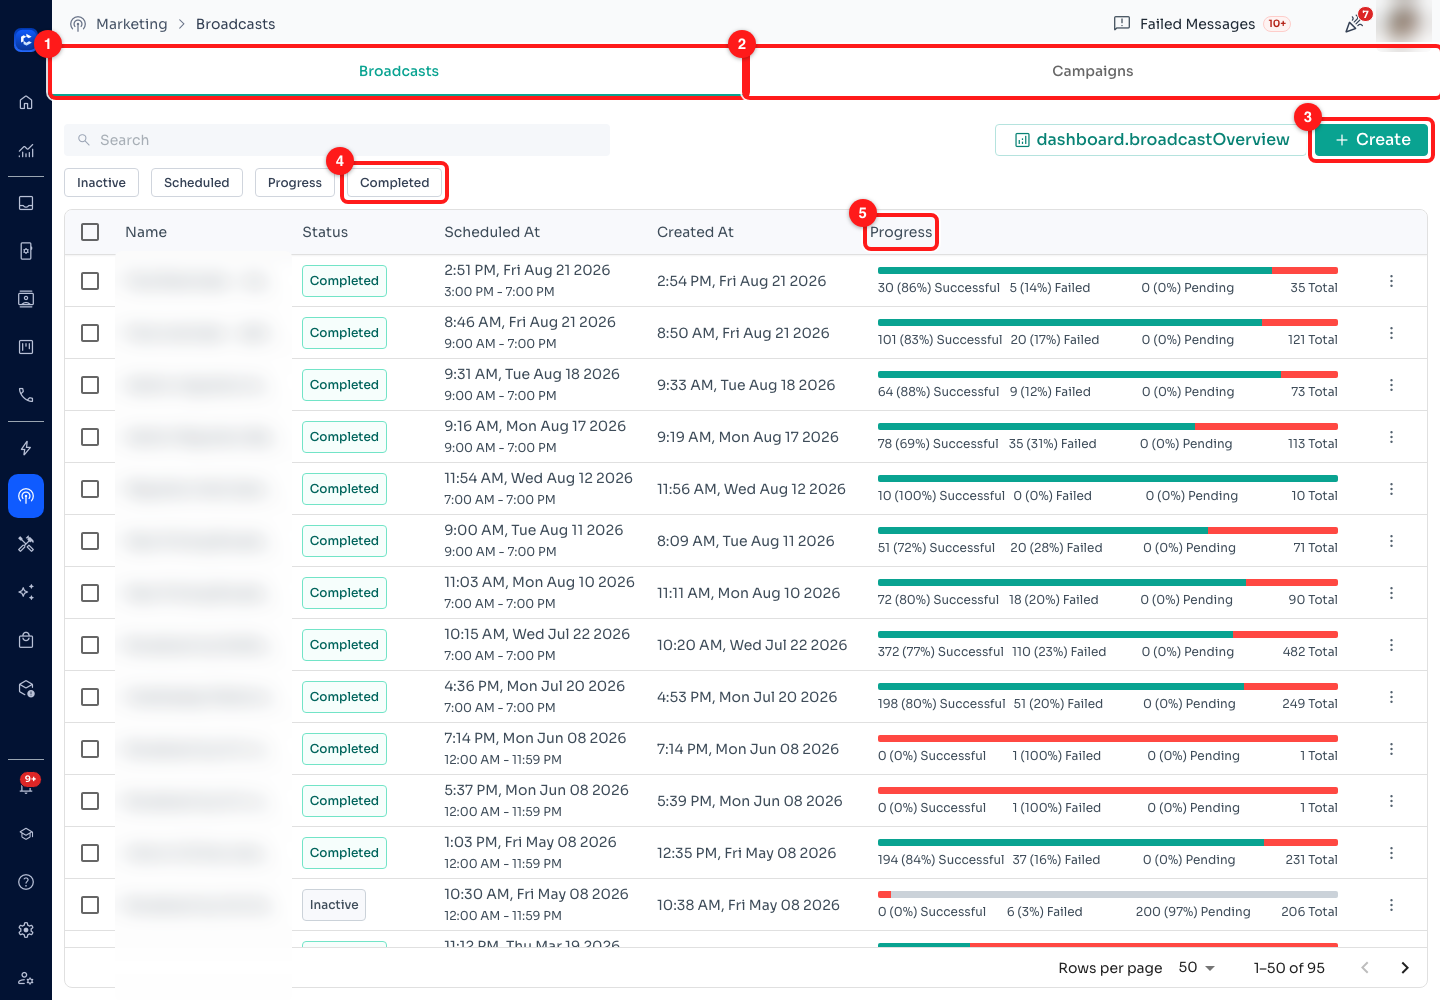
Step 7 — (1) the Broadcasts tab, (2) the Campaigns tab, (3) Create, (4) the Completed status filter, (5) the Progress column. Broadcast names are blurred.
- (5) Progress breaks every send into Successful, Failed and Pending with both a count and a percentage. Compare that failure percentage across sends: a broadcast that fails far more often than your others is usually pointed at a stale segment rather than suffering a delivery problem.
- (4) The status chips — Inactive, Scheduled, Progress, Completed — filter the list. Scheduled is the one to check before you leave for the day.
- (2) Campaigns is the multi-step sibling of a one-off broadcast.
- Building and scheduling a broadcast, and the template rules Meta applies to it, are Module 4 of this course.
💸 This is the step where a mistake costs real money. Sending to 50,000 contacts instead of the 5,000 you meant is a bill you cannot recall, and a lot of people annoyed at once. Apply the filter on the Contacts page first, read the count it gives you, and confirm that number is the one you intended before you schedule. Check the current per-message rates on your Billing page rather than assuming last year's.
Step 8 — KTIC Group: give the repetitive half to the AI
KTIC Group are an agency, so their constraint is people: taking on more clients meant more conversations, and more conversations meant more staff. Their account is about breaking that link. Keyword replies handle questions you can predict; an AI chatbot handles the ones you cannot, by answering from material you have given it. Open AI in the left rail.
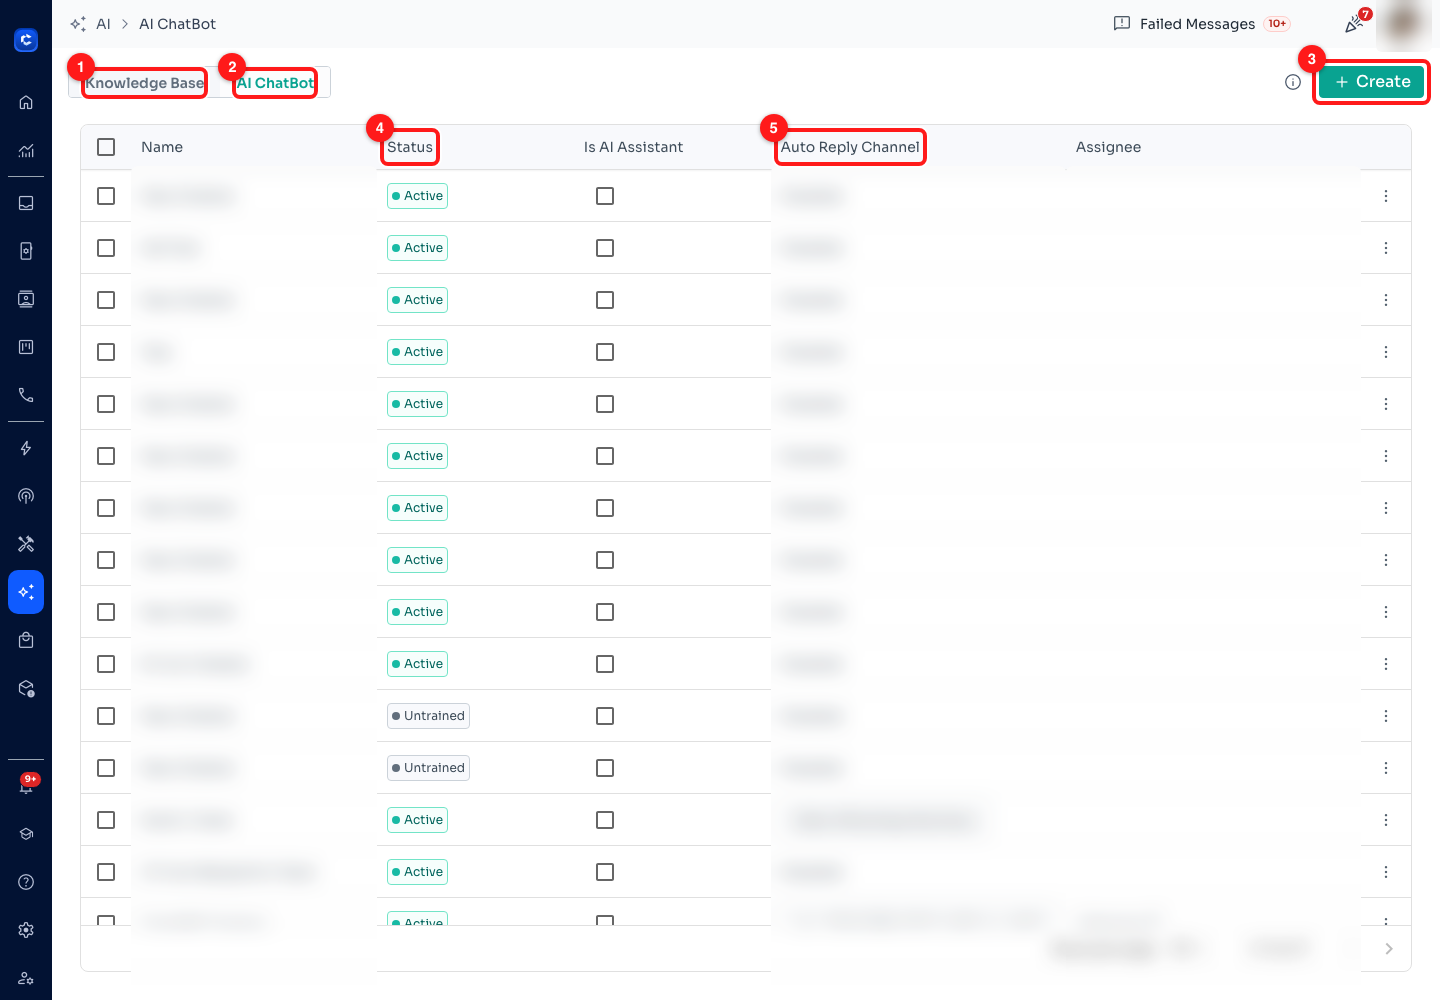
Step 8 — (1) the Knowledge Base tab, (2) the AI ChatBot tab, (3) Create, (4) the Status column, (5) Auto Reply Channel. Chatbot names, channels and assignees are blurred.
- (1) Knowledge Base comes first in the order of work, whatever the tab order suggests. It is the material the bot answers from — your pricing, your policies, your FAQs. A bot with nothing behind it invents answers.
- (4) Status reads Untrained until the bot has been trained on that material, and Active once it is live. An Untrained bot is not answering anybody.
- (5) Auto Reply Channel is which channel the bot picks up. Point a new bot at one channel, watch what it says for a few days, and widen it only once you trust it.
- Is AI Assistant is a separate job from auto-replying. A bot with this ticked is the one that suggests replies to your agents inside the Inbox composer — the agent still sends, edits or ignores it. Only one chatbot per team can hold the role. If the thought of an AI answering unsupervised makes you nervous, this is where to start: suggestions to your team first, auto-reply on a channel later.
🤝 None of the four businesses describe replacing their team with a bot. Each of them describes the bot taking the questions that have one right answer, so the people are left with the conversations that need judgement. Decide in advance which questions you are willing to hand over, and make sure a customer can still reach a human — Module 5 covers handover and the escalation settings.
Step 9 — Check whether any of it actually worked
Every claim in these four interviews is a before-and-after. You cannot make one without a before, so this is the step to do first if you are starting today: open Analytics, note where you are now, and come back in a month. Without that reading, an improvement is just a feeling.
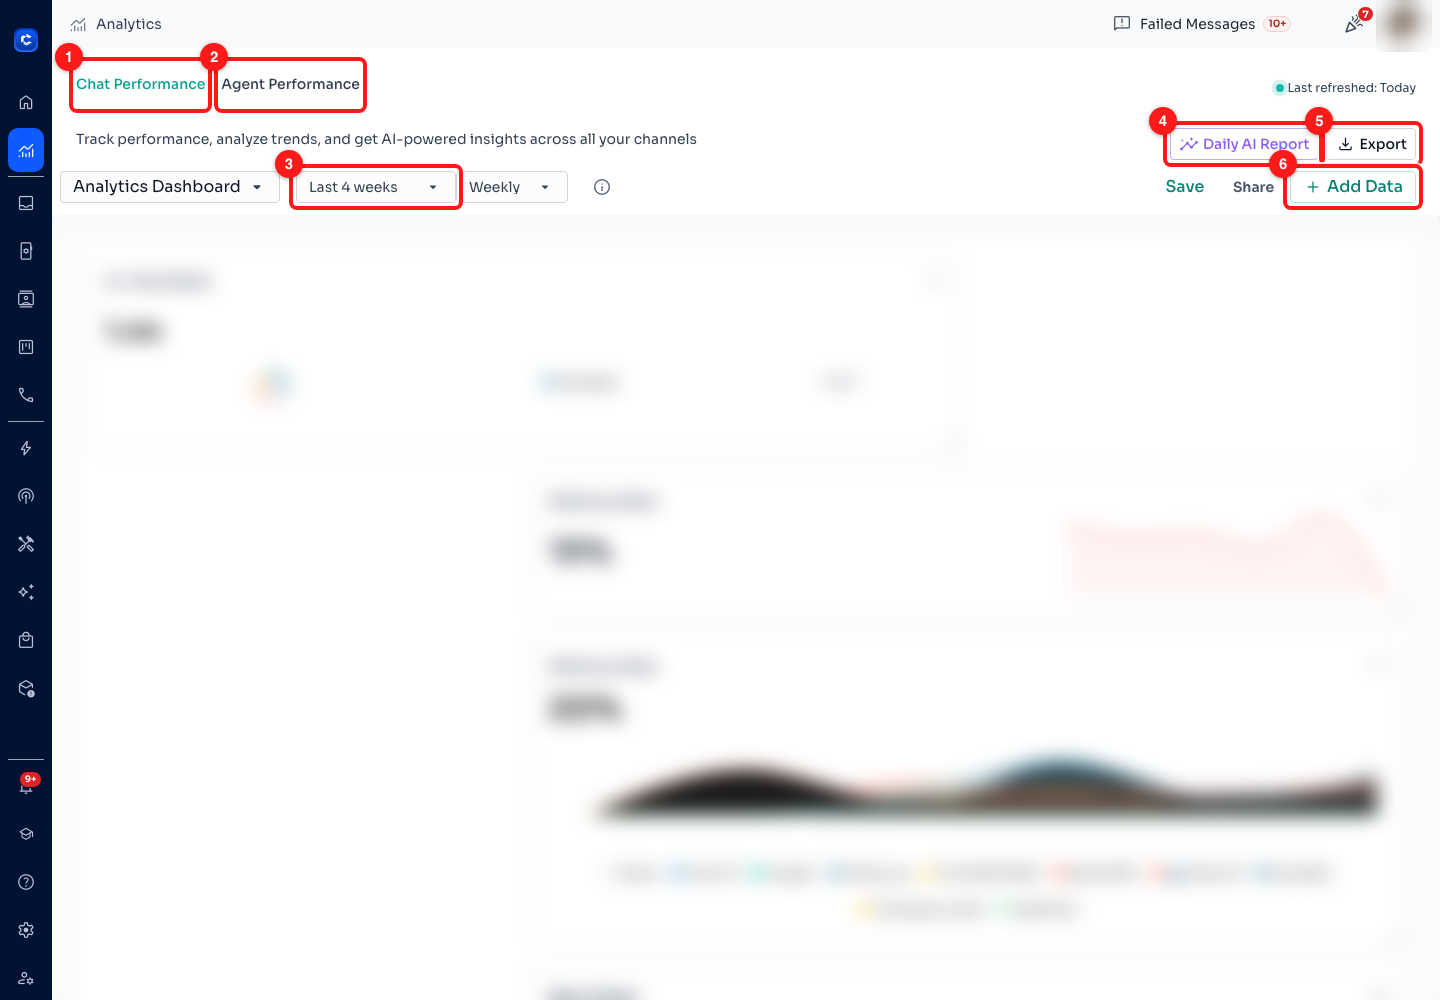
Step 9 — (1) Chat Performance, (2) Agent Performance, (3) the date range, (4) Daily AI Report, (5) Export, (6) Add Data. The widget bodies are blurred; they carry this team's own figures.
- (1) Chat Performance is the conversation side — volume, delivery and the ratio of messages in to messages out. (2) Agent Performance is the team side.
- (3) The date range (shown here as Last 4 weeks) and the granularity beside it (Weekly) set what the whole dashboard is measuring. Change the range before you compare anything, and compare like with like.
- (6) Add Data adds a widget to the dashboard, and the dashboard can be saved and shared — so the numbers you decide to watch are the ones that greet you each morning.
- (5) Export takes the figures out for a report; (4) Daily AI Report produces a written summary of the period.
- Module 8 covers this dashboard properly. For this module you need only one thing from it: a written-down starting point.
📉 Pick two or three numbers and stay with them. Response time, the ratio of messages in to messages out, and broadcast delivery rate are enough to tell whether the changes in this module are working. A dashboard with twenty widgets on it gets read once.
The four video lessons in this module
Each interview opens inside ChatDaddy from the Academy page, or on YouTube using the links below.
- Komi: transforming sales with automation · 2:37 · restructuring sales conversations around WhatsApp automation — Steps 2 and 3.
- Sugarscarf: transforming sales with automation · 2:42 · a retail brand handling order volume without growing the team — Steps 4 and 5.
- MekarEmas: 50% lower costs, 70% higher conversion · 3:49 · what changed operationally to produce those numbers — Steps 6 and 7.
- KTIC Group: handling 10x more clients · 4:41 · an agency scaling client communication without scaling headcount — Step 8.
Common questions
Where do I start if I want to copy one of these setups?
Step 9, then Step 2. Take a reading on the Analytics dashboard first so you have a before, then build one keyword reply for the question your team answers most often. It is the smallest change with the most visible effect, it takes a few minutes, and it costs nothing if you get it wrong. Everything else in this module is larger, and all of it is easier to justify once you can point at one thing that already worked.
Are the results in these videos typical?
There is no way to tell from inside ChatDaddy, and this article will not pretend otherwise. These are four customers who agreed to be interviewed, describing results they measured themselves — that is a selected group by definition, and none of the figures can be checked against the product. Treat the numbers as their outcome and the setup as the transferable part. Your own before-and-after on the Analytics dashboard is the only figure that tells you anything about your business.
Do I need all four of these things running at once?
No, and trying to is the most common way this goes wrong. Each story is one change, and the four stack in a sensible order: catch the common questions with keyword replies, cover the closed hours with an offline bot, tag your contacts so campaigns go to a segment, and only then put an AI chatbot on what is left. Adding them one at a time is also the only way to know which one moved the number.
What is the difference between a keyword reply and an AI chatbot?
A keyword reply matches words you chose and sends text you wrote, so it is exact, free of surprises and completely predictable — but it only handles the questions you thought of. An AI chatbot answers from a knowledge base in its own words, so it handles phrasings you never anticipated, and needs training material and supervision in return. Most of the setups in this module use both: keyword replies on the handful of questions that dominate, a chatbot behind them for the long tail.
My offline bot is replying during working hours.
The business hours on the Offline Bot page are the hours you are open, and the bot fires outside them — so a bot replying at 11am usually means Monday to Friday were filled in as the closed hours by mistake, or that a weekday's switch is off, which makes that whole day count as closed. Check the switch on each row as well as the times. If the rows look right, check the time zone next: the hours carry the offset of the machine that saved them, so hours set by a colleague in another country will not line up with your clock.
🎉 That is the whole course. Eleven modules, from connecting your first channel to reading what your automations did. You now have the same pieces the four businesses in this module used — the difference between their setup and yours is only which ones you have switched on. Pick the one change from this module that fits your worst bottleneck and do that one this week. If you get stuck, Talk to an expert at the bottom of the Academy page books a session with a ChatDaddy specialist who will walk through your setup with you.