
Academy Module 3 — Team Inbox: Work Every Conversation as a Team
The written walkthrough of Academy Module 3. Filter and read the shared inbox, start a chat with a number that has never written in, assign conversations by hand or automatically, use templates, schedule replies, leave internal notes, and set up Incognito Mode.
Also searched as: Academy Module 3 — Team Inbox: Work Every Conversation as a Team, What this module covers, Cut the list down with the filter panel, Read a chat row before you open it, Open a conversation, Start a chat with somebody who has never messaged you, Open the chat from the contact record, Assign a chat by hand, Let ChatDaddy do the assigning, Know your composer, Send a template when the window has closed, Write now, send later, Leave a note the customer cannot see, Incognito Mode and the rest of Inbox Settings, The nine video lessons in this module
🎓 Part 3 of 11 — ChatDaddy Academy. This is the written version of the Team Inbox module: nine video lessons, about 23 minutes of watching, turned into steps you can follow on screen. You can read it on its own, or keep it open beside the videos on the Academy page.
Module 1 got you a workspace and Module 2 got you a healthy channel. The Inbox is where the work actually happens: every message from every channel lands in one list, and your whole team works it together. This module is about the four things that stop a shared inbox turning into chaos — knowing which chats are yours, getting each one to the right person, replying without retyping the same thing, and leaving your colleagues the context they need.
What this module covers
- The filter panel — folders, channels, assignees, tags and pinned filters
- Reading a chat row, and what each part of it tells you before you open it
- The anatomy of a conversation: header actions, thread, composer and profile panel
- Starting a chat with a number that has never messaged you
- Assigning a chat by hand, and setting up auto-assign so you do not have to
- Sending an approved template when the 24-hour window has closed
- Scheduling a reply for later, and cancelling it if the customer replies first
- Internal notes your teammates can see and your customer cannot
- Incognito Mode and the rest of the Inbox Settings
⏱️ Time needed: about 25 minutes to read and try. You need: a connected channel (Module 2) and, for the assignment steps, at least one teammate invited (Module 1). Everything below is on the Inbox except auto-assign, which lives on the Channels page, and starting a new chat, which begins in Contacts.
Step-by-step
Step 1 — Cut the list down with the filter panel
Open the Inbox from the left rail. On a busy account the list is long, so the first thing to learn is the narrow strip of icons to the left of it. Click the funnel at the top of that strip and the filter panel slides out.
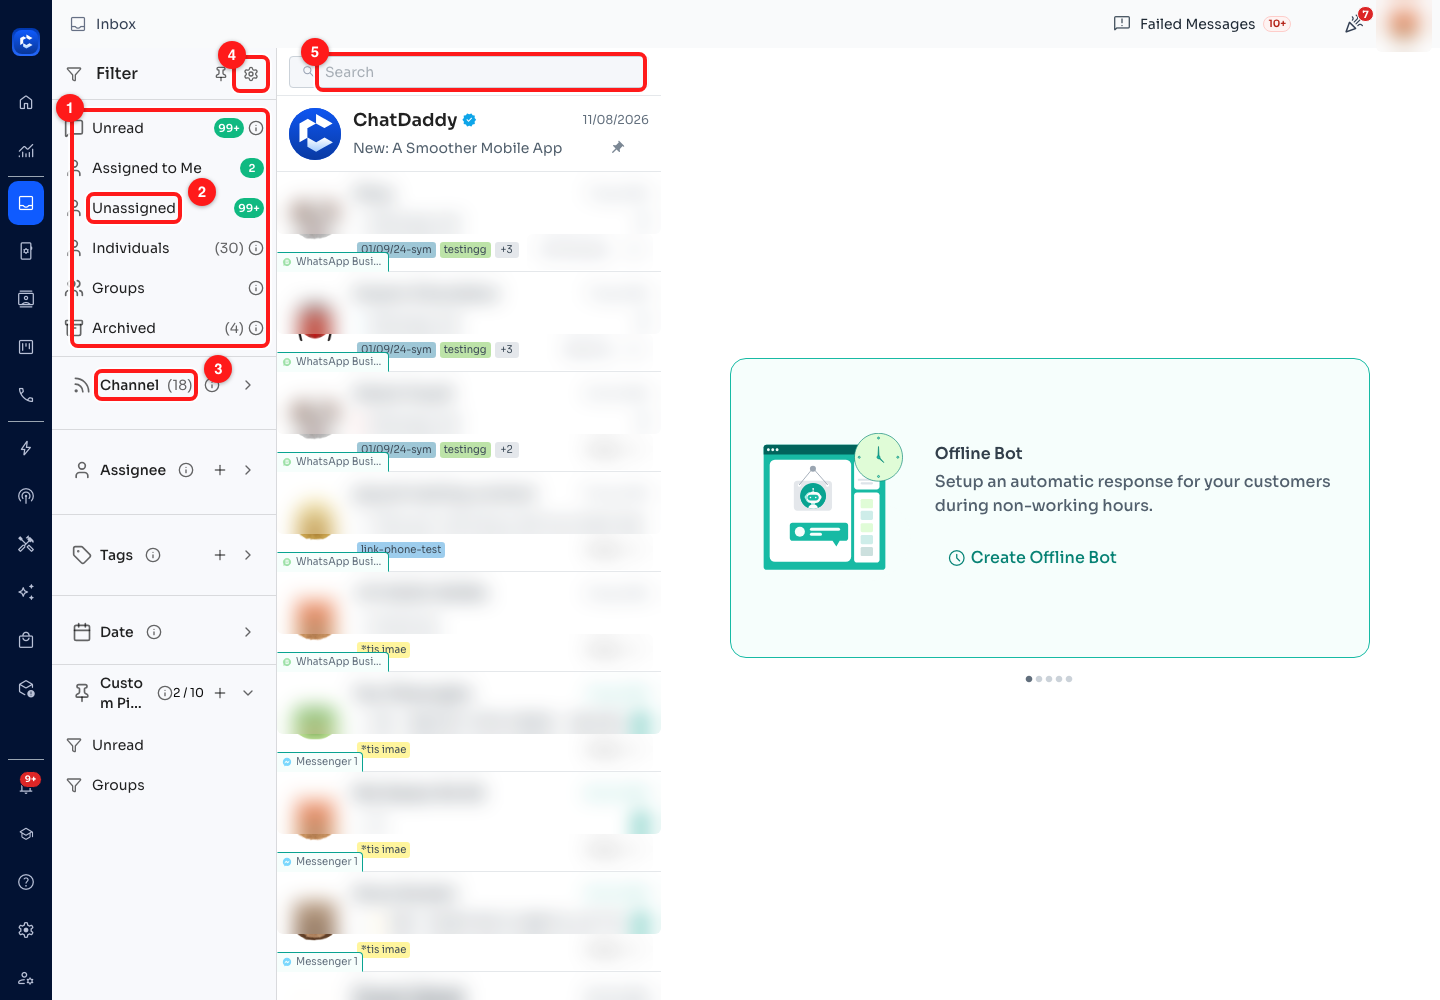
Step 1 — (1) the folders, (2) Unassigned, (3) filter by channel, (4) the Inbox Settings cog, (5) search. Contact names, message previews and avatars are blurred throughout this article.
- (1) The folders — Unread, Assigned to Me, Unassigned, Individuals, Groups and Archived, each with a live count beside it. Assigned to Me is the one to live in once your team starts assigning; it is your personal queue.
- (2) Unassigned is the shared queue — every chat nobody has taken yet. If one person is on duty, this is the folder they work down. It is also the number to watch: a growing Unassigned count is the clearest sign that routing is not set up properly.
- (3) Channel filters to one connected number. Below it sit Assignee, Tags and Date, which combine — unassigned, tagged "refund", on the support number, this week is a normal thing to ask for.
- (4) The cog opens Inbox Settings, which is Step 12. The pin beside it keeps the panel open instead of letting it slide shut when your pointer leaves.
- (5) Search looks across your chats by contact and message content.
📌 A filter you build often is worth pinning. Custom Pinned filters at the foot of the panel saves the current combination under a name and puts it on the top bar — the test workspace in the screenshot has 2 of a possible 10 pinned. The + beside Assignee and Tags saves those individually.
Step 2 — Read a chat row before you open it
Each row in the list carries four pieces of information, and reading them saves you opening chats that are not yours to answer.
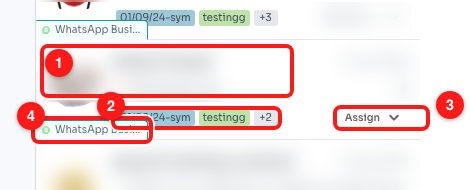
Step 2 — one row, close up: (1) who and what they last said, (2) the tags on the chat, (3) the assignee, (4) which channel it arrived on.
- (1) Contact, last message and time. A bold name means unread. The little tick or arrow before the preview tells you whether the last message was yours or theirs.
- (2) Tags. Colour-coded labels you apply yourself — the same tags you filter by in Step 1. A chat can hold several; the list shows the first few and a +2 style counter for the rest.
- (3) The assignee. A teammate's name when the chat is taken. When it is not, the slot reads Assign — click it right there in the list to hand the chat to somebody without opening it. That dropdown is Step 6.
- (4) The channel chip. Which of your connected numbers this conversation came in on. With several channels in one inbox this is the difference between answering as your support line and answering as your sales line.
Step 3 — Open a conversation
Click a row. The screen splits into four working areas, and it is worth knowing what each one is for before you start replying.
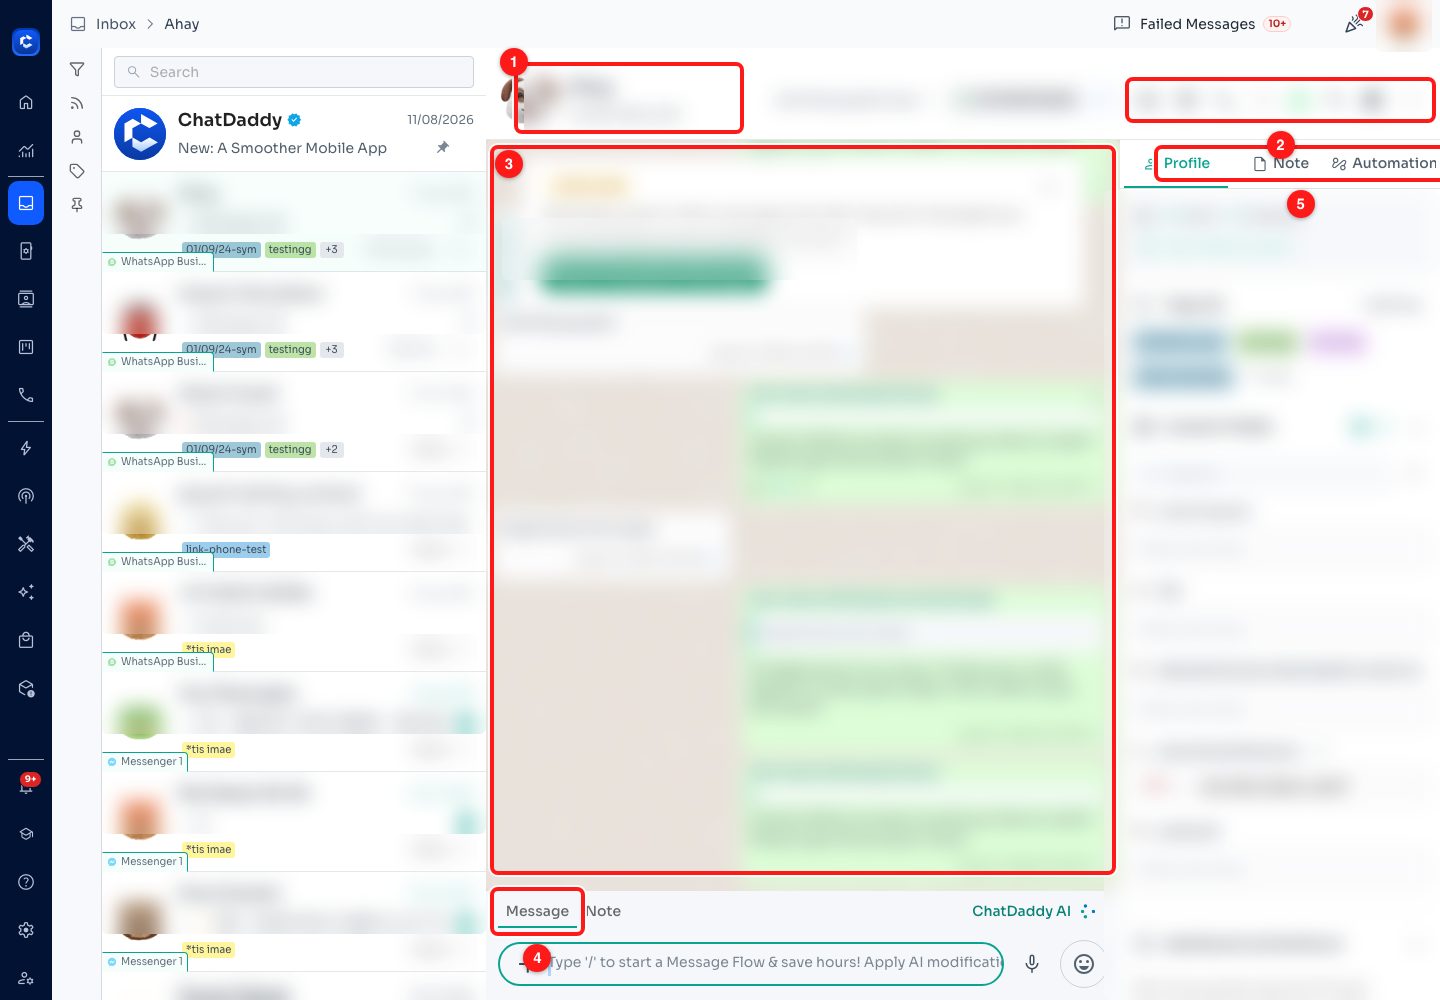
Step 3 — (1) who you are talking to, (2) the chat actions, (3) the message thread, (4) the composer tabs, (5) the profile panel tabs.
- (1) Identity — the contact's name and number, and the channel this conversation is on. The channel selector beside the name is how you check you are about to reply from the right number.
- (2) Chat actions, left to right: Open Ticket raises a CRM ticket from this chat (Module 7), Archive Chat takes it out of the list without deleting it, Make Call, Video Call and WhatsApp Call, Search Messages searches inside this conversation, and Toggle left panel hides the chat list to give the thread more room. The ⋮ holds the rest.
- (3) The thread. Messages sent by an automation are labelled with the flow that sent them, so you can tell at a glance whether a customer has been talking to a bot or to a person.
- (4) The composer, with its Message and Note tabs — Steps 8 and 11.
- (5) The profile panel — Profile, Note and Automation. Profile holds the sent/received counts, the chat's Tags, your Custom Fields, when this contact typically replies, their open Tickets and their Orders.
👀 The Note tab in the profile panel is the running list of every internal note left on this contact, and it has an export button. That is the panel to open when you are picking up a conversation somebody else has been handling.
Step 4 — Start a chat with somebody who has never messaged you
The Inbox only lists conversations that exist. To message a number for the first time you create the contact first. Go to Contacts in the left rail and click + Create.
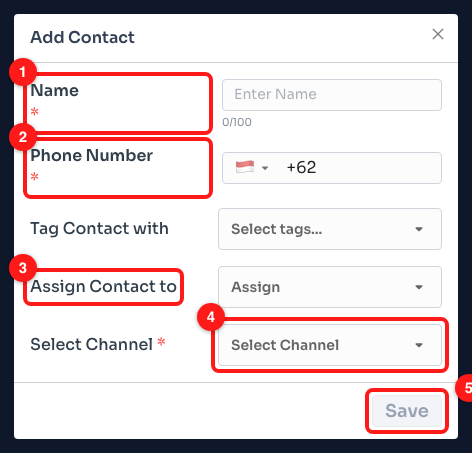
Step 4 — (1) Name, (2) Phone Number with its country selector, (3) assign the contact to a teammate, (4) choose the channel, (5) Save.
- (1) Name and (2) Phone Number are the two required fields. Pick the country from the flag dropdown and type the rest of the number without the country code.
- (3) Tag Contact with and Assign Contact to are optional, and both save you a job later — a contact created already tagged and already assigned lands in the right teammate's queue the moment they reply.
- (4) Select Channel is required, and it decides which of your numbers the conversation will run on. Choose the one you want the customer to see.
- (5) Save creates the contact. Nothing is sent yet.
Step 5 — Open the chat from the contact record
Click the contact's row in the Contacts list. The record opens as a panel with everything ChatDaddy knows about them, and a button that drops you into the Inbox with that conversation open.
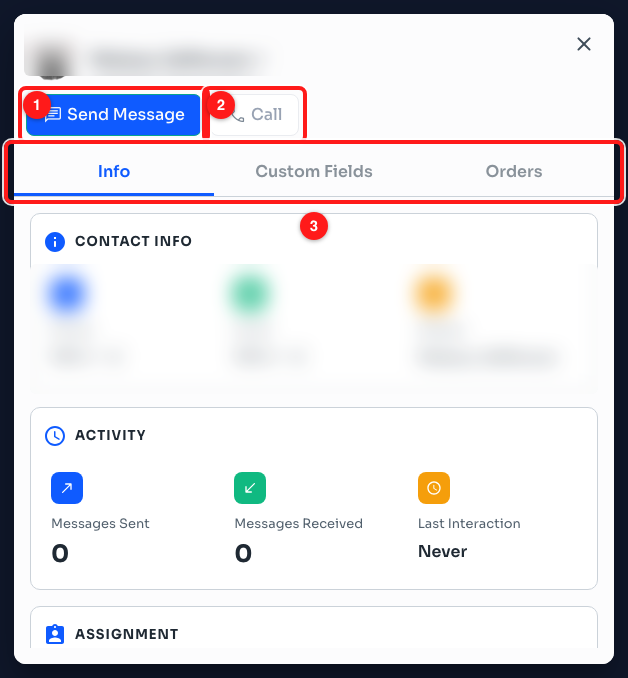
Step 5 — (1) Send Message opens the chat in the Inbox, (2) Call dials the contact, (3) the record's tabs. The name and contact details are blurred.
- (1) Send Message takes you straight to this contact's conversation in the Inbox, ready to type.
- (2) Call places a call to the number instead — Module 3 does not cover calling, but the button lives here.
- (3) Info, Custom Fields and Orders. Info shows phone, e-mail and aliases, an Activity block with messages sent, messages received and last interaction, and an Assignment block for handing the contact to a teammate.
⚠️ On a WhatsApp Business API channel you cannot simply type a first message to somebody who has never written to you — you are outside WhatsApp's 24-hour window, so the only thing that will send is an approved template. That is Step 9. On a QR channel there is no such window and a plain message will go.
Step 6 — Assign a chat by hand
Assigning is how a shared inbox stops being everybody's problem and becomes somebody's job. Click the Assign control on any chat row — you do not need to open the chat.
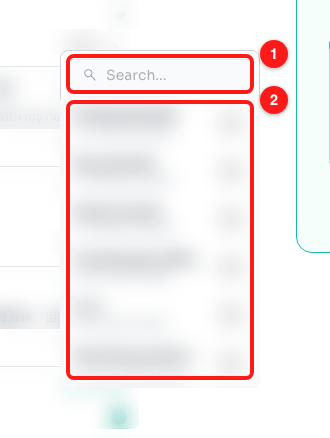
Step 6 — (1) search your team, (2) the teammate list, blurred here because these are real colleagues on a real workspace.
- (1) Search filters the list as you type, which matters once the team is more than a handful of people.
- (2) Pick a teammate and the chat moves out of Unassigned and into that person's Assigned to Me. The row's assignee slot changes from Assign to their name, so the rest of the team can see it is handled.
Step 7 — Let ChatDaddy do the assigning
Doing that by hand for every new conversation does not scale. Auto-assign is configured per channel: go to Channels, open the ⋮ menu on the channel you want and choose Settings, then find Auto-Assign Rules.
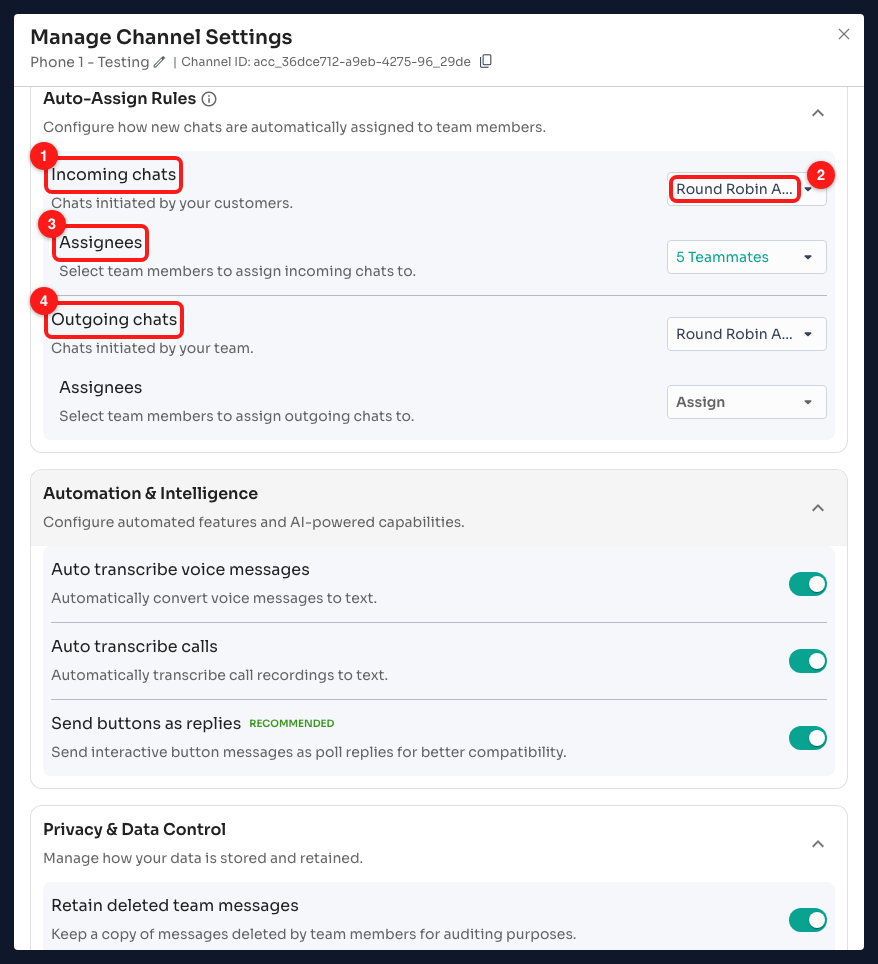
Step 7 — (1) rules for incoming chats, (2) the assignment method, (3) which teammates are in the rotation, (4) the same settings for outgoing chats. The channel name and ID are blurred.
- (1) Incoming chats — conversations your customers start. This is the one that matters for support.
- (2) The method. Smart Assign gives the chat to the teammate with the fewest chats currently assigned to them. Round Robin Assign hands chats out in sequence across the people you pick. Leave it Disabled to keep assigning by hand.
- (3) Assignees — the teammates in the rotation. Only the people you select here will receive chats.
- (4) Outgoing chats — conversations your team starts, with the same two methods. Useful when an agent opens a chat from a contact record and you want it to stay with them.
🔁 Auto-assign is set on each channel separately, so a workspace with a sales number and a support number can route them to different teams. If new chats are still landing in Unassigned, check you configured the channel they actually arrive on. The same dialog also holds Sync past chats & contacts, Auto transcribe voice messages and Retain deleted team messages — worth a look while you are in there.
Step 8 — Know your composer
Back in a conversation, the bar along the bottom is where everything you send starts. It has more in it than it looks.

Step 8 — (1) the Message and Note tabs, (2) attachments, (3) the message field and its "/" hint, (4) ChatDaddy AI.
- (1) Message / Note. Message goes to the customer. Note does not — Step 11.
- (2) The + button attaches files, images, voice notes, orders and payment requests.
- (3) The message field. The placeholder is the tip worth remembering: type
/to pull up your message flows without leaving the keyboard. Selecting text you have already typed offers AI rewrites of it. - (4) ChatDaddy AI drafts a reply from the customer's last message. You can send it as it is or edit it first — it is a draft, not an automatic send.
Step 9 — Send a template when the window has closed
On a WhatsApp Business API channel, if the customer has not messaged you in the last 24 hours, ChatDaddy shows a 24h Limit card in the thread: "WhatsApp doesn't allow messages 24h after they last messaged you. You can however send a template message." Click Send Template Message.
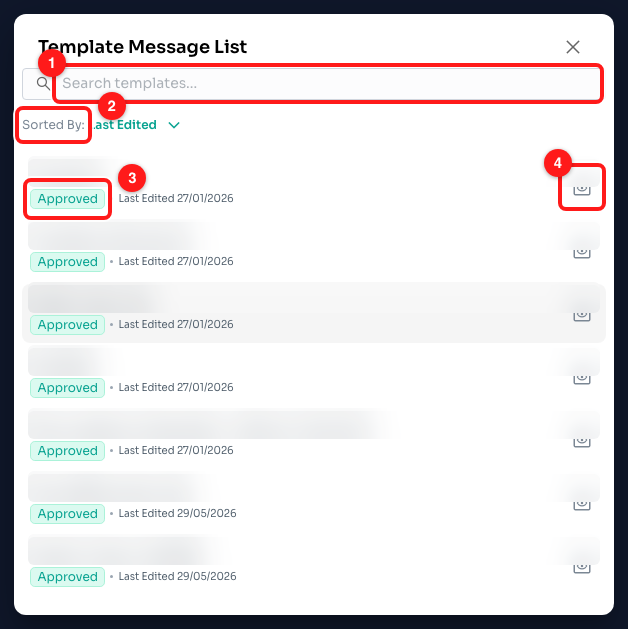
Step 9 — (1) search your templates, (2) change the sort, (3) the approval status of each one, (4) preview before you send. Template names are blurred.
- (1) Search templates by name. With more than a handful of templates this is faster than scrolling.
- (2) Sorted By defaults to Last Edited, so the ones you have been working on are at the top.
- (3) The status chip. Only Approved templates can be sent — the picker says so plainly when you are outside the messaging window. A template Meta has not approved yet will not go, no matter how it reads.
- (4) Preview shows the template as the customer will receive it. Templates with variables ask you to fill them in before sending.
💬 The 24-hour window is Meta's rule, not ChatDaddy's, and it reopens the moment the customer replies — after which you can send ordinary messages freely until it lapses again. Templates themselves are created and submitted for approval in the Marketing area, which is Module 4.
Step 10 — Write now, send later
Type your message as normal, then click the small arrow beside the send button rather than the send button itself. The scheduling menu only becomes available once there is something in the field.
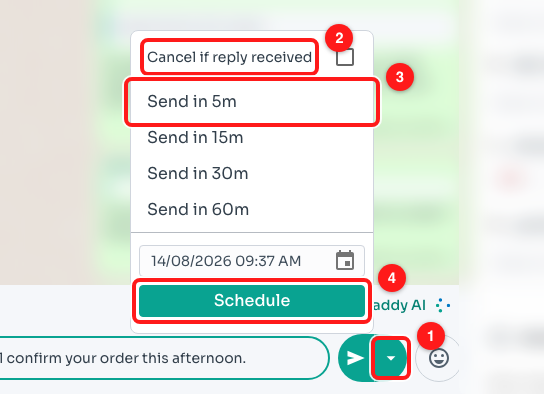
Step 10 — (1) the arrow beside Send, (2) cancel if they reply first, (3) the quick delays, (4) pick an exact date and time.
- (1) The arrow opens the menu. Clicking the send button itself sends immediately.
- (2) Cancel if reply received is the setting that makes scheduling safe. Tick it and the message is dropped if the customer writes back before it goes out — no more "just following up" landing thirty seconds after they answered. Set it before you choose a time.
- (3) Send in 5m, 15m, 30m and 60m cover the common follow-up delays in one click.
- (4) The date and time picker below them handles anything longer — a different time zone, tomorrow morning, next Monday. Set the date and time, then click Schedule.
🕓 Scheduled messages sit in the thread with a countdown until they go, so you can see what is queued. If you would rather not look at them, Hide Scheduled Messages in Inbox Settings (Step 12) takes them out of the view — they still send.
Step 11 — Leave a note the customer cannot see
Switch the composer from Message to Note. The whole bar changes colour and gains a lock, which is the point: nothing you write here is sent to anybody outside your team.

Step 11 — (1) the Note tab, (2) the Team Only lock, (3) the note field.
- (1) The Note tab switches the composer. The amber tint is deliberate — it is there so nobody types a note thinking it is a reply, or the reverse.
- (2) Team Only is the confirmation. The tooltip on the tab says the same thing: it adds a note to the current chat that only your team sees.
- (3) The note field works like the message field, including AI rewrites on selected text. Typing @ offers your teammates, so you can address a note to the person picking the chat up next.
📝 Notes are what make a handover survive a shift change. "Promised a refund, waiting on finance" takes five seconds to write and saves the next agent re-reading forty messages. Every note on the contact is collected under the Note tab of the profile panel, and can be exported from there.
Step 12 — Incognito Mode and the rest of Inbox Settings
Open the filter panel again and click the cog in its header. These preferences are per person, not per workspace — changing them affects your view of the Inbox and nobody else's. Each row carries a small live preview of what the setting does.
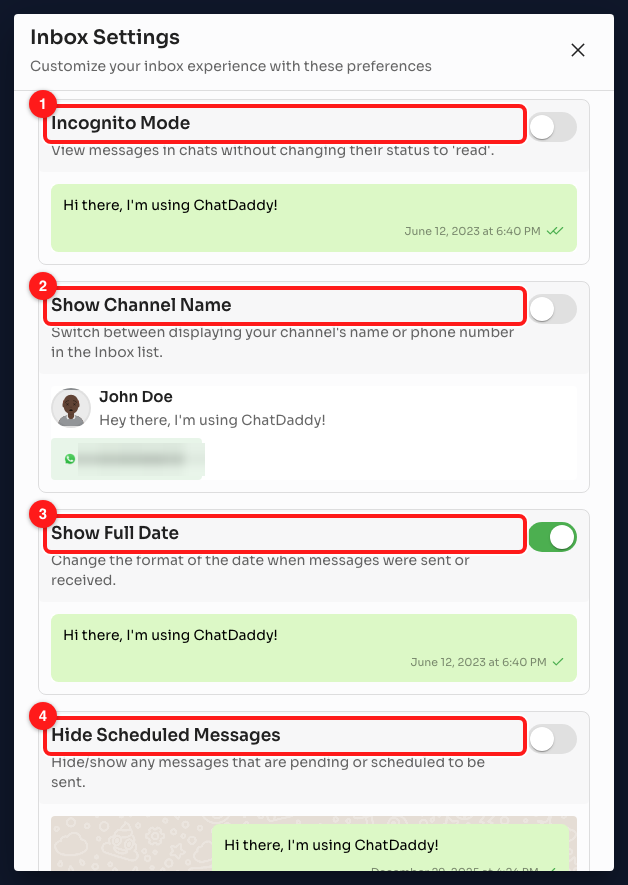
Step 12 — (1) Incognito Mode, (2) Show Channel Name, (3) Show Full Date, (4) Hide Scheduled Messages.
- (1) Incognito Mode — "View messages in chats without changing their status to 'read'." With it on you can open a conversation, read it and decide what to do without the customer seeing a read receipt and without the chat dropping out of your Unread folder. Triage with it on; turn it off when you start replying.
- (2) Show Channel Name switches the Inbox list between your channel's name and its phone number. On a workspace with several numbers, names are far easier to scan.
- (3) Show Full Date changes timestamps from relative to absolute — useful when you are reconstructing what happened and when.
- (4) Hide Scheduled Messages removes pending and scheduled messages from the thread. They still send; you just stop seeing them queued.
Scrolling further down the same dialog: Include archived chats puts archived conversations back in the list after the active ones, Warn on Editing Msg Flow alerts you when a change to a message flow could affect live conversations, and Auto-Suggest Replies turns the automatic AI reply suggestions on and off.
🔍 A note on the two Incognito lessons. The video descriptions in the Academy talk about hiding customer phone numbers from agents. That is not what the setting in the product does today: Incognito Mode controls read receipts and read status, as the description inside the dialog states. There is no phone-number masking option in the Inbox at the moment. If you need agents to work chats without seeing full numbers, raise it with support rather than looking for a toggle that is not there.
The nine video lessons in this module
Each lesson opens inside ChatDaddy from the Academy page, or on YouTube using the links below. The steps above follow the same order, with a couple of lessons covered together where they land on the same screen.
- How to use the Inbox · 4:12 · filters, folders and the anatomy of a conversation — Steps 1, 2 and 3.
- Start a chat with anyone · 2:10 · messaging a number that has never written to you — Steps 4 and 5.
- Auto-assign to boost teamwork · 4:18 · routing incoming chats so nothing sits unanswered — Steps 6 and 7.
- Use message templates · 2:16 · saved replies and approved templates in two keystrokes — Steps 8 and 9.
- Schedule a message in the Inbox · 1:58 · write now, send later — Step 10.
- Schedule WhatsApp messages · 3:21 · planning outgoing messages and reviewing them before they go — Step 10.
- Notes on a conversation · 1:41 · internal context your teammates see and your customer does not — Step 11.
- Incognito contact mode · 1:08 · privacy while working a chat — Step 12, and read the note there first.
- Use Incognito mode · 2:09 · when to switch it on — Step 12.
Common questions
Why can I not just type a message to a new customer?
Because of WhatsApp's 24-hour rule, and only on WhatsApp Business API channels. Meta lets you send free-form messages for 24 hours after the customer last wrote to you. Outside that window — which includes anybody who has never written to you at all — the only thing that will send is a template Meta has approved. ChatDaddy shows a "24h Limit" card in the thread with a Send Template Message button when you are in that state. QR channels are not subject to the window.
New chats are still landing in Unassigned even though I set up auto-assign.
Three things to check. First, auto-assign is configured per channel, not per workspace — open Channels, use the ⋮ menu on the channel the chats are actually arriving on, and look at Auto-Assign Rules there. Second, the rule for Incoming chats is separate from the one for Outgoing chats; customer-initiated conversations follow the incoming rule. Third, only the teammates listed under Assignees receive chats, so an empty or stale assignee list means nobody is in the rotation.
What is the difference between a note and a message?
A message is sent to the customer. A note is not — it is stored against the conversation and only your team can read it. They are written in the same place: the composer has a Message tab and a Note tab, and the whole bar turns amber with a "Team Only" lock when you are on Note, precisely so the two never get confused. Notes accumulate under the Note tab of the profile panel on the right, where they can also be exported.
Can I cancel a scheduled message?
Yes, and you can have ChatDaddy cancel it for you. Tick "Cancel if reply received" in the scheduling menu before you pick a time, and the message is dropped automatically if the customer writes back first — which is usually exactly what you want for a follow-up. Scheduled messages also sit visibly in the thread with a countdown until they send, so you can see what is queued. If you have turned on Hide Scheduled Messages in Inbox Settings you will not see them in the thread, but they still send.
Does Incognito Mode hide the customer's phone number from my agents?
No. Incognito Mode in ChatDaddy controls read status: it lets you open and read a chat without marking it read and without sending a read receipt, which is what makes it useful for triage. The setting's own description in the Inbox Settings dialog says as much. Some of the Academy video descriptions frame it as number masking; there is no phone-number masking option in the Inbox today. If that is a requirement for your team, talk to support rather than hunting for a toggle.
How do I find one conversation among thousands?
Start with the search box above the chat list, which searches contacts and message content. If you know roughly what kind of chat it is, the filter panel is faster: combine a channel, an assignee, a tag and a date range to narrow the list, then search within that. Any combination you use repeatedly can be saved with Custom Pinned filters and reached from the top bar in one click. Inside a conversation, Search Messages in the header searches that thread alone.
➡️ Next: Module 4 — Broadcasts & Campaigns. You can now handle conversations as they come in. The next module is the other direction: reaching hundreds of contacts at once with templates that get approved and broadcasts that do not get you blocked.