
Academy Module 4 — Broadcasts & Campaigns: Reach Thousands and Actually Get Delivered
The written walkthrough of Academy Module 4. Build a broadcast end to end — choose and clean the audience, pick the message flow and channel, set a sending speed that will not get your number flagged, schedule it, and read the result afterwards.
Also searched as: Academy Module 4 — Broadcasts & Campaigns: Reach Thousands and Actually Get Delivered, What this module covers, Find the Broadcasts list, What you can do to a broadcast after it exists, Open the builder, Choose who it goes to, Check the list behind the number, Drop the contacts who will cost you, Read the audience before you spend on it, Pick the message flow, Choose the kind of channel, Pick the channel and name the broadcast, Choose a sending speed, Check the estimate, and set the hours, Smart Timing, and the two behaviour switches
🎓 Part 4 of 11 — ChatDaddy Academy. This is the written version of the Broadcasts & Campaigns module: five video lessons, about 19 minutes of watching, turned into steps you can follow on screen. You can read it on its own, or keep it open beside the videos on the Academy page.
Module 3 was about conversations that come to you. A broadcast is the other direction: one message, hundreds or thousands of contacts, sent out under your own number. It is the single easiest way to get that number restricted, and the single easiest way to bring a quiet month back to life — which of the two you get is decided almost entirely before you press Save, in the audience you pick and the speed you send at. This module walks the whole builder in the order the screen presents it.
What this module covers
- The Broadcasts list — statuses, the progress bar, and what you can still do to a broadcast after it exists
- Choosing an audience with filters, and importing one from a CSV
- The Contact Health Filter — dropping the contacts who will cost you money and quality score
- The Audience Quality Summary — what a list is worth before you spend on it
- Picking the message flow, and why some flows cannot be picked
- WABA, Non-WABA, Messenger and Instagram broadcasts, and how they differ
- Sending speed, WhatsApp messaging tiers, and the risk attached to each speed
- Broadcast hours and the Smart Timing recommendation from your own past sends
- Scheduling a broadcast, and the Important Notice you have to clear first
- Reading the Overview dashboard once the messages have gone
⏱️ Time needed: about 30 minutes to read and set one up. You need: a connected channel (Module 2), contacts to send to (Module 1 or an import), and at least one message flow with a starting point (Module 6 covers building them). Everything below is on Marketing → Broadcasts.
⚠️ Nothing in this article was actually sent. Every screenshot was taken by filling the builder in and then cancelling. Do the same while you are learning: the builder is safe to explore right up to the I Understand button in Step 15, and that button is the point of no return.
Step-by-step
Step 1 — Find the Broadcasts list
Click the Marketing icon in the left rail. It opens on Broadcasts, which is every broadcast this workspace has ever built, newest first.
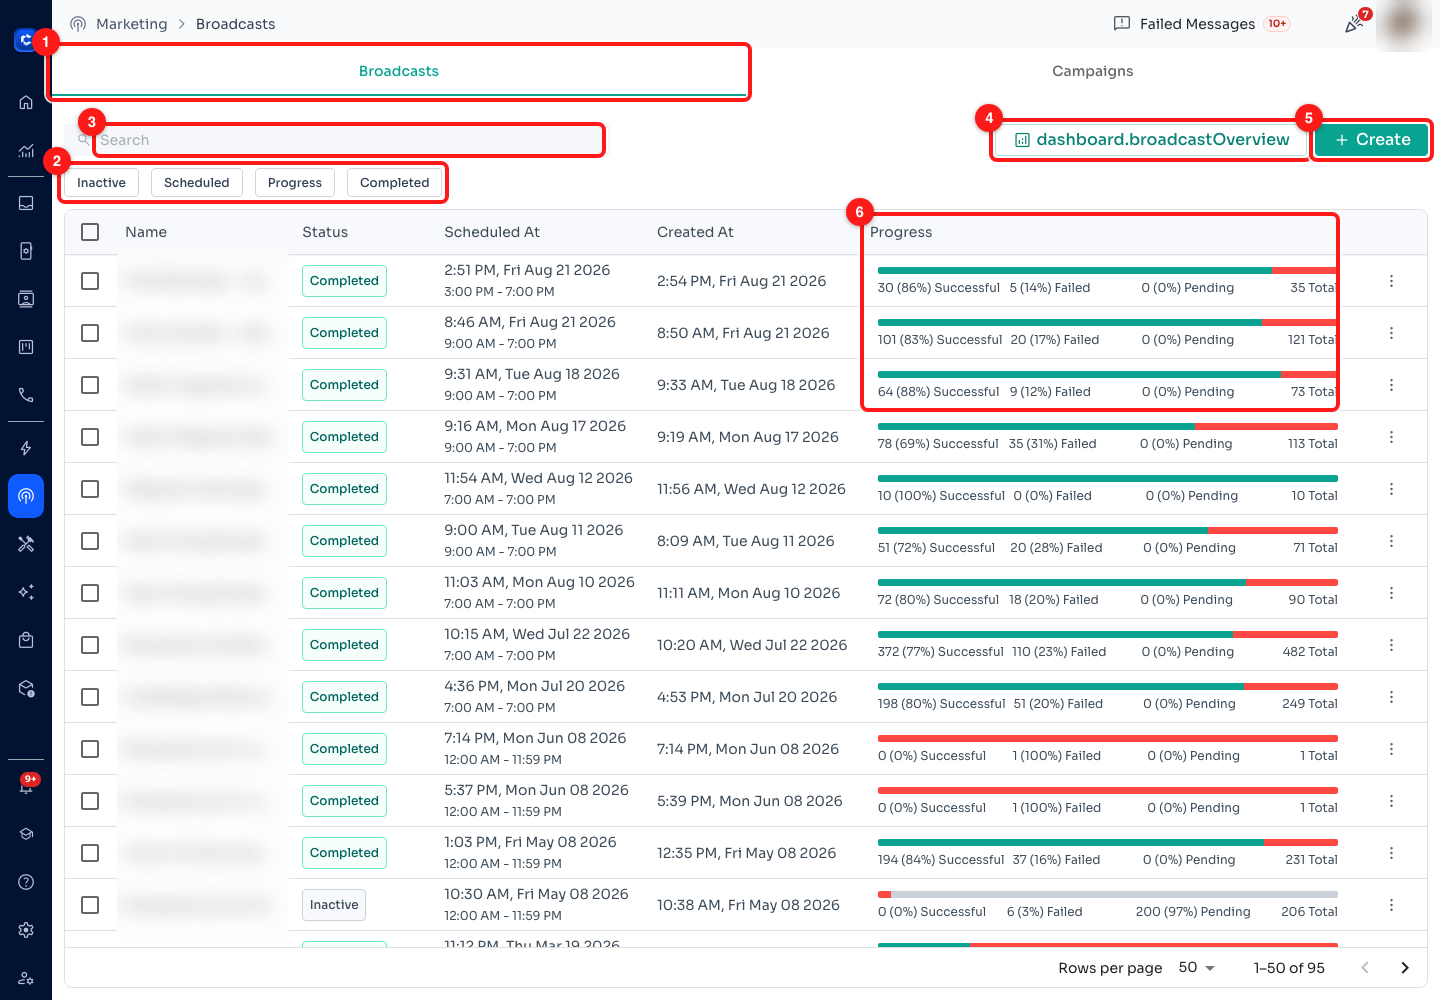
Step 1 — (1) the Broadcasts and Campaigns tabs, (2) the status filters, (3) search, (4) Overview, (5) Create, (6) the progress bar on each row. Broadcast names are blurred throughout this article because on this workspace they carry teammates' names.
- (1) Broadcasts / Campaigns. Broadcasts is the tab this module is about. Campaigns is a different feature — coupon campaigns, each with a public link and a redemption limit — and it is empty on a new workspace.
- (2) The status filters. Inactive is built but not sending, Scheduled is waiting for its time, Progress is sending right now, Completed has finished. A broadcast you saved and forgot sits under Inactive.
- (3) Search matches on the broadcast name — which is the argument for naming them properly rather than keeping the auto-generated "Broadcast by you on date".
- (4) Overview opens the analytics dashboard for all your broadcasts (Step 16). At the time of writing this button renders its untranslated key,
dashboard.broadcastOverview, instead of the word "Overview" — it is the right button. - (5) Create starts a new broadcast, which is Step 3 onwards.
- (6) The progress bar on every row: Successful, Failed, Pending and the total, as counts and percentages. This is the number that tells you whether a broadcast worked, and a row that is mostly red is the subject of Step 16.
📅 The Scheduled At column shows two lines: the date and time the broadcast starts, and underneath it the hours it is allowed to send during. A row reading 12:00 AM – 11:59 PM has no restriction; 9:30 PM – 10:30 PM only sends inside that hour each day. That second line is set in Step 12.
Step 2 — What you can do to a broadcast after it exists
The ⋮ at the end of each row is worth knowing before you build anything, because it decides how much of a mistake a bad broadcast is.
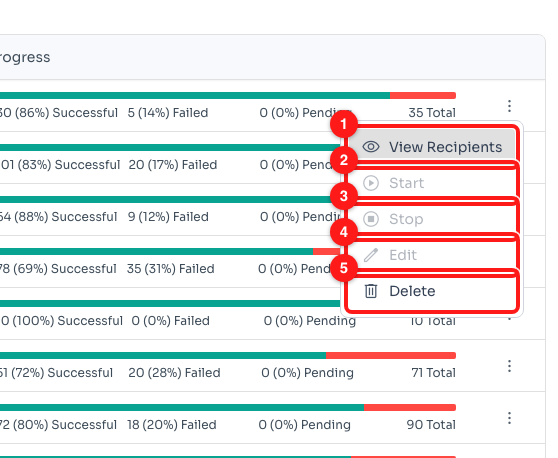
Step 2 — the row menu: (1) View Recipients, (2) Start, (3) Stop, (4) Edit, (5) Delete. Greyed-out entries are disabled for this row's status.
- (1) View Recipients lists exactly who this broadcast went to, and what happened to each one. This is where you go when the progress bar shows failures.
- (2) Start sends a broadcast that is sitting there unsent. It is disabled on a broadcast that has completed or is already sending, and on one with no pending recipients left.
- (3) Stop halts one that is mid-send. Everything already delivered stays delivered; the rest stop going out. It is disabled on completed and inactive broadcasts. This is the button you want if you realise mid-send that the message is wrong.
- (4) Edit reopens the builder. A completed broadcast cannot be edited — ChatDaddy says so rather than silently doing nothing.
- (5) Delete removes the broadcast record.
Step 3 — Open the builder
Click + Create. The whole broadcast is one page in three numbered sections, and you can move between them freely — nothing is a wizard you have to complete in order.
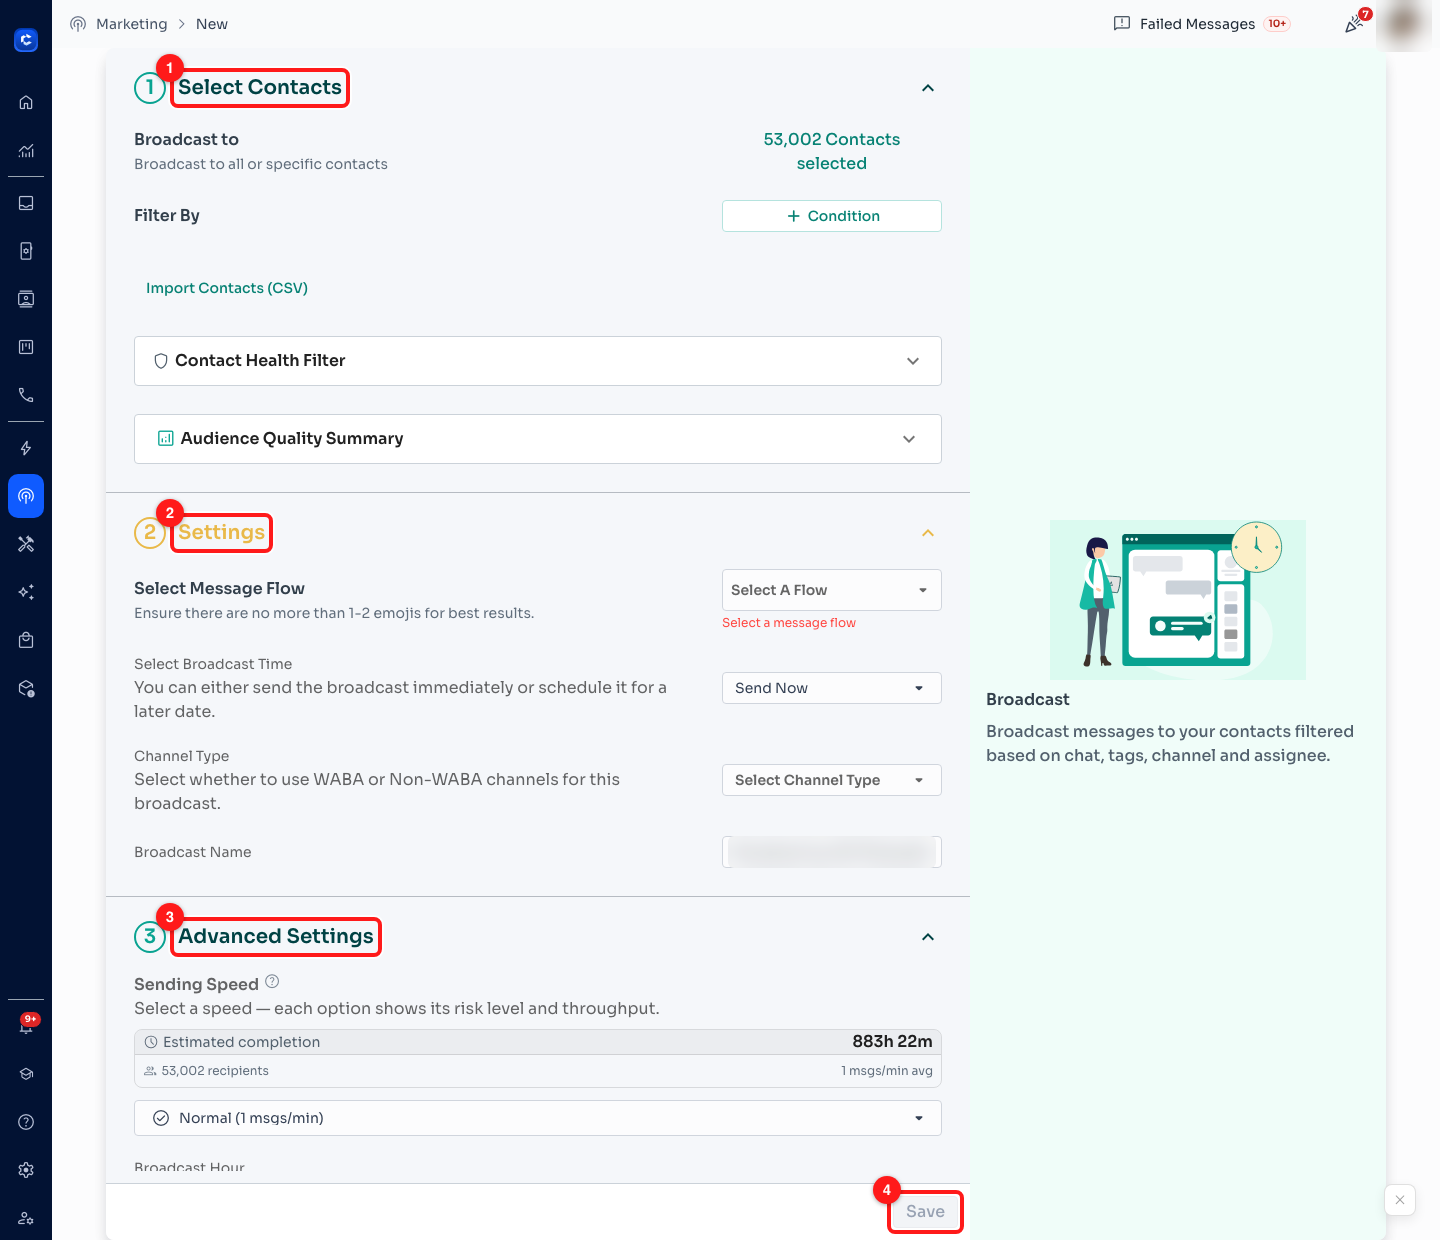
Step 3 — (1) Select Contacts, (2) Settings, (3) Advanced Settings, (4) the Save button. The pre-filled broadcast name is blurred; it defaults to your own name and the current date.
- (1) Select Contacts — who it goes to. Steps 4 to 7.
- (2) Settings — what is sent, from which channel, and when. Steps 8 to 10, and 14.
- (3) Advanced Settings — how fast, during which hours, and how it behaves. Steps 11 to 13.
- (4) Save is greyed out until four things are true: at least one contact selected, a broadcast name, a message flow, and a channel. Hover it while it is disabled and it lists exactly which of the four is missing.
🎯 The first time you open this page ChatDaddy runs an eleven-step guided tour over it, and the list itself offers a six-step "Send your first Broadcast!" wizard. Both are worth one pass. Once dismissed, the tour is still reachable from the Guide me pill in the bottom-right corner.
Step 4 — Choose who it goes to
Section 1 opens with every contact in the workspace already selected, and a live count. Narrowing that count down is the most valuable thing you will do in this whole module.
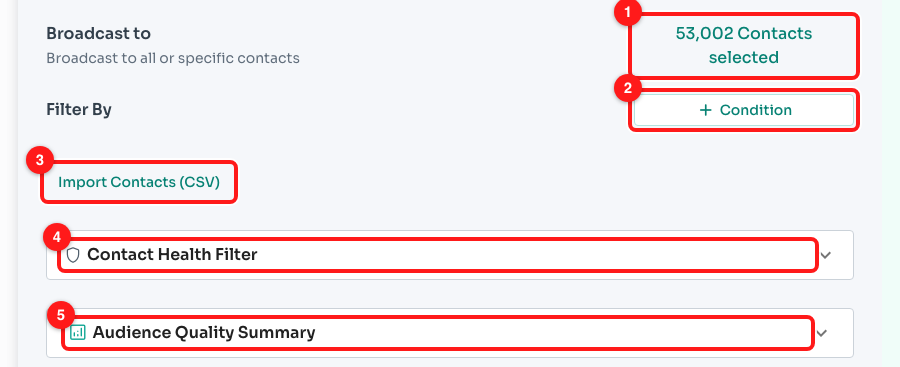
Step 4 — (1) the live recipient count, (2) add a filter condition, (3) import a list from CSV, (4) Contact Health Filter, (5) Audience Quality Summary.
- (1) The count is a button — click it to see the actual list behind the number (Step 5). It updates as you add filters, so you always know how many messages you are about to pay for. Once you have picked a WABA channel with a messaging tier, it also shows that tier's ceiling: "12,000 Contacts selected (max 10,000)".
- (2) + Condition builds the audience out of contact filters: tags, the channel they are on, their assignee, when you last spoke, custom fields. Conditions stack, and each one you add appears as a chip with an × on it, so removing one is a single click.
- (3) Import Contacts (CSV) uploads a list, creates a tag of its own for it, and adds that tag to this broadcast's filters — so the send goes to exactly the people you just uploaded. Useful for an audience that lives in a spreadsheet rather than in ChatDaddy.
- (4) Contact Health Filter and (5) Audience Quality Summary are the two panels that turn a big list into a good one. They are Steps 6 and 7 and they are the point of this module.
Step 5 — Check the list behind the number
Click the count. The dialog shows the contacts your filters currently select, with a search box so you can confirm a specific person is — or is not — in the send.
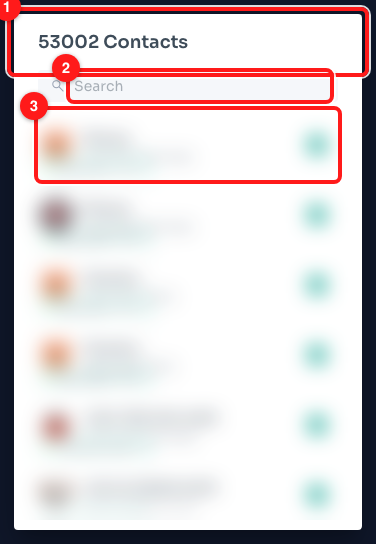
Step 5 — (1) the count as a heading, (2) search within the selection, (3) one selected contact. The list itself is blurred: these are real customer records.
- (1) The heading repeats the count, so you can sanity-check it against what you expected before going any further.
- (2) Search looks inside the current selection only. Typing a customer's name here is the fastest way to answer "will this go to them?".
- (3) Each row shows the contact and which channel they are reachable on. A contact who is on a channel you are not broadcasting from will not receive anything, however many filters say they should.
🧾 Close this dialog with Escape or the backdrop. Opening it changes nothing — it is a view of the filters you have already set, not a place to tick people individually.
Step 6 — Drop the contacts who will cost you
Expand Contact Health Filter. This is the list-hygiene step the "How to broadcast" lesson spends most of its time on, and ChatDaddy does the counting for you: each rule shows how many contacts it would remove from your current selection.
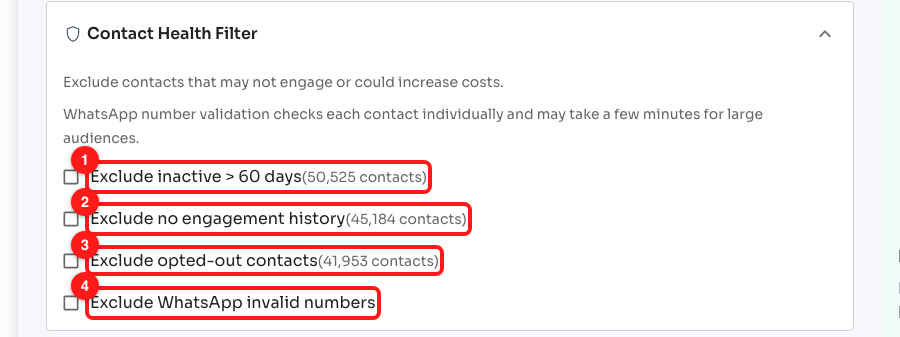
Step 6 — the four exclusions, each with the number of contacts it drops: (1) inactive over 60 days, (2) no engagement history, (3) opted out, (4) invalid WhatsApp numbers.
- (1) Exclude inactive > 60 days removes anyone you have not exchanged a message with in two months. These are the contacts most likely to report a message as spam, because they have forgotten who you are.
- (2) Exclude no engagement history removes contacts with no recorded interaction at all — usually the residue of an old import.
- (3) Exclude opted-out contacts. ChatDaddy's own tooltip defines these as contacts who have never replied to you: messages went out, nothing came back. Meta treats a list of those as a quality problem, and so should you.
- (4) Exclude WhatsApp invalid numbers checks each number against WhatsApp and drops the ones that are not registered. The panel warns that this validates contacts one at a time and can take a few minutes on a large audience — start it and let it finish rather than saving mid-check.
💷 The filters combine, and once any of them is on, the panel tells you the share of the audience you have removed. Every excluded contact is a message you do not pay for and a delivery failure you do not collect, so this panel usually pays for the minute it takes.
Step 7 — Read the audience before you spend on it
Expand Audience Quality Summary. It scores the selection you have ended up with, estimates what sending to it will cost, and — unusually for this kind of panel — tells you what to change.
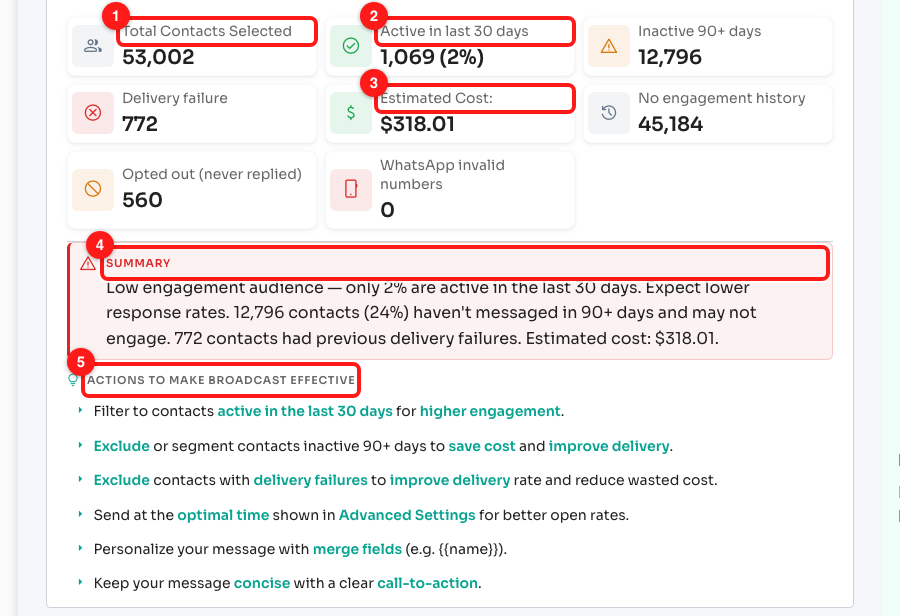
Step 7 — (1) total selected, (2) how many are recently active, (3) the estimated cost, (4) the plain-English summary, (5) the recommended actions.
- (1) Total Contacts Selected — the same number as Step 4, restated here as the base for everything else.
- (2) Active in last 30 days, as a count and a percentage. This is the number that decides the tone of the summary: below 10% the panel calls the audience low-engagement outright.
- (3) Estimated Cost for this send. Beside it sit Inactive 90+ days, Delivery failure, No engagement history, Opted out (never replied) and WhatsApp invalid numbers — the same populations Step 6 can remove, shown here as sizes so you can decide which are worth removing.
- (4) The summary is one paragraph in plain English: how engaged the audience is, how many previous delivery failures it contains, and what it will cost.
- (5) Actions to make broadcast effective is a short, specific list generated from your own numbers — filter to recently active contacts, exclude the delivery failures, send at the optimal time from Step 13, use merge fields, keep it short with one call to action.
🔁 Steps 6 and 7 are a loop, not a sequence. Tick an exclusion in the health filter, watch the quality summary and the recipient count move, and stop when the numbers stop improving. That loop is the difference between a broadcast that works and one that costs you a number.
Step 8 — Pick the message flow
Section 2. A broadcast does not carry a message of its own — it sends a message flow, which is the same thing you build in the Flow Builder (Module 6). Click Select A Flow.
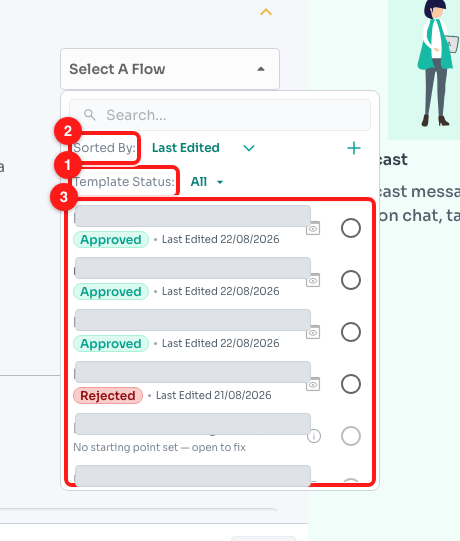
Step 8 — (1) the Template Status filter, (2) the sort control and the + that builds a new flow, (3) one flow in the list, with its own template status and the date it was last edited. The flow names themselves are masked — they are this workspace's real automations. The greyed fifth row is a flow that cannot be picked; see the callout below.
- (1) Template Status filters the list by how Meta has reviewed each flow's templates, and offers four choices: All, Approved, Not Approved and Not Submitted. This matters on a WhatsApp Business API channel, where Meta must approve the template before it can go out to people who are not in an open conversation with you. Filter to Approved and you are only choosing between flows that will actually send. Not Approved is a catch-all — it covers rejected, still-pending and mixed flows together — while Not Submitted is the flow you built but never sent to Meta for review.
- (2) Sorted By flips between last-edited and name; the + opens the Flow Builder to create a new flow without leaving this page. There is a search box above both.
- (3) Each row carries the flow's name, its template status and when it was last edited. The status is per flow, and there are six of them: Approved, Approved (Stale), Pending (still with Meta), Rejected, Not Submitted, and Mixed — which means exactly what it says, a flow whose templates are not all in the same state, so part of it may send and part may not. Only Approved is safe to broadcast on a WABA channel.
🚩 A flow you know exists is in the list but will not select. A message flow can only be broadcast if it starts with a message. If it does not, the row is greyed out, its radio button will not tick, and a grey line under the name reads "No starting point set — open to fix" — the fifth row in the screenshot above is one. Hover that line and the tooltip gives you the fix: "Set a message (not a trigger) as this flow's starting point to use it here." The i beside it opens How to add a starting point. A trigger is not a starting point, and using one is the single most common reason a flow cannot be broadcast.
✍️ The field's own advice — "Ensure there are no more than 1–2 emojis for best results" — is not decoration. Emoji-heavy promotional templates are among the most commonly rejected at Meta review and the most commonly reported by recipients.
Step 9 — Choose the kind of channel
Broadcasts are not WhatsApp-only. Channel Type decides which of your connected channels the rest of this section will offer you.
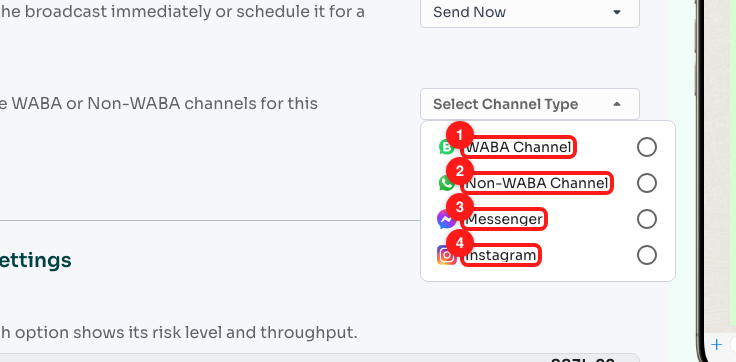
Step 9 — (1) WABA Channel, (2) Non-WABA Channel, (3) Messenger, (4) Instagram.
- (1) WABA Channel — a WhatsApp Business API number. This is what the module's first lesson is about: approved templates, messaging tiers, proper throughput. If you have not connected one, the option still shows but carries a padlock and the note "Connect a WhatsApp Business API channel to use".
- (2) Non-WABA Channel — a QR-linked WhatsApp number, the kind Module 2 sets up in a minute. Broadcasting from one works, and is also the fastest way to get a personal number restricted; everything about sending speed in Step 11 applies double here.
- (3) Messenger and (4) Instagram broadcast to the audience of a connected Meta page. Because their recipient IDs are scoped to one page, a Messenger or Instagram broadcast uses exactly one channel — you will not be able to tick several, where a WhatsApp broadcast lets you spread the send across numbers.
📼 ChatDaddy's own eleven-step tour still tells you that "broadcasts aren't available on Messenger, Instagram or SMS". The selector above disagrees, and the selector is the newer of the two — Messenger and Instagram are offered and pickable today. The tour's other claim, that every broadcast must go out over a WABA channel, is best read as advice rather than a rule: Non-WABA is selectable, and the tour is telling you not to use it. SMS is genuinely not offered.
Step 10 — Pick the channel and name the broadcast
Once a type is chosen, a Select Channel row appears underneath it, listing only channels of that type. Then give the broadcast a name you will recognise in six weeks.
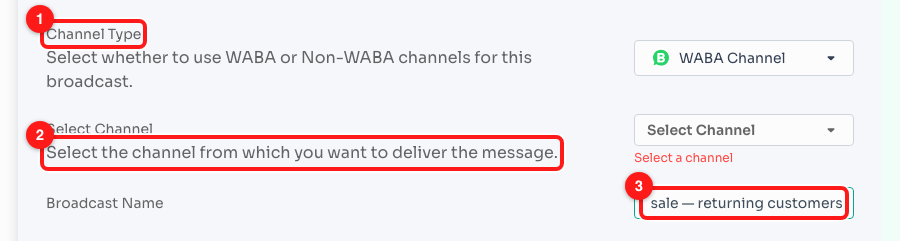
Step 10 — (1) Channel Type, now showing the type picked in Step 9, (2) the Select Channel row, still empty and carrying its red "Select a channel" warning, (3) the Broadcast Name field, renamed from its default.
- (1) Channel Type now shows what you picked. Changing it clears any channel you had selected, because the two lists do not overlap.
- (2) Select Channel is the number the messages actually come from — and therefore the number that carries the risk. On WhatsApp you may pick more than one, which spreads the send; on Messenger and Instagram you may pick exactly one.
- (3) Broadcast Name is required, and capped at 128 characters. Your customers never see it — it exists so you can find this send again. It defaults to "Broadcast by your name on date", which is useless on a list of a hundred. Name it for the audience and the offer: "June sale — lapsed customers".
Step 11 — Choose a sending speed
Section 3, and the setting that most often decides whether your number survives the campaign. Each option states its throughput, its risk level, and who it is for. Sending Speed does not appear until you have actually ticked a channel in Step 10 — a channel type is not enough. If Advanced Settings looks half-empty, that is why; go back and pick the channel.
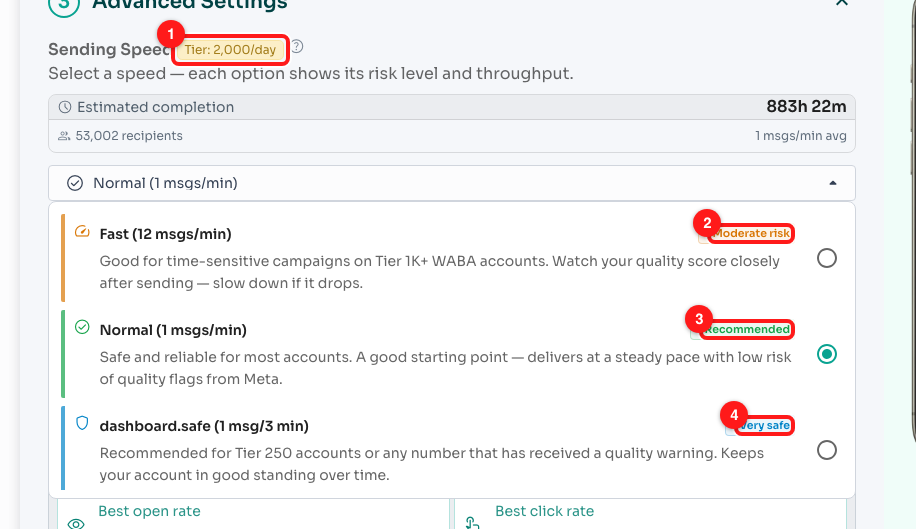
Step 11 — (1) the Tier chip, which decides the rest of this list, (2) Fast, moderate risk, (3) Normal, recommended, (4) the safe end. This screenshot is a Tier 2,000/day account, so Fastest does not appear at all — see the callout below.
- (1) The Tier chip — here reading Tier: 2,000/day — sits beside the "Sending Speed" heading whenever the channel type is WABA. It is not decoration: it decides which of the speeds below you are allowed to pick at all. Tap it for the in-product guide to raising your tier.
- (2) Fast — 12 a minute, moderate risk. For time-sensitive campaigns on Tier 1K+ WABA accounts. Watch the quality score afterwards and slow down if it drops.
- (3) Normal — 1 a minute, recommended. The default, and the right answer unless you have a specific reason. Steady, low risk of a quality flag.
- (4) The safe end. One message every three minutes, and — scrolling one row further — one every five. The five-minute setting is for brand-new numbers and for accounts recovering from a Meta restriction: near-zero flag risk, for when account health matters more than finishing today. Custom, with a slider, sits at the bottom of the list.
🏷️ Your messaging tier decides what is in this list, so yours may be shorter or longer than the screenshot. The account above is Tier 2K, which is why there is no Fastest row — that is the product working as designed, not a missing feature. The full rule: a Tier 250 account (250 unique customers per 24 hours) is offered only Normal, safe and safest — no Fast, no Fastest, no Custom. Tier 1K and Tier 2K get everything except Fastest and WABA Max. Tier 10K and above get the lot. On a Non-WABA (QR-linked) channel there is no tier at all, so the list is ungated and Fastest is offered — which is precisely the wrong place to have it.
⚡ Fastest — 120 messages a minute, high risk — is the row you will only see on a Tier 10K+ account or a QR-linked channel. ChatDaddy's own description: a high chance of triggering Meta's rate limits, only suitable for Tier 10K+ accounts with a proven quality history, not recommended for regular campaigns. Treat it as a setting you have to justify, not a default.
🔤 Two rows in this list show their untranslated keys —
dashboard.safe(1 msg/3 min) anddashboard.safest(1 msg/5 min). They are the "Very safe" and "Safest" settings; the risk badge on the right of each row is the reliable label. A missing translation, not a different setting.
🚀 There is a sixth speed you will not see on most accounts. WABA Max — 480 messages a minute, labelled Extreme risk — appears at the top of this list only when every channel on the broadcast is a WhatsApp Business API number and the account is on Tier 10K or above. ChatDaddy describes it as enterprise throughput, to be used only if your quality score is consistently high. Tier 250, 1K and 2K accounts are not offered it at all, and it never appears on a QR-linked channel.
Step 12 — Check the estimate, and set the hours
The speed you chose, multiplied by the audience from Step 4, gives a finishing time — shown right above the selector. It is the reality check on the previous step.
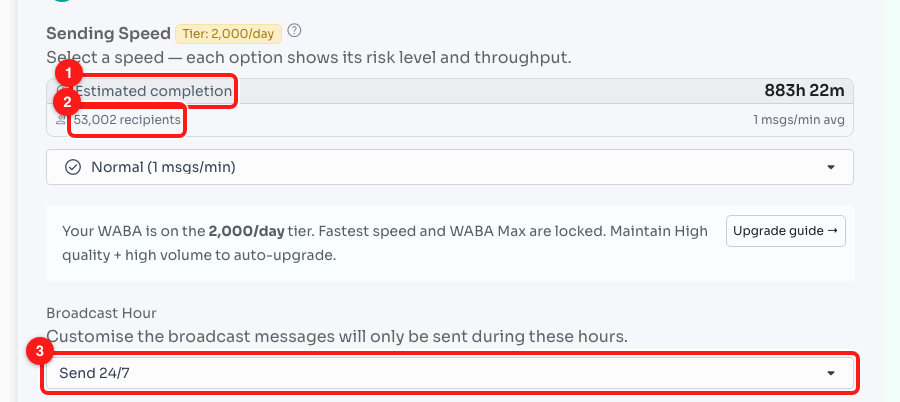
Step 12 — (1) estimated completion, (2) the recipient count and average rate, (3) the Broadcast Hour selector.
- (1) Estimated completion — how long this send will take end to end, and the line that turns Step 11 from an abstract risk setting into a schedule. The screenshot is an unfiltered audience of 53,002 contacts at Normal: 883 hours, or about five weeks of continuous sending. The same list at Fast finishes in about three days. If that number looks absurd, it is telling you the audience is too big rather than the speed too slow — go back to Steps 6 and 7 before you reach for a faster setting.
- (2) Recipients and average rate, restated so you can see what is driving the estimate.
- (3) Broadcast Hour is either Send 24/7 or Send During Specific Hours. Choose the second and you get a start and end time, defaulting to 08:00–20:00. Messages only go out inside that window; a long send simply resumes the next day.
🔒 Between the speed selector and Broadcast Hour, a WABA channel shows a banner spelling out the tier rule from Step 11 in your own numbers — "Your WABA is on the 2,000/day tier. Fastest speed and WABA Max are locked. Maintain High quality + high volume to auto-upgrade." — with an Upgrade guide → button beside it. If you were wondering where the faster options went, this is the product answering you.
🌙 If your audience is in one country, set the hours. A promotional message arriving at 03:00 is the single most reliable way to be reported as spam, and a nine-hour send started in the afternoon will run into the night unless you stop it.
Step 13 — Smart Timing, and the two behaviour switches
Underneath the hours, ChatDaddy offers windows worked out from your own previous campaigns, and two switches that change how the send behaves.
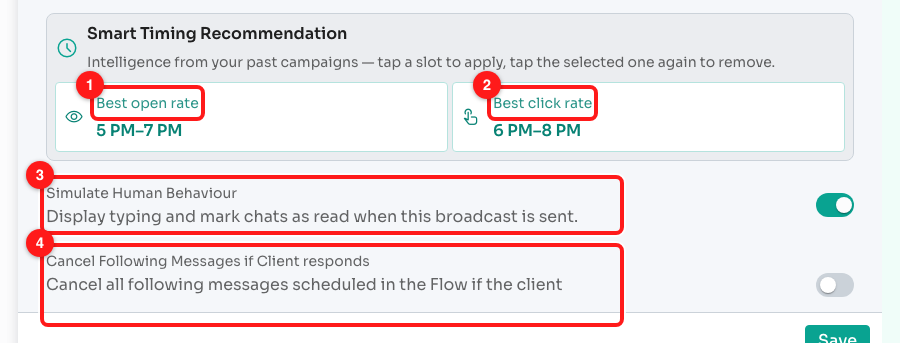
Step 13 — (1) the best open-rate window, (2) the best click-rate window, (3) Simulate Human Behaviour, (4) Cancel Following Messages if Client responds.
- (1) Best open rate and (2) Best click rate are time slots derived from how your past broadcasts performed on the selected channels — not generic advice. Tap one to apply it as your broadcast hours; tap the applied one again to remove it. They are often different windows, so pick the one that matches what you want people to do.
- (3) Simulate Human Behaviour shows a typing indicator and marks chats as read as the broadcast goes out. It makes the send look less mechanical, which is the point.
- (4) Cancel Following Messages if Client responds. If your flow sends more than one message, this stops the rest the moment the customer replies. Turn it on for anything with a follow-up: nothing reads as automated more loudly than a bot sending message two after a human has already answered message one.
Step 14 — Schedule it
Back up in Section 2, Select Broadcast Time is either Send Now or Schedule for Later. Choose the second and a date-and-time field appears below it.
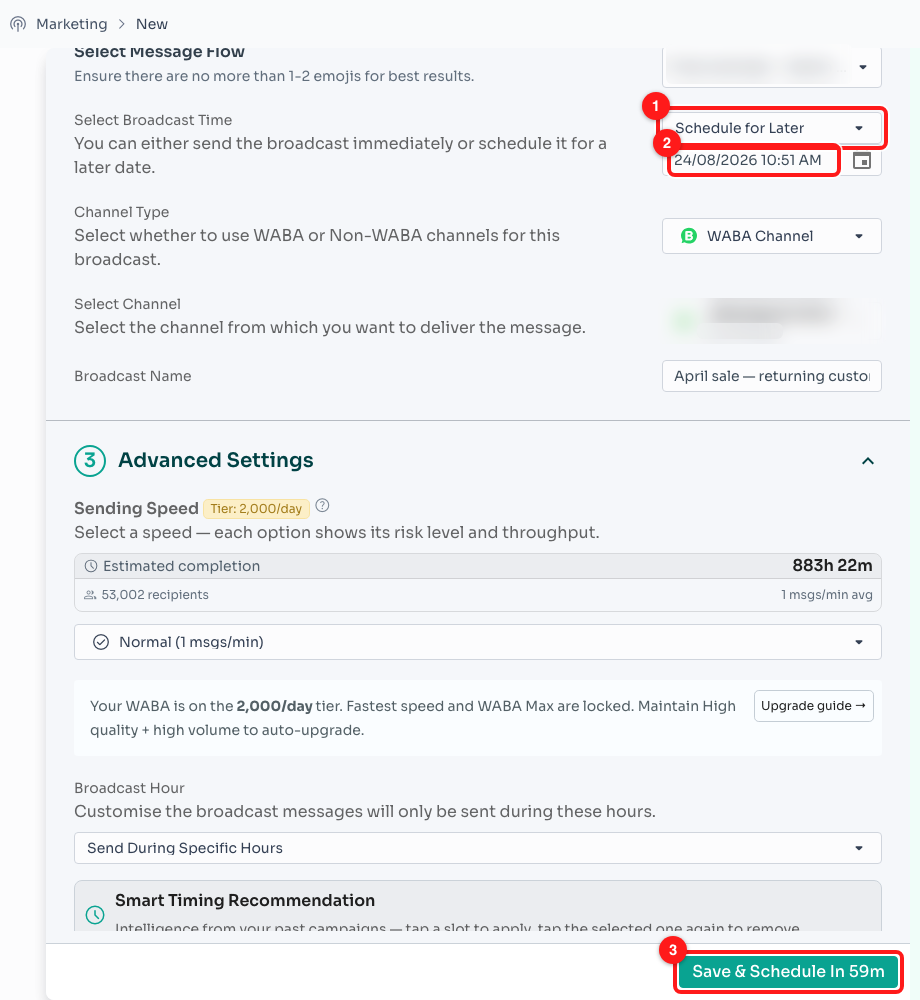
Step 14 — (1) the schedule mode, (2) the date and time, (3) the Save button, which has renamed itself.
- (1) Schedule for Later. Switching to it moves the time to an hour from now if what was there is in the past or nearly so, which stops you accidentally scheduling something into a moment that has already gone.
- (2) The date and time may be anything from now to a year ahead, in your workspace's local time. A scheduled broadcast starts by itself — you do not need the browser open, or to be online at all.
- (3) The Save button tells you what it will do. It reads Save when there is nothing to schedule, Save & Send Now when the time is within a minute, and Save & Schedule In 2 hours when it is further out. Read it before you click it — it is the clearest confirmation of what you have set up.
🕓 Scheduling and broadcast hours are two different things. The schedule is when the broadcast starts; the hours from Step 12 are when it is allowed to send. Schedule one for 22:00 with hours of 08:00–20:00 and nothing goes out until the next morning.
Step 15 — Clear the Important Notice
Click Save on a new broadcast and ChatDaddy stops you once, on purpose. This dialog is the last point at which nothing has happened.
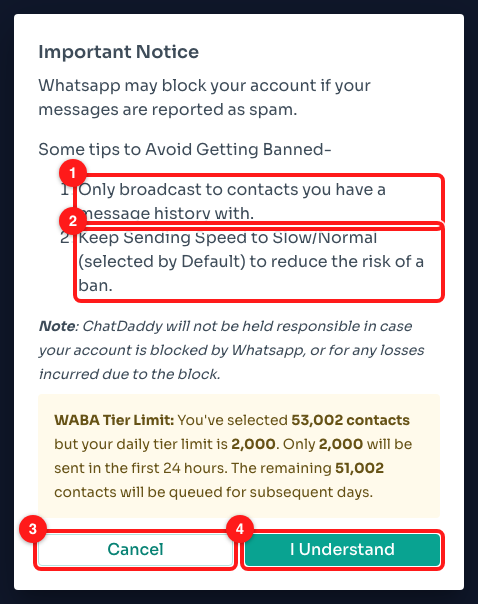
Step 15 — (1) broadcast only to contacts you have history with, (2) keep the speed slow, (3) Cancel, (4) I Understand — the point of no return.
- (1) "Only broadcast to contacts you have a message history with." This is the same advice the Contact Health Filter automates in Step 6, and it is the single biggest factor in whether your number gets reported.
- (2) "Keep Sending Speed to Slow/Normal (selected by Default) to reduce the risk of a ban." Step 11, restated at the moment it counts.
- (3) Cancel returns you to the builder with everything you typed intact and nothing created. Use it freely while you are learning.
- (4) I Understand creates the broadcast. On a WABA channel whose audience is larger than the tier allows, a yellow WABA Tier Limit panel appears above these buttons with the split in your own numbers — in the screenshot, 53,002 contacts against a 2,000/day tier: "Only 2,000 will be sent in the first 24 hours. The remaining 51,002 contacts will be queued for subsequent days." That panel is the clearest statement of what pressing this button actually starts.
🚨 The notice ends with a line worth reading twice: ChatDaddy will not be held responsible if your account is blocked by WhatsApp, or for losses incurred due to the block. A separate warning appears if you pick a fast speed on a QR-linked WhatsApp number — it asks you to keep the interval to at least five seconds, or use a Business API channel instead. Both warnings are describing the same real risk.
Step 16 — Read the result
Once messages have gone, go back to the Broadcasts list and click Overview — the button at (4) in Step 1. This is meant to be the dashboard across every broadcast you have run. Read the warning under the screenshot before you rely on it.
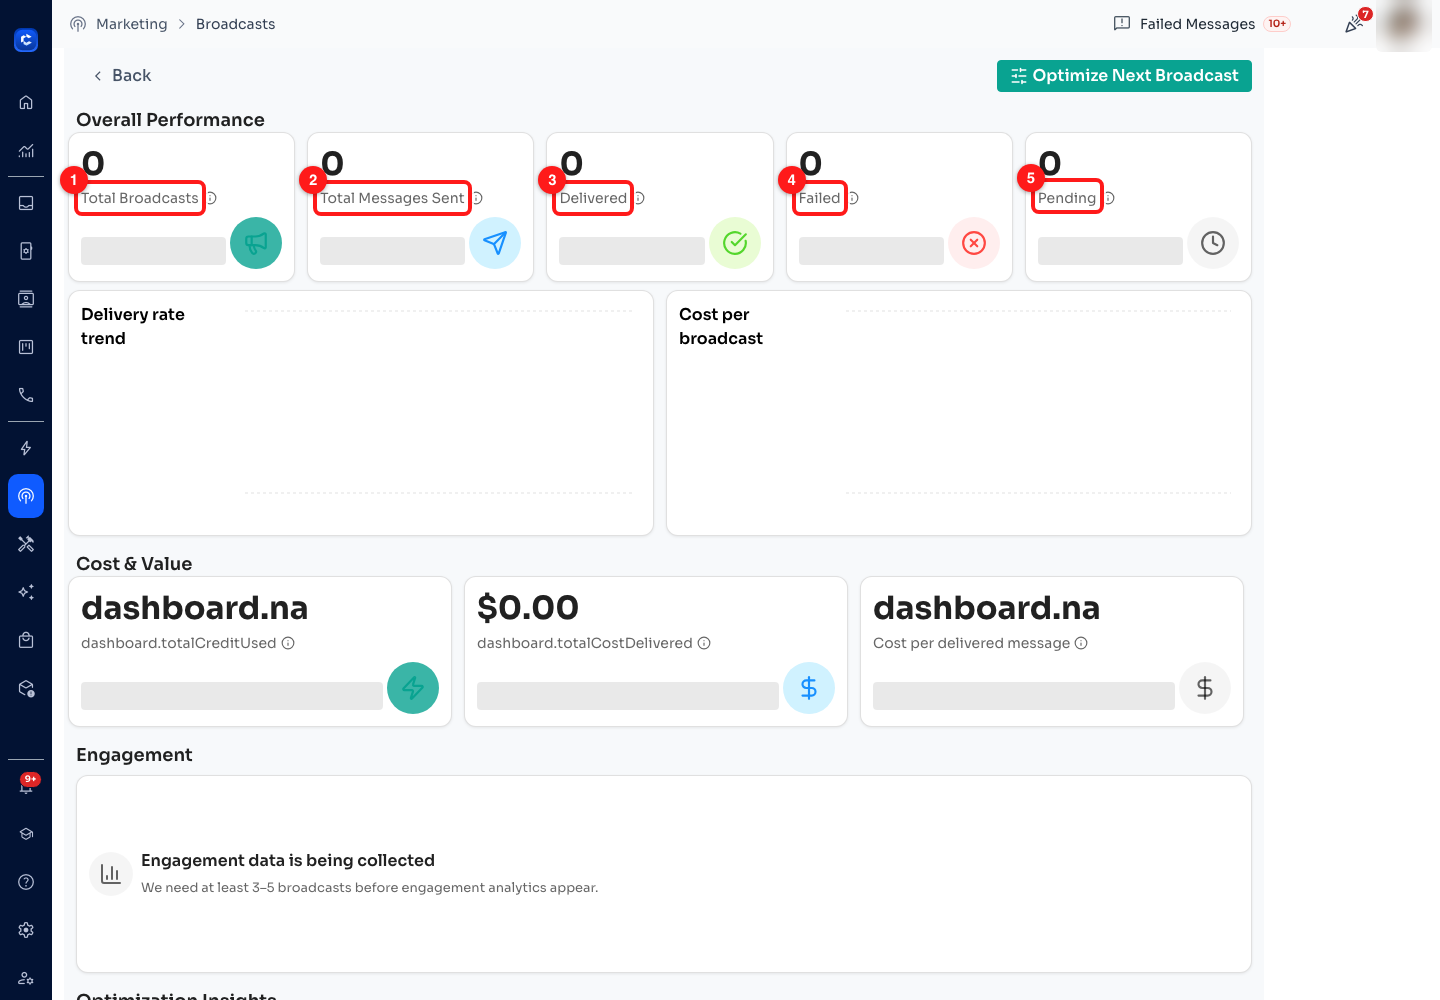
Step 16 — the five Overall Performance cards: (1) Total Broadcasts, (2) Total Messages Sent, (3) Delivered, (4) Failed, (5) Pending. Every one of them reads zero in this screenshot, on a workspace with 95 broadcasts behind it — see below.
- (1) Total Broadcasts and (2) Total Messages Sent are the volume you have put through your numbers. The second card's tooltip spells out the arithmetic: total = delivered + failed + pending.
- (3) Delivered, with your delivery rate underneath it. This is the number that matters, and the one to watch move as you get stricter about audiences.
- (4) Failed, with the failure rate underneath. A high rate usually means invalid numbers — which is what the health filter's WhatsApp validation in Step 6 removes — or a template Meta has stopped accepting.
- (5) Pending is still queued: either the broadcast has not reached those recipients yet, or they are waiting for the next broadcast-hours window or the next tier window.
🐞 This dashboard does not currently populate, and the screenshot above is what you should expect to see. On the workspace used for this article — 95 broadcasts, many of them completed with thousands of delivered messages — all five cards read 0, the bars beneath them stay as grey loading placeholders indefinitely (checked repeatedly over two minutes, on two occasions three days apart), two of the Cost & Value figures render their untranslated key
dashboard.na, and the Engagement panel says "We need at least 3–5 broadcasts before engagement analytics appear" on an account with ninety-five of them. This is a defect, not something you have configured wrongly, and no amount of waiting fixes it. Until it is fixed, use the per-broadcast numbers instead — they are accurate: the progress bar on every row of the list (Step 1, annotation 6) gives you successful, failed and pending with percentages, and View Recipients gives you the contact-by-contact detail.
For completeness, the page is built to go further than the five cards: below them sit Cost & Value, Engagement, Optimization Insights, Quick Wins and Growth Projections, then two lists — your successful broadcasts and the ones needing attention. Those sections are empty for the same reason the cards are.
🔍 For one specific broadcast, use View Recipients from the row menu in Step 2. The Overview dashboard is meant to answer "how are we doing"; View Recipients answers "what happened to this person", and it is the one that works today.
The five video lessons in this module
In the order they appear on the Academy page, with the step above that covers the same ground.
- Official WhatsApp broadcast tutorial (WABA) · 3:48 · approved, template-based sending on the Business API — Steps 8, 9 and 11.
- Set up a broadcast on ChatDaddy · 3:47 · audience, message and schedule in one pass — Steps 3 to 10.
- How to broadcast · 4:59 · list hygiene, pacing and opt-outs — Steps 6, 7, 11 and 15.
- Create a simple WhatsApp broadcast · 4:32 · a minimal broadcast to test your setup — Steps 3 to 10, skipping the health filter.
- Schedule a broadcast · 1:44 · queueing a campaign for when people will read it — Steps 12, 13 and 14.
Common questions
The Save button is greyed out and I do not know why.
Hover it. The tooltip lists exactly what is missing, joined by dots: "Select at least one contact", "Enter a broadcast name", "Select a message flow", "Select a channel". All four have to be true. The one that catches people out is the message flow, because a flow with no starting point set cannot be selected at all — see Step 8.
My broadcast says Completed but most of it Failed.
Open View Recipients from the row menu to see which contacts failed. Three causes account for nearly all of it. The numbers are not on WhatsApp — turn on Exclude WhatsApp invalid numbers in the Contact Health Filter and it will not happen again. The template was not approved — filter the flow picker to Approved before you pick. Or you were outside the 24-hour window on contacts you have no template for, which is the same rule Module 3 covers for the Inbox.
I selected 5,000 contacts but only some of them received it.
That is your WhatsApp messaging tier. Meta caps how many unique customers a Business API number may message in a rolling 24 hours: 250 on the lowest tier, then 1,000, 2,000, 10,000, 100,000 and unlimited. ChatDaddy does not drop the rest — it sends up to the limit and queues the remainder for subsequent days, and the Important Notice in Step 15 tells you the split before you commit, in your own numbers — the screenshot there reads "You've selected 53,002 contacts but your daily tier limit is 2,000. Only 2,000 will be sent in the first 24 hours. The remaining 51,002 contacts will be queued for subsequent days." The Tier chip beside Sending Speed opens the in-product guide to raising it.
Can I stop a broadcast that is already sending?
Yes. ⋮ → Stop on the row halts it; messages already delivered stay delivered and the rest stop going out. Start it again later with ⋮ → Start and it picks up the pending recipients. What you cannot do is edit a broadcast that has already completed — ChatDaddy disables Edit and says so.
Should I broadcast from my QR-linked number or wait for the API?
Wait for the API if the broadcast matters. A QR-linked (Non-WABA) channel will send, but it has no approved templates, no messaging tier and no official standing with Meta — it is your personal WhatsApp account behaving unusually, which is precisely the pattern that gets numbers restricted. If you must, use the slowest speed, send only to contacts with message history, and keep the volume small. Module 2 covers getting onto the Business API.
What is the Campaigns tab next to Broadcasts?
Coupon campaigns — a different feature that lives on the same page. Each one has a public link, a redemption limit and its own analytics, and it is for distributing a discount rather than for sending a message to a list. It is empty until you create one, and none of this module's five lessons covers it.
➡️ Next: Module 5 — AI Agents & Chatbots. You can now reach your whole list on purpose. The next module is about the replies that come back: putting an AI agent on the front of your inbox so the answerable questions get answered without you.