
Academy Module 5 — AI Agents & Chatbots: Answer the Repetitive Questions Automatically
The written walkthrough of Academy Module 5. Build a knowledge base, create an AI agent from a template, write the behaviour instructions and the fallback message that hands over to a human, connect the agent to a channel, and test it before a customer ever sees it.
Also searched as: Academy Module 5 — AI Agents & Chatbots: Answer the Repetitive Questions Automatically, What this module covers, Before you build: scope, script, escalate, Open AI and learn the two tabs, Read the knowledge base list, Build a knowledge base, Pick the kind of agent you are building, Define Behaviour: name, model and instructions, Write the fallback message, Add Knowledge: link the library to the agent, Allow Actions: a preview of what is coming, Connect Channels: put the agent in front of customers, Save, then test before anyone else does, Read the list and keep an eye on it, The three video lessons in this module
🎓 Part 5 of 11 — ChatDaddy Academy. This is the written version of the AI Agents & Chatbots module: three video lessons, about 21 minutes of watching, turned into steps you can follow on screen. You can read this on its own, or keep it open beside the videos on the Academy page.
Module 3 gave your team an inbox to work conversations in. This module takes the repetitive part of that work off them. An AI agent in ChatDaddy is a chatbot you ground in your own documents, give a personality and a set of rules, and then point at a channel — so that "what are your opening hours" and "do you deliver to Penang" get answered in seconds, and the questions that actually need a person get handed over cleanly.
What this module covers
- The three questions to answer before you build anything — scope, script, escalate
- Where AI lives in ChatDaddy and how knowledge bases differ from chatbots
- Creating a knowledge base from documents, web links or your own message history
- Starting an agent from the Receptionist, Sales or Support template
- Writing behaviour instructions and the fallback message that hands over to a human
- What the Allow Actions section does and does not do today
- Connecting the agent to a channel and picking who it escalates to
- Testing the agent privately before any customer sees it
- Reading the status board so you know whether your agent is actually live
⏱️ Time needed: about 40 minutes to build and test your first agent, plus whatever time it takes to collect the documents you want it to learn from. You need: a connected channel (Module 2) and at least one document, FAQ page or web link that answers your most common questions.
Before you build: scope, script, escalate
The shortest lesson in this module is also the one worth doing first. Most chatbots disappoint because they were switched on before anyone decided what they were for. Answer these three questions on paper before you open the builder — every field in the builder is easier once you have.
- Scope — what will it answer? Go through last month's conversations and find the five questions you answer most. That list is your agent's job. Anything outside it is not a failure of the agent; it is a handover.
- Script — how should it sound? Decide the tone, the things it must never say, and what it should do when it is unsure. This becomes your AI Behavior Instructions.
- Escalate — when does a human take over? Decide the moment the agent should stop and pass the conversation on. This becomes your Fallback Message and the assignee you pick in Connect Channels.
Step-by-step
Step 1 — Open AI and learn the two tabs
Click the sparkle icon in the left rail to open AI. Everything in this module happens behind two tabs at the top of this page, and the difference between them is the thing most people get wrong on their first try.
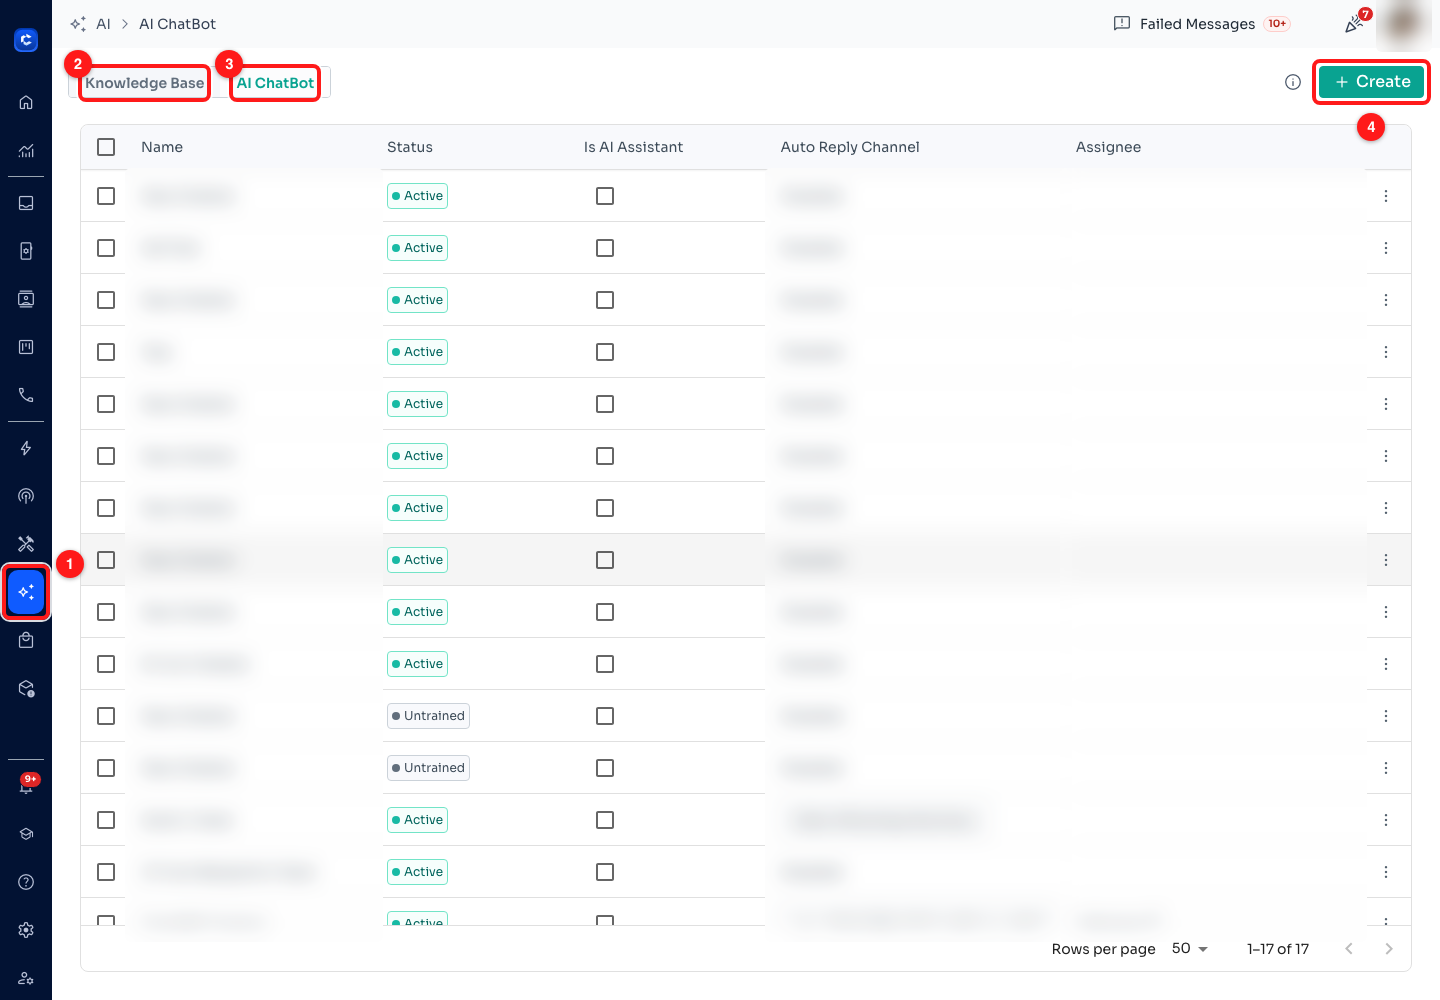
Step 1 — (1) the AI icon in the left rail, (2) the Knowledge Base tab — what your agents know, (3) the AI ChatBot tab — the agents themselves, (4) Create. Chatbot names, channels and assignees are blurred here; on your own screen you see them in full.
- (2) Knowledge Base holds the facts. A knowledge base is a bundle of documents, web links and imported chat history. It answers nothing on its own — it is a library.
- (3) AI ChatBot holds the agents. An agent has a personality, a set of permitted actions and a channel. It reads from whichever knowledge bases you link to it.
- One knowledge base can be shared by several agents, which is the point of keeping them apart. Write your returns policy once; let the sales agent and the support agent both read it.
- (4) Create makes a new item in whichever tab you are on, so check the tab first.
Step 2 — Read the knowledge base list
Open the Knowledge Base tab. Each row is one library. The columns tell you whether it is worth anything before you link it to an agent.
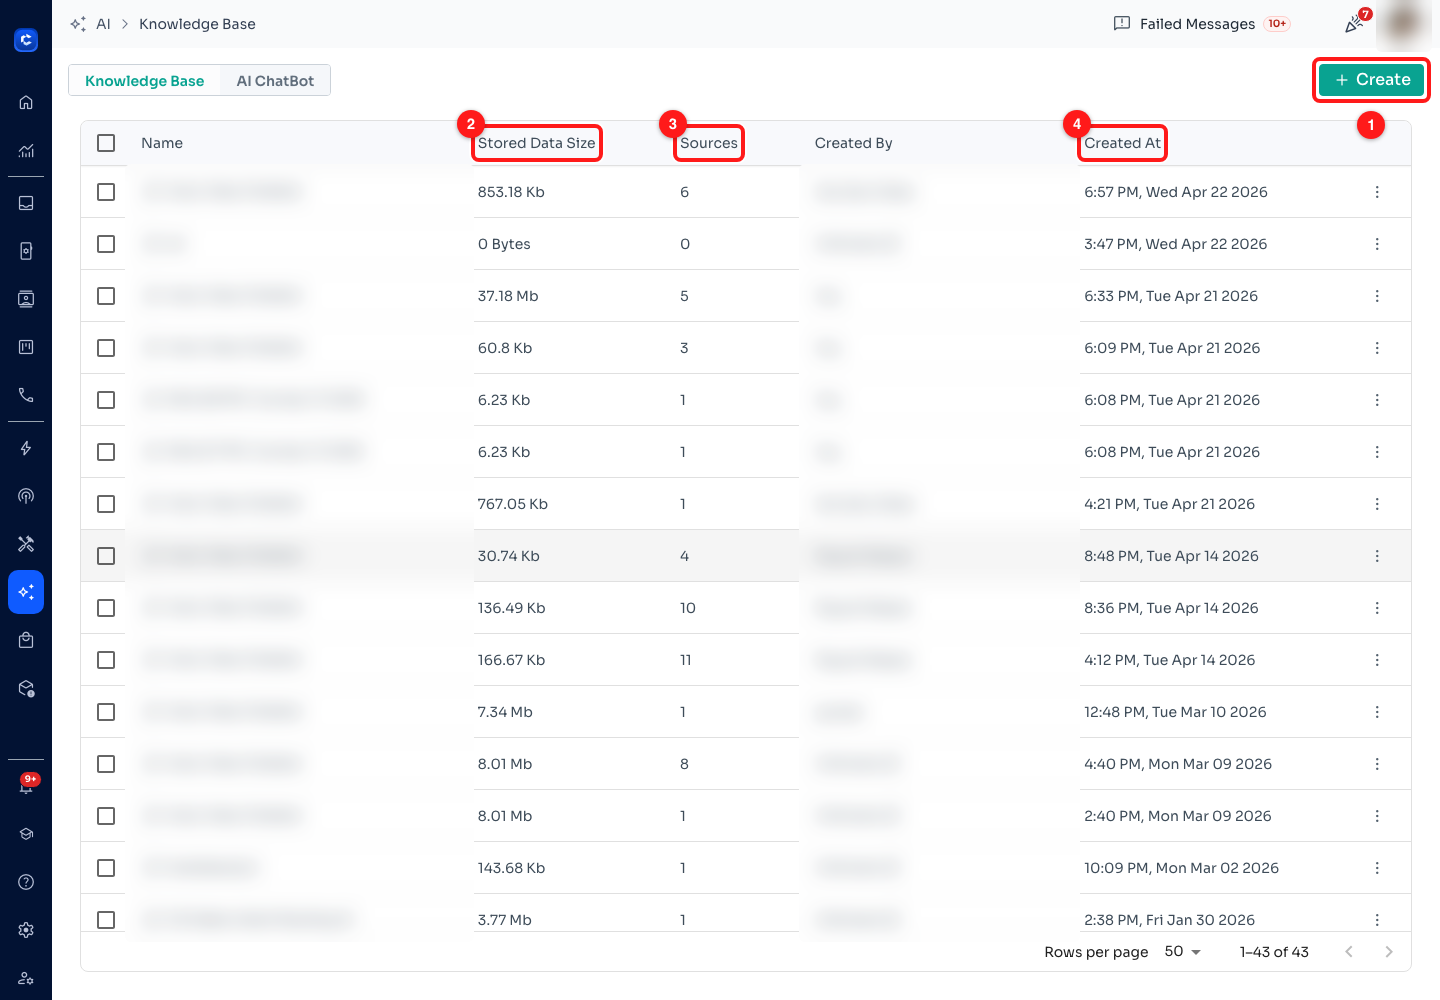
Step 2 — (1) Create a new knowledge base, (2) Stored Data Size, (3) Sources, (4) Created At. Names and Created By are blurred here.
- (2) Stored Data Size is how much text this knowledge base holds. It is also what you are billed on — the form itself says knowledge base pricing is based on the amount of data stored, so a 37 Mb library is a cost as well as an asset.
- (3) Sources is the number of documents and links inside. A knowledge base showing 0 Bytes and 0 sources was created and never filled — it will teach an agent nothing, and it is the most common reason a new agent answers "I don't know".
- (4) Created At and Created By matter on a shared workspace. Before you delete a library that looks like clutter, check who built it and which agents link to it.
Step 3 — Build a knowledge base
Click Create on the Knowledge Base tab. The form is two numbered sections: name it, then feed it. Nothing is stored until you press Save.
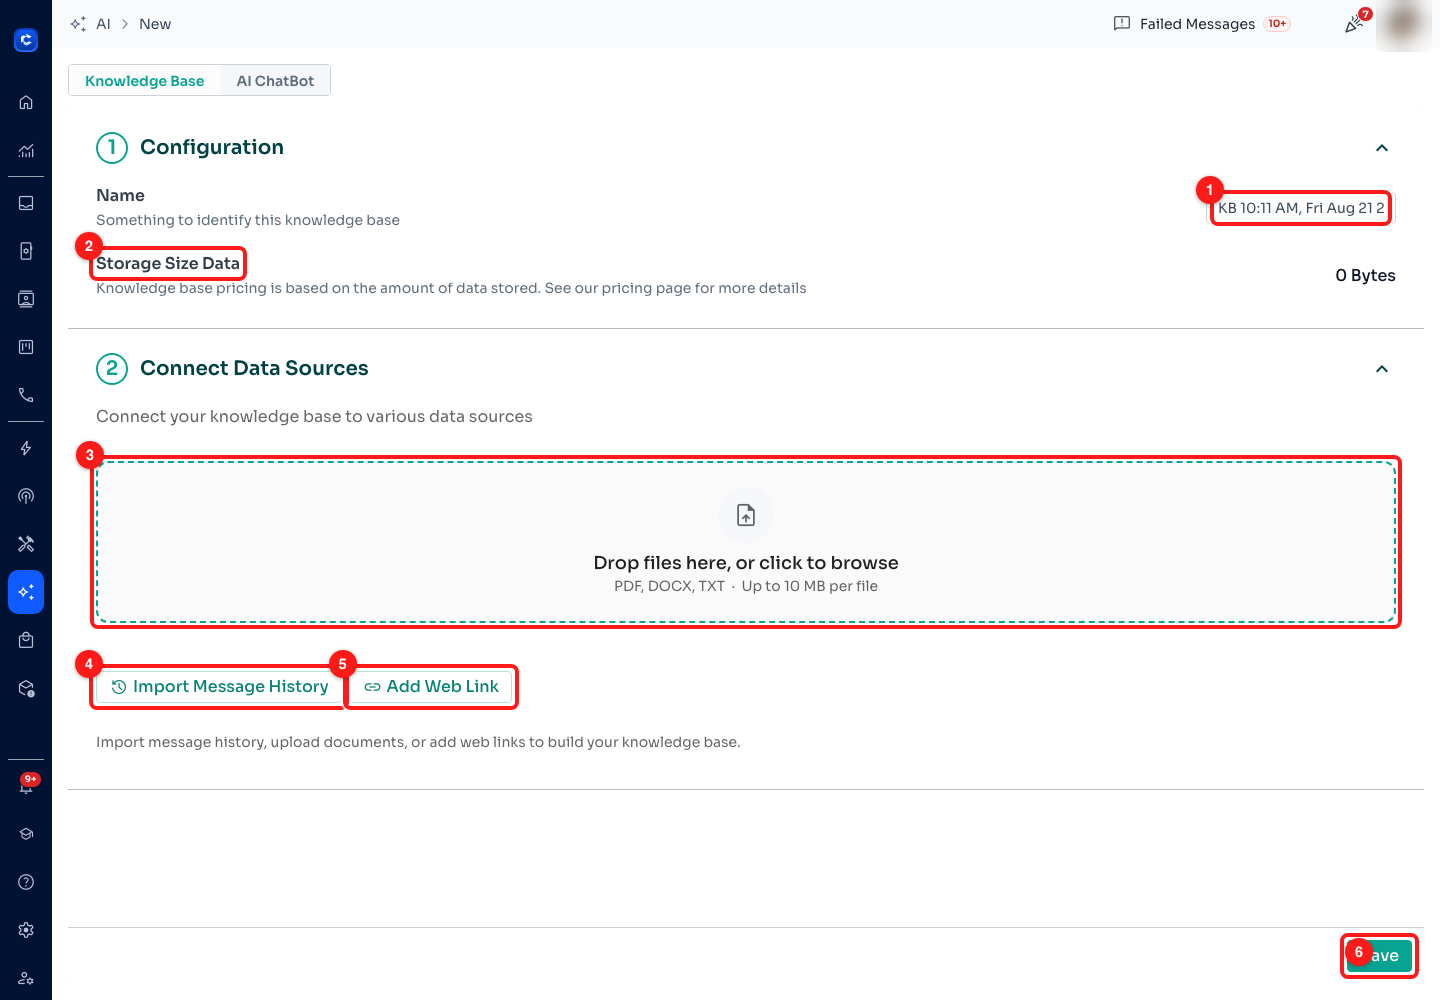
Step 3 — (1) Name, prefilled with a timestamp, (2) Storage Size Data, which is what you are billed on, (3) the file drop target, (4) Import Message History, (5) Add Web Link, (6) Save.
- (1) Name arrives prefilled with a timestamp such as KB 10:11 AM, Fri Aug 21. Replace it. On a workspace where a dozen libraries are all called "Auto: New Chatbot", nobody can tell which is which, and the list in Step 2 becomes useless.
- (3) Drop files here, or click to browse takes PDF, DOCX and TXT, up to 10 MB per file. This is the fastest route in: a product sheet, a returns policy, a price list.
- (4) Import Message History builds the library from conversations you have already had. It is the best source you own, because it is phrased the way your customers actually ask.
- (5) Add Web Link points the library at a page — your FAQ or pricing page — instead of a file.
- (6) Save commits it. Until you press it, nothing you have added exists.
🧹 Garbage in, garbage out is not a slogan here — it is the whole mechanism. An agent grounded in a stale price list will quote stale prices confidently. Before you upload anything, open it and check that the prices, hours and policies in it are the ones you want a customer to be told today.
Step 4 — Pick the kind of agent you are building
Switch to the AI ChatBot tab and click Create. ChatDaddy shows you three ready-made agents before it offers you a blank one. Read the three descriptions even if you already know which you want — they are a good, short definition of what each kind of agent is for.
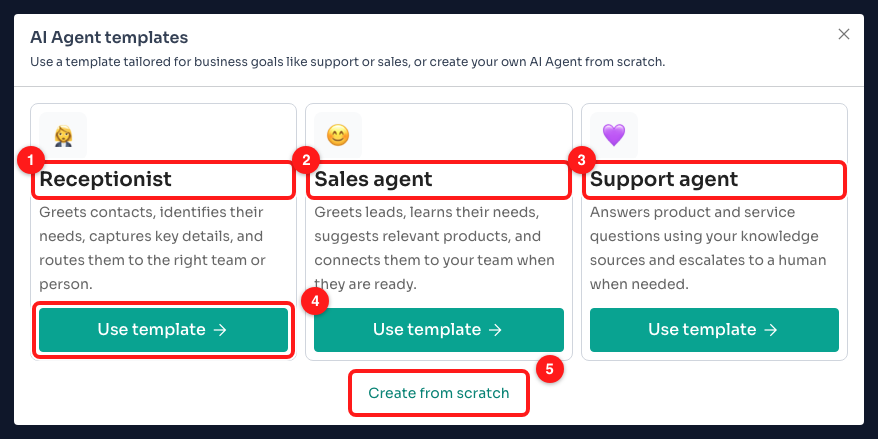
Step 4 — (1) Receptionist, (2) Sales agent, (3) Support agent, (4) Use template, (5) Create from scratch.
- (1) Receptionist greets contacts, identifies their needs, captures key details and routes them to the right team or person. Pick this if your main problem is triage.
- (2) Sales agent greets leads, learns their needs, suggests relevant products and connects them to your team when they are ready.
- (3) Support agent answers product and service questions using your knowledge sources and escalates to a human when needed. This is the one that leans hardest on Step 3.
- (4) Use template opens the builder for that role.
- (5) Create from scratch takes you to the same builder without picking a role.
⚠️ Your choice on this screen does not carry into the builder yet. Whichever card you click — including Create from scratch — the builder opens with the same default customer-support instructions and the Prompt Template dropdown reading Support agent. That is how the app behaves today, not something you did wrong. Load the role you actually want from that dropdown in Step 5, which does work.
Step 5 — Define Behaviour: name, model and instructions
The builder has four sections along the top — Define Behaviour, Add Knowledge, Allow Actions and Connect Channels — and a live status panel on the right. Define Behaviour is where the agent gets its personality.
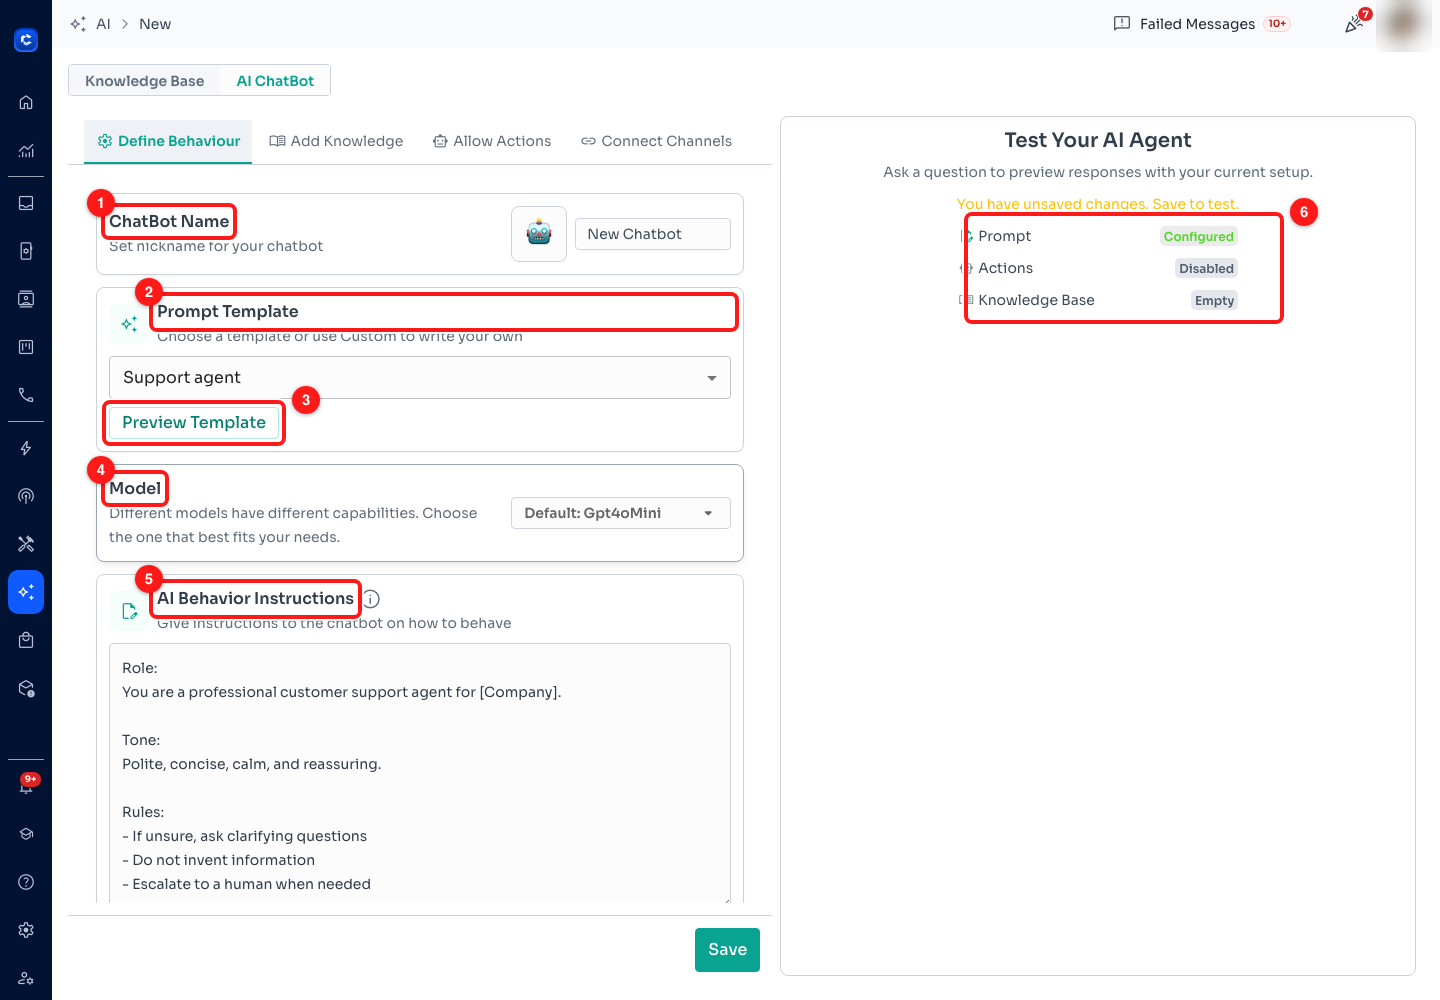
Step 5 — (1) ChatBot Name, (2) Prompt Template, (3) Preview Template, (4) Model, (5) AI Behavior Instructions, (6) the readiness panel.
- (1) ChatBot Name is internal — it is what shows in the list and in the Inbox when the agent replies. Name it for its job ("Order status bot"), not for a person. It arrives as New Chatbot and holds up to 64 characters.
- (2) Prompt Template is the control that actually loads a role. It offers Receptionist, Sales agent, Support agent and Custom, and picking one rewrites the instructions below. This is where you choose the agent you thought you were choosing in Step 4.
- (3) Preview Template opens the chosen template's prompt read-only, so you can see what you are inheriting before you commit to it.
- (4) Model picks which AI model answers. There are two: Gpt4oMini, the fast, cheap one and the right default for FAQ work, and Gpt4o, which is stronger and costs more. A new agent has none set, which is why the box reads Default: Gpt4oMini.
- (5) AI Behavior Instructions is the prompt itself, up to 10,000 characters. It is prefilled with a Role / Tone / Rules scaffold — about 220 characters — and the app nudges you to write at least 50.
- (6) The readiness panel on the right tracks Prompt, Actions and Knowledge Base as you go, and tells you plainly when you have unsaved changes.
🔁 Editing the instructions switches the dropdown to Custom — your words are never silently overwritten. If you then pick a different template, ChatDaddy asks first: "Switching will replace it with the selected template." Copy anything you want to keep somewhere safe before you say yes.
✍️ The Rules section of the default prompt is the part to spend your time on. "Do not invent information" and "Escalate to a human when needed" are the two lines that separate a useful agent from an embarrassing one. Add your own: never quote a discount, never promise a delivery date, never give medical or legal advice — whatever your business cannot afford to have said on its behalf.
Step 6 — Write the fallback message
Scroll down inside Define Behaviour. The Fallback Message is what the agent says when it cannot answer — the moment your customer meets the limits of the machine. The form marks it required, and it is the single most important sentence in the whole build.
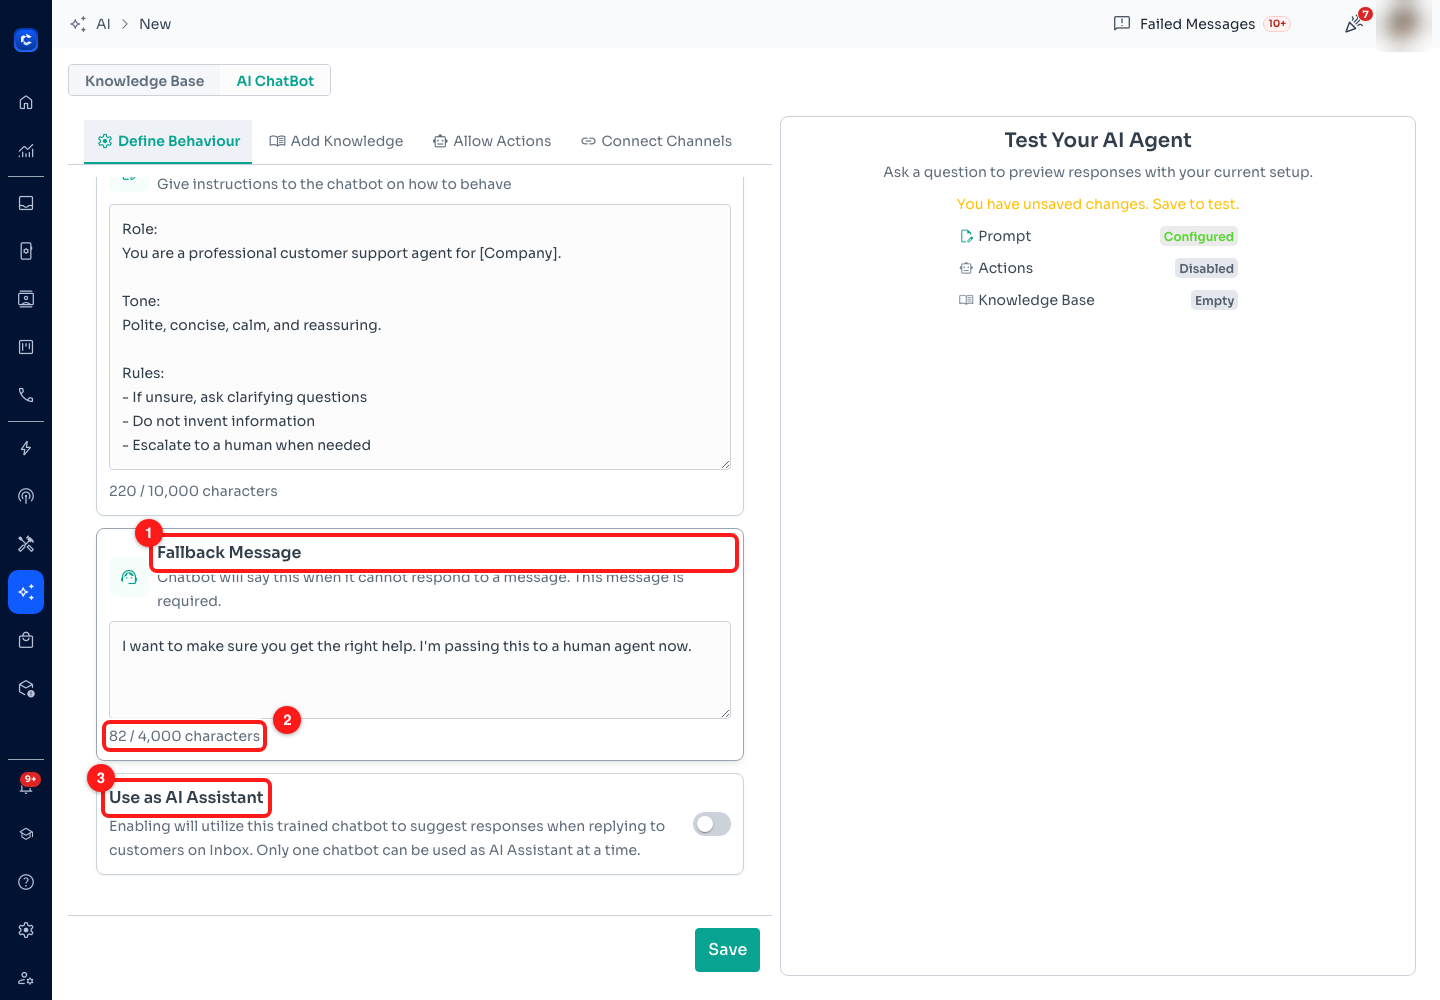
Step 6 — (1) Fallback Message, (2) the character counter, (3) Use as AI Assistant.
- (1) Fallback Message — up to 4,000 characters, though three lines is plenty. The default reads "I want to make sure you get the right help. I'm passing this to a human agent now." It works because it does not apologise, does not blame the customer, and says what happens next.
- Say what happens next and roughly when. "A member of our team will reply here within office hours" prevents the follow-up message asking whether anyone is there.
- (3) Use as AI Assistant is a different job entirely. Instead of replying to customers, the agent suggests replies to your team inside the Inbox, and a human sends them. Only one chatbot can be the AI Assistant at a time, so turning it on asks you to confirm that it will be taken off whichever agent has it now.
💡 Use as AI Assistant is the safest way to start. Turn it on instead of connecting a channel, and for a week your agents see AI-drafted replies they can edit or ignore. You get to read what the agent would have said to real customers, with a human between it and the send button. Fix the prompt from what you see, then go live.
Step 7 — Add Knowledge: link the library to the agent
Open the Add Knowledge section. This is where the library you built in Step 3 becomes something the agent can read. An agent with no knowledge answers from the model's general training only, which is exactly how a bot ends up inventing your refund policy.
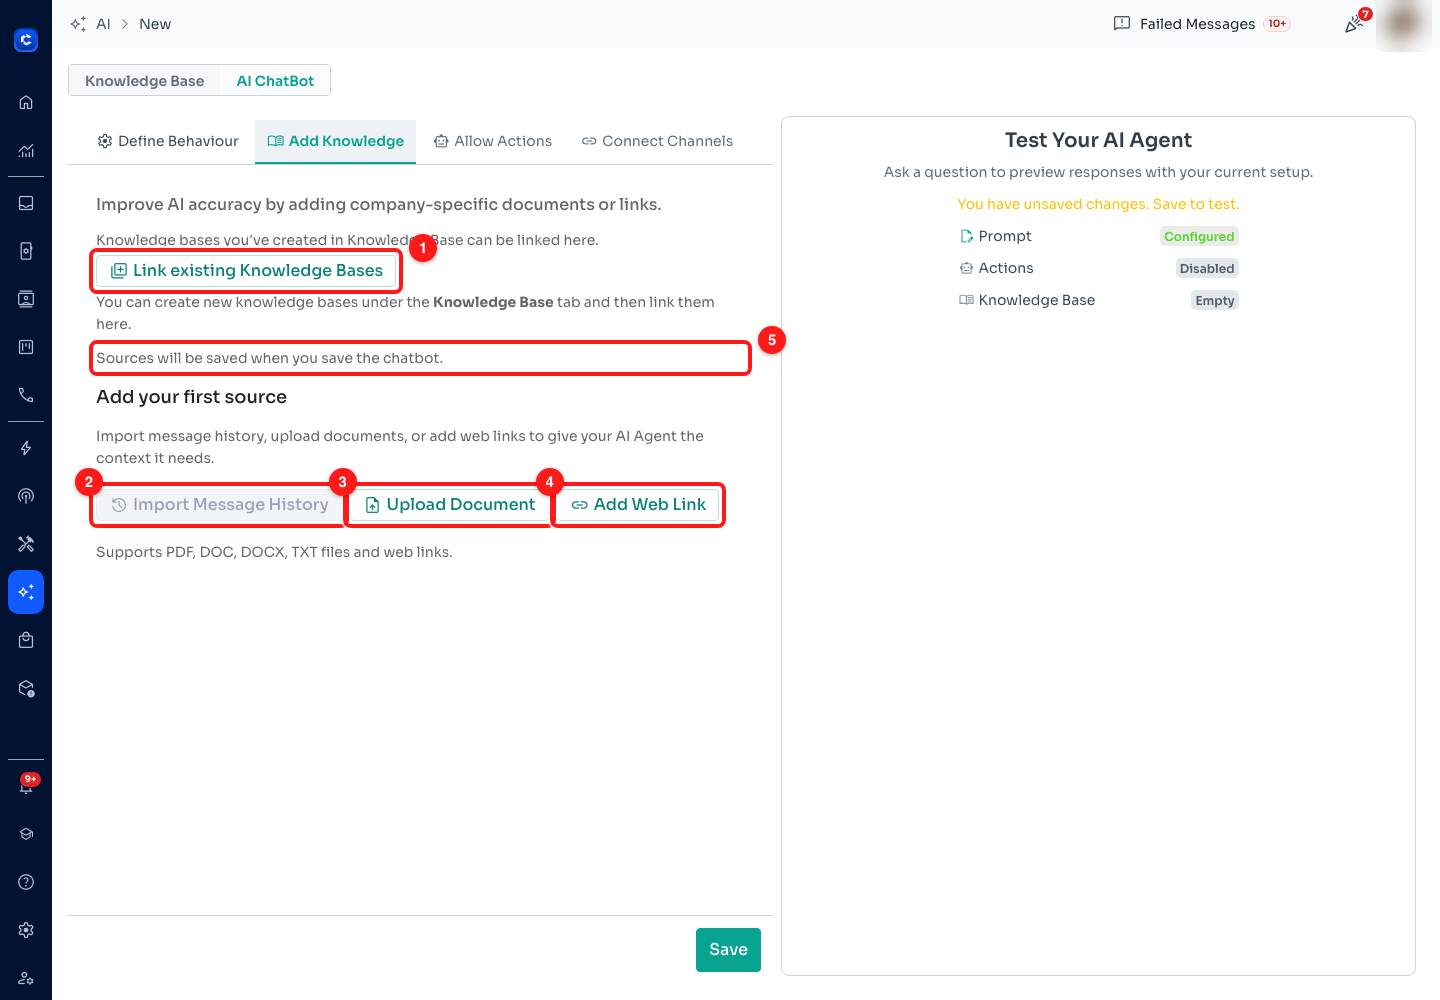
Step 7 — (1) Link existing Knowledge Bases, (2) Import Message History, greyed out on an unsaved agent, (3) Upload Document, (4) Add Web Link, (5) the notice that sources save with the chatbot.
- (1) Link existing Knowledge Bases attaches a library you already built. This is the route to prefer — one library, several agents, one place to update when the price changes.
- (3) Upload Document and (4) Add Web Link attach a source to this agent only. Quicker in the moment, worse in six months, because the same PDF ends up uploaded four times and updated once. This section takes PDF, DOC, DOCX and TXT files as well as web links.
- (2) Import Message History is greyed out on a brand-new agent, with the tooltip "Save your chatbot first to import message history". Save the agent, reopen it, and it works.
- (5) Sources are saved when you save the chatbot — adding a file here does not commit it on its own.
Import Message History is worth a paragraph of its own, because it is the best source of training material you already own. It asks you three things in turn: which connected channel to read, which chats (leave it empty to take them all), and how far back to go — All time, Last 7 days, Last 30 days or a custom range, with 30 days preselected. It then turns those conversations into a text file and attaches it as a source. Images and other attachments are not included, only the words.
Step 8 — Allow Actions: a preview of what is coming
Open Allow Actions. This section shows six things a future agent will be able to do beyond talking, each with its own switch, all off by default. It is worth reading so you know what is on the way — but it is not working yet, and this article would be doing you no favours by pretending otherwise.
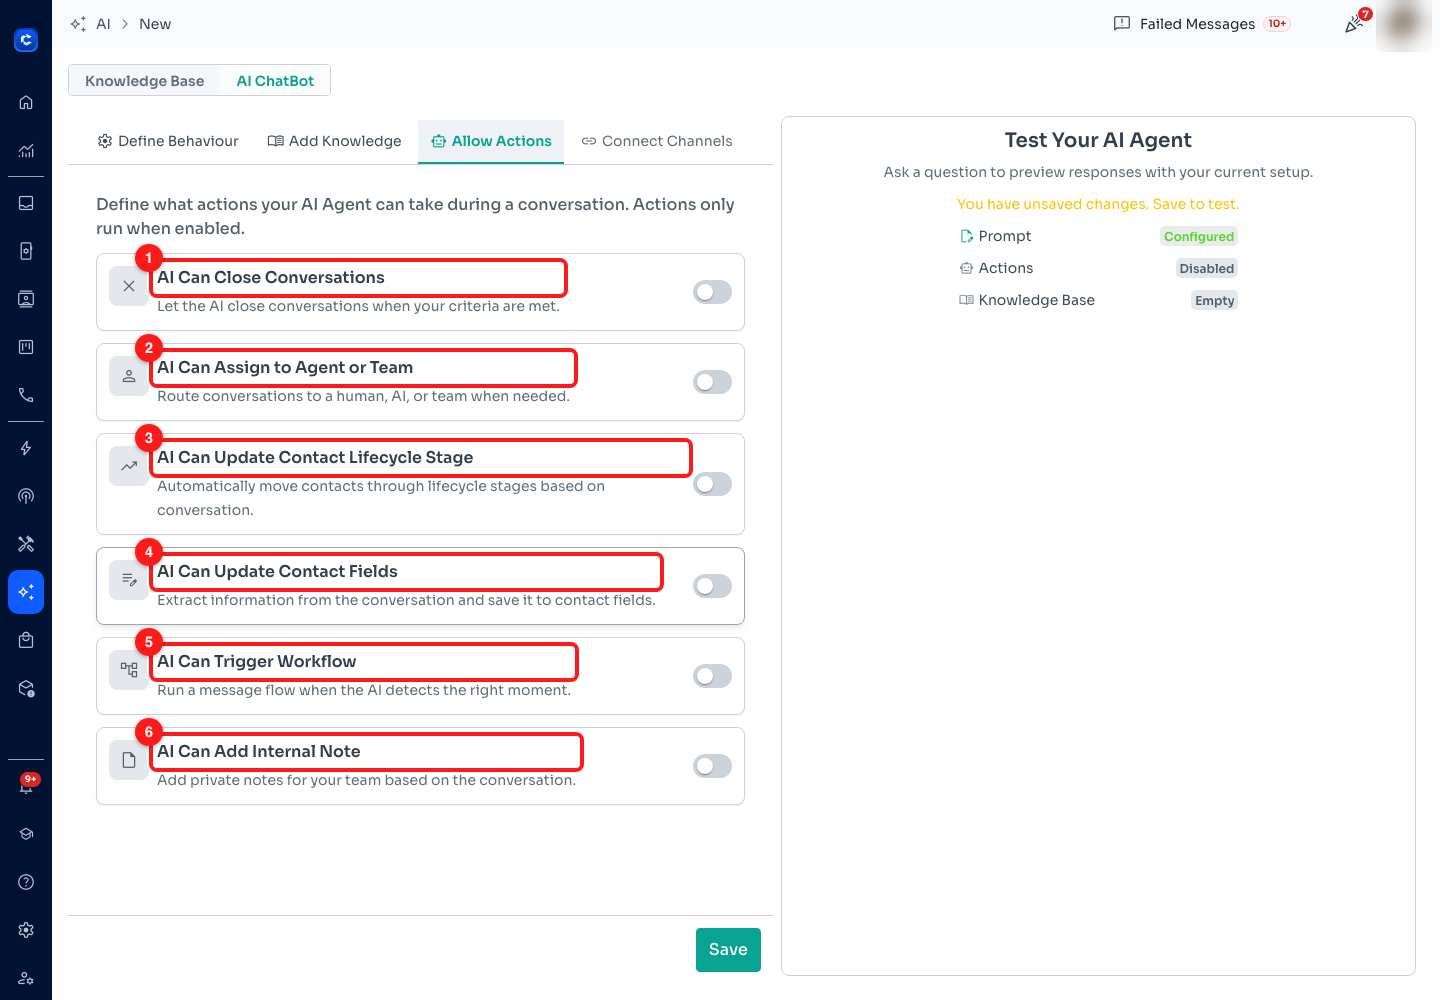
Step 8 — the six actions, all off by default: (1) Close Conversations, (2) Assign to Agent or Team, (3) Update Contact Lifecycle Stage, (4) Update Contact Fields, (5) Trigger Workflow, (6) Add Internal Note.
🚧 Do not rely on this section yet. The switches here are not saved with your chatbot — turn one on, save, reopen the agent, and it is off again. AI Can Trigger Workflow always reports "No workflows available" however many message flows your workspace has. And the "Action triggered:" lines you see in the test panel are simulated, not a record of anything that happened. Build your escalation with the Fallback Message in Step 6 and the Assign dropdown in Step 9 — those do work.
For reference, this is what the six switches are intended to do:
- (1) AI Can Close Conversations — close a chat when criteria you describe are met.
- (2) AI Can Assign to Agent or Team — route the conversation to a human agent, an AI agent or a team.
- (3) AI Can Update Contact Lifecycle Stage — move a contact to Lead, Qualified, Customer, Champion or Other based on the conversation.
- (4) AI Can Update Contact Fields — extract details from the chat and write them to named contact fields.
- (5) AI Can Trigger Workflow — start one of your message flows when the agent detects the right moment.
- (6) AI Can Add Internal Note — leave a private note for your team on the conversation.
Step 9 — Connect Channels: put the agent in front of customers
Open Connect Channels. This is the switch that takes the agent from a draft on your screen to something answering real people, so read every row before you save.
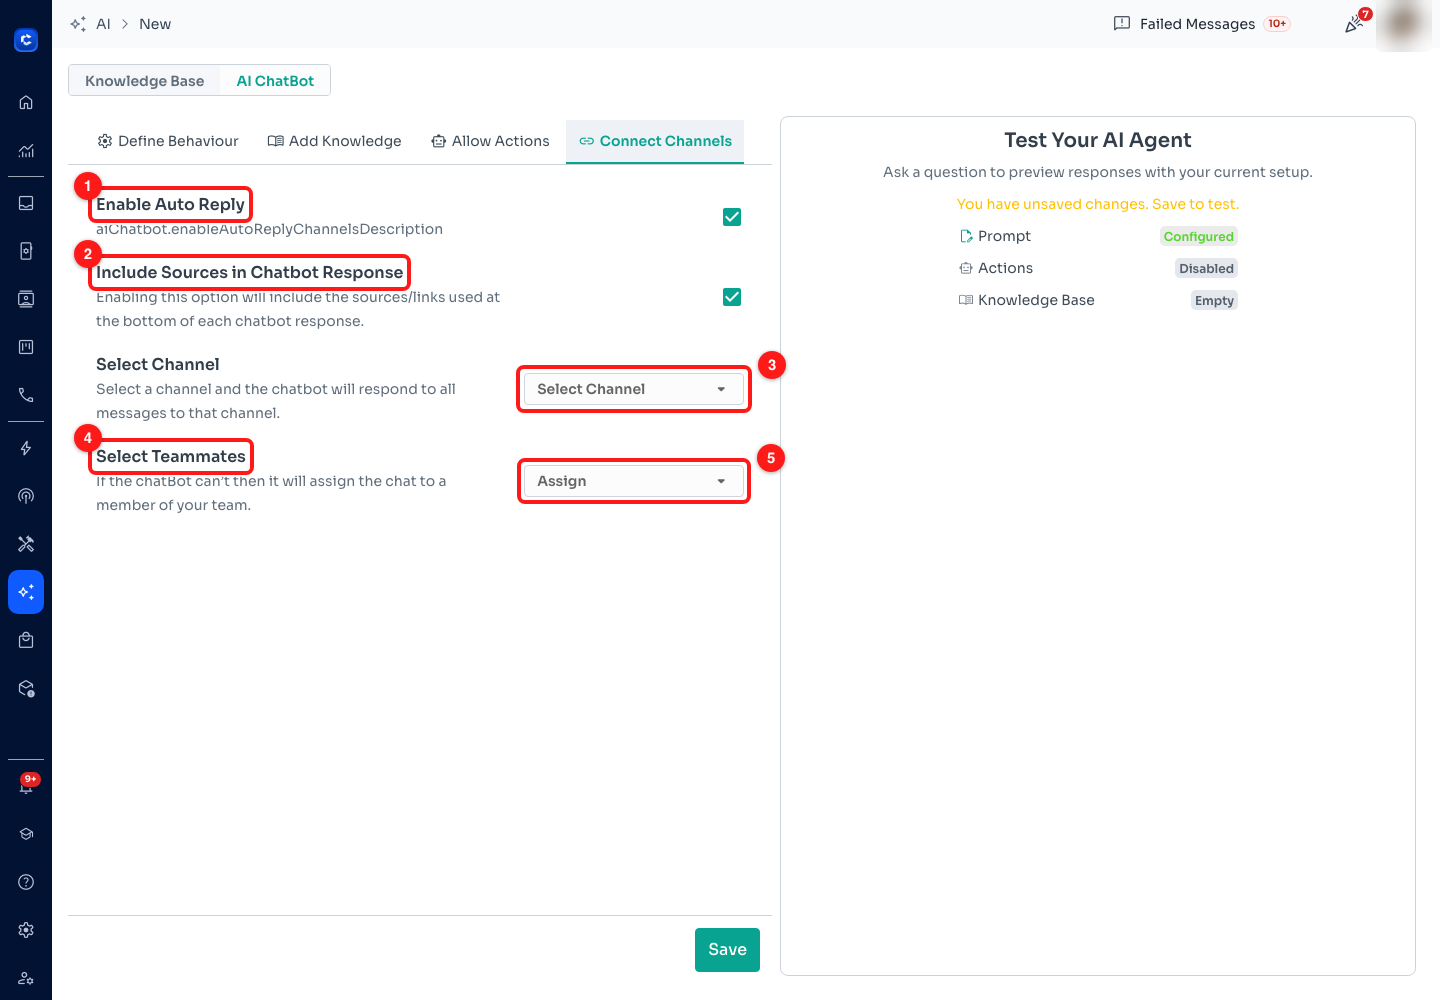
Step 9 — (1) Enable Auto Reply, (2) Include Sources in Chatbot Response, (3) Select Channel, (4) Select Teammates, (5) the Assign dropdown.
- (1) Enable Auto Reply is the master switch. With it off, the agent exists but answers nobody.
- (2) Include Sources in Chatbot Response appends the sources and links the agent used to the bottom of each reply. Reassuring in a B2B or documentation context; clutter in a consumer WhatsApp chat. Your call — it is on by default.
- (3) Select Channel picks which channel the agent answers on. The agent replies to all messages on the channel you pick, so a channel handled by a busy human team is the wrong place to start.
- (4) Select Teammates and (5) Assign decide who picks the conversation up when the agent cannot. Point this at a person or team who is actually watching the Inbox — an escalation to nobody is worse than no agent at all.
🐞 The help text under Enable Auto Reply currently renders as the raw key
aiChatbot.enableAutoReplyChannelsDescriptionrather than a sentence. That is a missing translation string in the app, not something you have configured wrongly. The switch itself works normally.
Step 10 — Save, then test before anyone else does
Press Save. The panel on the right becomes a working chat window against your agent, using the exact prompt, knowledge and model you just configured. Test here until you are bored of it. This is the last cheap place to find out the agent is wrong.
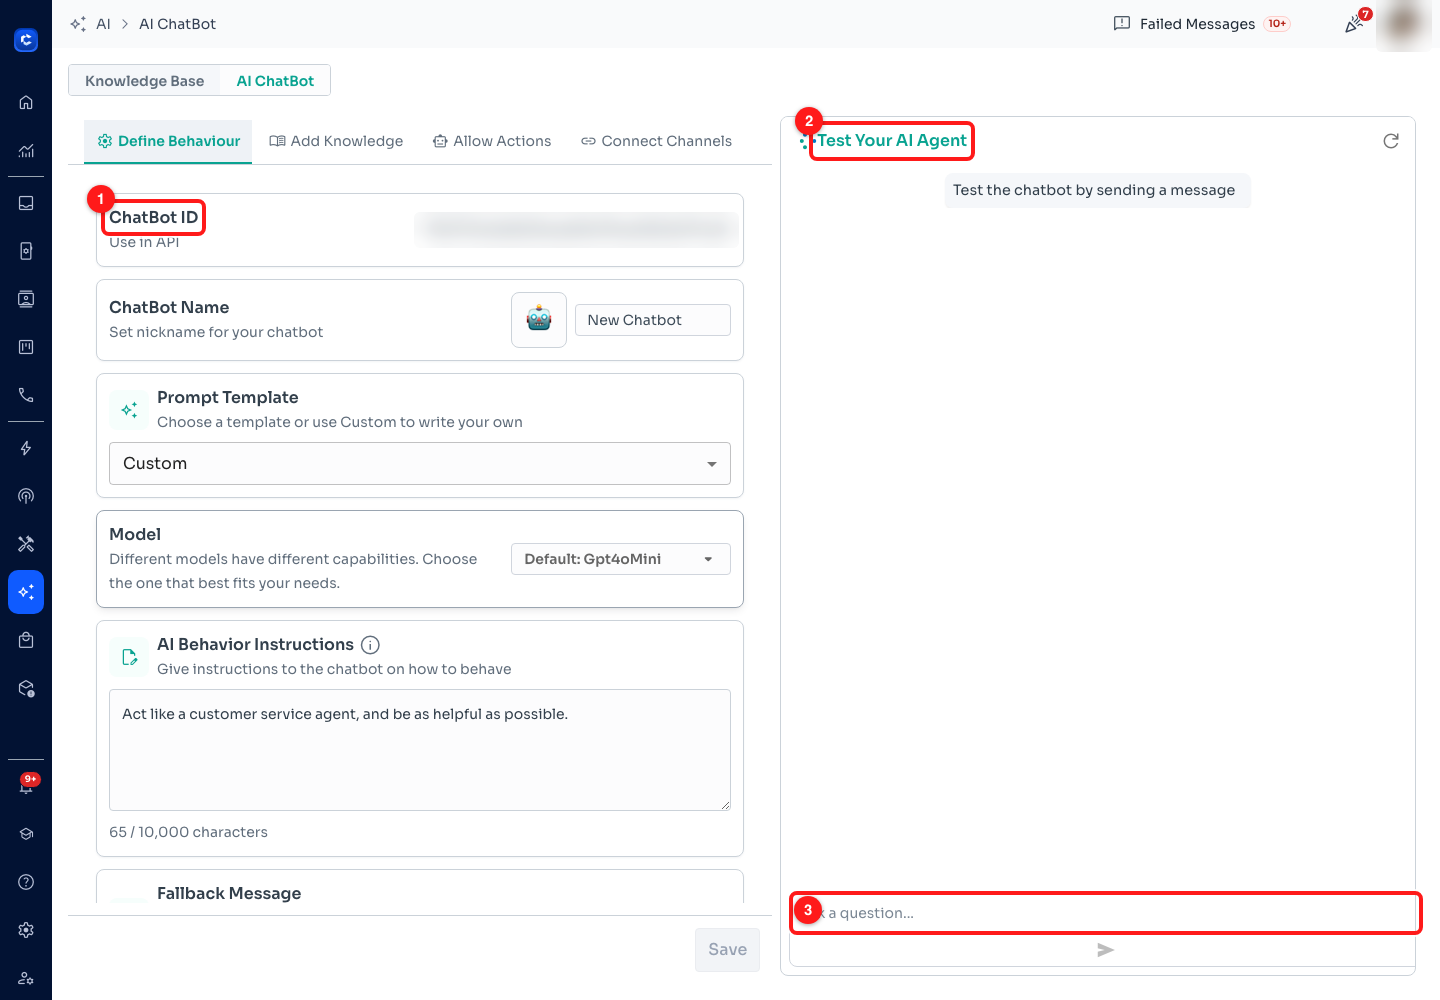
Step 10 — (1) ChatBot ID, blurred here, (2) the Test Your AI Agent panel, (3) the question box.
- (3) Ask a question sends a message to the agent exactly as a customer would. Try your five most common questions from the scope exercise, one at a time.
- Then try to break it. Ask something outside its scope and check that you get your fallback message rather than an invented answer. Ask for a discount. Ask something rude. Ask the same question three ways.
- (1) ChatBot ID appears once the agent is saved and is labelled Use in API — it is the handle for calling this agent from your own code. Treat it as an identifier you do not paste into public places.
- The panel only works on a saved agent. While you have unsaved changes it says so, and testing is disabled until you save.
🧪 Test the handover, not just the answers. The questions your agent answers well are the ones you designed for. The ones that matter are the questions you did not think of — and what you are checking is that it says so and passes them on, rather than guessing.
Step 11 — Read the list and keep an eye on it
Back on the AI ChatBot tab, the list is your running status board. Four columns tell you whether each agent is doing anything, and to whom.
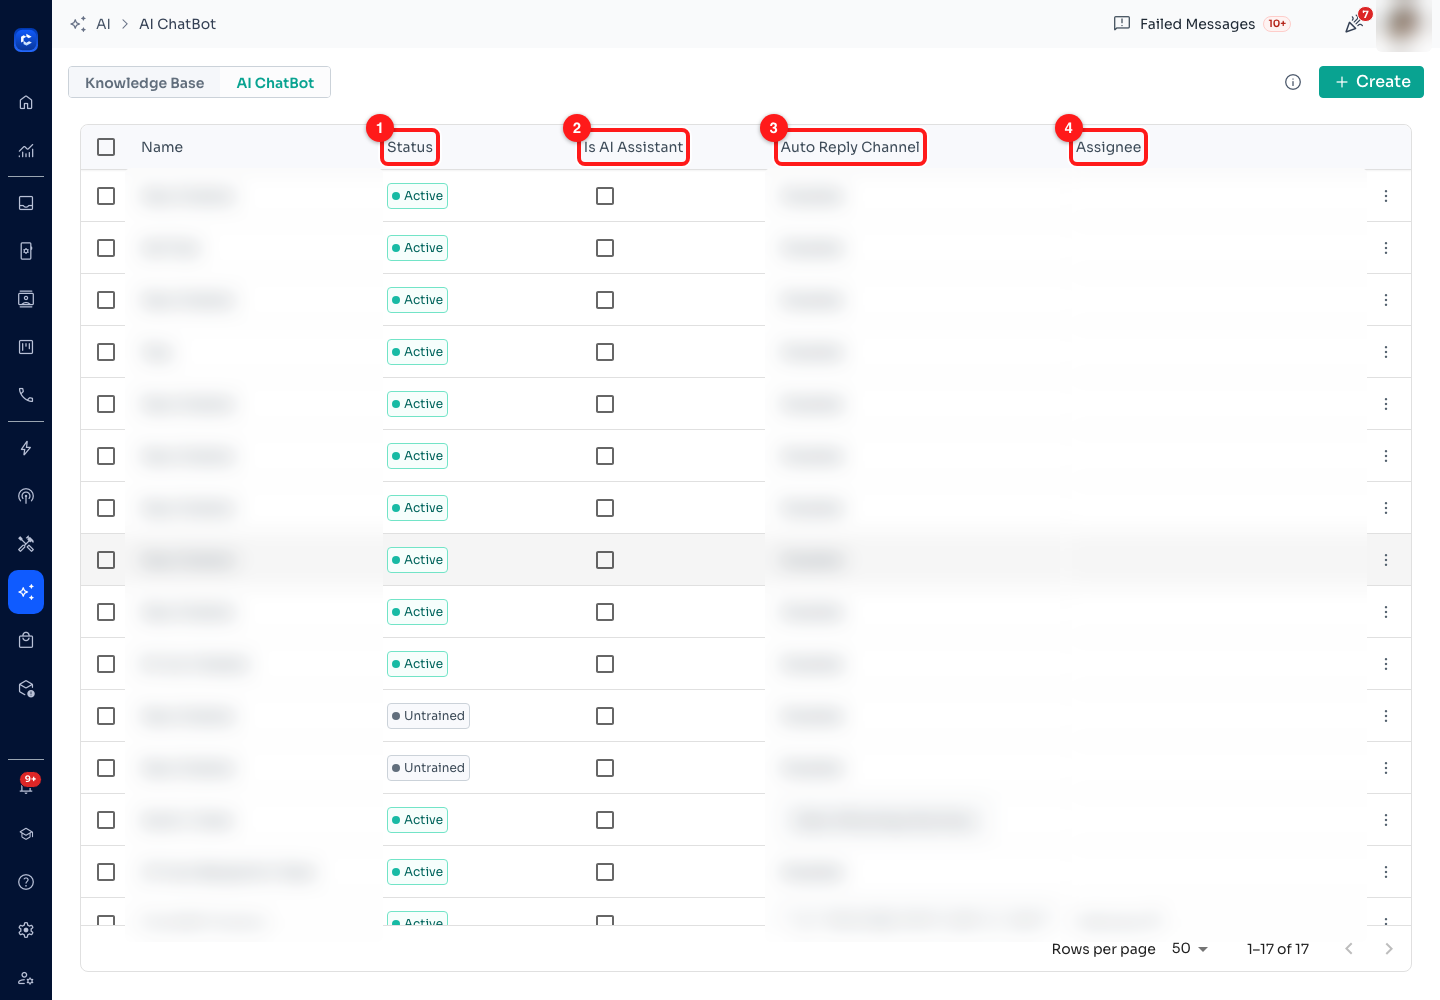
Step 11 — (1) Status, (2) Is AI Assistant, (3) Auto Reply Channel, (4) Assignee. Names and channels are blurred here.
- (1) Status tracks training on the agent's sources. Untrained means it has never been trained; Training shows a percentage while it runs; Active means a training run finished and the agent is ready; Failed and Aborted mean it did not finish. Anything other than Active is the first thing to check when replies are not happening.
- (2) Is AI Assistant marks the single agent currently suggesting replies to your team in the Inbox.
- (3) Auto Reply Channel shows Disabled for every agent that is not connected to a channel. This column is the honest answer to "is my bot live?" — a room full of Active agents with Disabled channels is answering nobody.
- (4) Assignee is the human or team that agent escalates to. A blank assignee on a connected agent is a conversation about to go nowhere.
The three video lessons in this module
Each lesson opens inside ChatDaddy from the Academy page, or on YouTube using the links below.
- Set up the AI Chatbot (v2) · 6:32 · intermediate · building a knowledge-grounded agent, testing it and handing off cleanly — Steps 1 to 7 and Step 10.
- Set up a ChatGPT agent on WhatsApp · 12:59 · advanced · the deep dive on prompts, guardrails and connecting the agent to live conversations — Steps 5, 6 and 9.
- Three steps to an effective chatbot · 1:09 · beginner · the planning framework to use before you build — the scope, script, escalate section above.
Common questions
My agent says it does not know, and the answer is definitely in my documents.
Work through it in this order. First, check the AI ChatBot list: if Status reads "Untrained", the sources have not been learned yet. Second, open the agent's Add Knowledge section and confirm the source is actually listed there and marked Ready — uploading a file without saving the chatbot does not attach it. Third, check the Knowledge Base tab: a library showing 0 Bytes and 0 sources was created but never filled. If all three look right, the answer is probably in the document in a form the agent cannot match — try phrasing the question the way a customer would in the test panel, and if that works, the problem is your prompt rather than your knowledge.
The agent is Active but never replies to anyone.
"Active" describes training, not deployment. Look at the Auto Reply Channel column on the AI ChatBot list — if it says Disabled, the agent is not attached to any channel and will never see a customer message. Open the agent, go to Connect Channels, turn on Enable Auto Reply, pick a channel in Select Channel and save. Also worth checking that the channel you picked is the one customers actually message.
Can I try the AI on my team before letting it talk to customers?
Yes, and it is the recommended way to start. In Define Behaviour, turn on "Use as AI Assistant" and leave Connect Channels alone. The agent then suggests replies to your team inside the Inbox instead of sending anything itself — a human reads each suggestion and decides. Only one chatbot can be the AI Assistant at a time, so you are choosing your best agent for the job. When the suggestions are consistently what you would have sent, connect it to a channel.
What is the difference between a knowledge base and the sources I upload inside a chatbot?
A knowledge base created on the Knowledge Base tab is a shared library — build it once and link it to as many agents as you like from Add Knowledge. A document uploaded directly inside a chatbot belongs to that chatbot alone. The second is quicker today and more work later, because when your prices change you have to remember every agent you uploaded the price list to. Use shared knowledge bases for anything more than one agent needs.
I turned on an Allow Actions switch, saved, and it was off again when I came back.
That is the current behaviour, not a fault on your side. The Allow Actions section is a preview of functionality that is not finished: the switches are not stored with the chatbot, so they reset every time you reopen the builder, and nothing is sent to the server when you save. AI Can Trigger Workflow also reports "No workflows available" no matter how many message flows exist. Until this ships, do your escalation with the Fallback Message and the Assign dropdown in Connect Channels, and your automation with the message flows in Module 6.
How much does the AI cost to run?
There are two separate costs. Knowledge base storage is billed on the amount of data stored — the Storage Size Data figure on the knowledge base form, and the Stored Data Size column on the list, are what that is measured against, and the form links to the pricing page. Conversations themselves consume AI credits, and which model you pick in Define Behaviour affects how fast that goes. For current prices, check the pricing page linked from the knowledge base form or ask ChatDaddy support — this article deliberately does not quote figures that change.
Can I stop the agent immediately if it says something wrong?
Open the agent, go to Connect Channels and turn off Enable Auto Reply, then save. That stops it answering while leaving everything you built intact, so you can fix the prompt and switch it back on. You do not need to delete the agent, and you should not — deleting loses the configuration and the knowledge links along with it.
➡️ Next: Module 6 — Automations & Message Flows. Your AI agent handles the conversations it understands. The next module covers the ones you can predict: keyword replies, offline bots and multi-step message flows that run on a trigger — the automation you can rely on today while the AI actions in Step 8 are still being finished.