
Academy Module 6 — Automations & Message Flows: Work That Runs Without You
The written walkthrough of Academy Module 6. Build a message flow in the visual editor, set up keyword replies that answer instantly, cover your closed hours with an offline bot, and chase quiet leads with timed follow-ups that stop the moment somebody replies.
Also searched as: Academy Module 6 — Automations & Message Flows: Work That Runs Without You, What this module covers, Find the Automation section and learn its five tabs, Start a flow: from scratch, from AI, or from a template, Understand the canvas before you put anything on it, Add the trigger: what is allowed to start a flow, Set the trigger so it cannot run away with itself, The step palette: the six things a flow can do, Write the message, Follow up on a quiet lead, and stop when they answer, Keyword replies: the list, Build a keyword reply, The five ways a keyword can match, Decide when a rule is allowed to fire, Cover your closed hours with the offline bot
🎓 Part 6 of 11 — ChatDaddy Academy. This is the written version of the Automations & Message Flows module: eight video lessons, about 27 minutes of watching, turned into steps you can follow on screen. You can read this on its own, or keep it open beside the videos on the Academy page.
Module 5 gave you an AI agent for the questions you cannot predict. This module covers the ones you can. Roughly the same handful of messages arrive every day — how much, where are you, are you open — and every one of them is a rule you can write once. By the end you will have a flow built in the visual editor, a keyword reply wired to it, an offline bot covering the hours nobody is at a desk, and a follow-up that chases a quiet lead and shuts itself off the moment they answer.
What this module covers
- The mental model behind a flow — triggers, steps and branches
- Building a flow from scratch in the visual editor and saving it
- Keyword replies: matching a word and answering with a flow
- The five ways a keyword can match, and how to stop rules firing over each other
- The offline bot — one automatic answer for everything outside business hours
- Timed follow-ups for leads who go quiet, cancelled automatically when they reply
- Checking what actually ran, and starting from a template instead of a blank page
⏱️ Time needed: about 40 minutes to read and build along. You need: a connected channel (Module 2) and, for the keyword-reply step, at least one saved message flow to point the rule at. Nothing here sends a message to a real customer until you switch a rule on.
Step-by-step
Step 1 — Find the Automation section and learn its five tabs
Everything in this module lives behind the lightning-bolt icon in the left rail. Open it and you land on Automation, which is really five tools sharing one page. Knowing which tab does what saves you building the wrong thing.
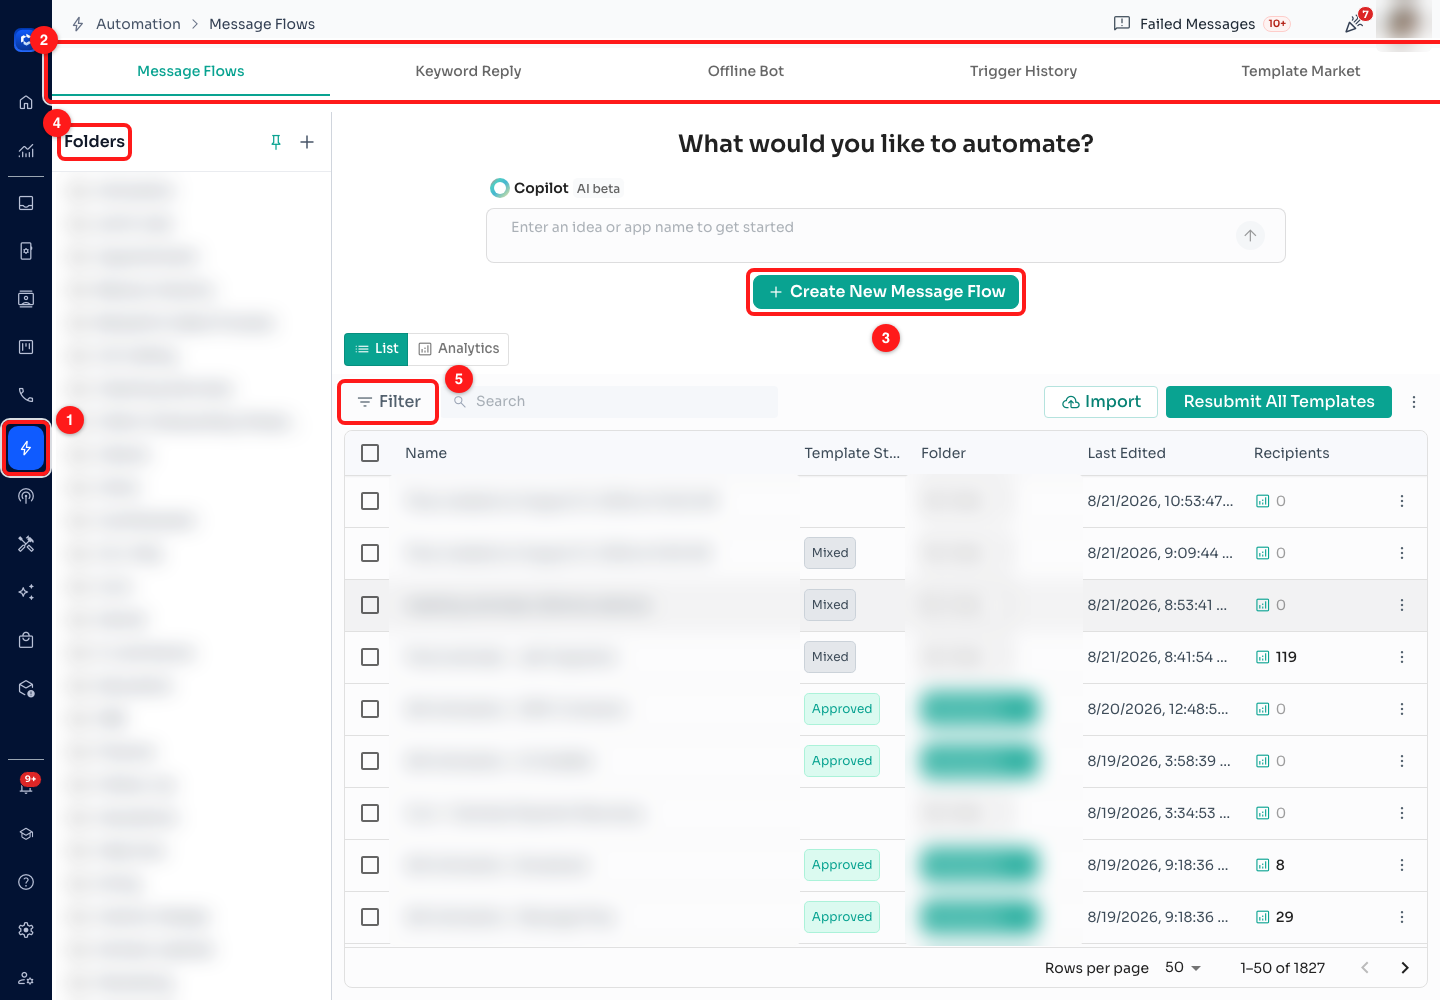
Step 1 — (1) the Automation icon in the left rail, (2) the five tabs, (3) Create New Message Flow, (4) the folder tree, (5) Filter. Flow names, folders and the Folder column are blurred here; on your own screen you see them in full.
- Message Flows — the flows themselves. A flow is the content and logic: what gets said, in what order, with what branches. This tab is where you build and store them.
- Keyword Reply — rules that watch incoming messages for a word and fire a flow when they see it. The rule and the flow are separate things: the rule is the trigger, the flow is the answer.
- Offline Bot — one flow, fired automatically outside the business hours you set.
- Trigger History — the record of which flows actually ran, and how far they got.
- Template Market — ready-made flows, filterable by language and industry, that you copy into your own list instead of starting from a blank canvas.
- (4) Folders and (5) Filter matter more than they look. A busy workspace ends up with hundreds of flows, and an unfiled flow called "Flow created on 21 August" is impossible to find six weeks later. Name flows as you make them and file them.
Step 2 — Start a flow: from scratch, from AI, or from a template
Click Create New Message Flow and ChatDaddy asks how you want to begin rather than dropping you straight onto an empty canvas. The three answers suit three different situations.
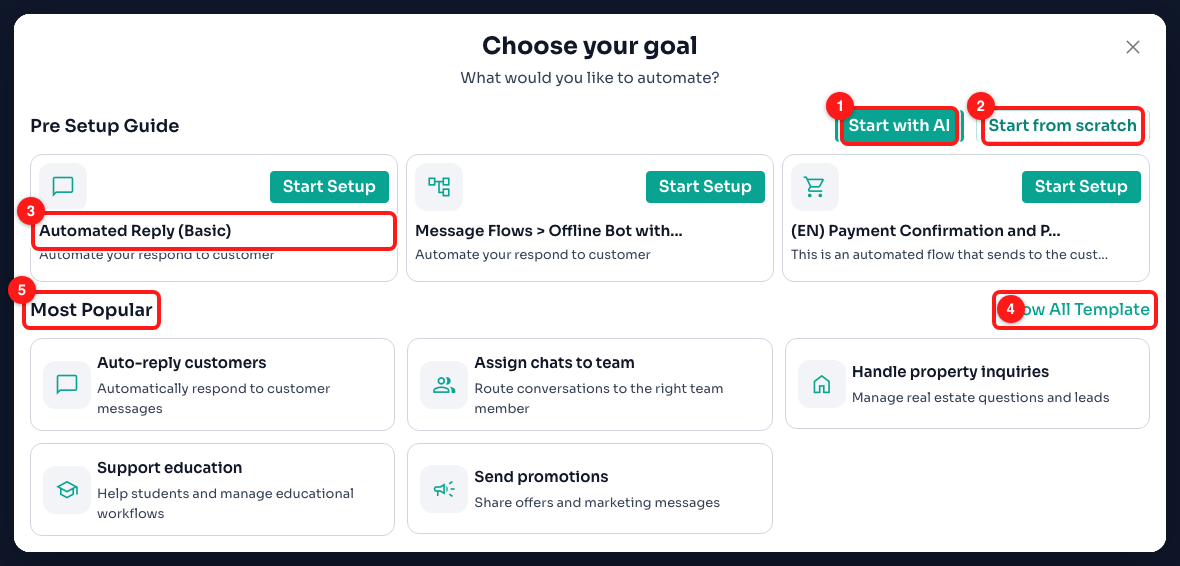
Step 2 — (1) Start with AI, (2) Start from scratch, (3) a Pre Setup Guide template, (4) Show All Template, (5) the Most Popular goals.
- (1) Start with AI — describe what you want in the box at the top of the Message Flows tab ("Enter an idea or app name to get started") and Copilot drafts the flow. It is labelled AI beta, so read what it produces before you switch it on.
- (2) Start from scratch — the blank canvas. This is what the rest of this module uses, because building one flow by hand teaches you what the templates are doing.
- (3) Pre Setup Guide — three short starters, including Automated Reply (Basic) and Offline Bot with Keyword Reply, which is the exact combination Steps 9 to 13 build.
- (5) Most Popular — goal-shaped shortcuts: auto-reply customers, assign chats to team, handle property inquiries, support education, send promotions.
Step 3 — Understand the canvas before you put anything on it
A blank flow is one prompt and a toolbar. The prompt is the important part: a flow can begin with a Message or with a Trigger, and the choice decides how the flow will ever run.
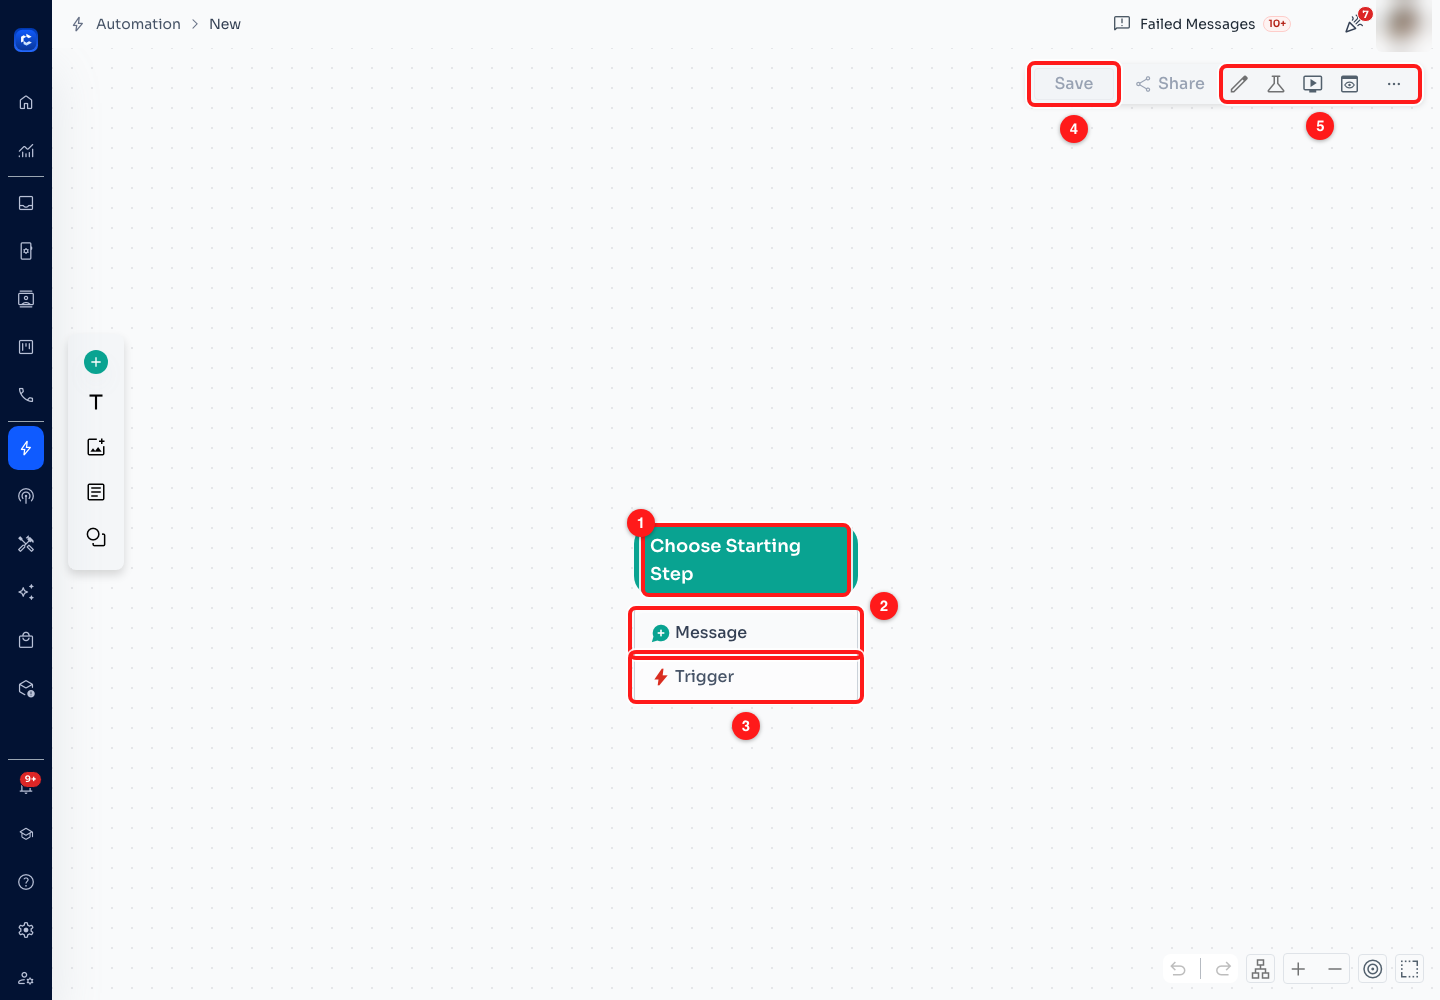
Step 3 — (1) Choose Starting Step, (2) start with a Message, (3) start with a Trigger, (4) Save (greyed out until there is something to save), (5) edit details, test, demo preview, preview and the options menu.
- Start with a Trigger when the flow should run itself — when a message arrives, when a new chat opens, when a contact or ticket changes. The trigger is inside the flow.
- Start with a Message when something else will start the flow for you — a keyword reply, the offline bot, or a broadcast. The flow is then pure content, and the thing that fires it lives on another tab.
- (5) The five toolbar icons, left to right: edit flow details (name, folder), Test, demo preview (walks the flow on the canvas), preview flow (renders it as a chat in the panel on the right) and the options menu.
- Test is disabled on any flow that contains a trigger. That is deliberate, not a fault: a triggered flow is started by a real event, so there is nothing for a manual test to stand in for. Use preview flow on those, and Test on flows that are fired from elsewhere.
⚠️ The builder saves by itself, every 15 seconds. You do not have to press Save for the flow to exist — open a blank canvas, add one node, and a flow called "Flow created on <date>" is already in your Message Flows list. Two consequences: an experiment you abandoned is still there and needs deleting, and a trigger you added is live as soon as it is saved. If you are only exploring, turn the trigger's Enabled switch off (Step 5) before you walk away.
Step 4 — Add the trigger: what is allowed to start a flow
Click Trigger and the Add New Node dialog opens on its Trigger tab. These are the events ChatDaddy can watch for you. Pick Incoming Message — the workhorse, and the one every keyword-style automation is built on.
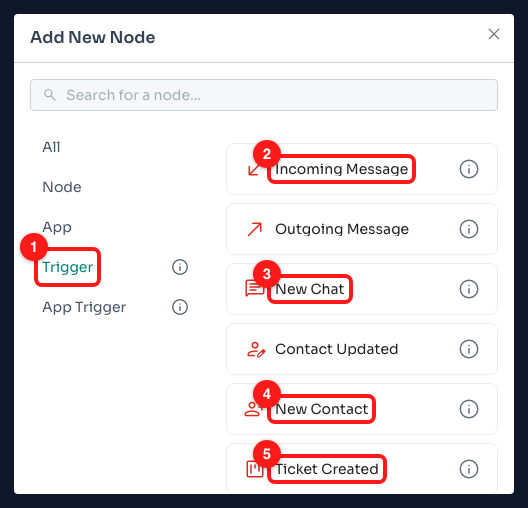
Step 4 — (1) the Trigger category, (2) Incoming Message, (3) New Chat, (4) New Contact, (5) Ticket Created. The search box at the top filters the whole list.
- Incoming Message and Outgoing Message — fire on any message in either direction.
- New Chat — fires only on the very first message of a brand-new conversation. This is the one to use for a welcome message, because it will not fire again on message two.
- New Contact and Contact Updated — fire from the contacts database rather than from a conversation. Useful for onboarding sequences after an import (Module 7).
- Ticket Created and Ticket Updated — fire from the CRM board, so a flow can react to a deal moving stage.
- New Note — fires when a teammate leaves an internal note on a chat.
- The dialog also has Node and App tabs, which hold the steps rather than the triggers. Step 6 covers those.
Step 5 — Set the trigger so it cannot run away with itself
The trigger lands on the canvas. Click its body — not the pencil, which renames it — and its settings open in the panel on the left. There are only four controls here and one of them matters a great deal.
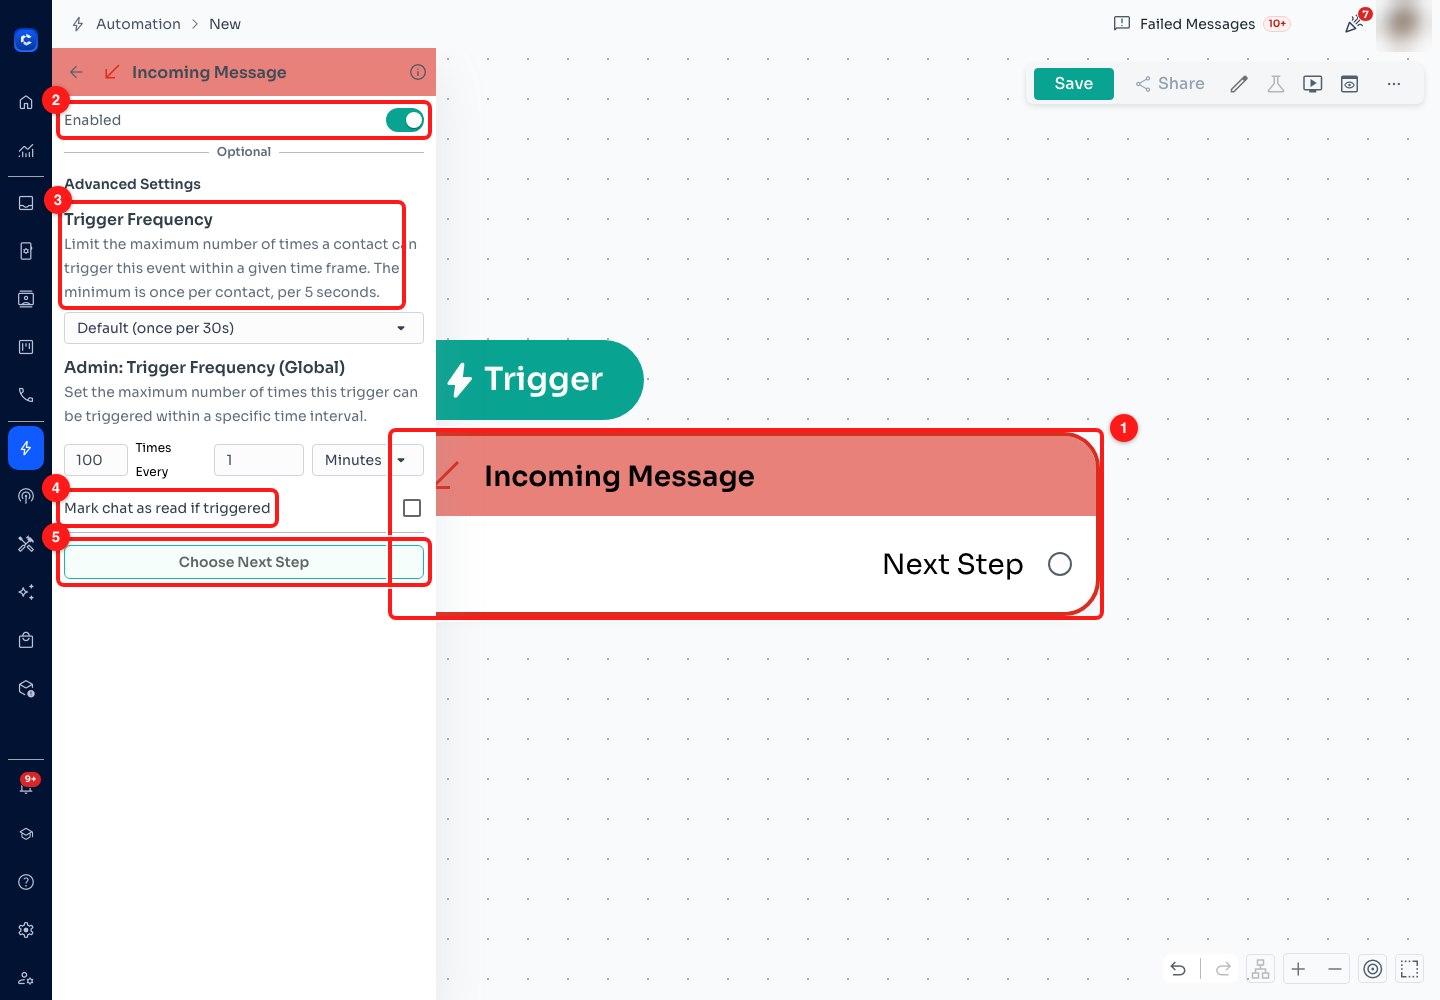
Step 5 — (1) the trigger node on the canvas, (2) the Enabled switch, (3) Trigger Frequency, (4) Mark chat as read if triggered, (5) Choose Next Step.
- (2) Enabled is the on/off switch for the whole rule, and it is on by default. This is the switch to reach for when a flow misbehaves: turning it off stops the flow firing while leaving everything you built intact.
- (3) Trigger Frequency limits how often one contact can set this flow off. The default is once per 30 seconds, and the screen states the floor: the minimum is once per contact, per 5 seconds. Raise it — once per hour, once per day — for anything that sends a real message, or a customer firing off five quick lines gets five replies.
- (4) Mark chat as read if triggered clears the unread badge when the automation answers. Leave it off if you want a human to still see the chat waiting.
- (5) Choose Next Step is how you extend the flow from here.
🔒 The screenshot also shows an Admin: Trigger Frequency (Global) block. That one is only rendered for accounts with admin panel access, so if you do not see it on your own screen, nothing is wrong — you are looking at the normal view.
Step 6 — The step palette: the six things a flow can do
Click Choose Next Step. The list splits into New Node — the six built-in steps — and New App, which is where a flow reaches outside ChatDaddy. Six steps is the entire vocabulary; everything complicated is these six arranged well.
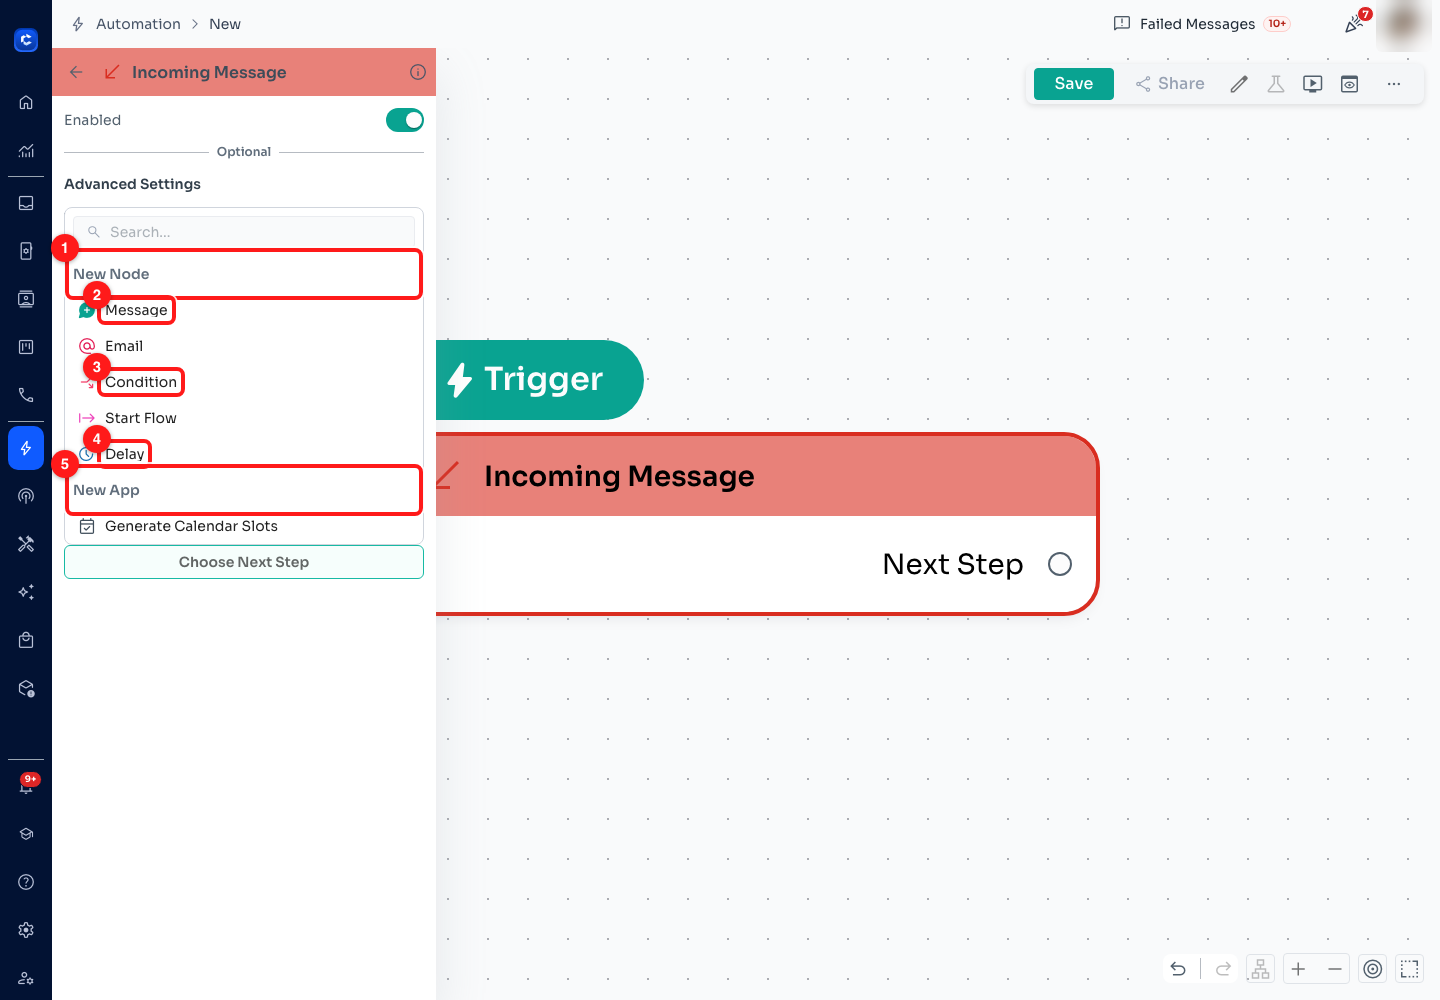
Step 6 — (1) the New Node section, (2) Message, (3) Condition, (4) Delay, (5) the New App section.
- Message — say something. Text, buttons, a list, media. The most common step by far.
- Email — send an e-mail instead of a chat message.
- Condition — the branch. Send the conversation down one path or another depending on what the contact said or what you know about them.
- Delay — wait. This is what turns a flow into a sequence rather than a single reply, and it is the whole basis of Step 8.
- Input — ask a question and capture the answer into the contact record.
- Start Flow — hand over to another flow, so a long process can be split into pieces you can reuse. The flow you point at has to have a starting message of its own, or the builder refuses the link.
- (5) New App steps reach further out: HTTP Request to call your own system, AI Chatbot to hand the conversation to the agent you built in Module 5, Calendar and Generate Calendar Slots for booking, and Create Ticket / Update Ticket / Stop Ticket Timer to drive the CRM board.
Step 7 — Write the message
Add a Message step and click Click here to Start Editing! on the new node. The composer opens on the left. Most of it is optional; only Body is not.
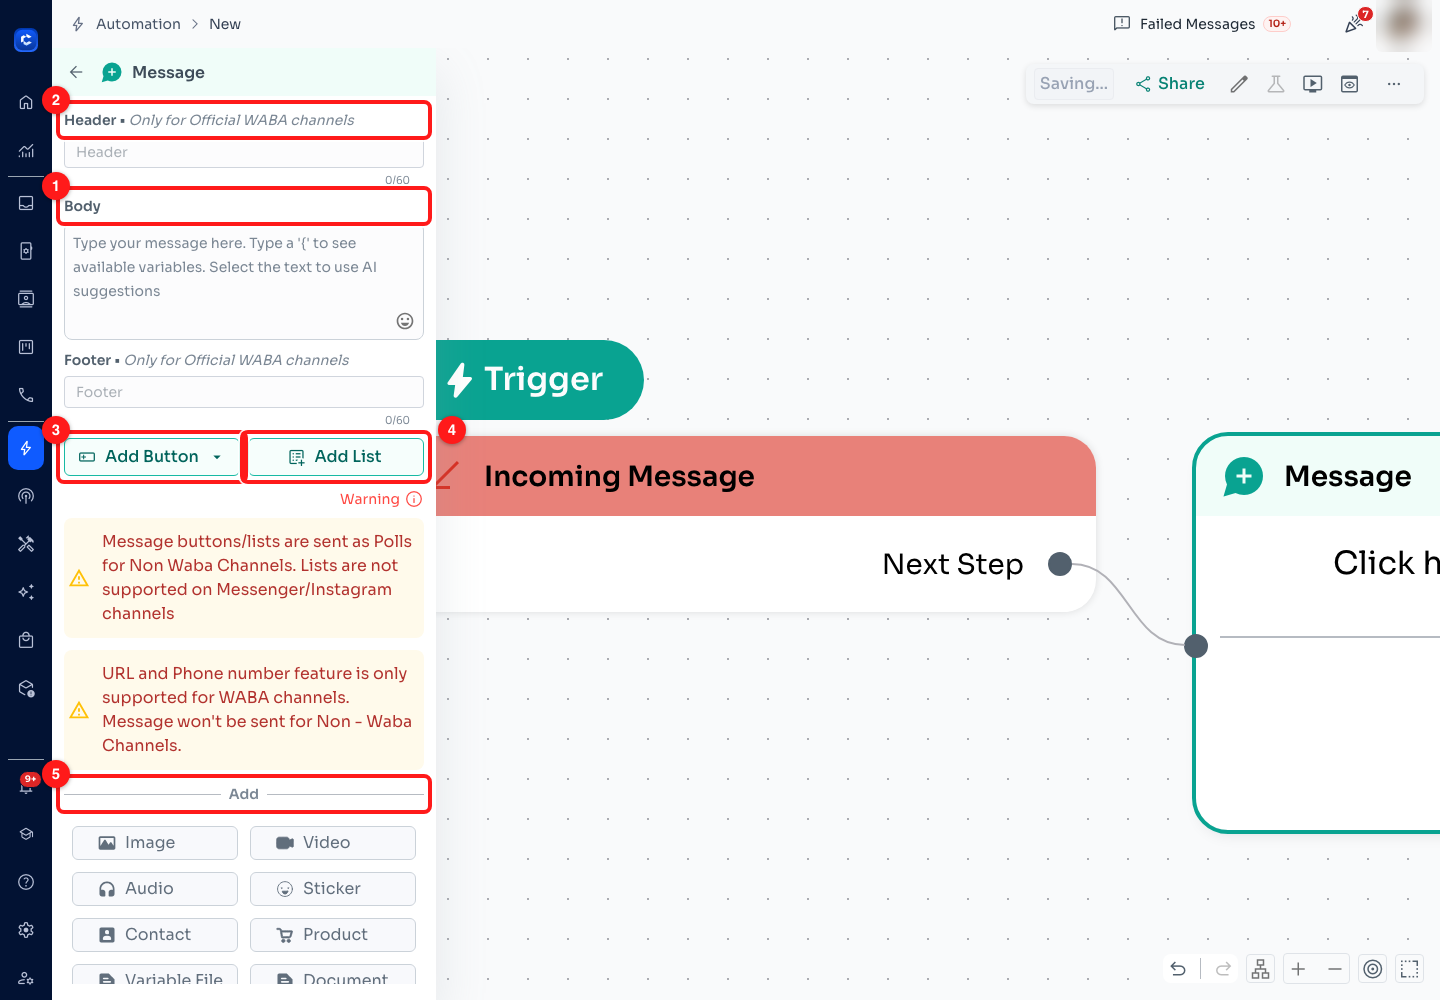
Step 7 — (1) Body, the message itself, (2) Header, WABA channels only, (3) Add Button, (4) Add List, (5) the Add row for media and attachments.
- (1) Body is the message. Type
{to insert a variable — the contact's name, a field from their record — and select any text you have written to get AI suggestions for rewording it. - (2) Header and Footer are each capped at 60 characters and are labelled Only for Official WABA channels. On a QR-connected number they simply will not appear.
- (3) Add Button and (4) Add List turn the message into something tappable, which is far more reliable than asking somebody to type 1, 2 or 3.
- (5) Add attaches an Image, Video, Audio, Sticker, Contact, Product, Variable File, Document or Voice Note.
- Further down the panel: Send Form attaches a form, Next Steps adds the following step without going back to the canvas, and Simulate Typing & Read Chat On Send makes the reply arrive after a short, human-looking pause.
📱 The composer prints two warnings and both are worth taking seriously. Buttons and lists are sent as polls on non-WABA channels, and lists are not supported on Messenger or Instagram at all. URL and phone-number buttons are WABA only, and the message will not be sent at all on a non-WABA channel. If your flow runs on a QR-connected number, keep the message to plain text and simple buttons.
Step 8 — Follow up on a quiet lead, and stop when they answer
A follow-up is not a separate feature — it is a Delay between two messages. Open the message you just wrote, scroll to Next Steps and click Add Delay, then open the delay to configure it. The last checkbox in it is the one that makes the difference between a helpful nudge and pestering somebody who already replied.
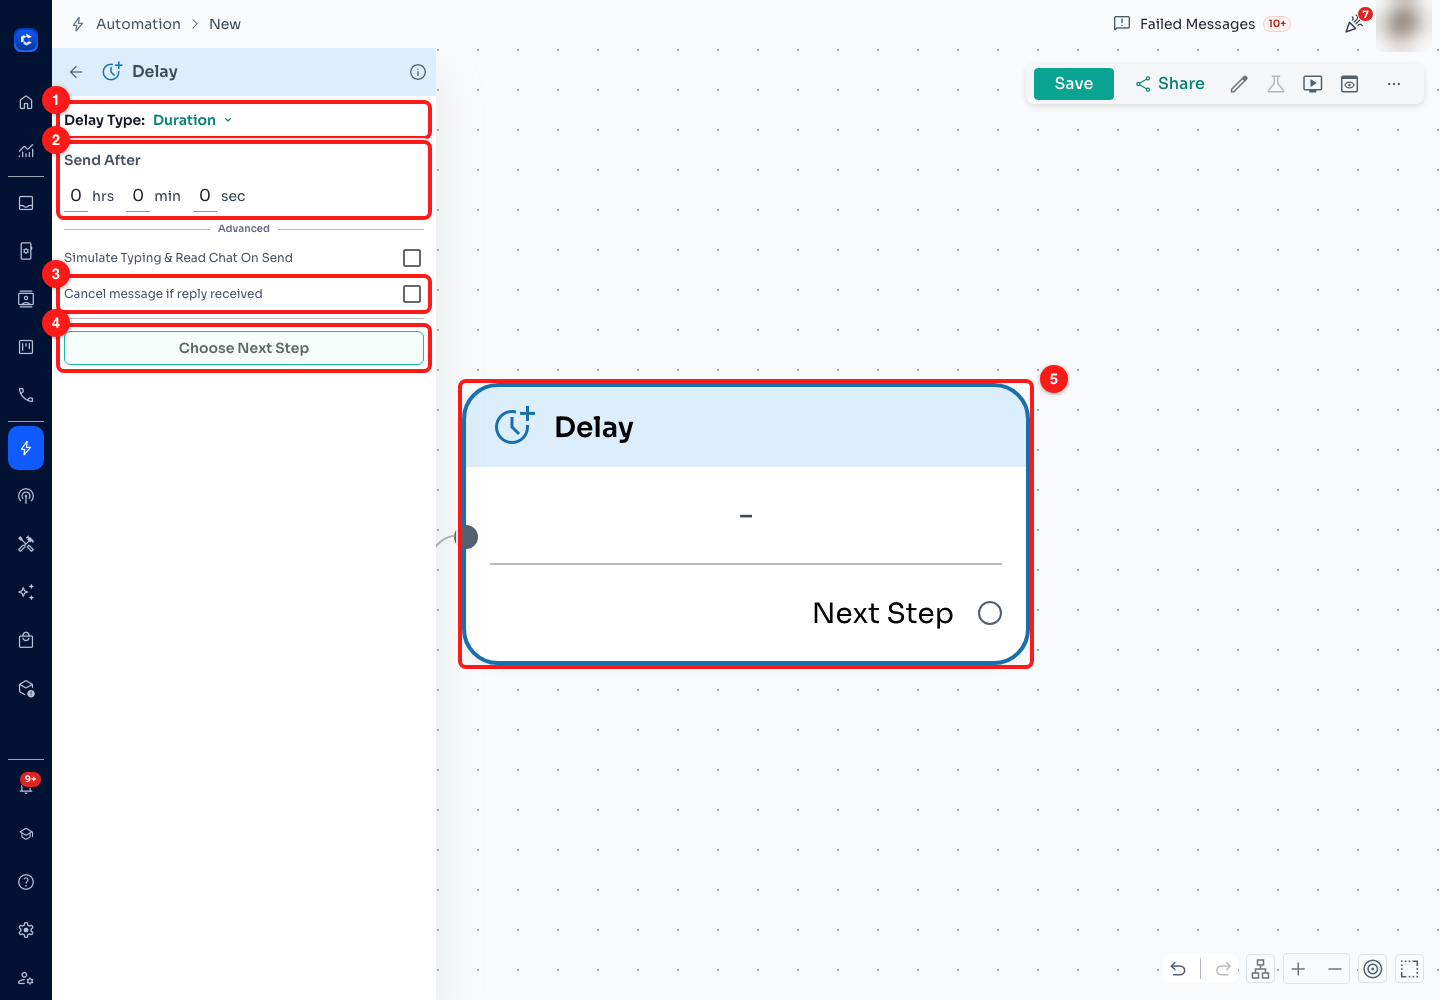
Step 8 — (1) Delay Type, (2) Send After, in hours, minutes and seconds, (3) Cancel message if reply received, (4) Choose Next Step, (5) the delay as it appears on the canvas.
- (2) Send After sets the wait in hours, minutes and seconds, so a 24-hour follow-up is 24 hrs and a "give them a moment" pause is 30 sec.
- (3) Cancel message if reply received is the whole point. With it ticked, the follow-up is dropped the instant the customer answers — so the person who replies in ten minutes never gets the "just checking in" message queued for tomorrow.
- A chase sequence is just this repeated: message → delay 1 day → message → delay 3 days → message. Attach a Condition step after a delay if the later messages should differ depending on what the contact did.
- Keyword replies and the offline bot carry the same safeguard under a different name — Cancel following messages if the Client Responds — which cancels every remaining message in the flow, not just the next one.
💾 Press Save when the flow reads the way you want. The builder will have saved it already, so Save is really a "save now rather than within 15 seconds" button — but pressing it is how you find out whether the flow has an error, because the button stays inactive while one is outstanding.
Step 9 — Keyword replies: the list
A flow that starts with a Message needs something to fire it, and for a single word — price, hours, location — that something is a keyword reply. Open the Keyword Reply tab. Each row is one rule.
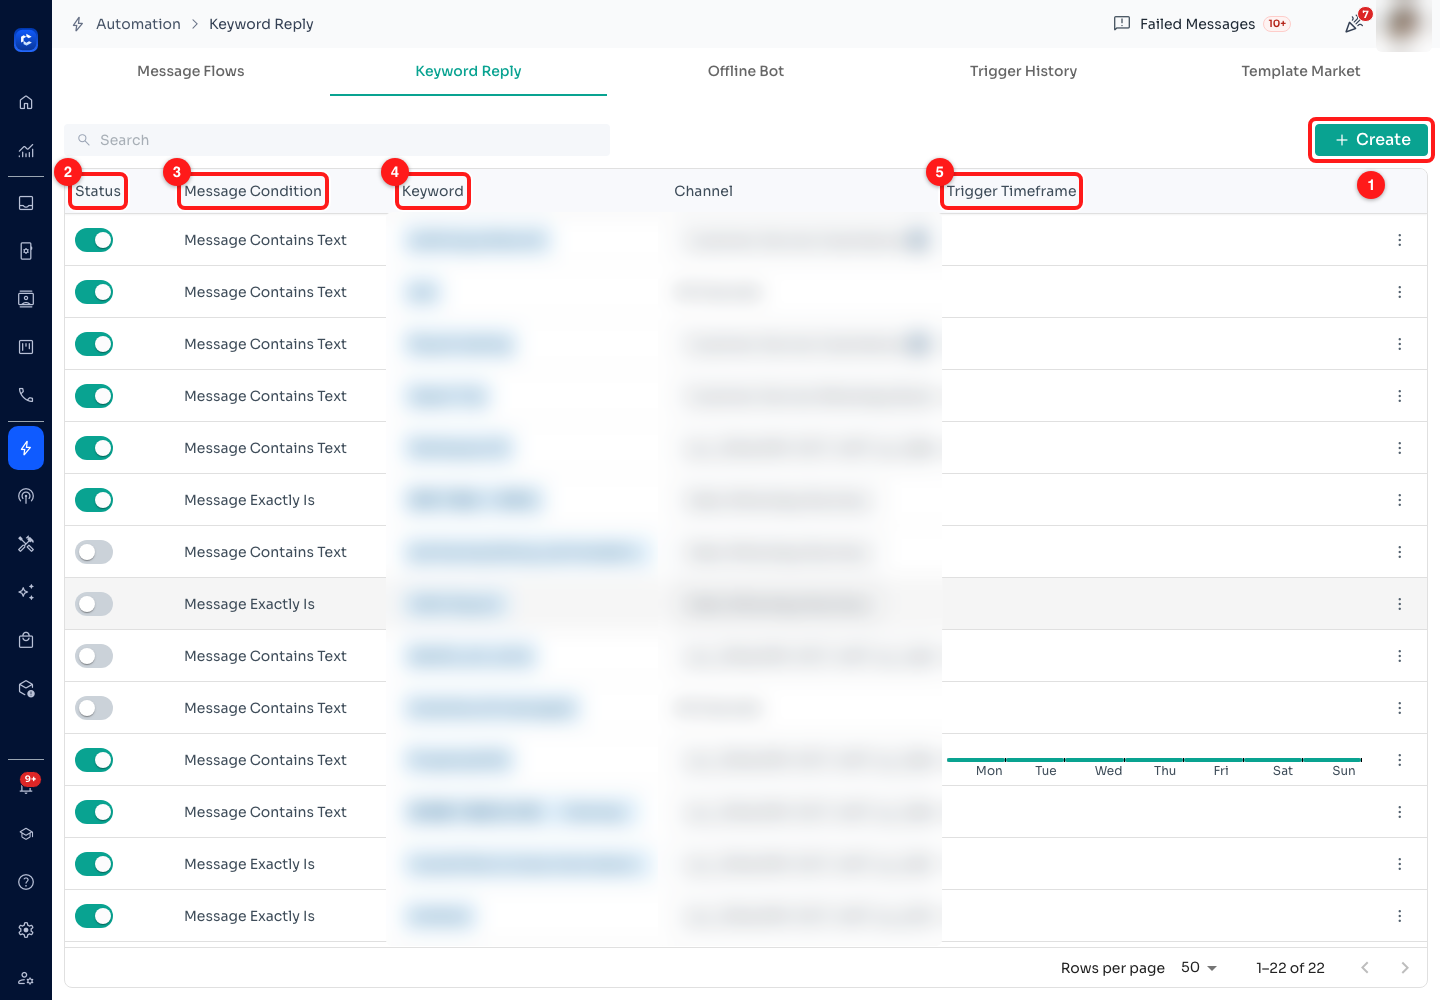
Step 9 — (1) Create, (2) the Status switch on every row, (3) Message Condition, (4) Keyword, (5) Trigger Timeframe. Keywords and channel names are blurred here; yours will show in full.
- (2) Status switches a rule on and off from the list, without opening it. This is the fastest way to silence a rule that is misfiring.
- (3) Message Condition shows how each rule matches — Message Contains Text, Message Exactly Is, and so on. Step 11 covers all five.
- (4) Keyword shows the words the rule watches for. A rule can hold several, comma separated, and one row commonly holds a whole family of spellings.
- (5) Trigger Timeframe shows the days a rule is allowed to fire on, for rules that have custom hours set. Blank means 24/7.
- The Channel column is the one to check when a rule "does not work". A rule scoped to one channel will not answer a customer who messaged a different number.
Step 10 — Build a keyword reply
Click Create. The form is three numbered sections and fits on one screen. Read it as a sentence: reply to this kind of message containing these words with this flow.
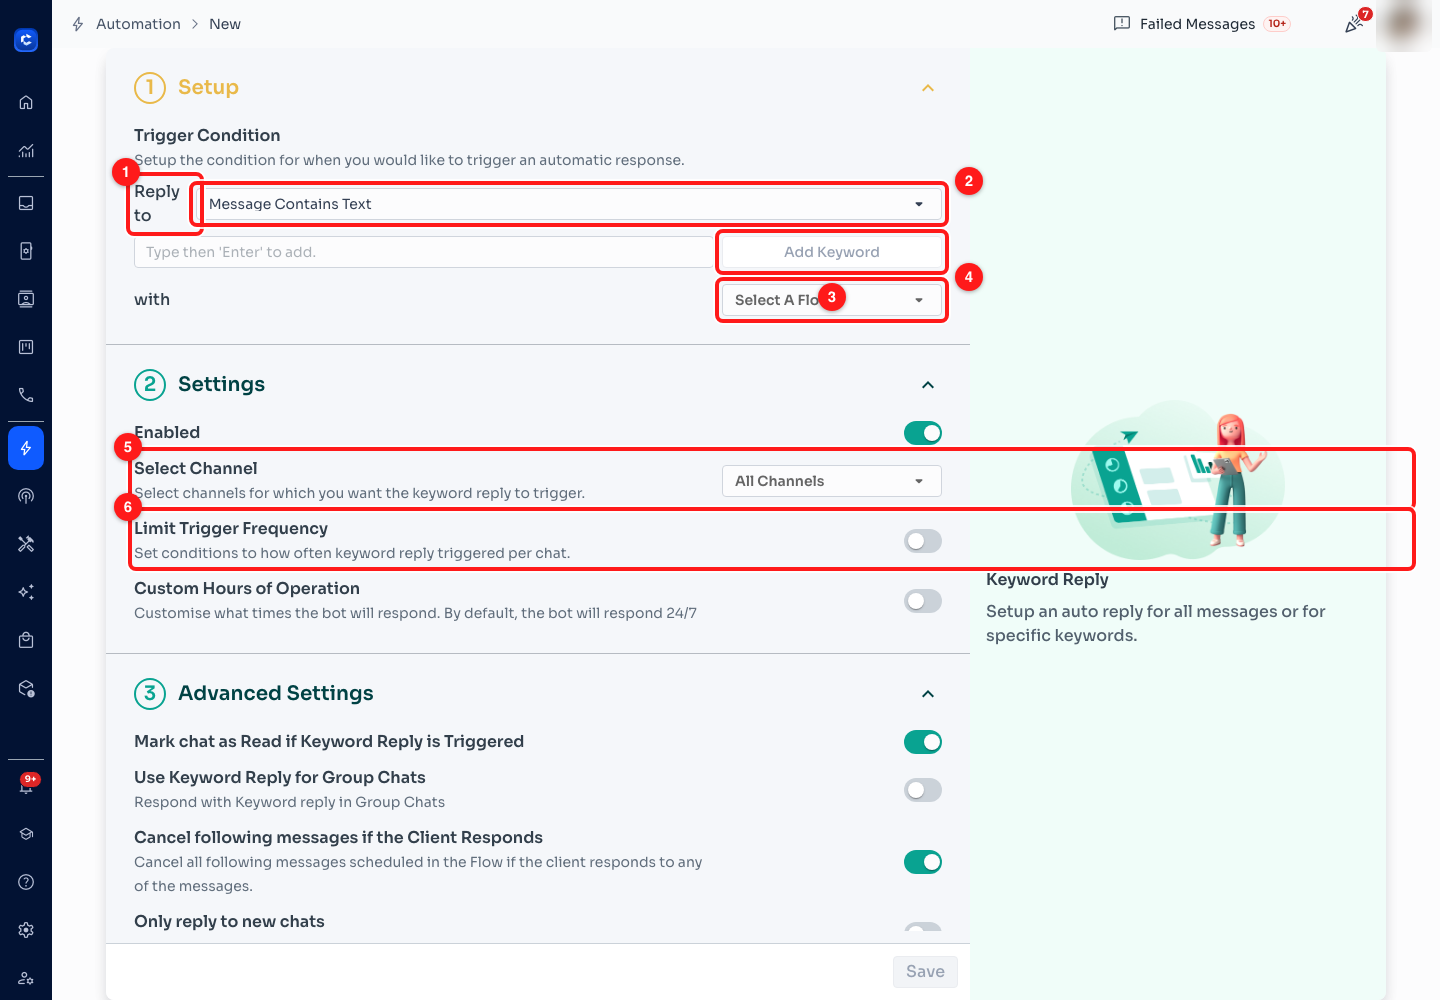
Step 10 — (1) Reply to, (2) the match condition, (3) the keyword box and Add Keyword, (4) the flow this rule answers with, (5) Select Channel, (6) Limit Trigger Frequency.
- (3) Keywords are added one at a time: type the word and press Enter, or click Add Keyword. Each one becomes a removable chip, so add every spelling your customers actually use — price, pricing, how much, and the same again in whatever other language they write in.
- (4) Select A Flow is where the rule meets the flow you built in Steps 3 to 8. This is why a flow fired by a keyword should not contain its own trigger: the keyword rule is the trigger.
- (5) Select Channel defaults to All Channels. Narrow it if the rule should only answer on one number.
- (6) Limit Trigger Frequency is off by default, which means the rule can fire on every matching message. Turn it on for anything that sends more than a one-liner.
- Enabled sits at the top of section 2 and is on by default — the rule goes live the moment you save.
Step 11 — The five ways a keyword can match
Open the Reply to dropdown. Choosing the right one of these five is the difference between a rule that helps and a rule that ambushes people.
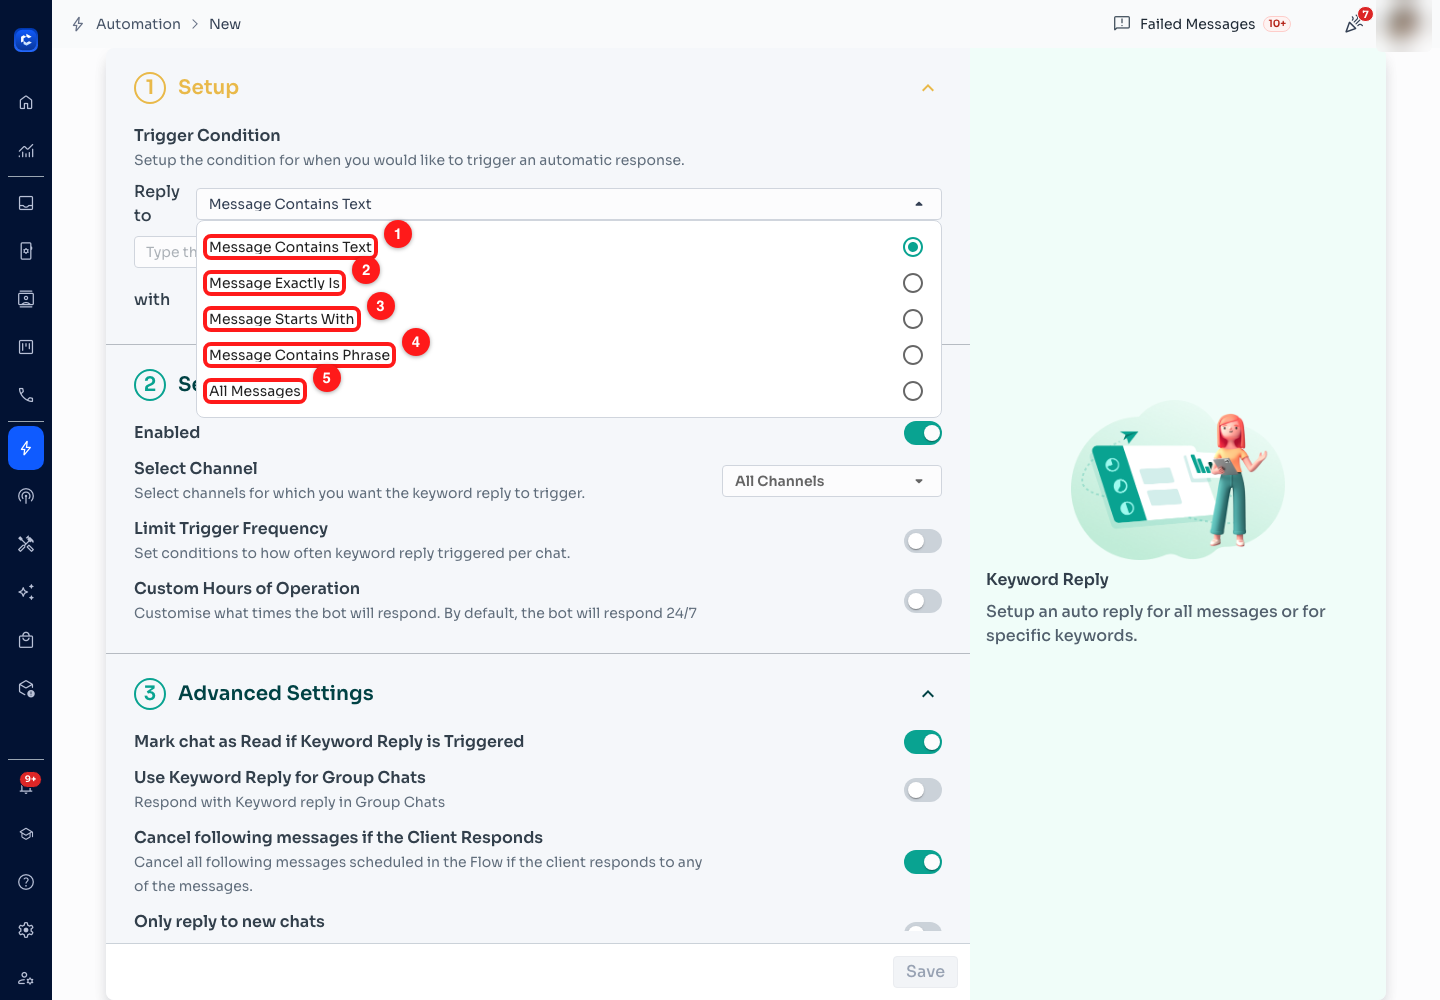
Step 11 — (1) Message Contains Text, (2) Message Exactly Is, (3) Message Starts With, (4) Message Contains Phrase, (5) All Messages.
- (1) Message Contains Text — the keyword appears anywhere in the message. The loosest option and the default. Watch for words hiding inside other words.
- (2) Message Exactly Is — the whole message equals the keyword and nothing else. The right choice for menu codes and campaign phrases, where you know exactly what the customer will send because your ad told them to send it.
- (3) Message Starts With — good for command-style keywords, so "stop" fires but "do not stop sending these" does not.
- (4) Message Contains Phrase — the phrase-level version of Contains Text, for keywords that are more than one word. Try it against a couple of real messages before you rely on it.
- (5) All Messages — fires on everything. This is the catch-all fallback, and it hides the keyword box because there is nothing left to match on. Give a workspace only one of these, scoped to one channel, or it will answer over the top of every other rule you own.
🧨 Rules do not know about each other. Two rules whose keywords both match one message both fire, and the customer gets two replies. Keep matches tight — prefer Exactly Is or Starts With over Contains Text whenever you reasonably can — keep at most one All Messages rule per channel, and turn a suspect rule off from the Status switch in the list before you go hunting for the cause.
Step 12 — Decide when a rule is allowed to fire
Two switches in section 2 control when, and both stay collapsed until you turn them on. Together they are how you stop a rule from repeating itself and how you stop it answering at three in the morning.
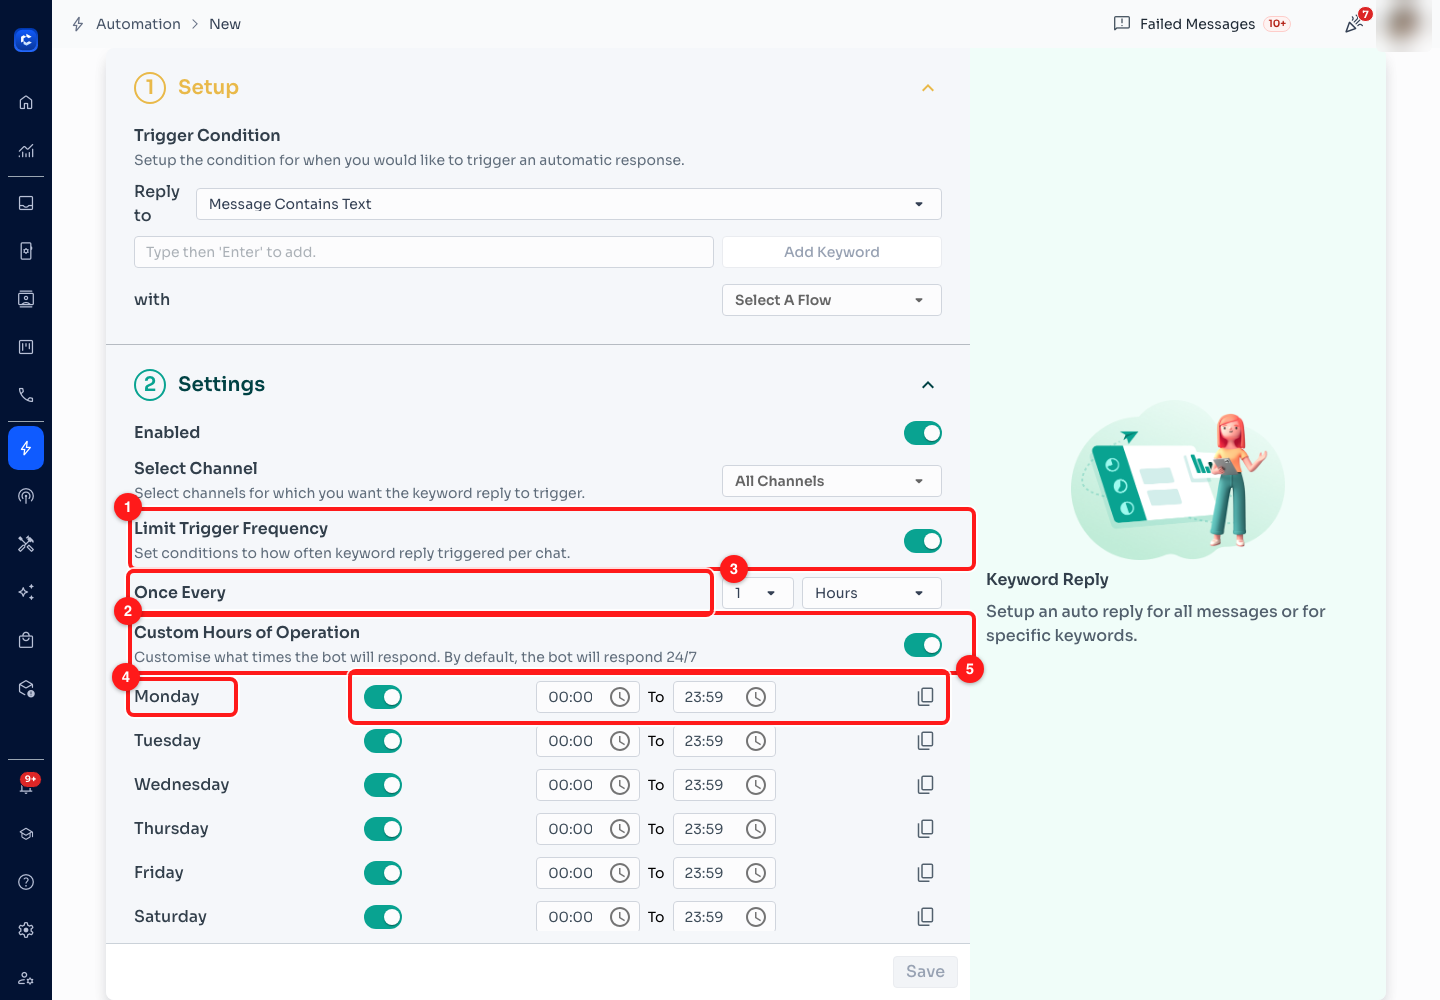
Step 12 — (1) Limit Trigger Frequency, (2) Custom Hours of Operation, (3) the Once Every controls, (4) the per-day switch, (5) that day's hours and the copy button.
- (1) Limit Trigger Frequency reveals Once Every, a number and a unit — seconds, minutes, hours or days. It is counted per chat, so once every 24 hours means one customer gets this reply once a day however often they message.
- (2) Custom Hours of Operation reveals a row per day. The description states the default plainly: without it, the bot responds 24/7.
- (4) The switch beside each day takes that day out entirely — switch Saturday and Sunday off and the rule simply does not fire at the weekend.
- (5) The times are set per day, and the copy icon on the right of a row applies that row's hours to the other days, so you set Monday once rather than seven times.
- Section 3, Advanced Settings, holds the rest: Mark chat as Read if Keyword Reply is Triggered, Use Keyword Reply for Group Chats, Cancel following messages if the Client Responds (the safeguard from Step 8) and Only reply to new chats, which fires only when the incoming message is the first message in that chat.
Step 13 — Cover your closed hours with the offline bot
The offline bot is a single rule with one job: answer everything that arrives when nobody is working. Open the Offline Bot tab. There is no list — this is one setting per workspace.
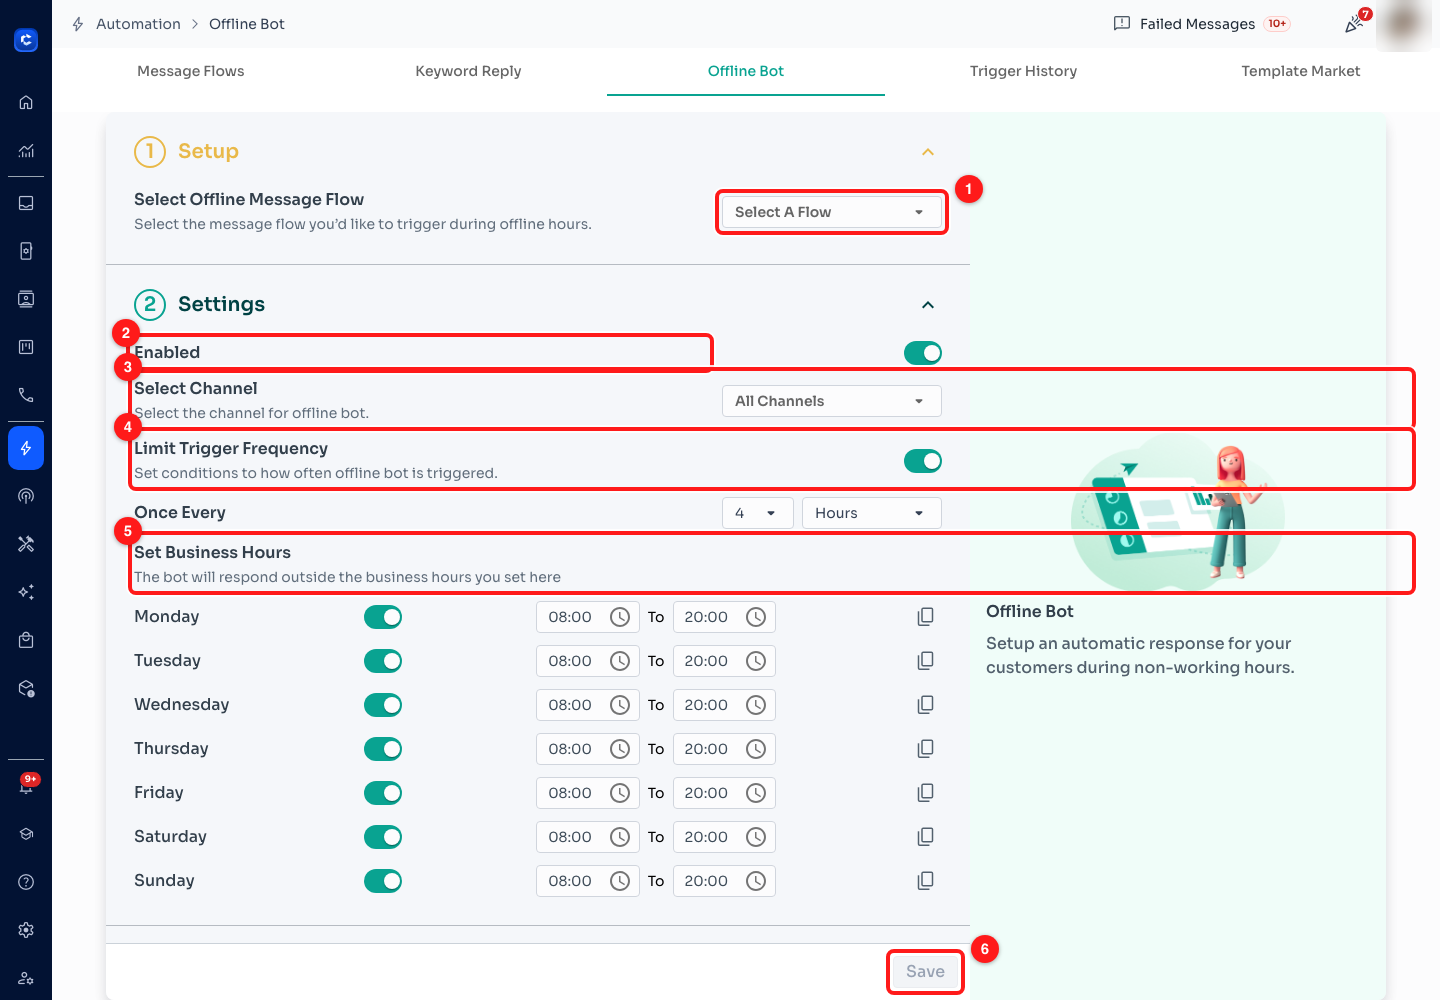
Step 13 — (1) Select Offline Message Flow, (2) Enabled, (3) Select Channel, (4) Limit Trigger Frequency, (5) Set Business Hours, (6) Save. The hours shown here are this workspace's own settings.
- (1) Select Offline Message Flow is the only required field. The flow it points at should not contain a trigger — the offline bot is the trigger.
- (5) Set Business Hours is the part people get backwards. You enter the hours you are open, and the bot answers outside them. The screen says so: the bot will respond outside the business hours you set here.
- (4) Limit Trigger Frequency stops the bot repeating itself through a long night. Once every few hours is usually right — a customer who sends four messages at 11pm should get one "we are closed", not four.
- (3) Select Channel scopes it, and (2) Enabled switches the whole thing on. Nothing takes effect until (6) Save.
- Advanced settings below the fold mirror the keyword reply's, including Only reply to new chats and Cancel following messages if the Client Responds.
✍️ Write the offline message so it sets an expectation rather than apologising. "Thanks — we are closed now and will reply when we open at 9am tomorrow" stops somebody waiting up. Adding a button or two for the questions you can answer without a human (prices, address, opening hours) turns dead time into a useful reply.
Step 14 — Check what actually ran
Automation you cannot see is automation you cannot trust. The Trigger History tab is the record of every flow run: which flow, what state it reached, when it started, and how far through the steps it got.
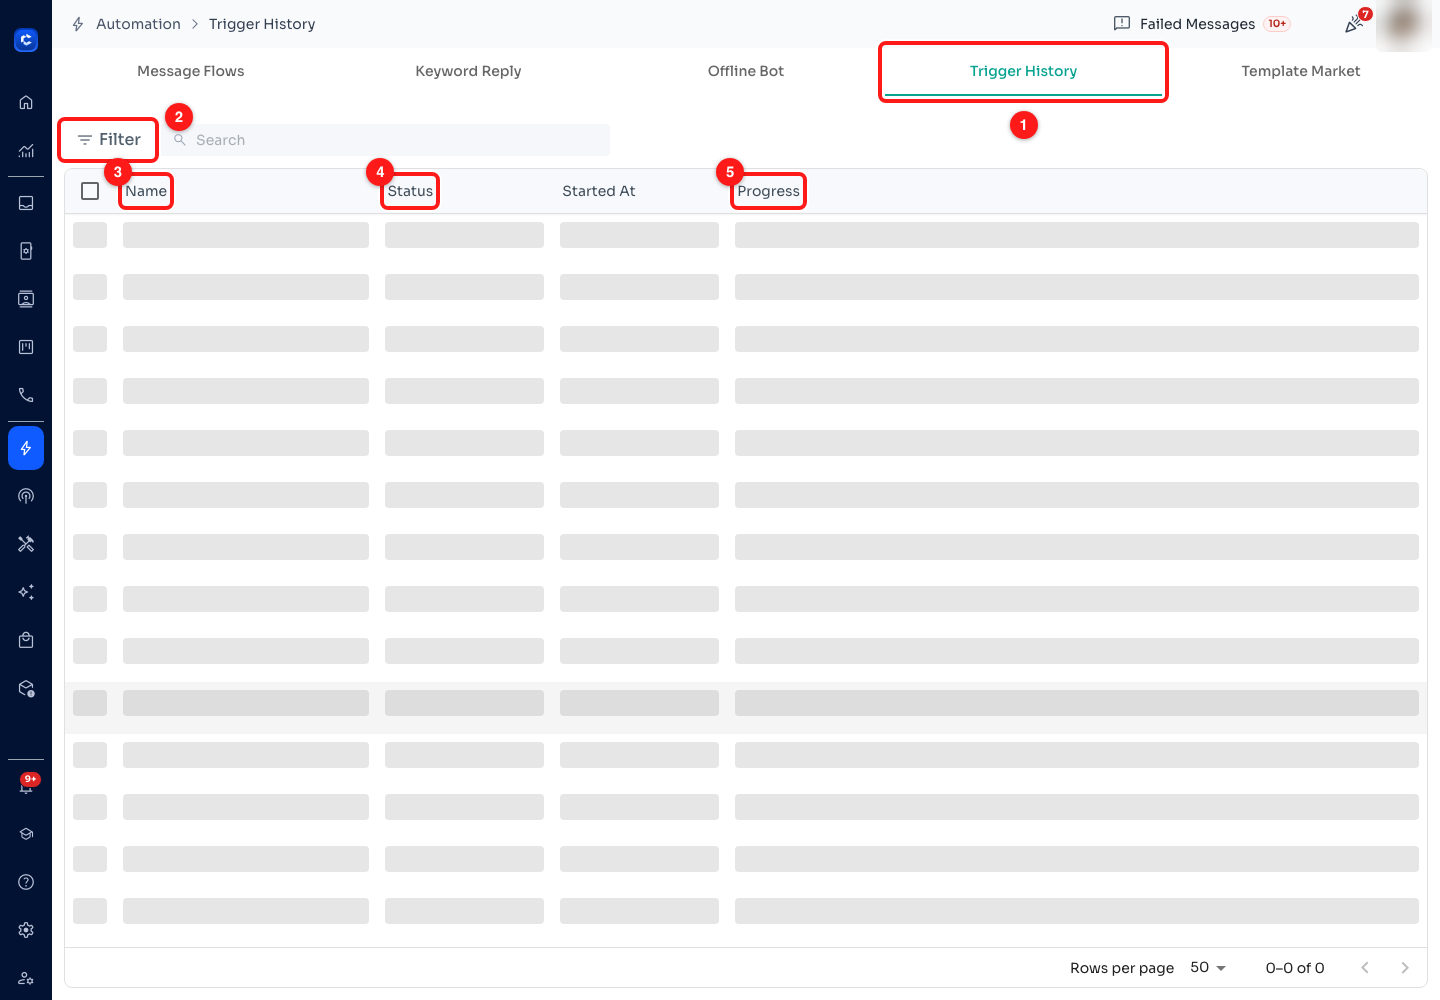
Step 14 — (1) the Trigger History tab, (2) Filter, (3) Name, (4) Status, (5) Progress. This workspace has no runs recorded, so the table shows placeholder rows and 0–0 of 0.
- (4) Status is what a run ended up as — running for one still in progress, completed for one that reached the end, stopped for one that was cut short (which is what "cancel if the client responds" looks like from here).
- (5) Progress shows how far through the flow each run got, which is how you find the step where a sequence is quietly dying.
- (2) Filter and the search box narrow it down to one flow when the list is long.
- The Failed Messages counter in the header bar beside the breadcrumb is the other half of this picture. Click it when the history says a run completed but the customer says nothing arrived — a delivery failure is usually a channel problem rather than a flow problem (Module 2).
Step 15 — Skip the blank page next time
Once you have built one flow by hand, there is no reason to build the second one that way. The Template Market holds ready-made flows for the jobs most businesses automate first.
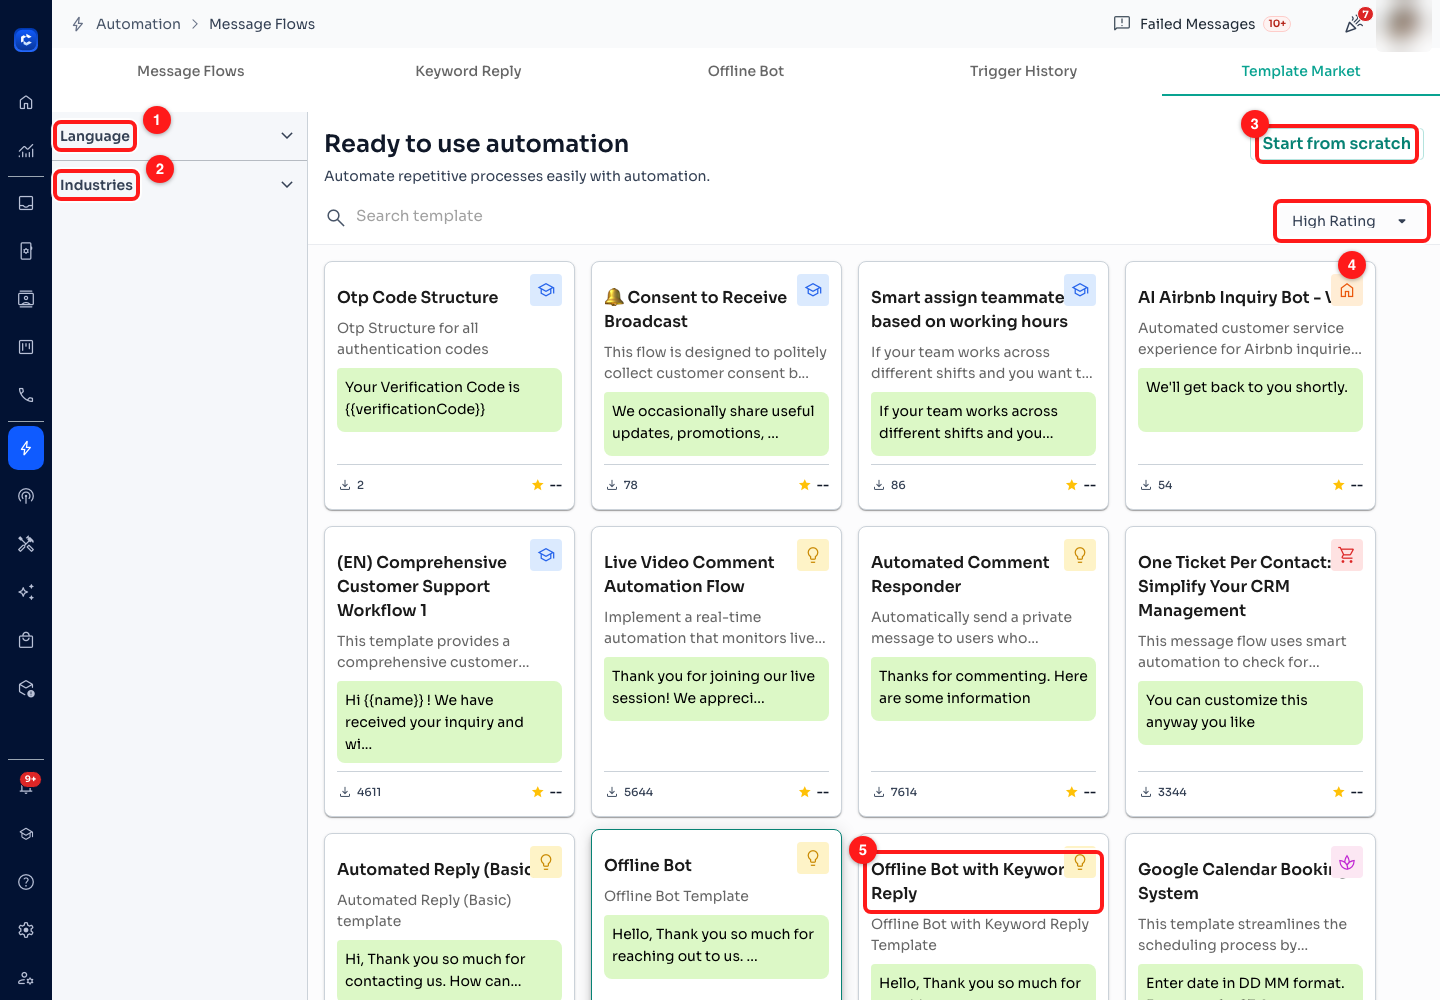
Step 15 — (1) Language, (2) Industries, (3) Start from scratch, (4) the sort order, (5) a template card — here, Offline Bot with Keyword Reply.
- Each card shows the template's first message, so you can see the tone before you take it, and a download count, which is the closest thing to a review the market has.
- (1) Language and (2) Industries narrow the list; several templates exist in both English and Chinese, marked (EN) and (CN) in their names.
- A downloaded template becomes a copy in your own Message Flows list. Edit it freely — you are not editing the original, and nothing is shared back.
- Good ones to start from: Offline Bot with Keyword Reply (Steps 9 to 13 in one piece), Automated Reply (Basic), Google Calendar Booking System, and Smart assign teammates based on working hours if your team works shifts.
- The Resubmit All Templates button back on the Message Flows tab is a different thing entirely — it re-submits your WhatsApp message templates for approval, which is what the Template Status column on the flows list is reporting. It belongs with broadcasts rather than with this market.
What to automate first
The shortest lesson in this module asks what is worth automating at all. The honest answer is: whatever you are typing by hand more than five times a day. In practice that is nearly always the same four things, and this is a sensible order to build them in.
- The offline bot. One flow, one setting, and it covers every hour nobody is working. Biggest return for the least building.
- The three questions you answer most. Price, opening hours, where you are. One keyword reply each, matched tightly.
- A welcome for brand-new chats. A flow on the New Chat trigger, so a first-time customer gets an answer and a menu instead of silence.
- One follow-up. Message, delay, message, with cancel if reply received ticked. This is the one that actually earns money, and the one most workspaces never build.
The eight video lessons in this module
Each lesson opens inside ChatDaddy from the Academy page, or on YouTube using the links below.
- What is a WhatsApp message flow? · 2:32 · beginner · triggers, steps and branches before you build one — Steps 3, 4 and 6.
- Create a simple message flow · 5:45 · intermediate · the visual editor end to end — Steps 2, 3, 5, 7 and 8.
- Set up keyword automation · 3:03 · beginner · reply instantly to pricing, hours and location — Steps 9 and 10.
- Advanced keyword automation replies · 3:00 · advanced · match modes, conditions and rules firing over each other — Steps 11 and 12.
- Set up a keyword reply · 5:26 · beginner · the complete builder walkthrough, trigger to test — Steps 10 to 12.
- Create a WhatsApp offline bot · 2:55 · beginner · covering your after-hours window — Step 13.
- Automatic follow-ups when clients go quiet · 3:06 · intermediate · chasing non-responders on a schedule — Step 8.
- Automate your WhatsApp Business · 1:13 · beginner · the overview and what to tackle first — the what to automate first section above, and Steps 14 and 15.
Common questions
My keyword reply is switched on but nothing happens.
Work through it in this order. First, the Channel column on the Keyword Reply list — a rule scoped to one channel will never answer a message that arrived on a different number. Second, the Message Condition: Message Exactly Is means the customer's whole message has to equal the keyword, so a trailing "hi" is enough to miss. Third, Custom Hours of Operation — if it is on and today is switched off, the rule is behaving correctly by staying quiet. Fourth, Limit Trigger Frequency: if it is set to once a day and that contact already triggered it, they will not get it again. Finally, check the rule actually points at a flow in Select A Flow.
A customer got the same automated message twice.
Almost always two rules matching one message. Keyword replies do not coordinate — if you have a rule on "price" set to Message Contains Text and another on "pricing", the message "what is your pricing" fires both. An All Messages rule fires alongside everything, so it is a common second offender. Open the list, look at the Message Condition and Keyword columns for overlap, tighten one of the two matches, and set Limit Trigger Frequency so a repeat cannot stack up.
What is the difference between a message flow and a keyword reply?
A flow is what gets said — the messages, the branches, the waits. A keyword reply is when it gets said — a rule watching incoming messages that fires a flow when it sees a match. One flow can be fired by several different keyword replies, by the offline bot, or by a broadcast, which is why the two live on separate tabs. The exception is a flow that contains its own Trigger node: that one fires itself and needs no rule.
My Message Flows list is full of things called "Flow created on ...".
Those are drafts. The builder autosaves every 15 seconds, so every time somebody opened a blank canvas and put a node on it, a flow was written to the list whether or not they meant to keep it. Two things follow. Rename flows as soon as you create them, using the pencil in the toolbar, and file them into a folder. And check the unnamed ones before you assume they are harmless — if one contains an enabled trigger, it is a live rule nobody remembers writing. Open it, click the trigger node and turn Enabled off, or delete the flow.
Why is the Test button greyed out?
Because the flow contains a trigger. A triggered flow is started by a real event — an incoming message, a new chat, a ticket moving — and there is nothing for a manual test to simulate, so the button is disabled by design. Use the preview flow icon instead: it renders the flow as a chat in the panel on the right of the builder. Test is available on flows without a trigger, which are the ones fired by a keyword reply, the offline bot or a broadcast.
My follow-up went out after the customer had already replied.
The delay did not have Cancel message if reply received ticked. Open the flow, click the Delay step, and turn it on — the queued message is then dropped the moment the contact answers. If the flow is fired by a keyword reply or the offline bot, there is a stronger version of the same idea in their Advanced Settings: Cancel following messages if the Client Responds cancels every remaining message in the flow rather than just the next one. Tick both.
Should the flow my keyword reply points at have its own trigger?
No. If the flow has an Incoming Message trigger inside it and a keyword reply pointing at it, you have two things trying to start the same conversation, and the trigger has no keyword condition so it fires on everything. Keep the two patterns apart: a flow fired by a keyword reply, the offline bot or a broadcast should start with a Message; a flow that runs itself should start with a Trigger and have no rule pointing at it.
Can I stop everything quickly if an automation goes wrong?
Yes, and you do not need to delete anything. A keyword reply has a Status switch on its own row in the list — one click and it is off. The offline bot has an Enabled switch on its settings page. A flow that triggers itself is stopped by opening it, clicking the trigger node and turning Enabled off. All three leave the automation intact so you can fix it and switch it back on. Then check Trigger History to see how many runs went out before you caught it.
➡️ Next: Module 7 — Contacts & Segmentation. Every automation in this module reacted to something a customer did. The next one is about what you already know about them: importing contacts, tagging and segmenting them, and using those segments to decide who a flow talks to in the first place.