
Academy Module 7 — Contacts & Segmentation: Group People So Every Message Lands Right
The written walkthrough of Academy Module 7. Build tags that mean something, put them on contacts one at a time or ten thousand at a time, back-fill them from message history, and turn them into the audience a broadcast or a flow actually talks to.
Also searched as: Academy Module 7 — Contacts & Segmentation: Group People So Every Message Lands Right, What this module covers, Open Contacts and read the list properly, Open one contact and find where tags hang, Make a tag by typing it, Select the contacts you want to act on, Add the tag (or take it off), The four tools behind the ⋮ menu, Back-fill tags from what people already said, Turn tags into a segment with the filter, Keep the tag list clean, Custom fields, for the facts a tag cannot hold, Import a list that arrives already tagged, Take a segment back out, Use the segment: a broadcast audience
🎓 Part 7 of 11 — ChatDaddy Academy. This is the written version of the Contacts & Segmentation module. The module has one video lesson, Group contacts with tags (2:43), and this article takes the same idea all the way through the product — from making a single tag to using it as a broadcast audience. Read it on its own, or keep it open beside the video on the Academy page.
Modules 5 and 6 taught ChatDaddy how to answer people. This one is about knowing who it is answering. Every contact who has ever messaged you is already in ChatDaddy — the capture workspace this article was written in holds a shade under 53,000 of them. That list on its own is useless: you cannot send a promotion to "everybody", and you should not want to. What makes it useful is a tag — a label you put on a contact that says something you care about. Bought in 2026. Asked about the enterprise plan. Trial expired. Speaks Malay. Once contacts carry labels like that, you can ask the list a question — who bought in 2026 but has not been contacted since March? — and get an audience back.
What this module covers
- The Contacts list, its columns and the two toolbars it hides
- Where a tag lives on a single contact, and how to create one by typing it
- Tagging hundreds of contacts at once — and what Select All really selects
- Back-filling tags from message history, so old conversations get labelled too
- The filter: turning tags into a segment with Is / Is Not and AND / OR
- Housekeeping — deleting dead tags, colouring live ones
- Custom fields, for the facts a yes/no tag cannot hold
- Importing a list from CSV with its tags already attached, and exporting one back out
- The payoff: using a tag as the audience for a broadcast or a message flow
⏱️ Time needed: about 30 minutes to read and follow along. You need: a connected channel (Module 2) so that contacts exist at all. Nothing in this module sends a message. Two steps do change data — adding a tag in Step 5 and deleting one in Step 9 — so read the warnings on those before you click.
Step-by-step
Step 1 — Open Contacts and read the list properly
Everything here lives behind the contact-card icon in the left rail. Open Contacts and you get one row per contact per channel — the same person messaging you on two numbers is two rows, which is worth knowing before you start counting your audience.
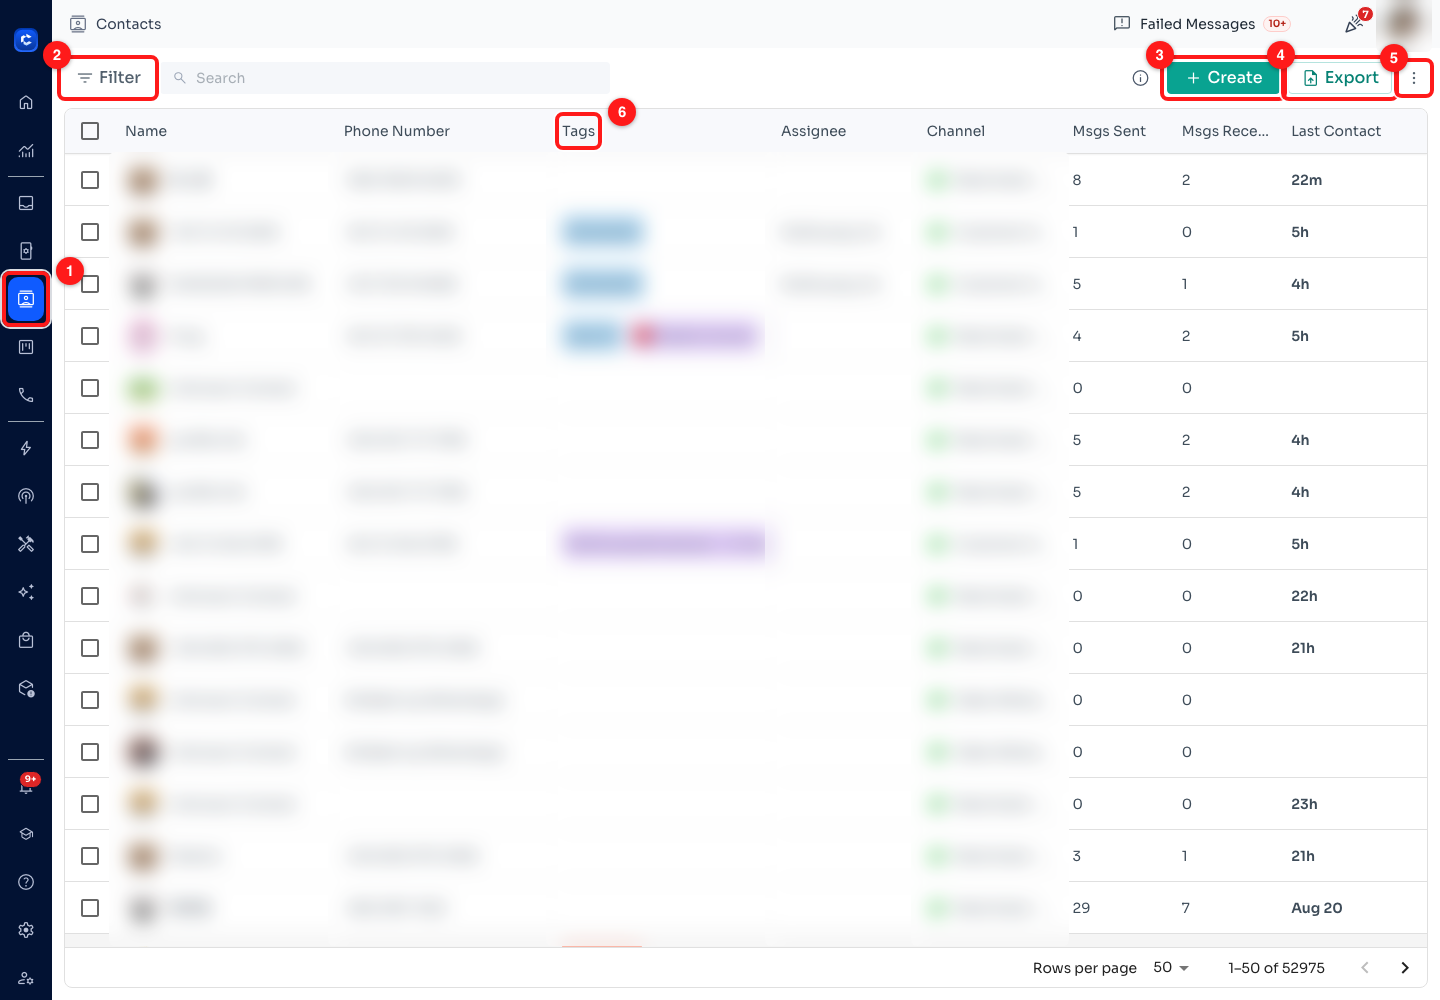
Step 1 — (1) the Contacts icon in the left rail, (2) Filter, (3) Create, (4) Export, (5) the ⋮ overflow menu, (6) the Tags column. Names, numbers, tags, assignees and channels are blurred throughout this article; on your own screen you see them in full.
- (2) Filter is the important button on this page and Step 8 is entirely about it. The search box beside it matches names and numbers only — it does not search tags.
- (3) Create adds one contact by hand: name, phone number, a channel, and optionally a tag and an assignee at the same time. The name field is capped at 100 characters.
- (4) Export takes contacts out as a file. (5) the ⋮ menu holds the four tools that matter most in this module — Step 6 opens it.
- (6) The Tags column shows two tags per row and collapses the rest into a +N you can hover to read. A row can carry far more tags than it shows.
- At the bottom: Rows per page (10, 20 or 50 — it starts on 50) and the running count, 1–50 of 52,975. That count is the whole workspace, and it is the number the filter in Step 8 is going to cut down.
Step 2 — Open one contact and find where tags hang
Click any row and the contact record opens. Scroll it to the bottom: past the phone number and the message counts there are two sections that decide how this contact gets found later.
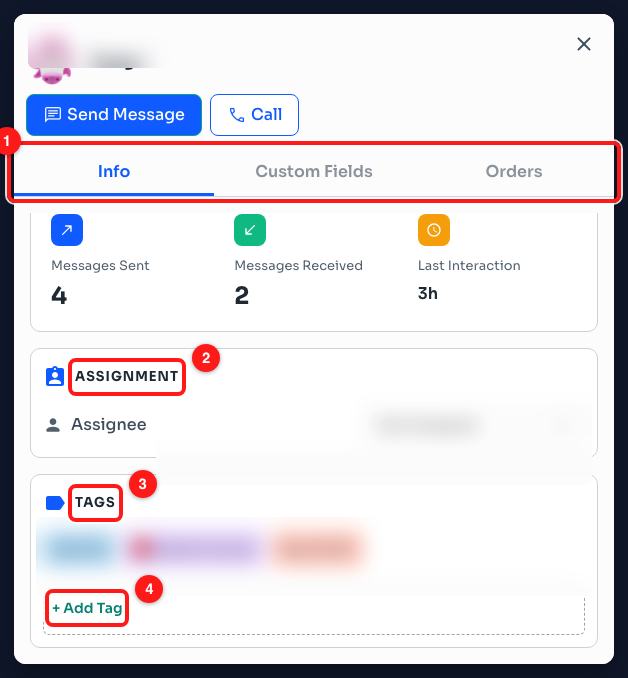
Step 2 — (1) the Info / Custom Fields / Orders tabs, (2) ASSIGNMENT, (3) TAGS, (4) + Add Tag. Scrolled to the foot of the record, so CONTACT INFO and the top of ACTIVITY sit above the frame.
- Above the fold, CONTACT INFO holds the phone number, username, e-mail and any aliases, and ACTIVITY holds Messages Sent, Messages Received and Last Interaction. Those three numbers are filterable, which makes them quietly useful: contacts who received more than five messages and sent none back is a real segment.
- (2) ASSIGNMENT is one teammate. A contact has exactly one assignee, so it answers "whose customer is this?" and nothing else.
- (3) TAGS is the opposite: as many as you like, and a contact can be in a dozen segments at once. This is why tags — not the assignee — are what you segment on.
- (4) + Add Tag opens the tag picker. That picker is the same control everywhere in ChatDaddy: on a contact, on a bulk action, in a filter, inside a flow.
- (1) Custom Fields is a separate tab because a custom field is a different thing — a value, not a label. Step 10 covers when to reach for one instead.
Step 3 — Make a tag by typing it
There is no "new tag" screen. Tags are created inside the picker: start typing, and if nothing in the workspace matches what you typed, ChatDaddy offers to create it. Click + Add Tag and type the name you want.
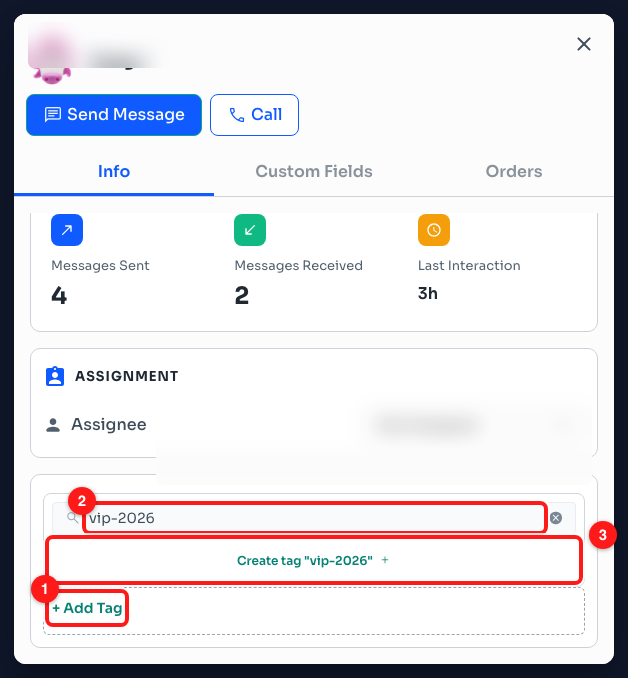
Step 3 — (1) + Add Tag, (2) the search field with a name typed in, (3) the Create tag "vip-2026" row that appears because no existing tag matches. This screenshot was taken without clicking it, so no tag was actually created.
- The Create tag row only appears once you have typed something, and only if no existing tag matches — the check ignores capitalisation, so typing VIP when vip exists offers you the existing one rather than a near-duplicate.
- Everything above that row is the existing tag list, filtered by what you typed. Nine times out of ten the tag you want is already there. Look before you create.
- Creating a tag needs the tag-creation permission. If you can filter by tags but never see a Create tag row, that is what is missing — ask an admin, not support.
- Names are a commitment. There is no rename anywhere in the product: a tag can be created, coloured and deleted, and that is all. Agree a naming pattern before your team invents thirty, and prefix related tags so they sort together — src-facebook, src-referral, src-walkin.
💡 A tag should be a fact, not an opinion. bought-2026-q1 is checkable by anyone. good-customer is not, and in six months nobody will remember what it meant or dare delete it. If two people would disagree about whether a contact deserves the tag, it is the wrong tag.
Step 4 — Select the contacts you want to act on
Tagging one contact at a time is fine for the first ten. After that, use the checkboxes: tick some rows and a second toolbar replaces the first.
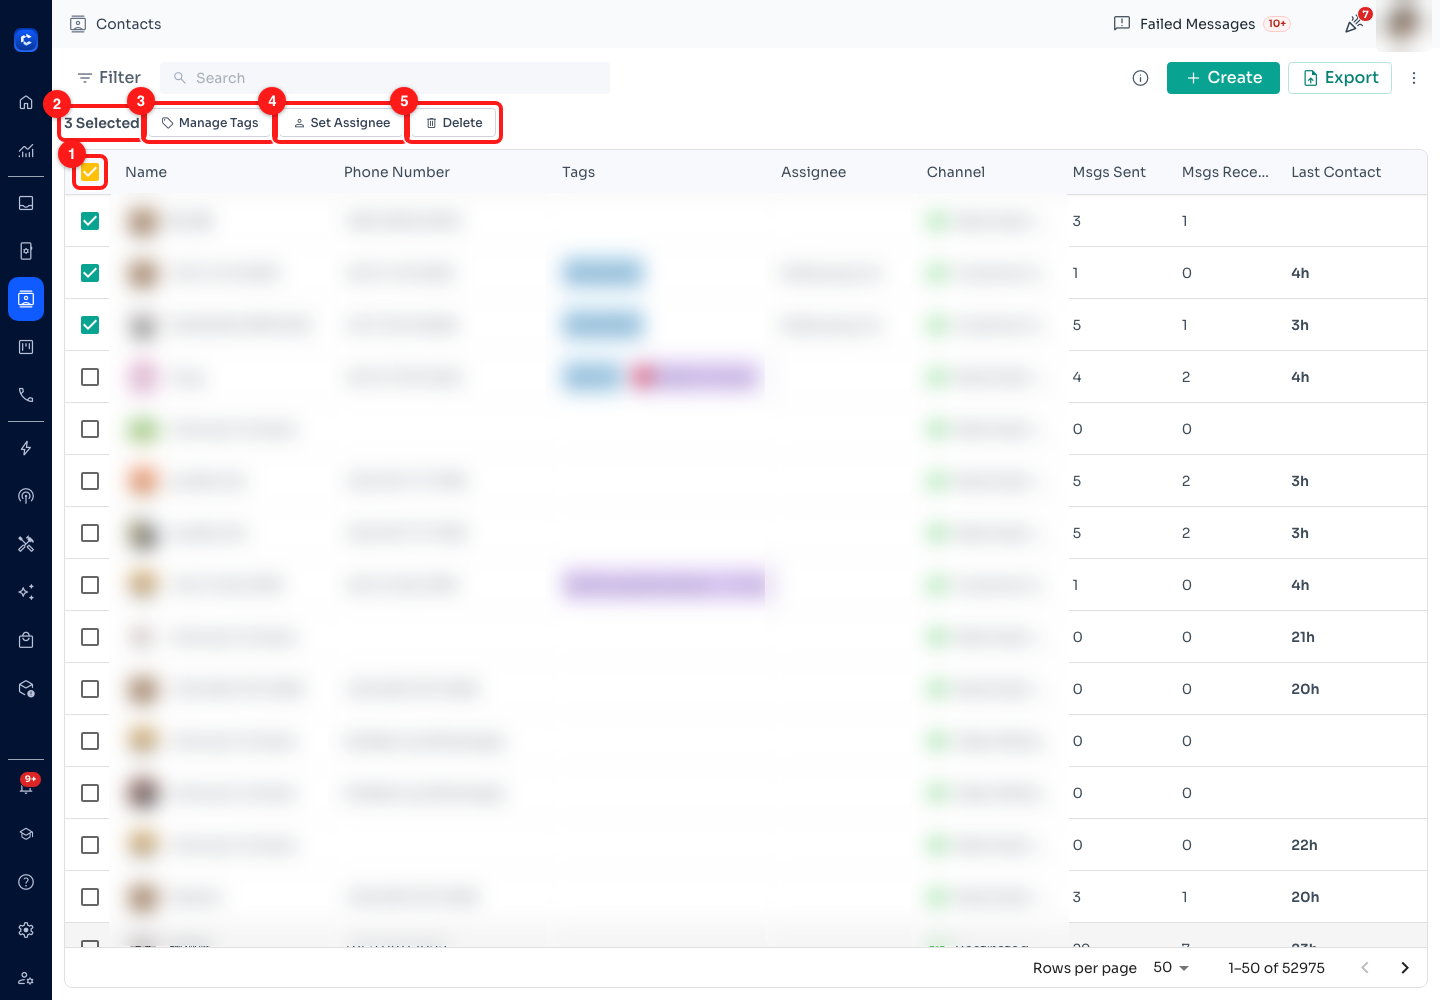
Step 4 — (1) the select-all checkbox in the header row, (2) the running count of what is selected, (3) Manage Tags, (4) Set Assignee, (5) Delete. Three rows were ticked by hand for this screenshot.
- (2) "3 Selected" is the count the bulk action will run against, and it is the number to read before every click.
- (3) Manage Tags adds or removes tags — Step 5. (4) Set Assignee hands the whole selection to one teammate. (5) Delete removes the contacts themselves, not their tags. There is no undo on that one.
- (1) The header checkbox is not "select the fifty rows on screen". It selects every contact matching the current filter, across every page — here that is all 52,975, and the action is sent to the server as one filtered instruction rather than a list of rows. Untick individual rows afterwards and they are carved out as exceptions.
- That makes select-all genuinely useful — filter to one tag, select all, add a second tag is a two-click segment rebuild — and genuinely dangerous next to the Delete button. Apply your filter first, check the count, then tick the box.
⚠️ Select All plus Delete empties your workspace. The two controls sit next to each other and neither warns you differently at scale — the same confirmation appears whether you selected ten contacts or fifty thousand, with the count in it. Read the count in that confirmation. It is the only thing standing between you and a rebuild from backups.
Step 5 — Add the tag (or take it off)
With rows selected, Manage Tags opens the picker. One popover does both jobs, and which job it is doing depends on the toggle at the top — this is the single most misread control on the page.
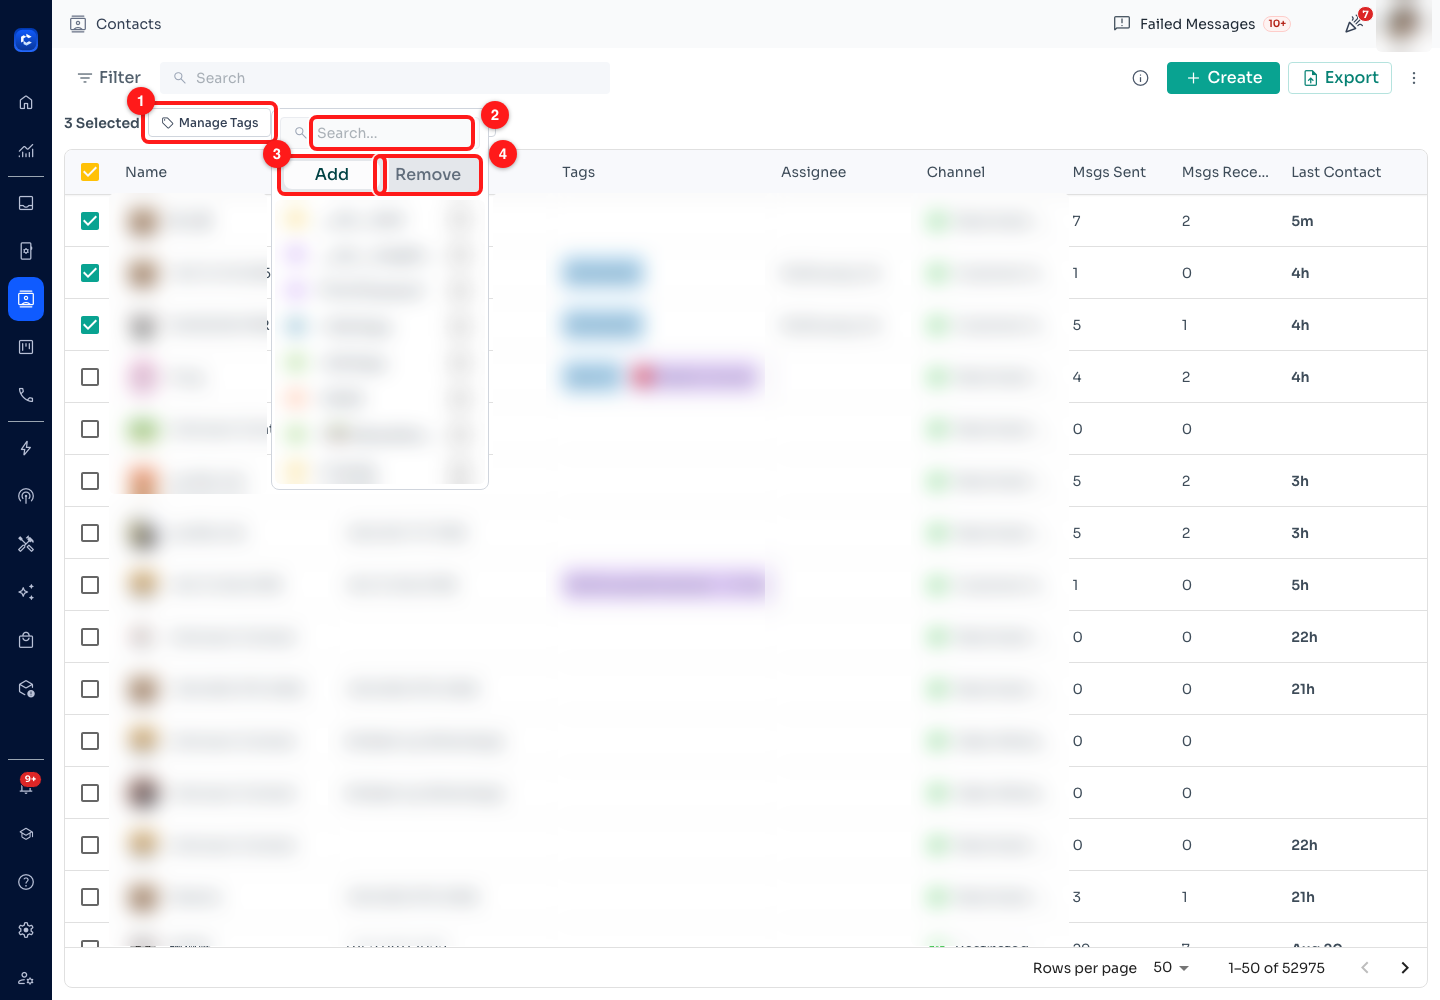
Step 5 — (1) Manage Tags, (2) the search field, (3) Add, (4) Remove. The tag list below is blurred because this workspace names tags after real clients. Nothing was ticked, so no contact was changed.
- (3) In Add mode, ticking a tag puts it on every selected contact. Unticking a tag that the selection already carries takes it off again — Add mode is really "edit", so do not untick things to tidy the list.
- (4) In Remove mode, ticking a tag takes it off the selection. The tick means the opposite of what it meant a second ago, which is exactly why people get this wrong.
- (2) Search first. With hundreds of tags, scrolling to find one is how the wrong neighbour gets ticked. You can also type a brand-new name here and create it on the spot, same as Step 3.
- From ten contacts upwards you get a confirmation naming the tag and the count — add the "vip-2026" tag to 400 contacts? Read the tag name in it. Nine times out of ten a wrong bulk tag is a mis-click one row above the one you wanted.
- A removed tag is not forgotten: the contact record keeps a short history of tags taken off it, so you can see that somebody untagged a contact rather than guessing.
Step 6 — The four tools behind the ⋮ menu
The overflow menu at the top right holds the rest of the contact toolkit. Three of the four are about tags, and the one people never find is the most useful of the lot.
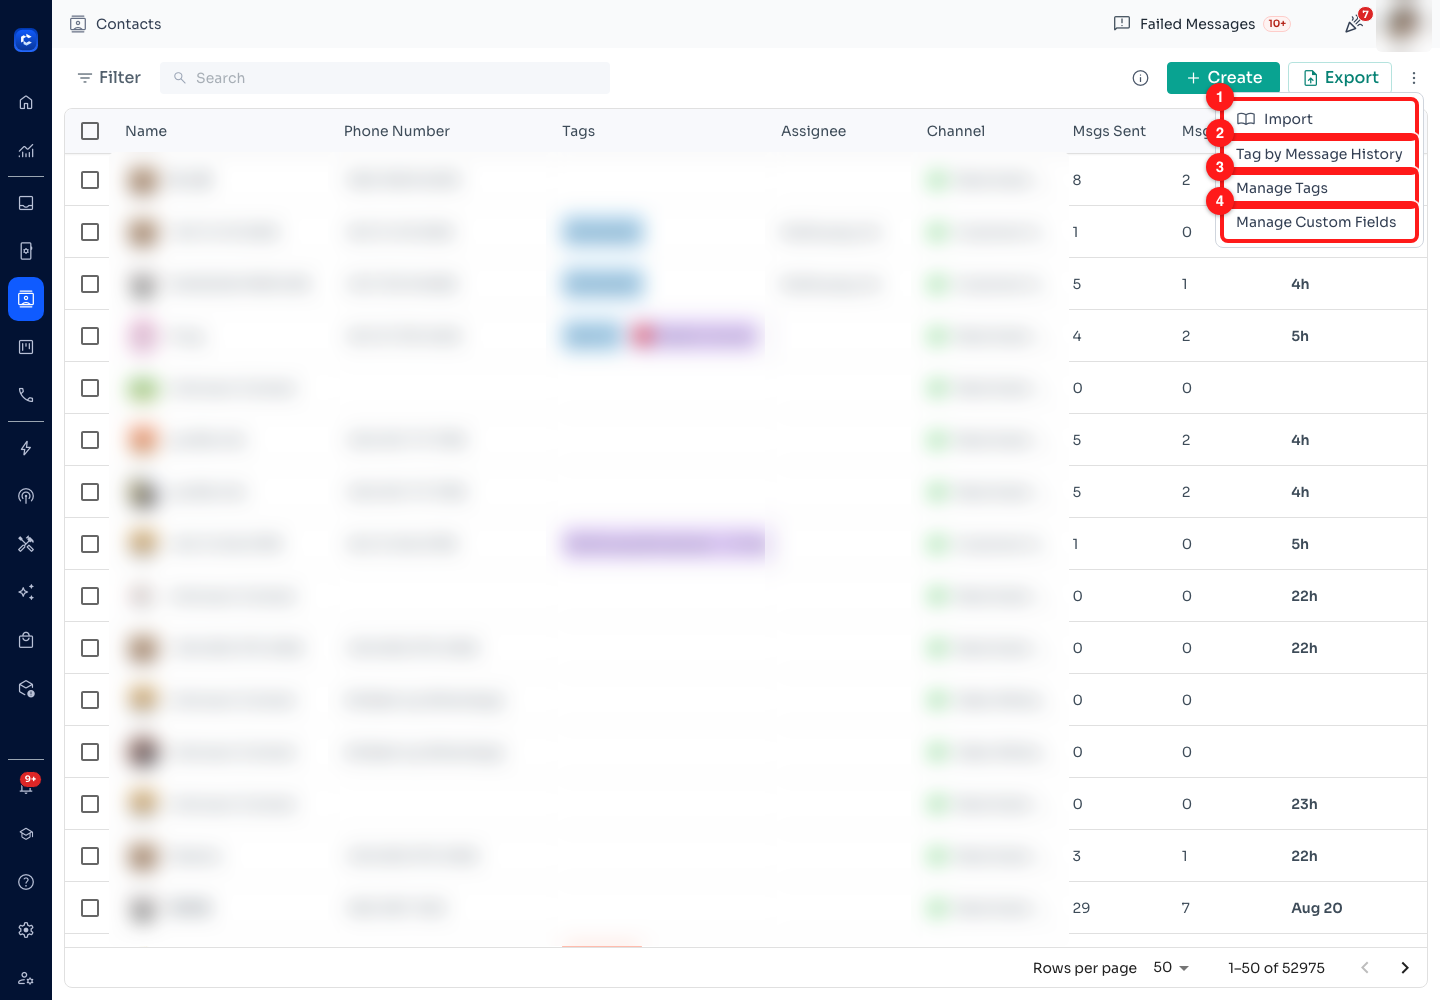
Step 6 — (1) Import, (2) Tag by Message History, (3) Manage Tags, (4) Manage Custom Fields.
- (1) Import brings a list in from a CSV, tags and all — Step 11.
- (2) Tag by Message History searches what people have already said to you and tags the contacts behind those chats. This is the one nobody finds, and it is how you tag a year of history in one go — Step 7.
- (3) Manage Tags is the tag list itself: create, colour, delete — Step 9.
- (4) Manage Custom Fields manages values rather than labels — Step 10.
- On a narrow window every toolbar button collapses into this menu, so Create, Export and Filter appear here too. On a wide screen only these four live here.
Step 7 — Back-fill tags from what people already said
Tagging works forwards from the day you start. Tag by Message History works backwards: give it a phrase, and every contact whose chat contains that phrase gets the tag you choose. If your customers have been asking about a product by name for a year, that is a segment sitting in your message history waiting to be labelled.
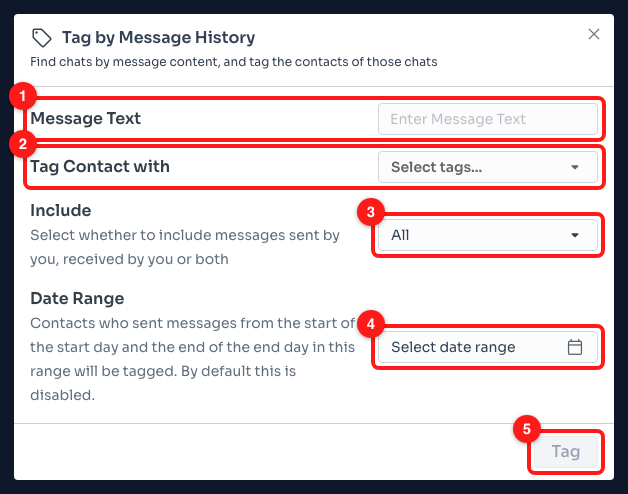
Step 7 — (1) Message Text, (2) Tag Contact with, (3) Include, (4) Date Range, (5) the Tag button. Filled in for the screenshot and then abandoned — the Tag button was never pressed.
- (1) Message Text is the phrase to look for, and it needs at least two characters. It matches message content, so keep it specific — price will catch every "what is the price" in your history, which may be exactly what you want or far too broad.
- (2) Tag Contact with is the tag to apply; at least one is required, and you can create a new one here rather than making it first.
- (3) Include decides whose messages count: All, Only sent by me, or Only received by me. Only received by me is usually right — you want people who said the thing, not chats where your own team said it.
- (4) Date Range is off unless you switch it on, in which case only contacts who messaged inside the range are tagged.
- It runs in your browser, not on the server. A progress bar counts the contacts as they are tagged and there is a Cancel button beside it. Closing the dialog or navigating away stops it part-way through — the contacts already tagged stay tagged. Leave the tab open until it finishes.
🧪 Try the phrase in the search bar first. Tag by Message History has no preview and no undo — it applies the tag as it goes. Run your phrase through Inbox search, look at what comes back, and only then run it here. If it does go wrong, the repair is Step 8 plus Step 5: filter to the tag, select all, and remove it in Remove mode.
Step 8 — Turn tags into a segment with the filter
This is the step the whole module is for. Filter opens a panel with nine kinds of condition down the left; Tag is the second. Everything you built in Steps 3 to 7 becomes useful here.
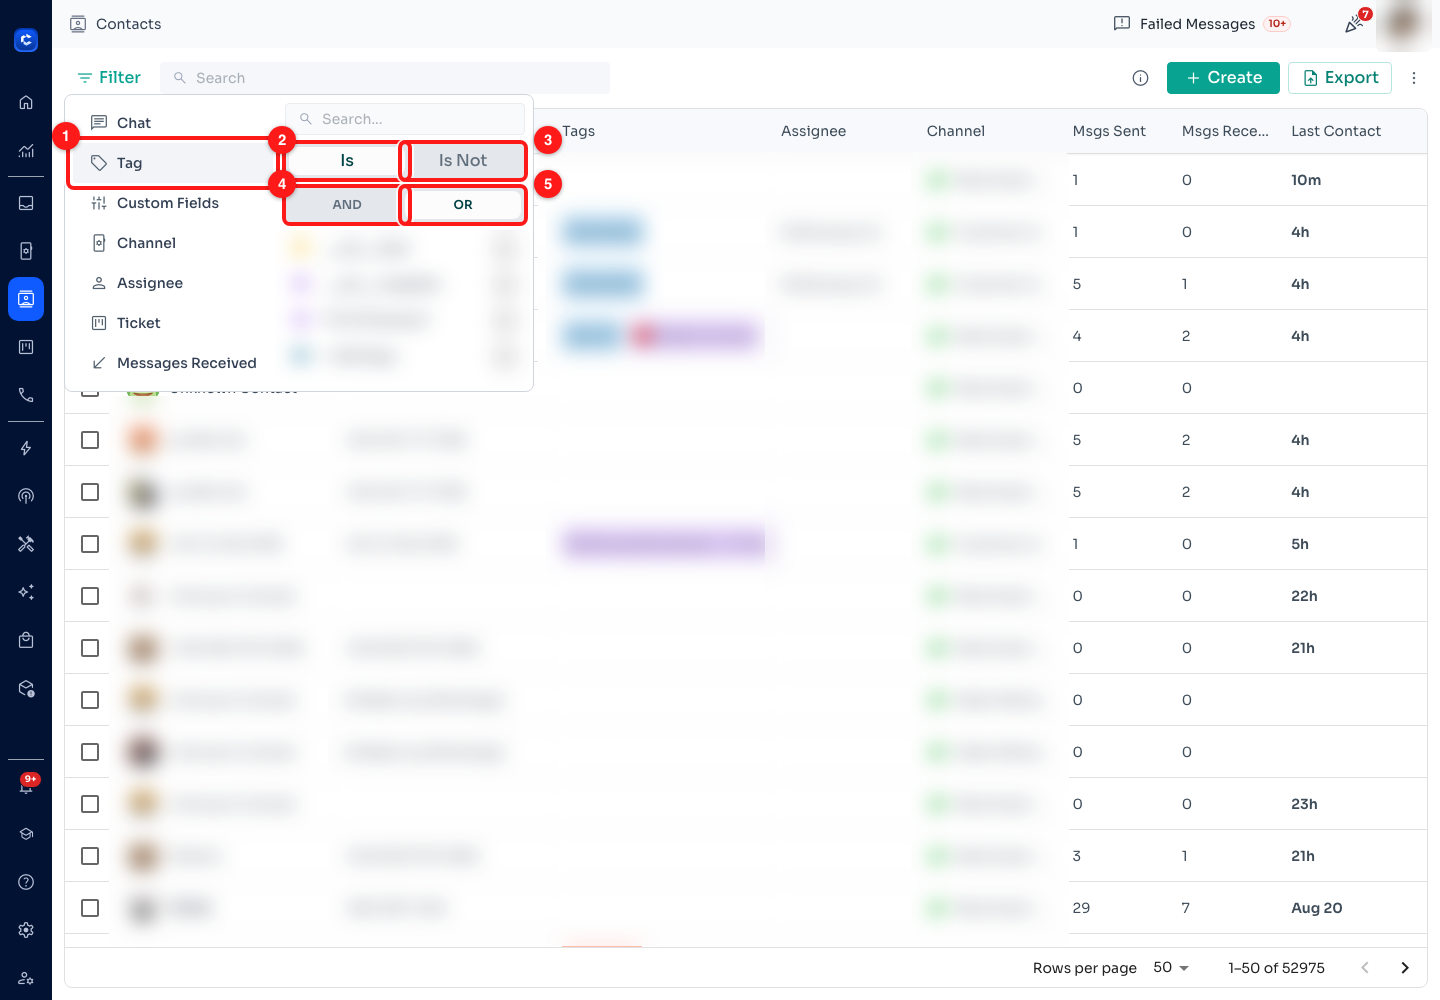
Step 8 — (1) the Tag filter in the list of condition types, (2) Is, (3) Is Not, (4) AND, (5) OR. The tag list beneath is blurred.
- (2) Is keeps contacts carrying the tags you tick. (3) Is Not keeps contacts carrying none of them — that is the one that builds a suppression list, such as everyone except people already tagged "unsubscribed".
- (4) AND means a contact must carry every tag you ticked. (5) OR means any one is enough. It starts on OR, which is why a two-tag filter often returns far more people than expected. If you want bought-2026 and speaks-malay, switch it.
- You can tick up to ten tags in Is mode and fifteen in Is Not mode; the remaining checkboxes grey out once you hit the cap.
- In Is mode each tag has advanced options: Added Between two dates and Added By a particular teammate. So tagged "interested" last month, by Sara is a filter, not a spreadsheet exercise.
- The other eight condition types stack on top: Chat (individuals, groups, unread), Custom Fields, Channel, Assignee, Ticket, Messages Received, Messages Sent and a date filter. Combine them, then watch the count at the bottom of the list — that count is your segment size.
🔗 This exact panel appears in three places. It is the contact filter, it is the broadcast audience picker in Step 13, and it is the "Send To" audience on a message flow trigger. Learn it once. A segment you can build here is a segment you can broadcast to or automate against, with the same Is / Is Not and AND / OR behaviour.
Step 9 — Keep the tag list clean
Manage Tags in the ⋮ menu is the tag list itself, and after a year it is where you find out what your team has been doing. Expect duplicates, typos and a dozen tags nobody remembers.
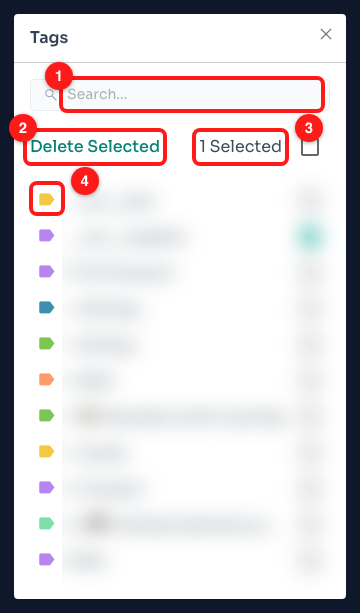
Step 9 — (1) the search box, (2) Delete Selected, (3) the selection count, (4) a tag's colour swatch. One tag was selected so the delete footer would render; it was not deleted. Tag names are blurred, swatches left visible.
- (1) Search and then tick. (3) the count and (2) Delete Selected appear once anything is ticked, and you are asked to confirm.
- Deleting a tag deletes it from every contact carrying it. It is not archived and there is no undo. Before you delete, filter the contact list by that tag (Step 8) and look at how many people you are about to change.
- (4) Click the swatch beside a tag to change its colour. Colour is the only visual signal in the Tags column, so it is worth spending: one colour per family — sources in blue, lifecycle in green, problems in red — makes a scan of the list readable.
- A new tag gets a colour automatically, derived from its name, so it is stable rather than random. You are picking a better one, not fixing a broken one.
- There is no rename. To correct a badly named tag: create the new one, filter by the old one, select all, add the new tag, then switch the popover to Remove and take the old one off. Delete the old tag last, once nothing carries it.
Step 10 — Custom fields, for the facts a tag cannot hold
A tag answers yes or no. A custom field holds a value — an order number, a renewal date, a company name. Trying to express those as tags is how a workspace ends up with four hundred of them.
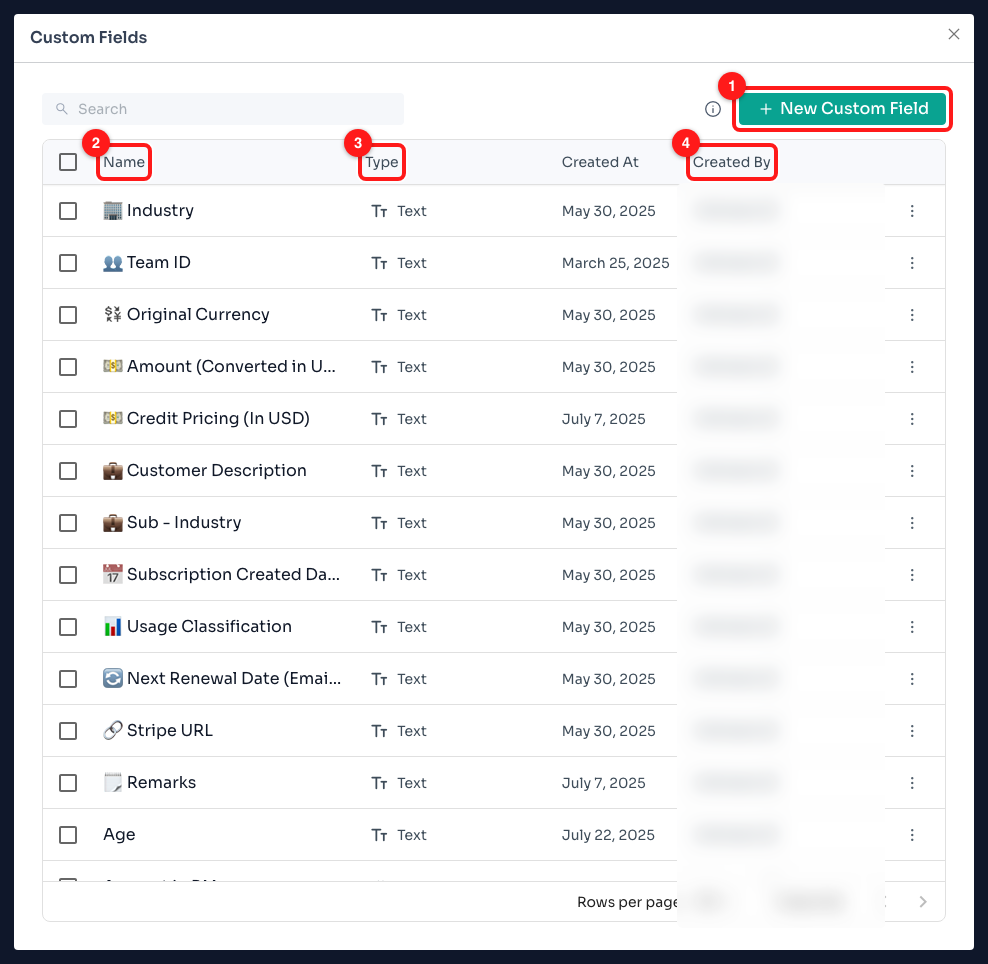
Step 10 — (1) New Custom Field, (2) the field name, (3) its type, (4) who created it (blurred; this workspace has 46 fields defined).
- (1) New Custom Field defines one. (3) Type is what the field holds — the fields in this workspace are mostly Text, with Number available for anything you want to compare rather than read.
- Use a tag when the answer is yes/no and you will want to select everybody who says yes: trial-expired, vip, speaks-malay. Use a custom field when every contact has their own answer: renewal date, order value, company.
- Custom fields are filterable too — they are the third condition type in the Step 8 panel — and each one becomes its own column in an export.
- They fill in from a CSV import (Step 11) as easily as tags do, which is usually how a few thousand of them arrive at once.
- A single contact can hold up to fifty tags and custom fields combined. That is the cap the importer enforces, and it is far more than a well-run workspace needs.
Step 11 — Import a list that arrives already tagged
If your contacts live in a spreadsheet, bring them in with their tags attached rather than importing first and tagging afterwards. Import in the ⋮ menu takes a CSV.
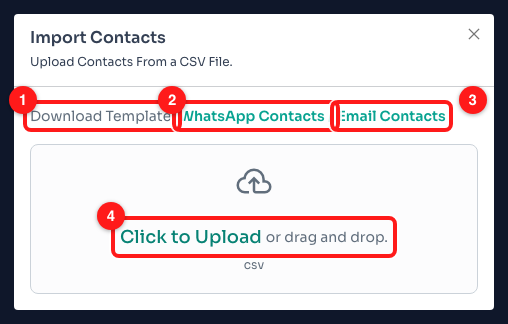
Step 11 — (1) Download Template, (2) the WhatsApp Contacts template, (3) the Email Contacts template, (4) the upload area. No file was chosen.
- (1)–(3) Take the template first. There are two, for WhatsApp contacts and for e-mail contacts, and they save you the guesswork about column names.
- CSV only — a spreadsheet saved as .xlsx will be rejected. Export to CSV first.
- ChatDaddy reads the headers itself: a column containing name, one containing phone or number, one containing tags, one containing assignee, one containing email. Anything left over can be mapped to a custom field on the next screen.
- The tags column is comma-separated —
vip, bought-2026, klon one row puts three tags on that contact. Tags that do not exist yet are created as they are imported, so a typo here becomes a permanent tag. Check the spelling in your spreadsheet. - Two options are worth setting deliberately. Merge Duplicates on means a contact already in ChatDaddy keeps what it has and gains the tags and fields from your file; off means duplicate rows are ignored entirely and only the first occurrence lands. Assignee Validation checks that the names in your assignee column are actually on your team.
- Rows without a phone number or e-mail are rejected, and a phone number needs at least eight digits. You cannot start the import while any row still shows an error — fix them in the file, or tick them to be ignored.
- Imported contacts are attached to one channel, which you pick before uploading. Pick the number you will actually be messaging them from.
Step 12 — Take a segment back out
Export is the reverse trip, and it respects whatever you have filtered and selected — so the way to export a segment is to build it in Step 8 first, then click Export.
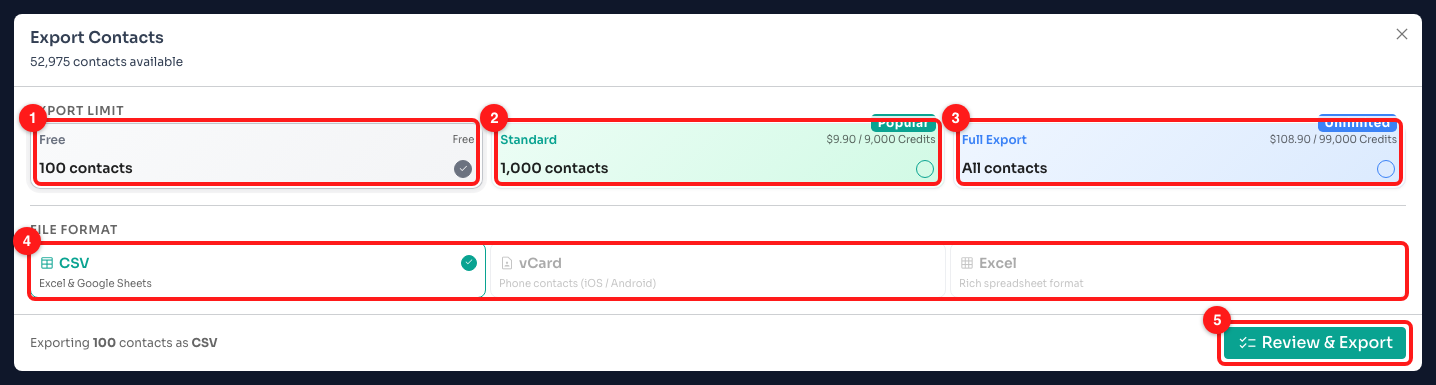
Step 12 — (1) the free tier, (2) Standard, (3) Full Export, (4) the file formats, (5) Review & Export. Opened and abandoned before the review screen, so nothing was charged.
- Export is metered. At the time of writing the free tier gives you 100 contacts and CSV only; Standard ($9.90, or 9,000 credits) raises it to 1,000 contacts and adds vCard; Full Export ($108.90, or 99,000 credits) removes the limit and adds Excel. The dialog shows the current prices and how many contacts you have.
- (4) The formats are CSV for spreadsheets, vCard for loading numbers into a phone, and Excel for a formatted workbook.
- (5) Review & Export is a second screen, not the export itself. You can search, filter and untick individual rows there before committing.
- The file carries account, ID, name, phone number, e-mail, messages sent and received, tags, assignee and last message, plus one extra column for every custom field in play. All of a contact's tags land in a single comma-separated cell — which is exactly the shape the importer in Step 11 reads back, so an export from one workspace imports cleanly into another.
Step 13 — Use the segment: a broadcast audience
A tag that nothing reads is a note to yourself. Here is the payoff. Open Marketing → Broadcasts and start a new broadcast: step 1 of the composer is Select Contacts, and the condition it offers is the same filter panel you learned in Step 8.
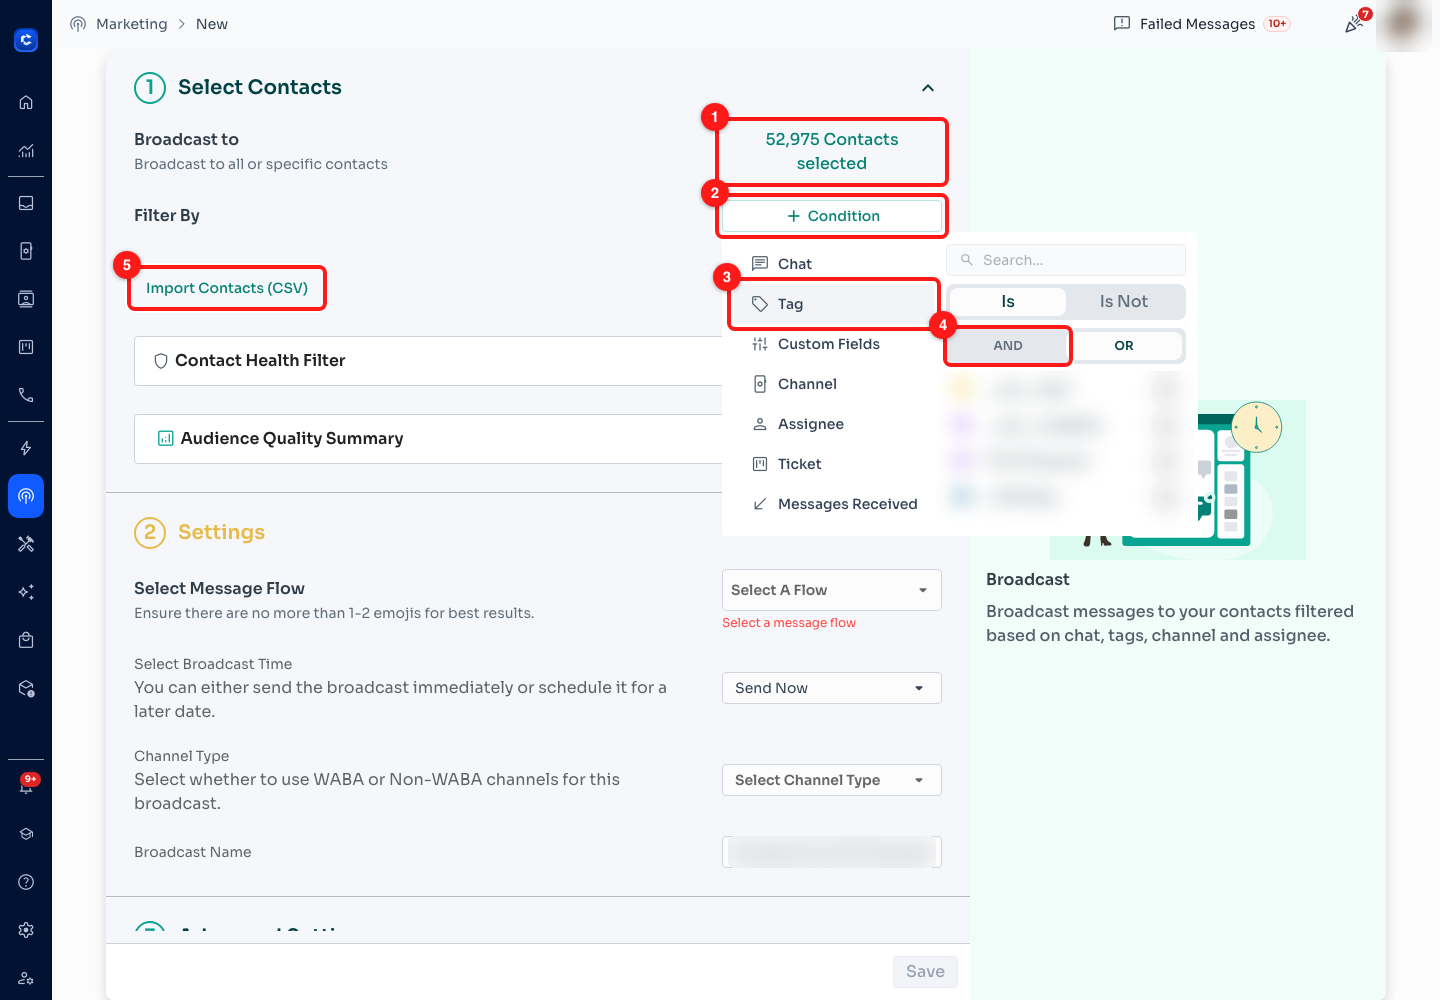
Step 13 — (1) the live recipient count, (2) Condition, (3) the Tag condition, (4) the AND / OR toggle, (5) Import Contacts (CSV). A draft only — no flow, channel or schedule was chosen and Save was never pressed.
- (1) The recipient count is live. It starts at every contact you have — 52,975 in this workspace — and drops as you add conditions. Treat it as the safety check: if you meant to reach four hundred people and it says fifty thousand, your condition has not applied.
- (2) Condition and (3) Tag are the Step 8 panel, embedded. Is, Is Not, AND and OR all behave identically here, so "vip-2026" AND NOT "unsubscribed" is two conditions and about six clicks.
- (5) Import Contacts (CSV) uploads a one-off list for this broadcast. Contacts imported this way are automatically given a generated tag so the broadcast can select exactly them — which is why an unfamiliar tag with a date in its name sometimes appears in your list.
- In a message flow, tags work in both directions. A flow's trigger uses this same audience picker to decide who it may run for; an Add Tag action step labels a contact mid-conversation; and a condition step can branch on whether a contact's tag is or is not something. So a flow can tag someone asked-about-pricing the moment they ask, and next month's broadcast can find them.
- Note the asymmetry: a flow can add a tag but there is no remove-tag action, and keyword replies cannot test tags at all. Removal is a manual job — Step 5 in Remove mode.
A tagging scheme that survives contact with a team
- Prefix by family. src-, lifecycle-, lang-, issue-. The picker sorts alphabetically, so prefixes keep related tags together and make the list searchable.
- One tag per fact, not per phrasing. interested, Interested and interested! are three tags and three broken segments. Agree the spelling once.
- Date the ones that decay. bought-2026-q1 stays true forever. recent-buyer is a lie within a quarter and nobody will notice.
- Colour by family, not by mood (Step 9). Colour is the only thing you can read at a glance in the Tags column.
- Review quarterly. Open Manage Tags, filter the contact list by anything you do not recognise, and delete what carries nobody. Ten good tags beat four hundred.
The video lesson
This module has a single lesson. It covers the core idea — creating tags and grouping contacts with them — and the steps above extend it through the rest of the product.
- Group contacts with tags · 2:43 · beginner · creating a tag and putting it on contacts, then reusing the group as a broadcast audience and a flow filter — Steps 3 to 5 for the tagging, Step 8 for the segment, and Step 13 for the reuse.
Common questions
I filtered by two tags and got far more contacts than I expected.
The tag filter starts on OR, so it returned everybody carrying either tag rather than everybody carrying both. Open Filter → Tag and switch the toggle to AND. Watch the count at the foot of the list as you do it — it should drop sharply. The same toggle exists in the broadcast audience picker and on a flow trigger's audience, and it defaults to OR in all three.
I ticked a tag in Manage Tags and it came off my contacts instead of going on.
The popover was in Remove mode. It has two modes sharing one list of checkboxes: in Add mode a tick puts the tag on, in Remove mode a tick takes it off. The header says which, and it is easy to miss because the list underneath looks identical either way. One further trap in Add mode: unticking a tag the selection already carries removes it, so do not untick things just to tidy the picker. To put the tag back, reselect the same contacts, make sure you are in Add mode, and tick it.
Can I rename a tag?
No. Tags can be created, coloured and deleted, and nothing else — there is no rename anywhere in the product. The workaround takes four steps and does not lose anybody: create the new tag; filter the contact list by the old one (Step 8); tick the header checkbox to select everybody matching that filter; open Manage Tags in Add mode and tick the new tag. Then switch the popover to Remove and untick — that is, tick, in Remove mode — the old one. Finally delete the old tag from Manage Tags, once nothing carries it. Because of this, spend a minute on the name before you create it.
What exactly does the header checkbox select?
Every contact matching your current filter, across every page — not the fifty rows on screen. With no filter applied that is your entire workspace. ChatDaddy does not send a list of contact IDs to the server; it sends your filter, and the server applies the action to everything that matches, so untick a few rows afterwards and those are sent as exceptions to the same filter. That makes it powerful and it makes it dangerous: from ten contacts upwards you get a confirmation with the count in it, and that count is the last thing standing between a bulk tag and a bulk delete. Apply the filter first, read the count, then tick.
I ran Tag by Message History and it stopped part-way through.
It runs in your browser rather than as a background job on the server. It pages through your message history and tags as it goes, showing a progress count and a Cancel button, so closing the dialog, navigating to another page or shutting the tab stops it where it is. The contacts already tagged keep the tag. Reopen it and run the same phrase again — contacts already carrying the tag are unaffected, so there is no harm in repeating it. For a very large history, start it and leave the tab alone until the success message appears.
Should this be a tag or a custom field?
Ask whether every contact would have a different answer. If the answer is yes or no and you will want to select everybody who says yes — trial-expired, vip, speaks-malay — that is a tag. If each contact has their own value — a renewal date, an order number, a company name — that is a custom field, because turning values into tags is what produces workspaces with four hundred of them. Both are filterable and both import from a CSV, so the only real cost of choosing wrongly is a mess you have to clean up later, and there is no rename to help you.
My export only produced 100 contacts.
That is the free export tier, and it is a limit on the export rather than on your account — you still have all your contacts. The dialog shows the paid tiers beside it: Standard raises the cap to 1,000 and Full Export removes it, payable with plan credits or as a one-off card payment. Before you buy, check you are exporting what you meant to: export respects the filter and the selection on the contact list, so filtering to your segment first often brings a 53,000-contact export down under the free limit.
➡️ Next: Module 8 — Analytics & Reporting. You now have contacts grouped into segments that broadcasts and flows can talk to. The next module is about reading what happened afterwards: which conversations converted, how fast your team replies, and which of these segments is actually worth the effort.