
Academy Module 9 — Integrations: Let Your Other Tools Send the WhatsApp Message
The written walkthrough of Academy Module 9. Connect Shopify so orders send their own WhatsApp updates, fire a message the moment a form is submitted, reach the apps ChatDaddy does not list natively through Zapier, and pick up leads from click-to-WhatsApp ads.
Also searched as: Academy Module 9 — Integrations: Let Your Other Tools Send the WhatsApp Message, What this module covers, Open the App Store, Pick the app you are connecting, Read the setup notes before you start, Select the app and save, Copy the webhook URL into your shop, Set the channel the messages go out from, Add a trigger for each event you care about, Set what fires the trigger and what it sends, Check the activity log, Fire a message when a form is submitted, Reach the apps that are not on the list, through Zapier, GoHighLevel: search for LeadConnector, Click-to-WhatsApp ads: get the number right first
🎓 Part 9 of 11 — ChatDaddy Academy. This is the written version of the Integrations module: four video lessons, about 17 minutes of watching, turned into steps you can follow on screen. You can read this on its own, or keep it open beside the videos on the Academy page.
Everything so far in this course has been you sending messages. This module is about the messages you never touch: an order is paid in Shopify and the customer gets a WhatsApp confirmation; somebody submits a form and a reminder goes out; a lead clicks an ad on Facebook and lands in your Inbox already labelled with the ad that brought them. The work is all done in one place — the App Store, the last icon in the left rail.
Every one of these integrations works the same way underneath. Your other tool sends ChatDaddy a webhook — a small message saying "this just happened" — and a trigger you set up decides which of those events is worth a WhatsApp message and which message flow to send. Learn it once on Shopify and the form, the payment provider and the booking system all work the same.
What this module covers
- The App Store — where connected integrations live and what their columns tell you
- Connecting Shopify: pick the app, copy the webhook URL, paste it into your store
- Building triggers — which store event fires, which flow it sends, how long it waits
- Reading the activity log when a notification did or did not go out
- Form submissions: the same pattern with Paperform and Google Form
- Reaching apps that are not on the list — including GoHighLevel — through Zapier
- Click-to-WhatsApp ads: what you set up in ChatDaddy and what stays in Meta
⏱️ Time needed: about 30 minutes for your first integration, most of it spent in the other tool rather than in ChatDaddy. You need: a connected WhatsApp channel (Module 2), admin access to the app you are connecting, and — this is the one people skip — a message flow already built and approved (Module 6). A trigger with no flow to send does nothing.
Step-by-step
Step 1 — Open the App Store
Click the App Store icon at the bottom of the left rail. Despite the name this is not a marketplace you browse — it is the list of integrations already wired to your workspace, one row per connection. If you have connected the same shop twice, you get two rows.
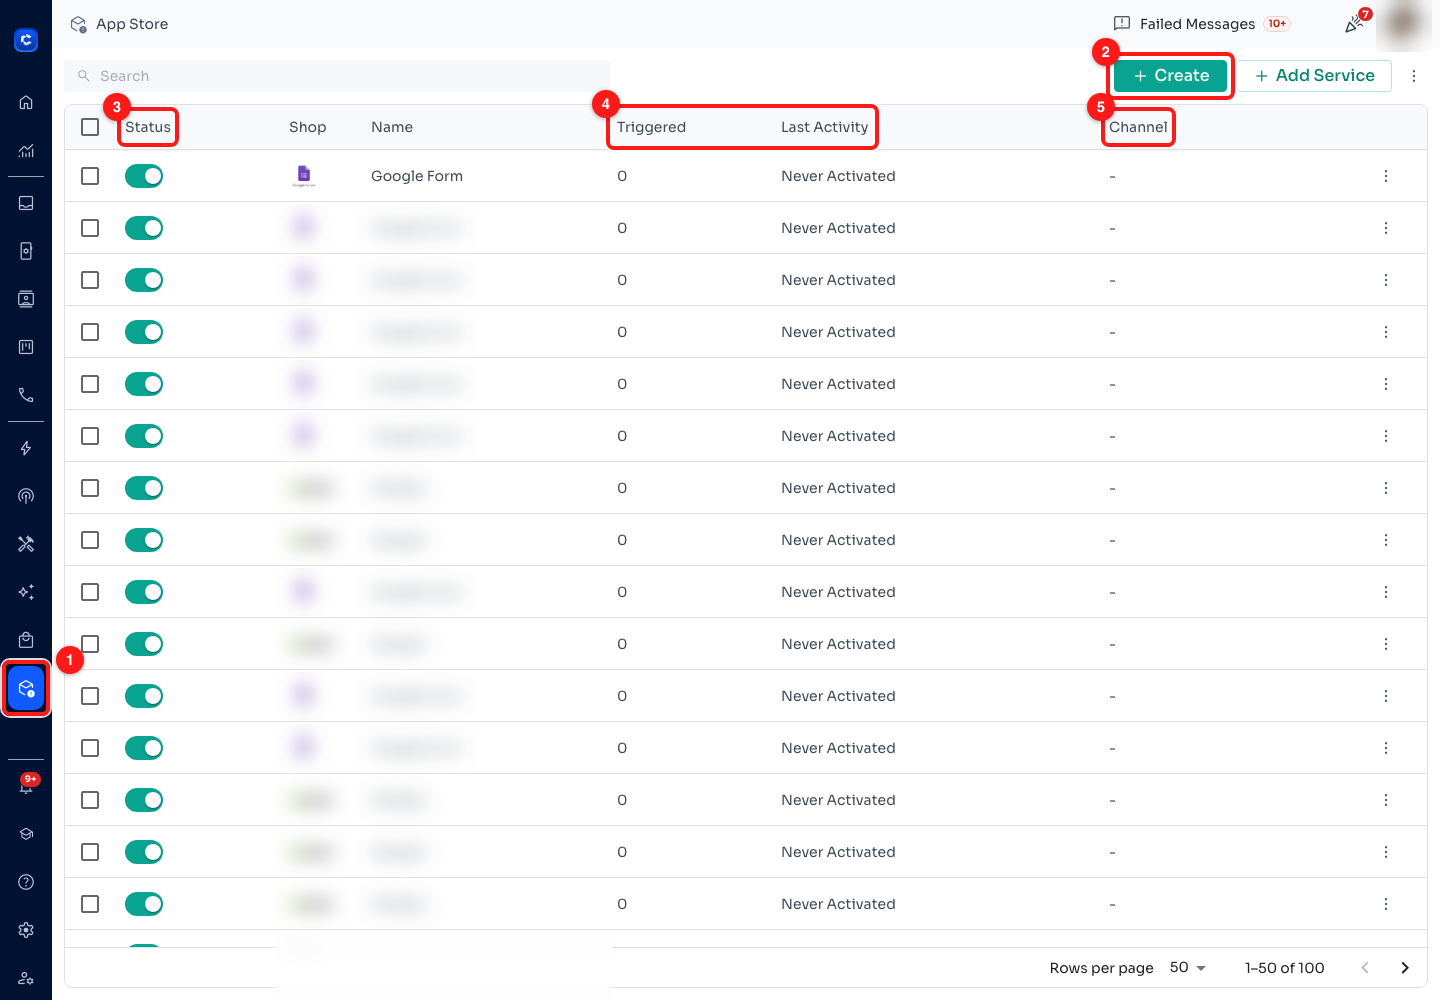
Step 1 — (1) App Store in the left rail, (2) + Create starts a new integration, (3) the on/off switch for each one, (4) Triggered and Last Activity, (5) which channel the messages go out from. Shop and Name are blurred here; on your own screen they name your stores.
- (1) App Store — the last icon in the rail, above the graduation cap.
- (2) + Create — the button you want. It opens the wizard in Step 2.
- (3) Status — a switch per integration. Turning it off stops every trigger on that connection without deleting the setup, which is the safe way to pause a noisy store.
- (4) Triggered / Last Activity — how many times this connection has fired, and when. A row reading 0 and Never Activated has never received a single webhook, which almost always means the URL is not pasted into the other app yet. Step 5 covers this.
- (5) Channel — the WhatsApp number the notifications are sent from. A dash here means no channel is set and nothing can go out.
⚠️ The + Add Service button beside Create is not the one you want. It asks for a Service ID and a Service URL — it registers a whole new type of service on the platform, and it needs the integrations permission rather than the ordinary notification one. To connect your own shop, always use + Create.
Step 2 — Pick the app you are connecting
+ Create opens Shop Selection. Twenty-one services are supported at the time of writing, grouped into five categories. Filter by category or use the search box at the top if you know the name.
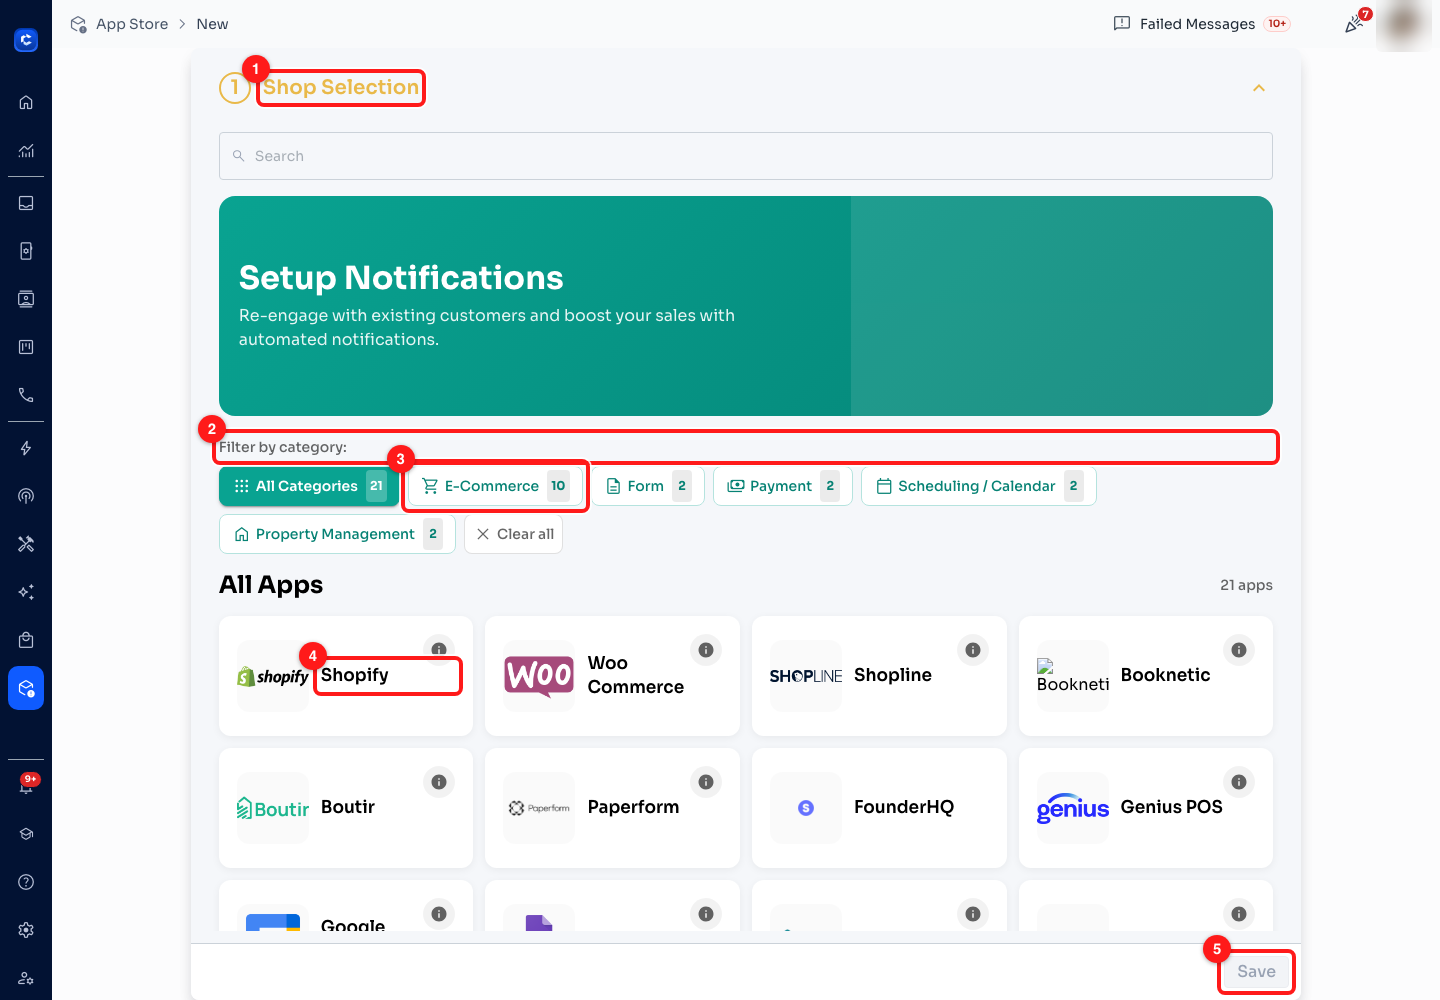
Step 2 — (1) Shop Selection, the first stage of the wizard, (2) the category filter, (3) E-Commerce, ten apps, (4) the Shopify tile, (5) Save, which creates the connection.
- E-Commerce (10) — Shopify, Woo Commerce, Shopline, Shopline Global, Shopage, Boutir, Tokopedia, Hotmart, Shiprocket and WhatsApp Shop.
- Form (2) — Paperform and Google Form. Step 10 covers these.
- Payment (2) — Stripe and Razorpay.
- Scheduling / Calendar (2) — Google Calendar and Booknetic.
- Property Management (2) — Hostex and Krossbooking.
- The rest — FounderHQ, Genius POS, Host Platform — sit under All Categories (21).
🧩 If your app is not on this list, do not force it. Step 11 shows the Zapier route, which reaches thousands of apps including several that people expect to find here.
Step 3 — Read the setup notes before you start
Every tile carries a small (i) in its top-right corner. Click that rather than the tile itself and ChatDaddy tells you what this particular service needs and where its settings live — written per app, so it names the actual menus you will be hunting for in the other tool.
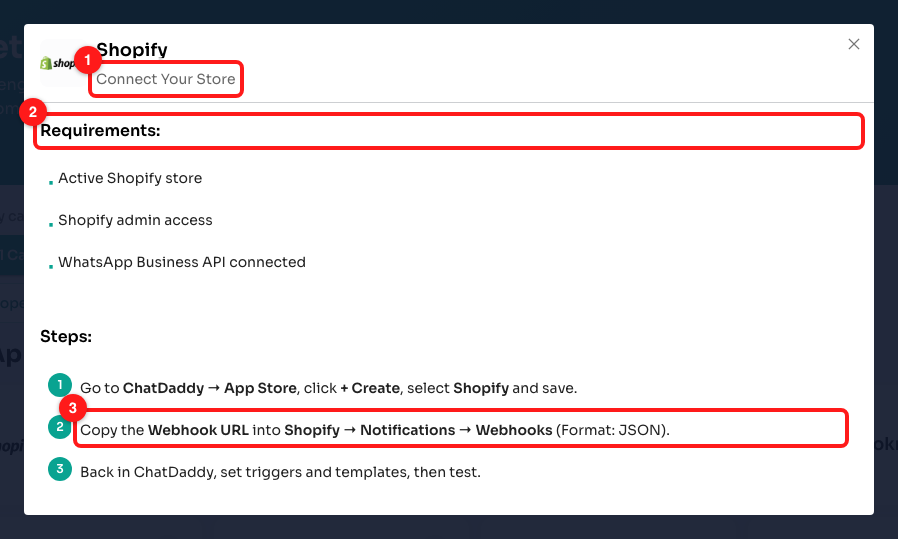
Step 3 — the Shopify notes. (1) the setup title, (2) Requirements, checked before you start, (3) the step that matters most: where the webhook URL goes, and that the format must be JSON.
- (2) Requirements — for Shopify: an active store, Shopify admin access, and a WhatsApp Business API channel connected. A QR-linked personal number is not enough for this one.
- (3) The steps — create the connection here, copy the Webhook URL into Shopify → Notifications → Webhooks with the format set to JSON, then come back and set the triggers.
- Clicking the tile instead of the (i) selects the app rather than explaining it — which is what you want next, but do read this panel first.
Step 4 — Select the app and save
Click the tile. A tick appears on it and a configuration panel opens on the right. Some services ask for something here — a store URL, an API key, a question ID — and some, Shopify among them, ask for nothing at all, because everything happens through the webhook. Press Save and the connection is created.
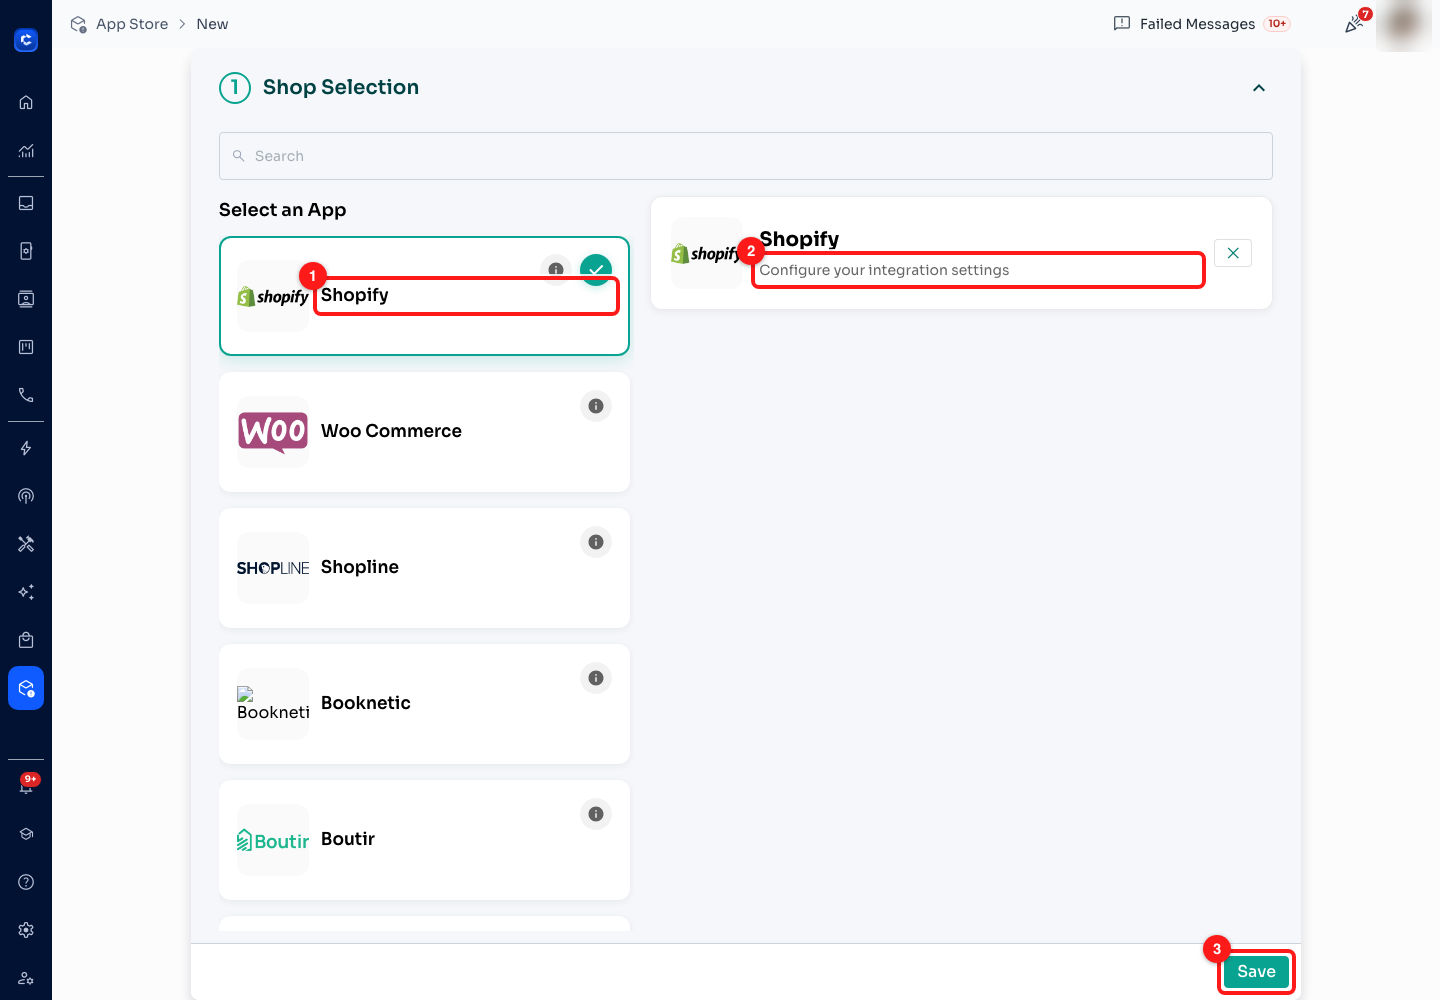
Step 4 — (1) the selected tile, ticked, (2) the configuration panel for that app, (3) Save. Saving creates the connection and takes you to its settings.
💡 Nothing is sent to your customers by saving. All you have created is an empty connection with no triggers on it — it will sit at Triggered 0 until you finish the next three steps.
Step 5 — Copy the webhook URL into your shop
This is the step that actually joins the two systems, and the one people get wrong. On the connection's settings screen, click Show Webhook URL at the bottom. Copy what you see and paste it into your shop's own webhook settings — for Shopify, Settings → Notifications → Webhooks, with the format set to JSON.

Step 5 — (1) the webhook URL, deliberately blurred here because it is a secret, (2) the copy button, (3) Text Tutorial, which opens the written guide for that particular service.
- (1) The URL is unique to this one connection. It carries both the tracking ID and a secret, which is how ChatDaddy knows the event came from your shop and not from someone guessing.
- (2) Use the copy button, not your mouse. Selecting the text by hand tends to clip a character off either end and the webhook then fails silently.
- (3) Text Tutorial links out to the full written guide for that service.
🔒 Treat the webhook URL like a password. Anyone holding it can post events to your workspace as though they were your shop — which means sending WhatsApp messages to your customers on your credits. Do not put it in a shared document, a screenshot or a support ticket.
Step 6 — Set the channel the messages go out from
Back on the connection, open Notification Settings — the first section of the two. This is short but the Channel field is not optional: it is the WhatsApp number your order notifications are sent from, and if it is unset the triggers fire into nothing.
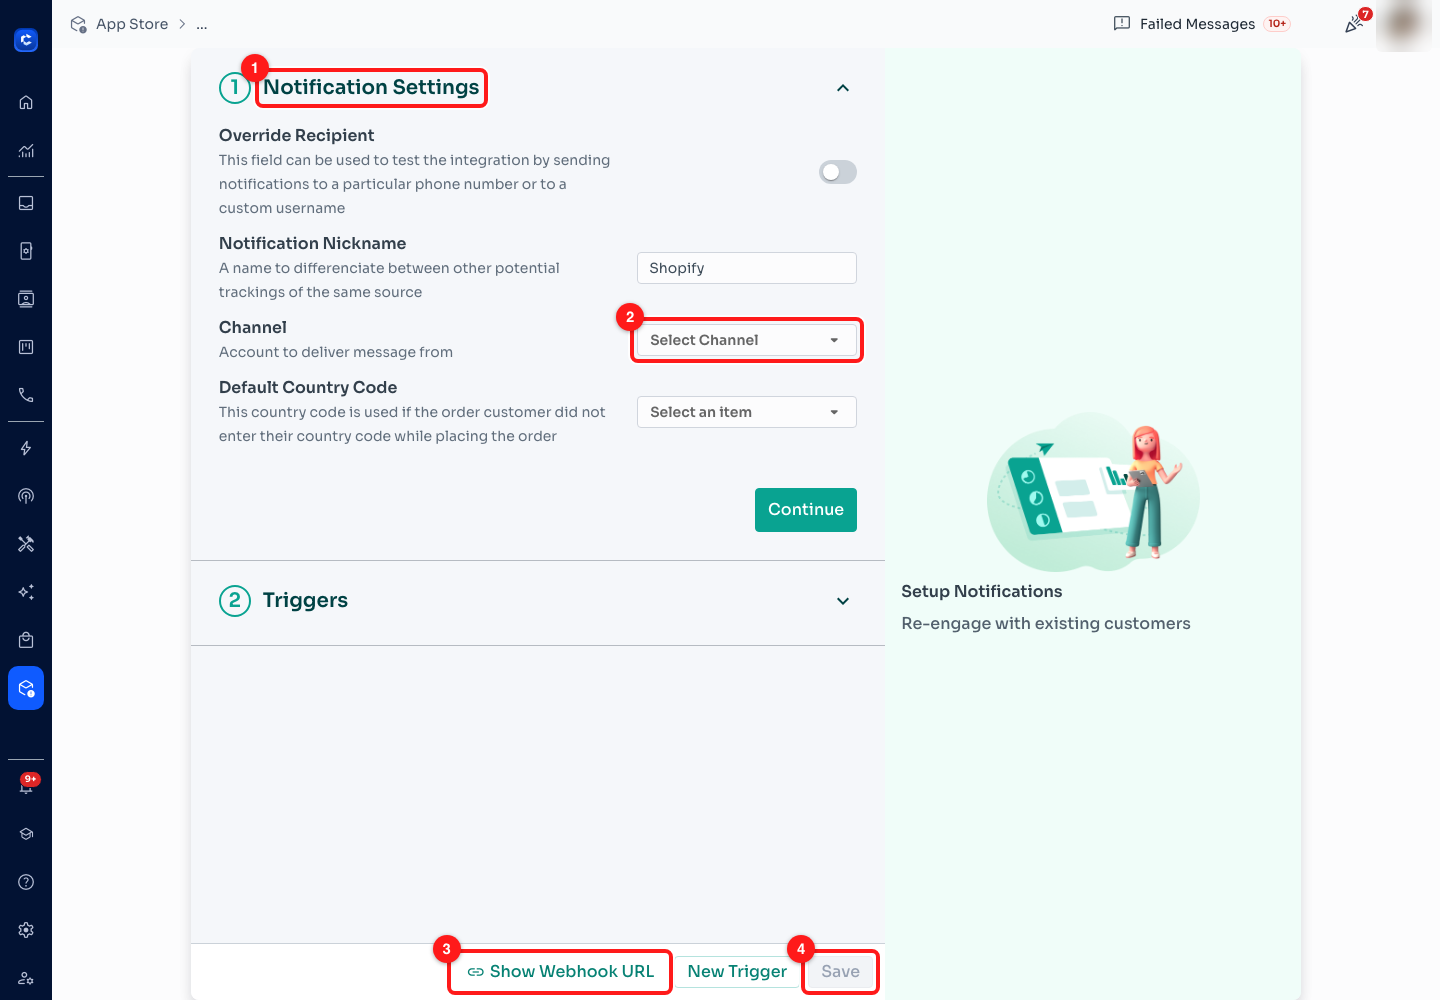
Step 6 — (1) Notification Settings, section one of two, (2) Channel, which must be set, (3) Show Webhook URL from Step 5, (4) Save.
- Channel — account to deliver message from. Set it.
- Notification Nickname — a label to tell this connection apart from another tracking of the same source. It defaults to the service name, which is why an App Store list can end up as a column of rows all called "Shopify". Rename it to the shop.
- Default Country Code — used when an order comes through with a phone number that has no country code on it. Worth setting if you sell mostly in one country; without it those orders cannot be messaged.
- Override Recipient — a testing switch. Turn it on and every notification from this connection goes to one phone number you nominate instead of to the customer. Very useful while you are getting the flow right; disastrous if you forget to turn it off.
Step 7 — Add a trigger for each event you care about
Open Triggers, the second section. Each trigger answers one question: when this happens in my shop, send this flow. One connection carries as many as you like, each with its own switch, so you can build them one at a time and turn the rest off until you trust them.
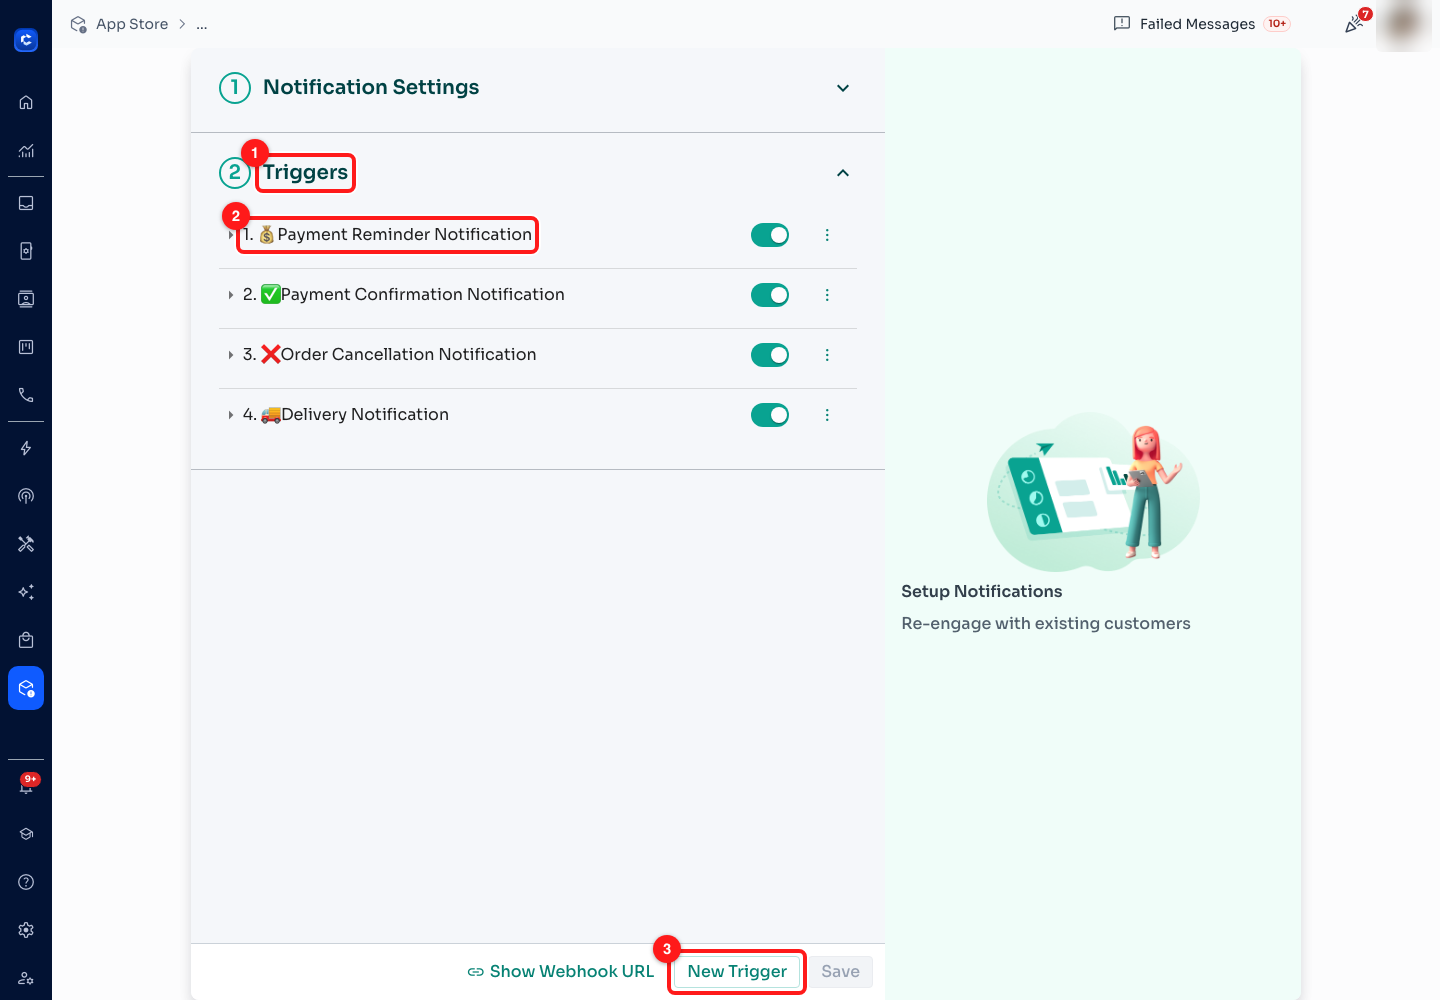
Step 7 — (1) the Triggers section, (2) one trigger, with its own on/off switch and row menu, (3) New Trigger adds another.
- The four in this example are the usual e-commerce set: payment reminder, payment confirmation, order cancellation and delivery notification.
- Each row has its own switch. Building a new trigger with the switch off, testing it, then switching it on is the safe order of work.
- Triggers are numbered in the order they were created, not in the order they fire — the order they fire in is decided entirely by which events your shop sends.
Step 8 — Set what fires the trigger and what it sends
Click a trigger to open it. There are four decisions here and they are all on one screen.
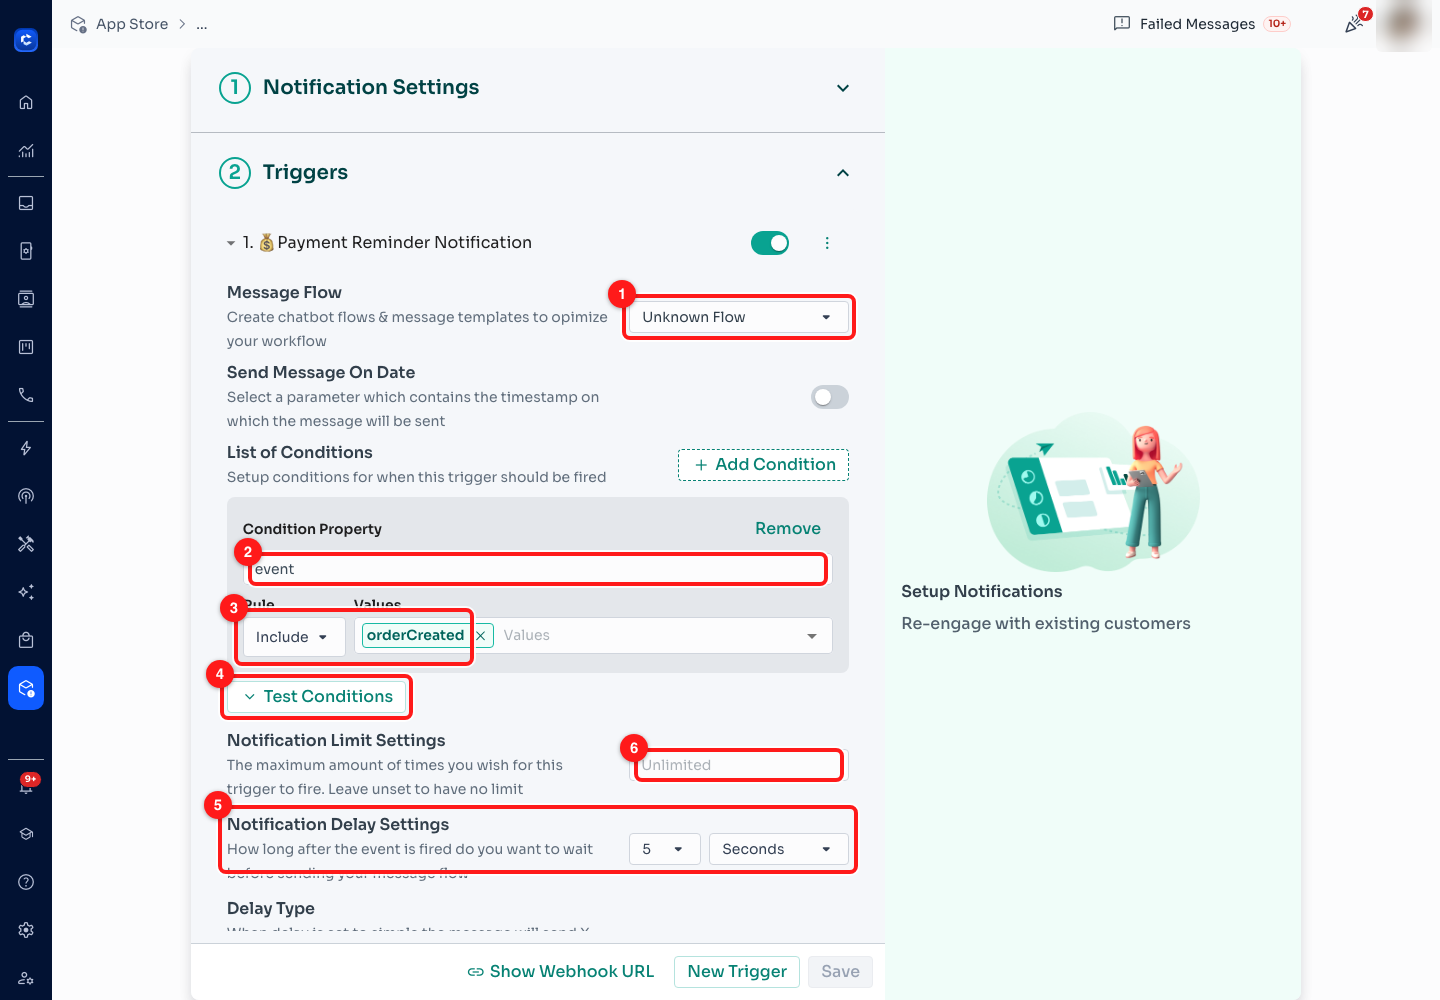
Step 8 — (1) the message flow this trigger sends, (2) the condition property, (3) the rule and the values it matches, (4) Test Conditions, (5) how long to wait before sending, (6) a cap on how many times this may fire.
- (1) Message Flow — the flow that gets sent. This is the flow you built in Module 6; the dropdown lists what already exists and nothing more.
- (2) and (3) The condition — property, rule, value. The standard e-commerce condition is property
event, rule Include, valueorderCreated— and equallyorderPaid,orderCancelledororderFulfilled. Add Condition stacks more; they all have to match for the trigger to fire. - (4) Test Conditions — checks your condition against the data your shop has actually sent, so you find out you have mistyped an event name before a customer does.
- (5) Notification Delay Settings — how long to wait after the event. It defaults to 5 seconds. A short delay is worth keeping: it gives the shop time to finish writing the order before the message quotes it.
- (6) Notification Limit Settings — the maximum number of times this trigger may ever fire. Leave it unset for no limit. Setting it to a small number is the cheapest possible safety net on a new integration.
🚨 If the Message Flow dropdown reads Unknown Flow, the flow this trigger used to point at has been deleted or renamed. The trigger still fires and still has nothing to send. Repoint it before you go live — this is the single most common reason an integration looks connected but no customer ever receives anything.
Step 9 — Check the activity log
Clicking a row in the App Store list opens Notification Details, the read-only view. Use it to answer the only question that matters after setup: did anything actually happen?
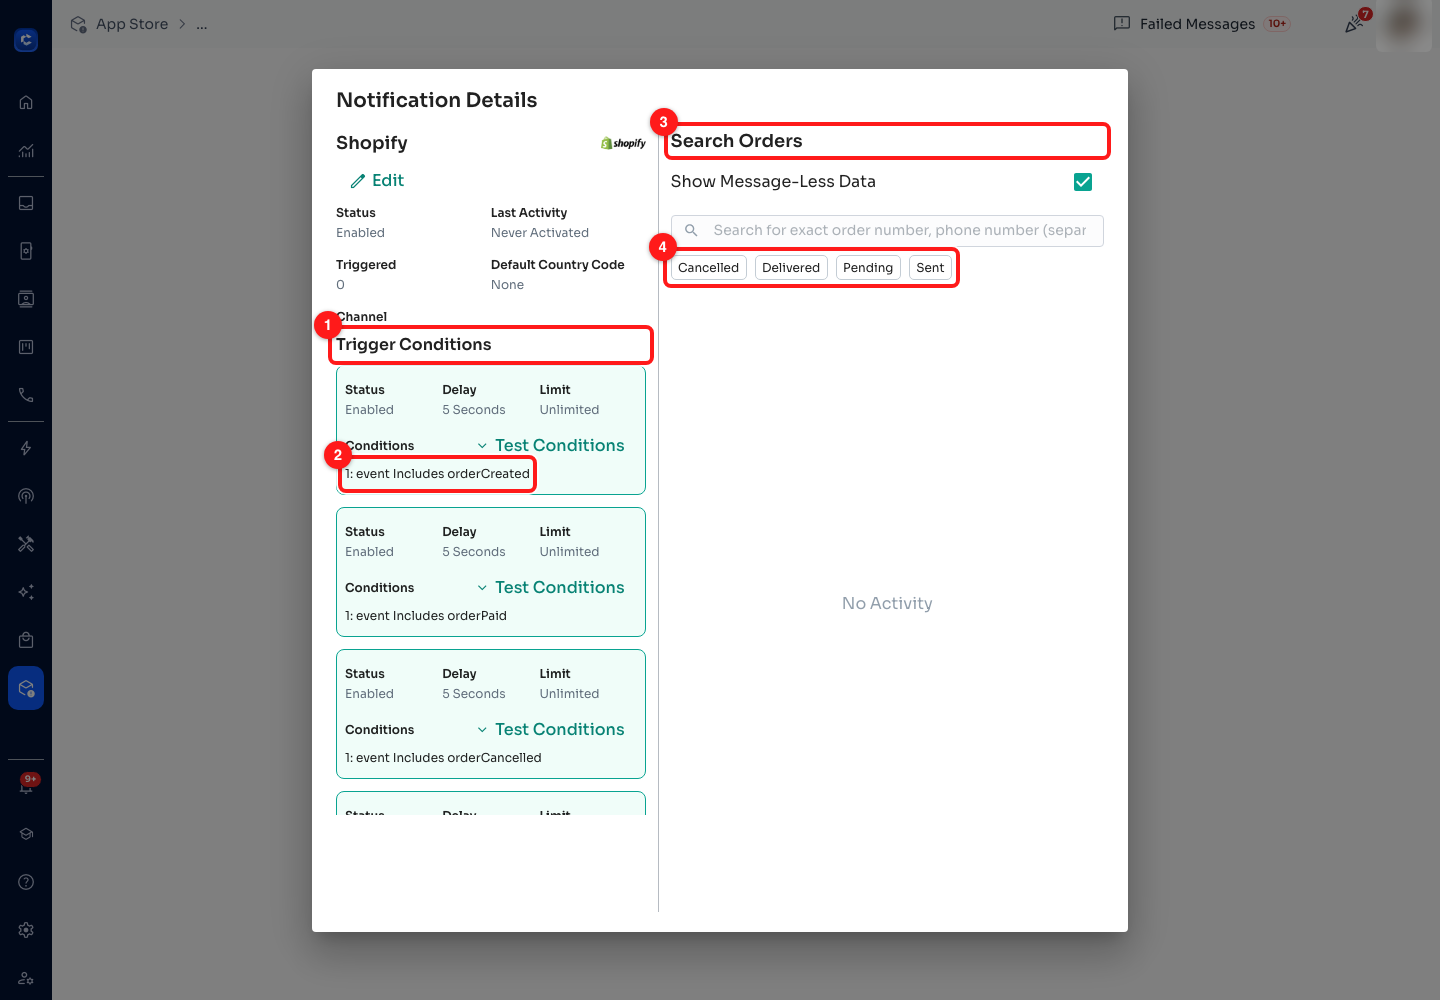
Step 9 — (1) Trigger Conditions, every trigger summarised, (2) the condition in plain words, (3) the order search, (4) filter the log by what happened to the message.
- (1) and (2) — each trigger reduced to one line: status, delay, limit and the condition written out, such as 1: event Includes orderCreated. Faster to scan than opening four accordions on the edit screen.
- (3) Search Orders — look up an exact order number or phone number. Several at once, separated by commas.
- (4) Cancelled, Delivered, Pending, Sent — the state of the WhatsApp message each event produced. Show Message-Less Data additionally lists events that arrived but produced no message at all, which is exactly what you want when a condition is not matching.
- A view reading No Activity with Triggered 0 means no webhook has ever arrived. That is a Step 5 problem, not a trigger problem.
Step 10 — Fire a message when a form is submitted
Forms work identically to shops — pick the app, save, copy the webhook URL into the form tool, add a trigger. Filter to the Form category and you get two: Paperform and Google Form. The only new idea is that a form submission has fields, and ChatDaddy needs to be told which one is which.
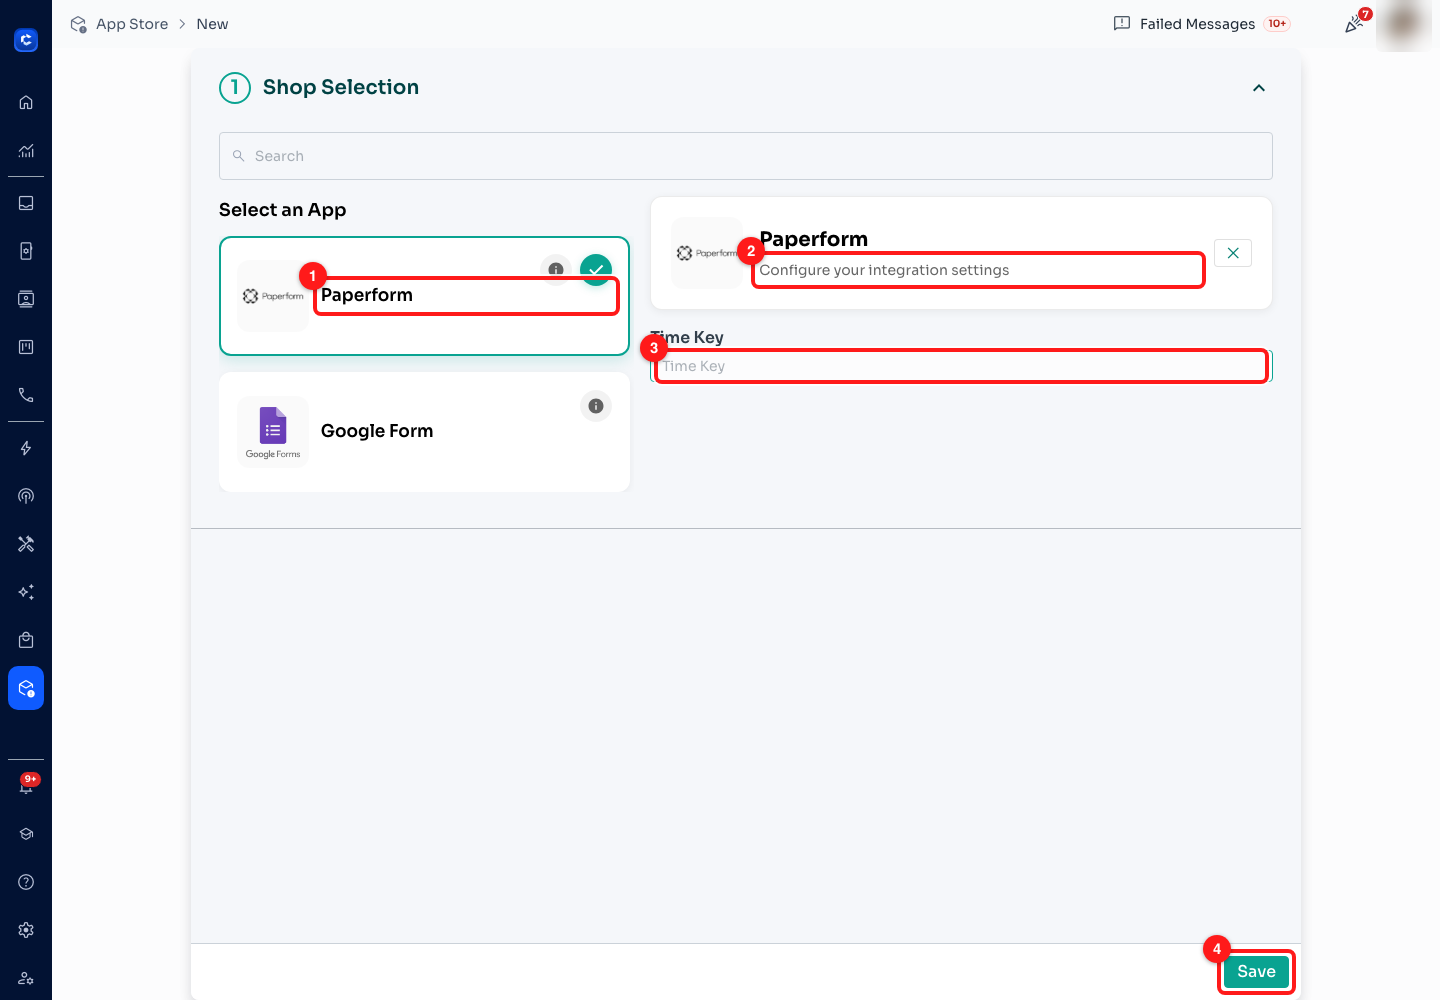
Step 10 — (1) Paperform, selected, (2) its configuration panel, (3) Time Key — the question ID of the appointment field, (4) Save.
- Paperform — your form must contain a phone number field whose question ID is
phone, and, if you are sending appointment reminders, an appointment field whose question ID you paste into (3) Time Key. Then the webhook URL goes into Paperform → Integrations & Webhooks. - Google Form — a different shape. It reads the linked Google Sheet rather than a webhook: add a short-answer WhatsApp Number question, share the sheet as Viewer with the address ChatDaddy gives you in the (i) panel, and paste the spreadsheet ID into the configuration panel.
- For either one, build the flow first. The trigger has nothing to send otherwise.
📌 A question ID is not the question's wording — it is the short identifier the form tool assigns to that field, and it stays the same when you re-word the question. Find it in Paperform beside the field itself. Get it wrong and submissions arrive with an empty appointment time.
Step 11 — Reach the apps that are not on the list, through Zapier
Twenty-one services covers the common cases and not your CRM. For everything else there is Tools → Zapier, which is Zapier's own builder embedded in ChatDaddy. ChatDaddy is a published Zapier app, so it can be either end of a Zap: something happens elsewhere and ChatDaddy sends a message, or something happens in ChatDaddy and the other tool reacts.
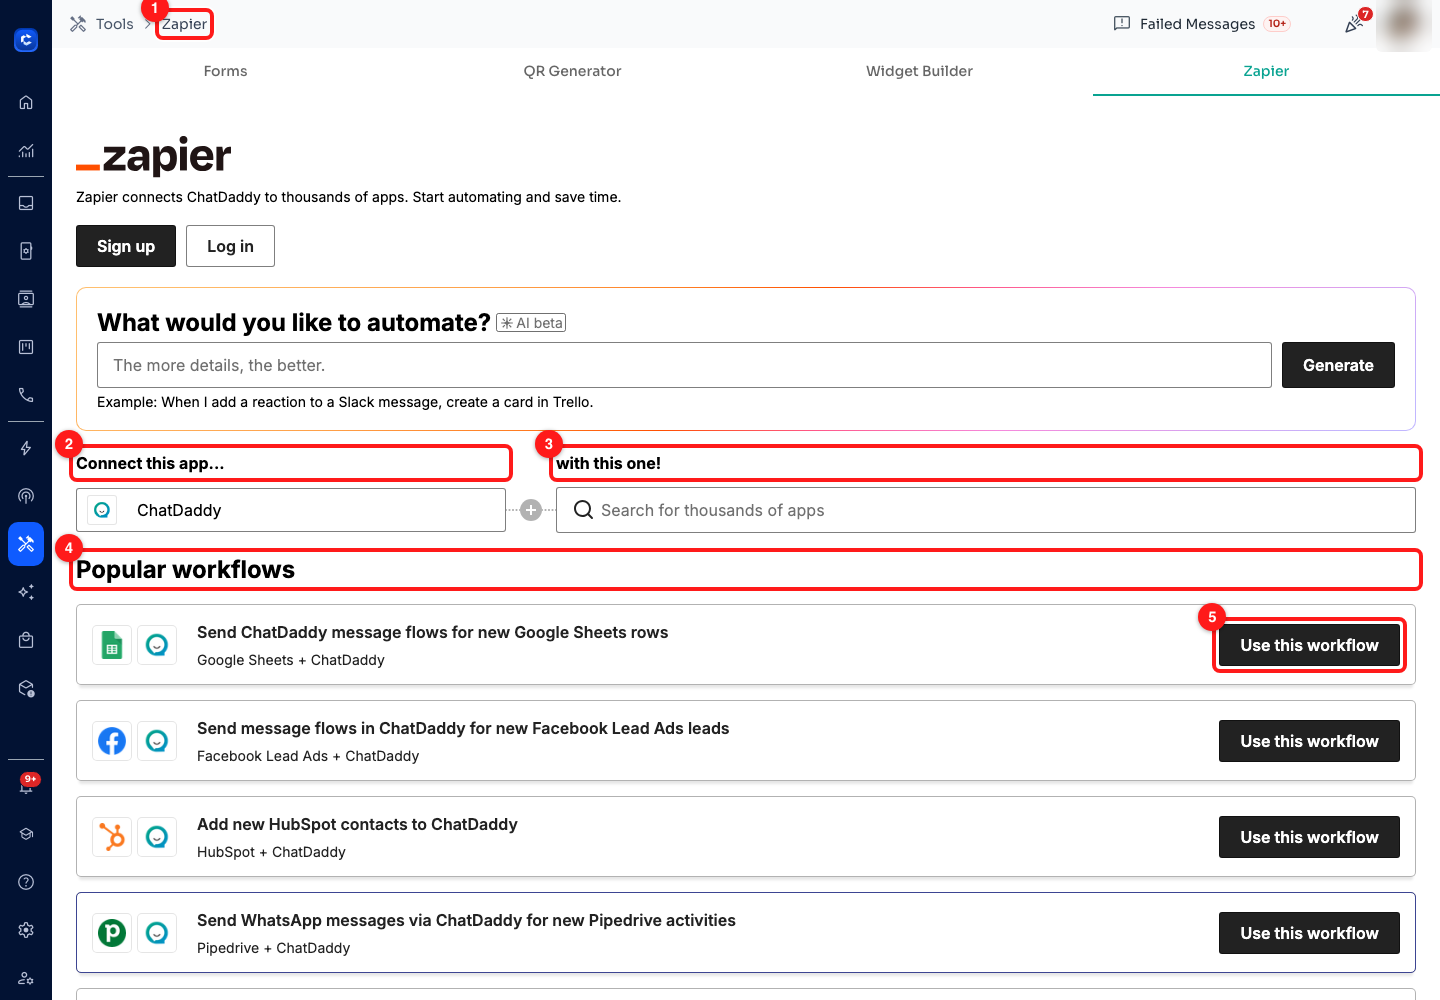
Step 11 — (1) the Zapier tab under Tools, (2) ChatDaddy, already filled in as one end of the Zap, (3) search for the app at the other end, (4) ready-made workflows, (5) Use this workflow opens one pre-configured.
- You need a Zapier account; Sign up and Log in are at the top of the panel. Zapier's own pricing applies, separately from ChatDaddy.
- (4) Popular workflows are the fastest start — among them Send ChatDaddy message flows for new Google Sheets rows, Send message flows in ChatDaddy for new Facebook Lead Ads leads, Add new HubSpot contacts to ChatDaddy, Send WhatsApp messages via ChatDaddy for new Pipedrive activities, and several for monday.com and Slack.
- A Zap still sends a message flow, exactly as an App Store trigger does. The flow has to exist first.
Step 12 — GoHighLevel: search for LeadConnector
GoHighLevel is the one that catches everybody out, and it is worth its own step. There is no GoHighLevel tile in the App Store, and typing GoHighLevel — or HighLevel — into the Zapier app search returns No search results found. The app is there; it is listed under its Zapier name, LeadConnector.
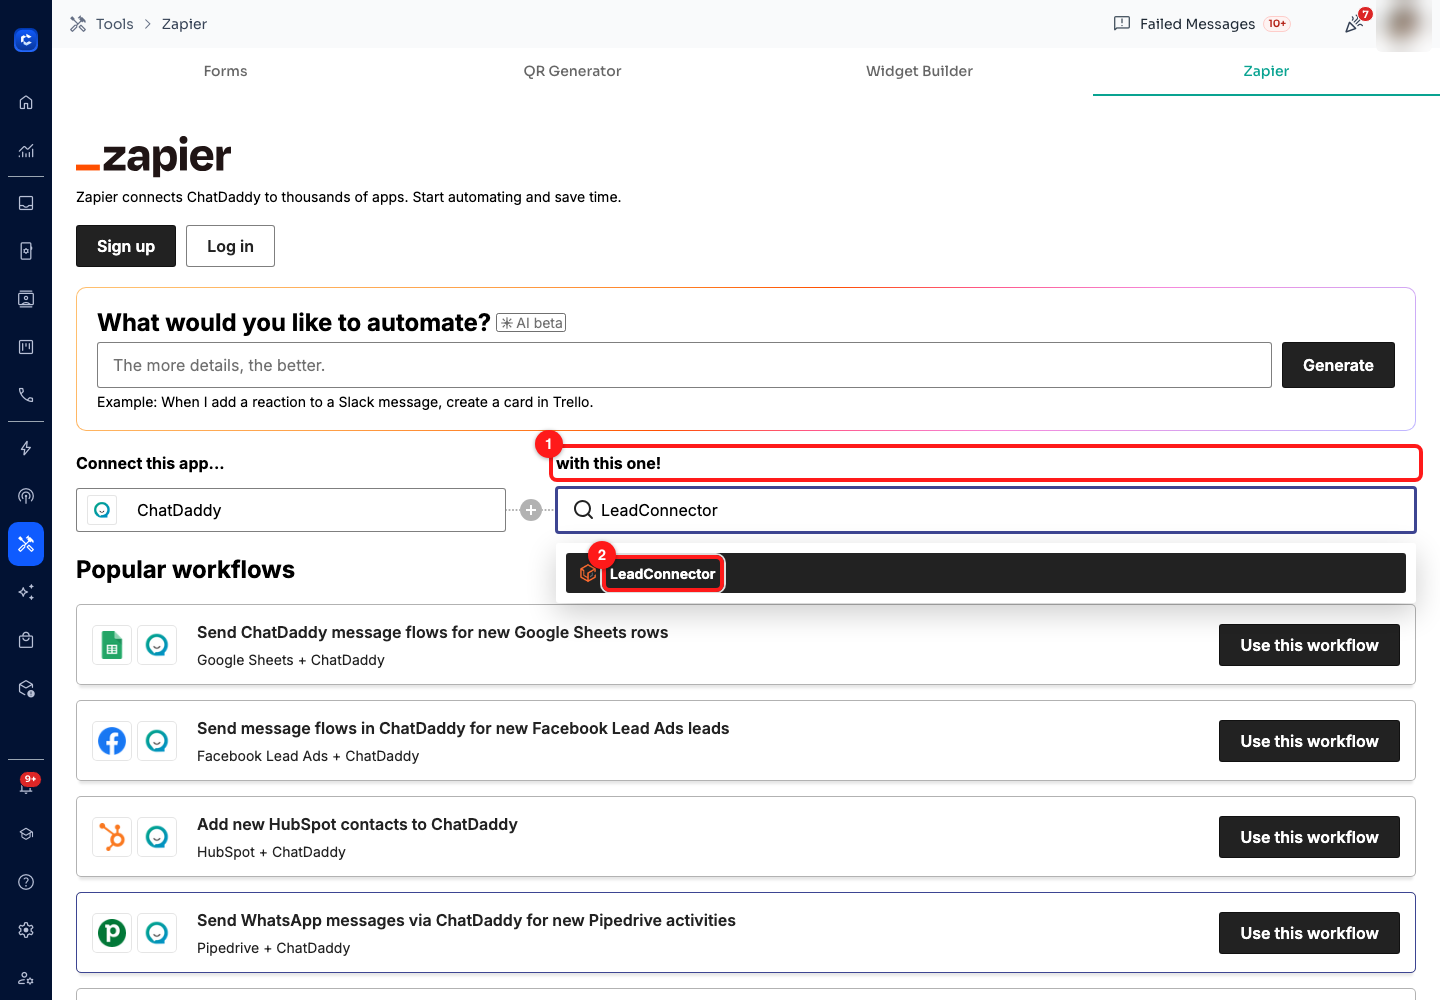
Step 12 — (1) the second half of the Zap, (2) LeadConnector — GoHighLevel under the name Zapier lists it by.
- Search LeadConnector, pick it as the app at the other end, and build the Zap as normal: a GoHighLevel trigger — a new contact, a form submission, a pipeline stage change — with ChatDaddy as the action.
- As with every Zap, the ChatDaddy end of it sends a message flow — the same flows Module 6 builds — rather than a raw message, so build the flow before you build the Zap.
- The same trick applies elsewhere: if an app seems missing, try the name its own developer publishes under before concluding it is unsupported.
Step 13 — Click-to-WhatsApp ads: get the number right first
A click-to-WhatsApp ad is built in Meta Ads Manager, not in ChatDaddy — you choose Messages as the objective and WhatsApp as the destination, and you pick the phone number the ad opens a chat with. The ChatDaddy side of it is one decision made in advance: which of your numbers that is. Check it on the Channels page before you spend anything.
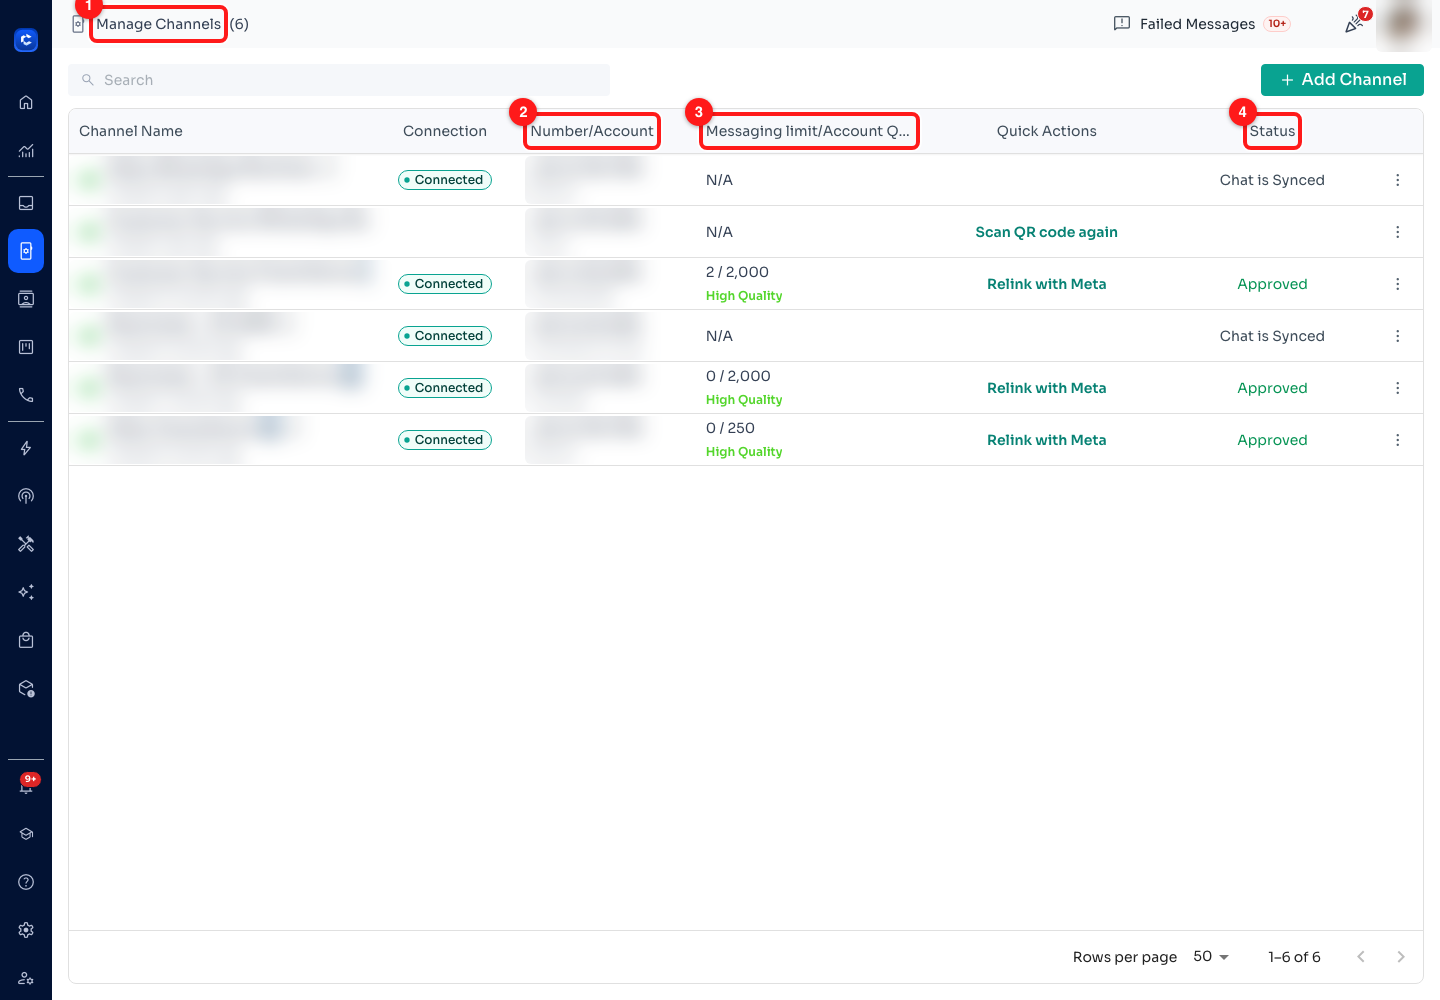
Step 13 — (1) Manage Channels, (2) the number each channel holds, (3) the messaging limit and account quality, which only Business API channels have, (4) status. Names and numbers are blurred here.
- (3) Messaging limit / Account Quality is the quick way to tell your channel types apart. A WhatsApp Business API channel shows a real limit and a quality rating — 2 / 2,000, High Quality — and a status of Approved. A QR-linked channel shows N/A and Chat is Synced.
- Point the ad at a number that is actually connected here and in good standing. An ad driving traffic to a channel that has dropped out — a row offering Scan QR code again or Relink with Meta — is money spent on conversations nobody receives.
- Ad leads arrive as ordinary conversations in your Inbox, so everything from Module 3 applies: assign them, tag them, and let a keyword reply or an offline bot greet them outside working hours.
🏷️ ChatDaddy tags these leads for you. When somebody arrives from a Meta ad, their first message carries an Ad ID chip you can copy straight out of the conversation, so you can tell which creative produced which customer. Referrals from an organic post show a Post ID instead. (We could not find a live ad-sourced conversation on the workspace these screenshots come from, so there is no picture of it here — look for the small bordered chip under the first message of the chat.)
The four video lessons in this module
All four open inside ChatDaddy from the Academy page, or on YouTube using the links below.
- Shopify order notifications on WhatsApp · 2:09 · intermediate · order confirmations and shipping updates sent automatically from your store — Steps 1 to 9.
- WhatsApp messages on form submission (Paperform) · 4:18 · intermediate · trigger a message the instant somebody submits your form — Step 10.
- WhatsApp notifications with GoHighLevel · 5:15 · advanced · connecting funnels without the Business API — Steps 11 and 12, and note the LeadConnector name.
- Set up a WhatsApp ad on Facebook · 5:39 · intermediate · click-to-WhatsApp ads landing in your inbox — Step 13.
Common questions
My integration says Triggered 0 and Never Activated. What is wrong?
No webhook has reached ChatDaddy at all, so the problem is upstream of your triggers — do not go rebuilding conditions. Work through it in this order. Is the webhook URL actually pasted into the other app's webhook settings? Was it copied with the copy button rather than selected by hand? For Shopify, is the format set to JSON rather than XML? And has an event of the right kind actually happened in that app since you pasted it — a connection wired up on a quiet Sunday genuinely will read zero.
Events are arriving but no WhatsApp message goes out.
Now it is worth looking at the triggers, and there are three usual causes. The trigger's Message Flow reads Unknown Flow, so there is nothing to send. The Channel on the Notification Settings section is unset, so there is nothing to send it from. Or the condition does not match — use Test Conditions against real data, and switch on Show Message-Less Data in the activity log to see the events that arrived and produced nothing.
Can I connect two Shopify stores to one workspace?
Yes. Create a second connection and you get a second row with its own webhook URL, its own triggers and its own channel. Rename each one under Notification Nickname as soon as you make it — the field defaults to the service name, so two stores otherwise both show up as "Shopify" and you will be opening rows at random to find the right one.
How do I test without messaging a real customer?
Turn on Override Recipient in Notification Settings and give it your own number. Every notification from that connection then goes to you instead of to the customer, so you can place a test order and watch the whole chain end to end. Setting a Notification Limit on the trigger while you experiment is a sensible second belt. Turn the override off before you go live — it stays on until you do.
Is the App Store list the same for everyone?
The catalogue of supported services is the same, but which of them are useful to you depends on your channel. Shopify's own setup notes list a connected WhatsApp Business API channel as a requirement, whereas the Zapier route in Step 11 works through whatever channel your message flow uses. Check the (i) panel on the tile before you plan the work — it lists that app's requirements explicitly.
➡️ Next: Module 10 — Growth Playbooks. Putting the pieces from Modules 1 to 9 together into the campaigns and routines that actually grow a WhatsApp channel.