
Bulk Actions on the Contacts Page (Tag, Assign, Delete, Export)
Tick a few contacts — or every contact matching your filters — and change them all at once. How the selection bar works, what Manage Tags, Set Assignee, Delete and Export each do, and when ChatDaddy stops to ask you to confirm.
Also searched as: Bulk Actions on the Contacts Page (Tag, Assign, Delete, Export), Where to find it, Choose the contacts you want to change, Pick an action from the selection bar, Add or remove tags across the selection, Hand the contacts to a teammate, Delete contacts (permanent), Export the selection, Working on the whole list at once, When ChatDaddy stops to ask, Bulk, Actions, Contacts, Page, Assign
Editing contacts one at a time gets slow fast. On the Contacts page you can tick as many contacts as you like and then tag them, hand them to a teammate, export them or delete them in a single action.
This article is the tour of that selection bar. It is for anyone who tidies up a contact list — after an import, after a campaign, or when someone joins or leaves the team.
⚠️ The header tickbox selects every contact that matches your current filters, not just the rows on screen. On a list of 542 contacts it selects all 542, even though only 50 are shown. Check the count in the selection bar before you act on it — and remember that Delete cannot be undone.
Where to find it
Open Contacts from the left-hand rail. The bulk actions are not a separate menu — they appear above the table the moment you tick your first contact, and disappear again when you untick everything.
Step-by-step
Step 1 — Choose the contacts you want to change
Every row has a tickbox in the far-left column. Tick the contacts you want, or use the tickbox in the column header to select the whole filtered list at once. Search and filter first if you want to work on a segment — for example everyone tagged lapsed — and then select.
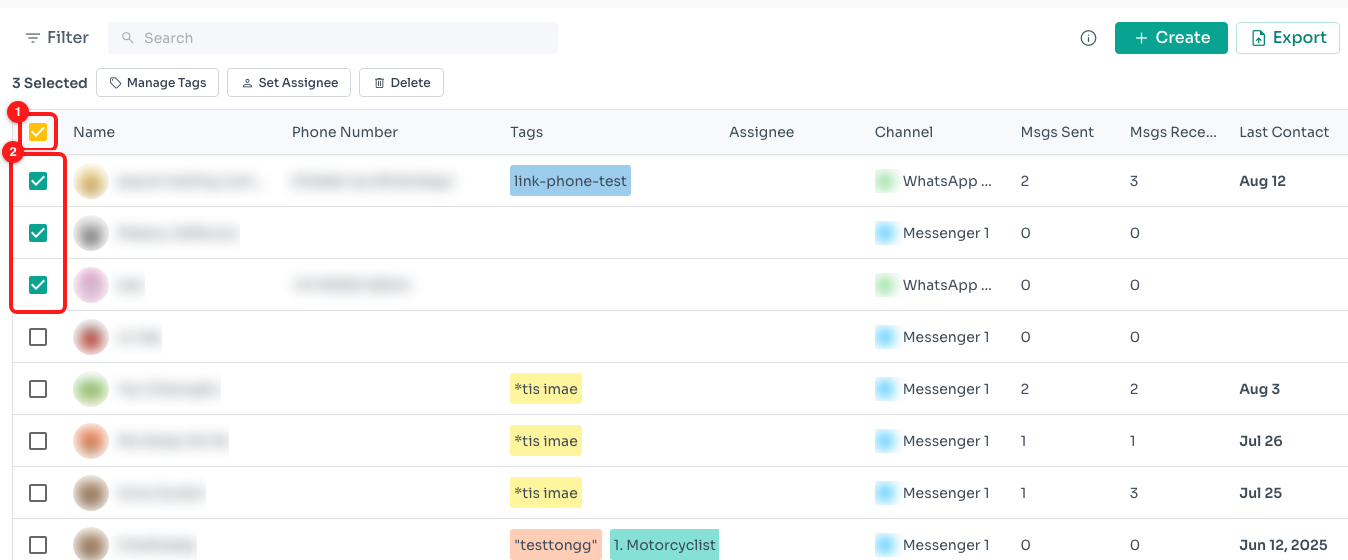
Step 1 — the header tickbox selects everything matching your filters (1); the row tickboxes select individual contacts (2).
🟠 When only some contacts are selected, the header tickbox turns amber. When it is green, every contact in the filtered list is selected.
Step 2 — Pick an action from the selection bar
A bar appears above the table showing how many contacts you have selected, followed by three buttons: Manage Tags, Set Assignee and Delete. The count is the number of contacts the next action will touch, so it is worth reading every time.
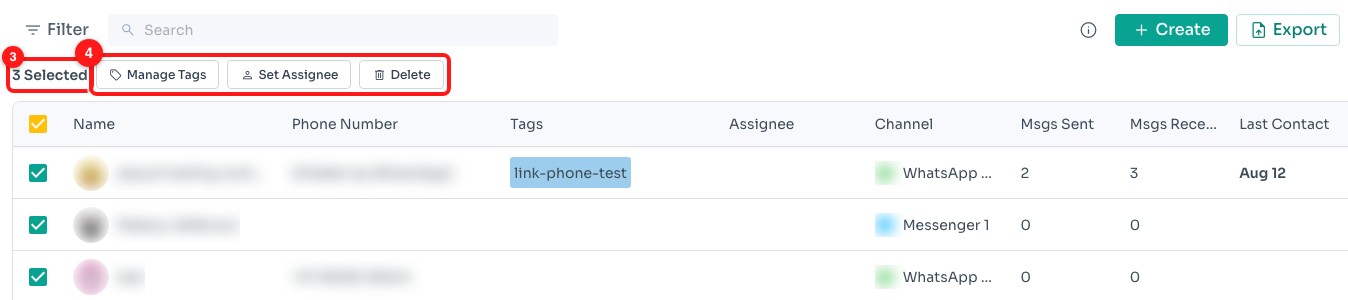
Step 2 — the running count (3) and the three bulk actions (4).
ℹ️ On a narrow screen or a phone the three buttons collapse into a single Bulk Actions menu holding the same options.
Step 3 — Add or remove tags across the selection
Click Manage Tags. The panel opens on Add, so ticking a tag adds it to every selected contact. Switch to Remove first if you want to strip a tag off them instead. You can search for a tag by name, and you can tick more than one — each tick is applied on its own.
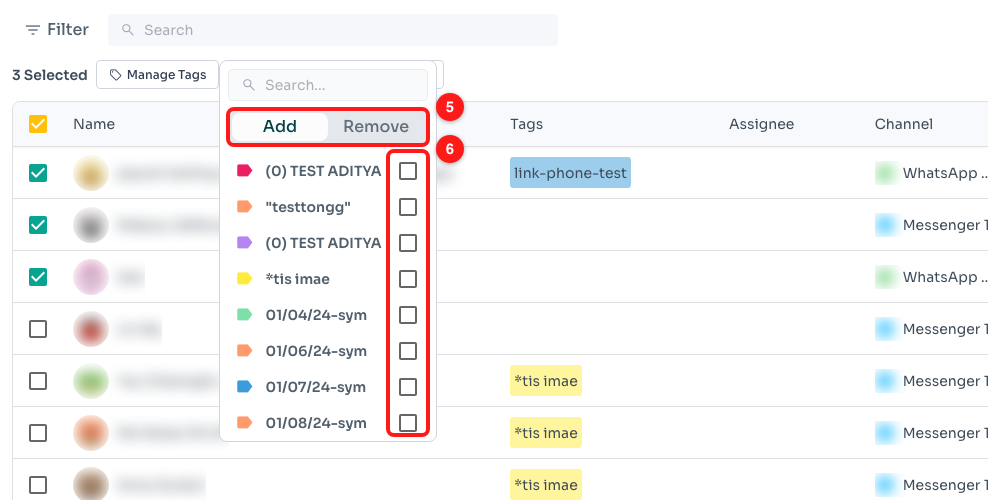
Step 3 — the Add / Remove switch decides which way the change runs (5); tick the tags you want (6).
Step 4 — Hand the contacts to a teammate
Click Set Assignee and pick a teammate from the list. Every selected contact is reassigned to them. To clear the assignee instead, choose Nobody — Remove Assignee at the top of the list.
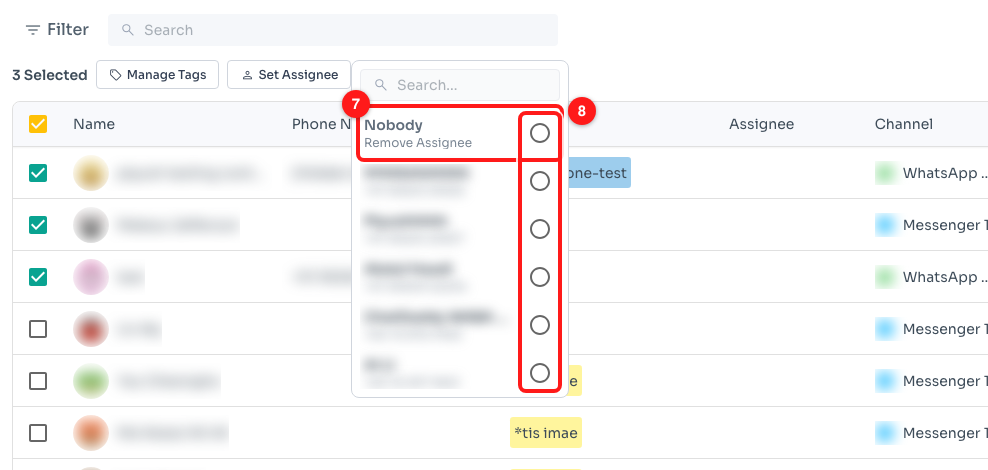
Step 4 — “Nobody” clears the assignee (7); the circle on the right of a row is what selects a teammate (8).
👆 Click the circle on the right of the row. Clicking the teammate’s name does not select them.
Step 5 — Delete contacts (permanent)
Click Delete and ChatDaddy asks you to confirm, naming the exact number of contacts. The button carries the same number so there is no doubt what you are about to remove. Cancel backs out; nothing is deleted until you press the red button.
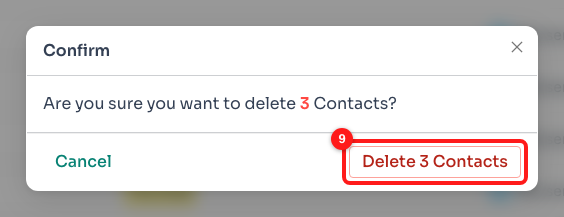
Step 5 — the confirmation repeats the count, and so does the button (9).
🚫 Deleting a contact removes the person and their record from your workspace. It cannot be undone and there is no bin to restore from. If you only want them out of the way, tag them and filter them out instead.
Step 6 — Export the selection
Export sits with the page buttons at the top right rather than in the selection bar, but it respects your selection: with contacts ticked it exports exactly those, and with the header tickbox on it exports every contact matching your filters — not just the page you can see. With nothing selected it offers the whole list.

Step 6 — Export sits in the page header (10) and works on whatever the selection bar currently holds (11).
Working on the whole list at once
Ticking the header box selects everything behind your current filters. The count jumps to the full total straight away, so you can see the size of what you are about to change before you change it.
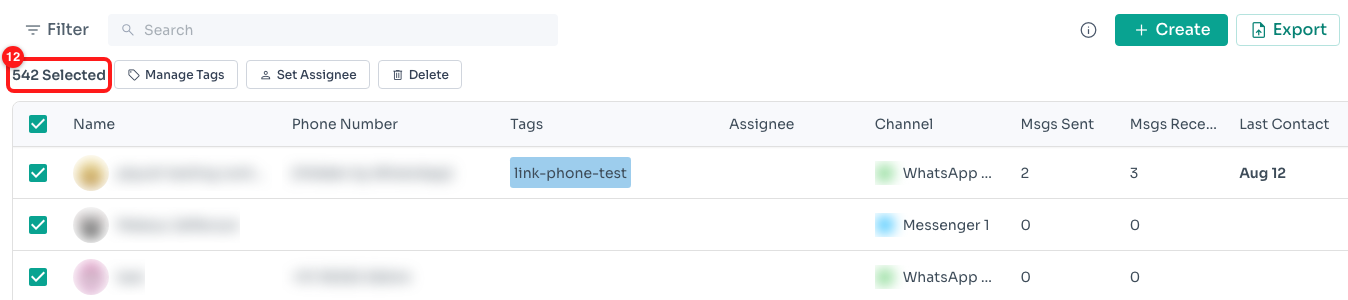
The header tickbox selected all 542 contacts, not the 50 rows on screen (12).
From there you can untick individual rows to carve out exceptions — the count drops by one each time, and those contacts are left alone.
When ChatDaddy stops to ask
Tag and assignee changes on fewer than 10 contacts are applied immediately, with no confirmation step. From 10 contacts upwards you get a confirmation first, spelling out the change and the number of contacts it will reach. Nothing is saved until you press that button.
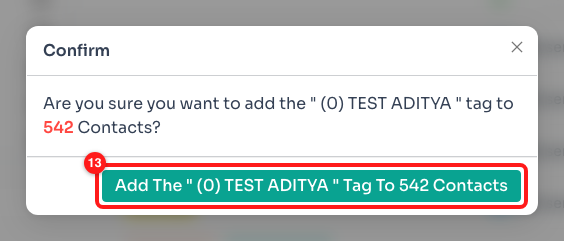
Adding a tag to 542 contacts asks first — and the button repeats both the tag and the count (13).
💡 Deleting always asks, however few contacts are selected.
Frequently asked questions
Some of the buttons are missing or greyed out for me.
The bulk actions are permission-controlled. Manage Tags and Set Assignee need permission to update contacts, Delete needs permission to delete them, and Export needs the contact export permission. If a button is missing or dimmed, ask your team owner to adjust your role in Settings.
I selected everything, then changed the filter. What happens?
The selection is cleared whenever the filters change, so you never carry a selection from one filtered list into another by accident. Set your filters first, then select.
Is “Manage Tags” in the ⋮ menu the same thing?
No. The Manage Tags in the three-dot menu at the top right is the tag library, where you rename and delete the tags themselves for the whole workspace. The Manage Tags in the selection bar only puts tags on, or takes them off, the contacts you have selected.
Can I add a brand-new tag while bulk tagging?
Yes. Start typing the new name into the search box in the Manage Tags panel and the option to create it appears — it is then applied to your selection like any other tag. You need permission to create tags for the option to show.
Nothing happened, and I saw an error about no contacts being updated.
That message appears when the change reached zero contacts — usually because your role only lets you see contacts assigned to you, or because the contacts were removed in the meantime. Reload the page, check the selection, and try again.
I deleted the wrong contacts. Can I get them back?
Not from the app — deletion is permanent and there is no bin. If you have an earlier export of the list you can import it again, though message history and assignments will not come back with it. Contact support as soon as you notice.