
How to Use ChatDaddy's CSV Import Templates (Contacts, Products, Coupons)
Every bulk import screen in ChatDaddy offers a Download Template link. Learn where each template lives, which columns it contains, how ChatDaddy matches your columns on upload, and what to do when rows come back with problems.
Also searched as: How to Use ChatDaddy's CSV Import Templates (Contacts, Products, Coupons), Where each template is, Open the contacts importer, Download the template, Fill it in and upload, Use the same link for products and coupons, When rows come back with problems, ChatDaddy's, Import, Templates, Contacts, Products, Coupons
Anywhere ChatDaddy lets you upload a spreadsheet — contacts, products, coupon codes — there is a Download Template link next to the upload box. It gives you a small CSV with the right column headings and one or two example rows, so you can fill in your own data without guessing what ChatDaddy expects.
This is the quickest way to get a large list into ChatDaddy correctly the first time. If you have ever had an import that matched no columns or dropped half your tags, starting from the template will fix it.
📄 The template downloads straight from the app as a real
.csvfile — open it in Excel, Numbers or Google Sheets, replace the example row with your data, and save it as CSV again. Saving it as.xlsxwill make the upload fail.
Where each template is
- Contacts — Contacts page → ⋮ → Import. Two links: WhatsApp Contacts and Email Contacts.
- Broadcast audiences — the same Import Contacts window opens from the Select Contacts step of a broadcast, so it uses the same contacts template.
- Products — Shop → Products → Import → Download Template Here.
- Coupon codes — Marketing → Campaigns → open a campaign → Coupon Settings → Download Template. There is a second template further down that page, under Number Bound Redemption Mode, for limiting a campaign to specific contacts.
Step-by-step
Step 1 — Open the contacts importer
Go to Contacts in the left-hand menu. At the top right, click the ⋮ button next to Export, then choose Import.
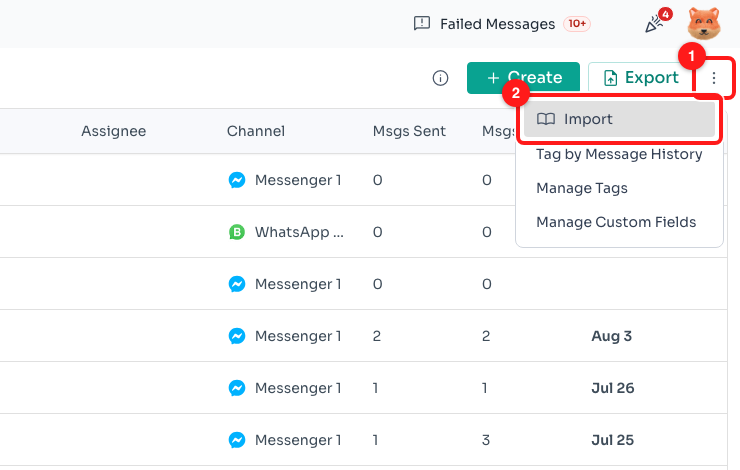
Step 1 — the ⋮ button at the top right of the Contacts page (1) and the Import option inside it (2).
🔑 You need the create contacts permission to see Import. If the option is missing, ask your team owner to update your role.
Step 2 — Download the template
The Import Contacts window opens. Just above the upload box it reads “Download Template.” followed by two links — WhatsApp Contacts and Email Contacts. Click the one that matches the list you are importing.
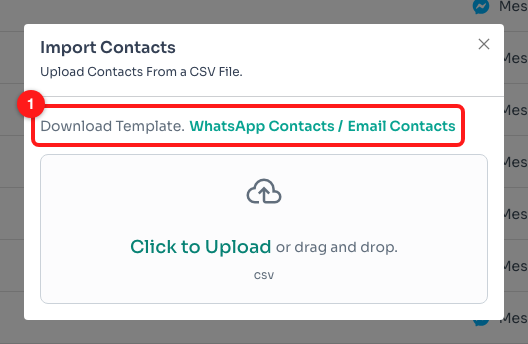
Step 2 — the two template links sit directly above the upload box (1).
The WhatsApp file is called Import Contacts Template.csv and contains four columns with one example row:
- Name — the contact's display name.
- Phone Number — in international format without a
+or spaces, for example60123456789. It must be at least 8 digits. - Tags — one tag, or several separated by commas. Because commas also separate CSV columns, wrap a multi-tag cell in quotes:
"Booking session,VIP". - Assignee — the full name or the phone number of a team member, exactly as it appears in your team. Leave it blank if you are not assigning anyone.
Step 3 — Fill it in and upload
Replace the example row with your own, keeping the heading row exactly as it is. Save as CSV, then drag the file onto the upload box or click Click to Upload.
ChatDaddy reads the file in your browser and shows a Preview. On the left is Column Selection, where each ChatDaddy field is matched to a column from your file; on the right is every row it found. Because you started from the template, the matching is filled in for you.
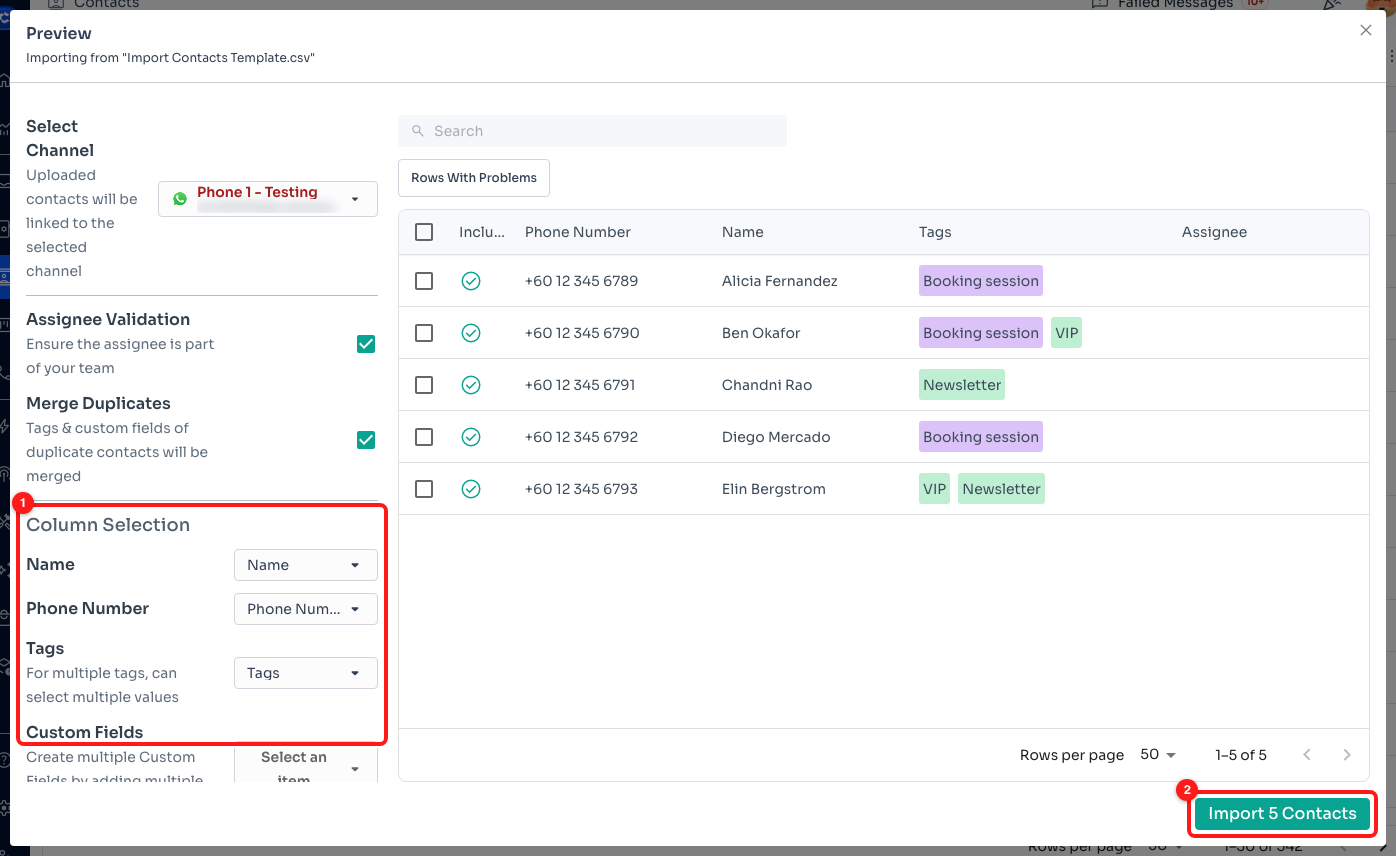
Step 3 — Column Selection maps your headings onto ChatDaddy fields (1). The button at the bottom right names exactly how many contacts will be created (2).
Two settings sit above the mapping, both switched on by default:
- Assignee Validation — checks that every name in the Assignee column belongs to someone on your team.
- Merge Duplicates — when the same phone number or email appears twice, the tags and custom fields of the later rows are merged into the first one. Untick it to keep only the first occurrence and ignore the rest.
Pick the channel the contacts should belong to under Select Channel if your team has more than one, then click Import N Contacts. You will see “Successfully imported N contacts” when it finishes.
Step 4 — Use the same link for products and coupons
Product and coupon imports work the same way. On Shop → Products, click Import and then Download Template Here.
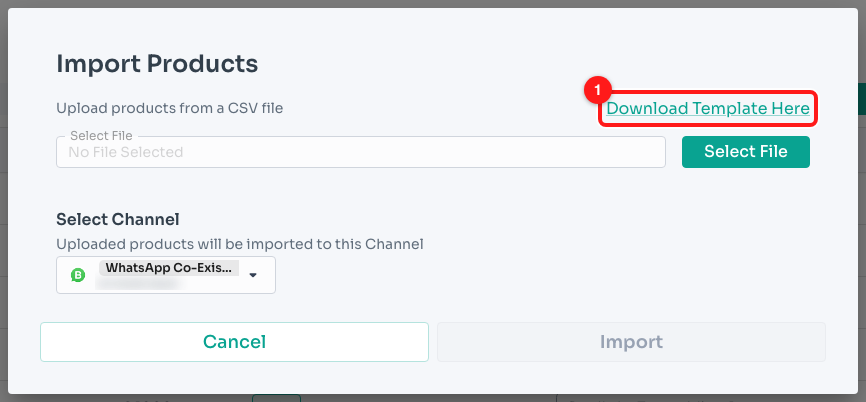
Step 4 — the products template link in the Import Products window (1).
Products CSV Template.csv has four columns — name, price, description and imageUrl — with two example products so you can see the expected format.
For a coupon campaign, open the campaign from Marketing → Campaigns and look under Coupon Settings.
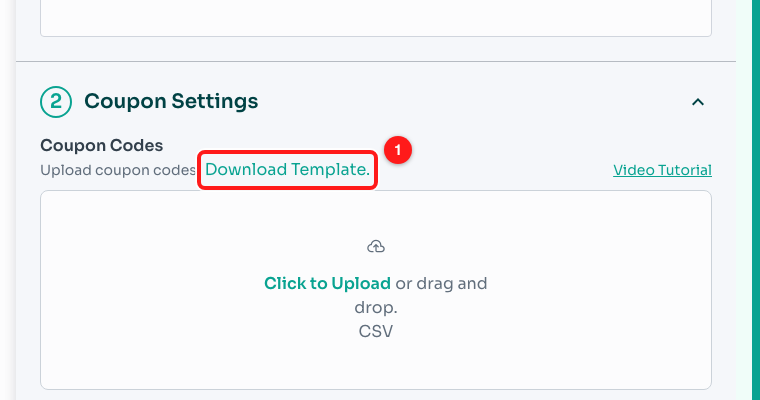
The coupon codes template sits beside the Coupon Codes upload box (1).
Coupon Codes CSV Template.csv uses code, discount and expiryDate (dates written as 2026-12-31). The redemption-contacts template further down the same page uses phoneNumber and couponCode.
When rows come back with problems
If anything in your file cannot be imported, a red banner reads “N Problem(s) Found” and the affected rows are shaded. The Import button stays greyed out until no included row has a problem — ChatDaddy will not import a partly broken list by accident.
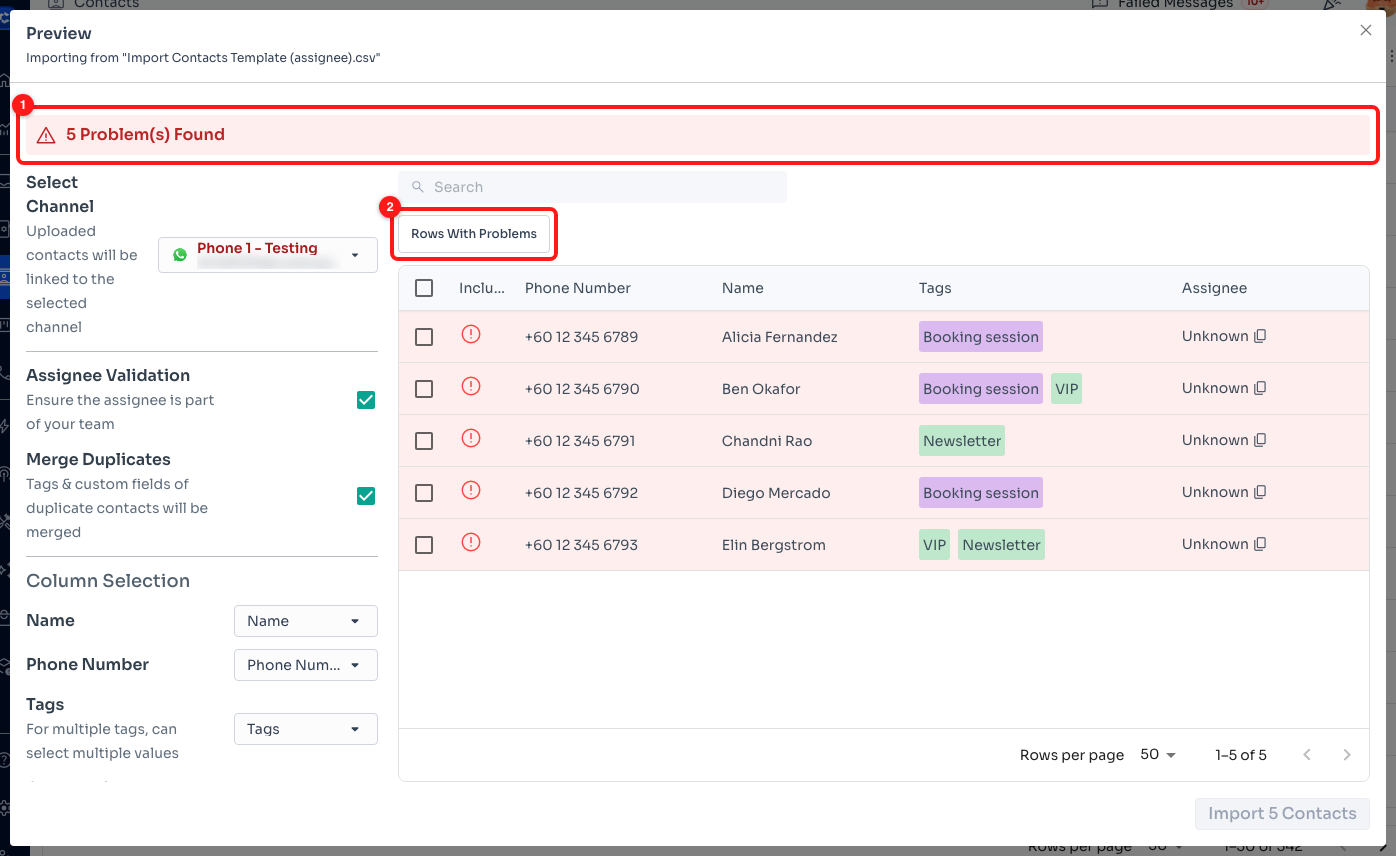
The problem banner counts every row that cannot be imported (1). Click “Rows With Problems” to filter the table down to just those rows (2).
Click Rows With Problems to see only the rows that need attention. Hover the warning icon on a row for the reason and a suggested fix. You then have two options: correct the file and upload it again, or tick the rows in the table and exclude them so the rest can go through.
- “No phone number or email” — the row has neither, so there is nothing to identify the contact by. Fill one in or exclude the row.
- “Invalid phone number” — fewer than 8 digits. Add the country code and remove any letters or leading zeros.
- “Invalid email” — the address is not a valid email format.
- “No team member found for assignee …” — the name in the Assignee column does not match anyone on your team. Correct the spelling, use the team member's phone number instead, clear the cell, or untick Assignee Validation to import the contact without an assignee.
- “Too many tags and custom fields” — a single contact can carry at most 50 tags and custom fields combined.
Frequently asked questions
The downloaded file opens as gibberish or as a web page.
That was a bug in older versions of ChatDaddy, where the template links served a web page saved under a .csv name. It is fixed — the templates are now built by the app itself. Refresh the page (or press Ctrl+Shift+R / Cmd+Shift+R) so your browser loads the current version, then download the template again.
Can I add my own columns to the template?
Yes. Any extra column can be mapped to a custom field in the Column Selection panel, and ChatDaddy creates the custom field for you on import. Keep each value under 255 characters. Do not rename the four original headings — ChatDaddy matches them by looking for the words name, phone or number, tags, assignee and email.
My columns did not match up automatically.
That happens when the heading row was renamed, moved down the sheet, or lost when the file was re-saved. You can fix it without re-uploading: open each dropdown under Column Selection in the preview and pick the right column from your file by hand.
How do I put more than one tag on a contact?
Put them all in the Tags cell separated by commas, and wrap the cell in double quotes so the CSV keeps it as one value — for example "Booking session,VIP". A spreadsheet app adds those quotes for you when you type a comma inside a cell and save as CSV.
ChatDaddy says the file could not be parsed.
The message “Failed to parse the selected file. Please check it is a valid CSV and try again.” means the upload was not readable CSV — most often an Excel .xlsx file renamed to .csv. In your spreadsheet app choose File → Save As or Download and pick CSV as the format.
Is there a limit on how many rows I can import?
There is no fixed row limit. ChatDaddy uploads in batches of 500 and the button shows the running total, for example Imported 500/2,400 Contacts. Keep the tab open until it finishes.