
How to Connect Google Sheets to ChatDaddy with Zapier
ChatDaddy has no built-in Google Sheets app, so Zapier is the bridge. Learn what the integration is for, then follow the step-by-step to turn new spreadsheet rows into WhatsApp messages and to log ChatDaddy contacts back into a sheet.
Also searched as: How to Connect Google Sheets to ChatDaddy with Zapier, What is it for?, Direction 1 — Google Sheets ➜ ChatDaddy, Direction 2 — ChatDaddy ➜ Google Sheets, Part 1 — Send a WhatsApp message when a row is added, Get the spreadsheet into the right shape, Open Tools in ChatDaddy, Open the Zapier tab, Pick Google Sheets as the other app, Sign in to Zapier and connect your Google account, Connect your ChatDaddy account, Choose what ChatDaddy should do, and map the columns, Test it, then turn the Zap on, Part 2 — Write ChatDaddy activity back into a sheet, Part 3 — From a sheet to a Broadcast
Most teams keep something important in a Google Sheet — a list of leads from a landing page, tomorrow's appointments, today's orders, the sign-ups for an event. ChatDaddy keeps the WhatsApp conversation. This integration joins the two, so a row in a spreadsheet can start a WhatsApp conversation, and a WhatsApp conversation can write itself into a spreadsheet — with nobody copying and pasting.
❗ Google Sheets is not in ChatDaddy's App Store, and it is not in the Flow Builder's App Trigger tab either. That tab contains only Webhook. Searching for "Google Sheets" in either place will always come back empty. That is expected: Sheets is reached through Zapier, and this article is the route.
What is it for?
The integration runs in two directions, and it is worth deciding which one you actually need before you build anything.
Direction 1 — Google Sheets ➜ ChatDaddy
Something is added to a sheet, and ChatDaddy reaches out on WhatsApp. Typical uses:
- Lead follow-up — a web form or ad campaign drops new leads into a sheet; each new row gets a WhatsApp welcome message within minutes instead of at the end of the day.
- Appointment and delivery reminders — a booking sheet sends the customer a reminder the morning of their slot.
- Order and payment confirmations — a fulfilment sheet confirms the order and shares the tracking number.
- Event sign-ups — everyone who registers gets the joining details, automatically.
- Building an audience — instead of messaging straight away, create the person as a ChatDaddy contact and tag them, so you can send one Broadcast to the whole tag later.
Direction 2 — ChatDaddy ➜ Google Sheets
Something happens in ChatDaddy, and a row is written to a sheet. Typical uses:
- A live lead log — every new contact lands in a sheet the sales team already works in.
- Capturing what a flow collected — when a message flow reaches its end, write the answers it gathered into a sheet for reporting.
- A pipeline mirror — when a contact is tagged Interested or Paid, append a row so finance or ops can see it without a ChatDaddy login.
- Reporting you own — a sheet you can pivot, chart and share outside the team, refreshed automatically.
🧭 Rule of thumb: if the spreadsheet changes first, Google Sheets is the trigger and ChatDaddy is the action. If the conversation happens first, ChatDaddy is the trigger and Google Sheets is the action.
Before you start
- A ChatDaddy account with at least one connected channel. Nothing can be sent without one.
- A Zapier account. The free tier is enough to build and test; higher volumes need a paid Zapier plan, billed by Zapier and not by ChatDaddy.
- A Google account with the spreadsheet in it.
- Your ChatDaddy login phone number and password — or, if you signed up with Google and have no password, your Team ID and a Refresh Token (see Step 6).
Part 1 — Send a WhatsApp message when a row is added
Step 1 — Get the spreadsheet into the right shape
Zapier reads a sheet by its column headers, so the sheet has to have them. Three rules save most of the troubleshooting later:
- Row 1 is the header row and every column you care about is named. Blank headers are skipped, and Zapier will not offer them when you map fields.
- Phone numbers are in full international format — country code, digits only, no spaces, no brackets, no leading
0.60123456789, not012-345 6789. Format the column as Plain text first so Google does not strip a leading+or turn the number into scientific notation. - No completely empty rows in the middle of the data. Zapier treats the first empty row as the end of the sheet and stops looking.
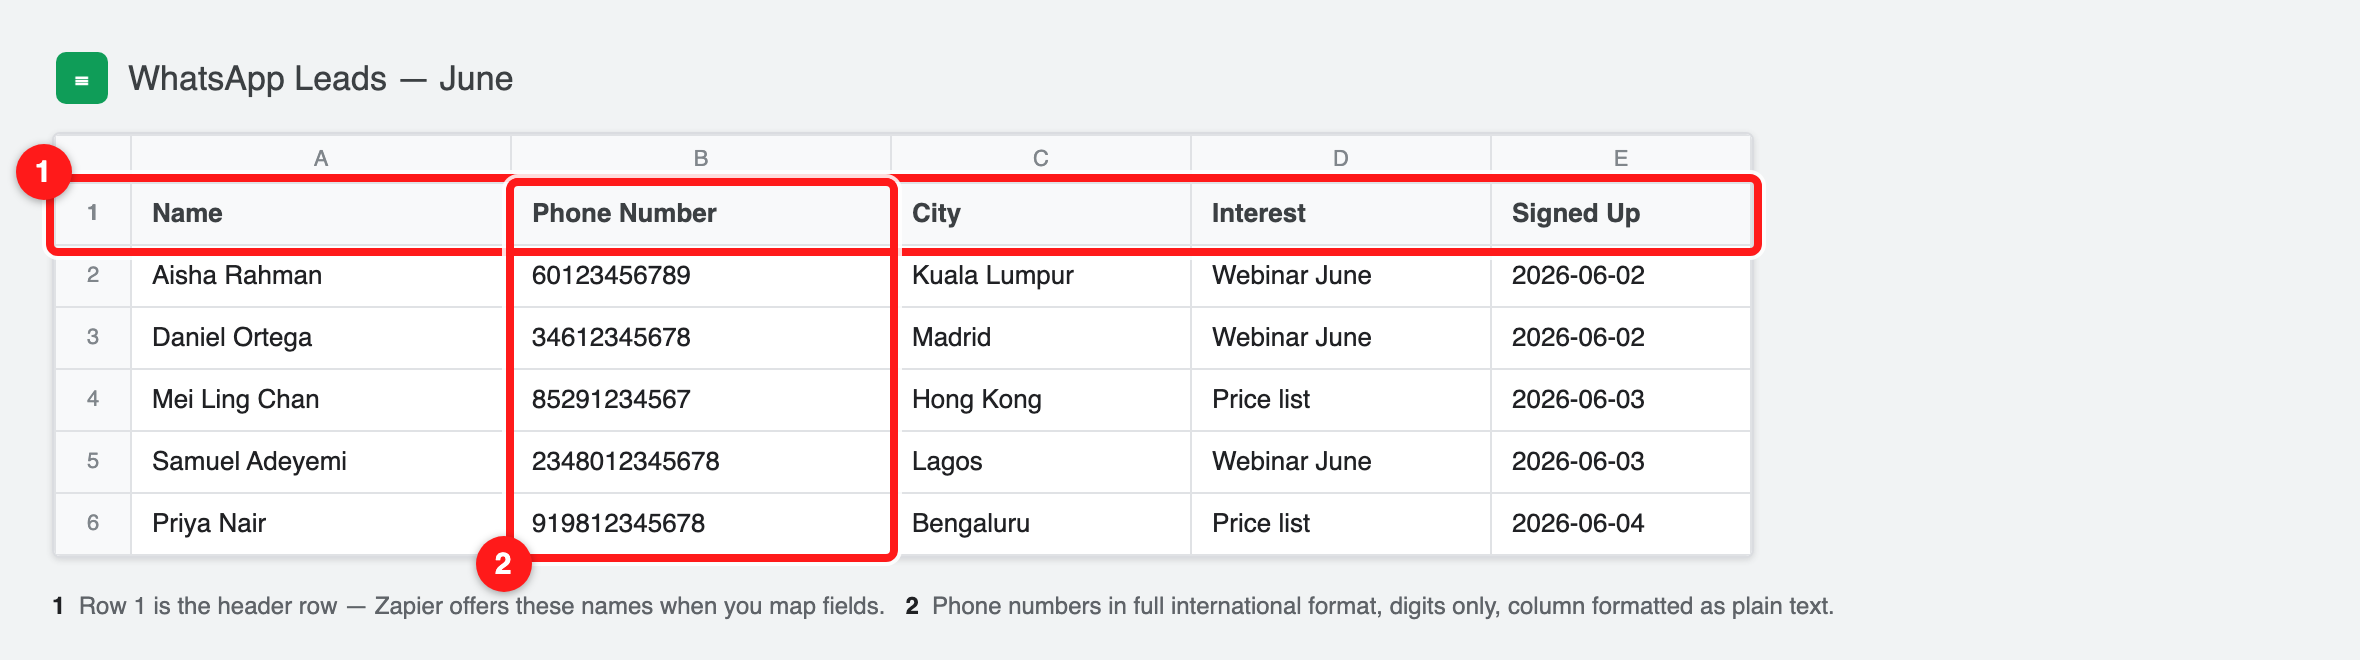
Step 1 — a sheet Zapier can read: a named header row (1) and phone numbers in full international format as plain text (2).
Step 2 — Open Tools in ChatDaddy
In the left-hand menu, click Tools.
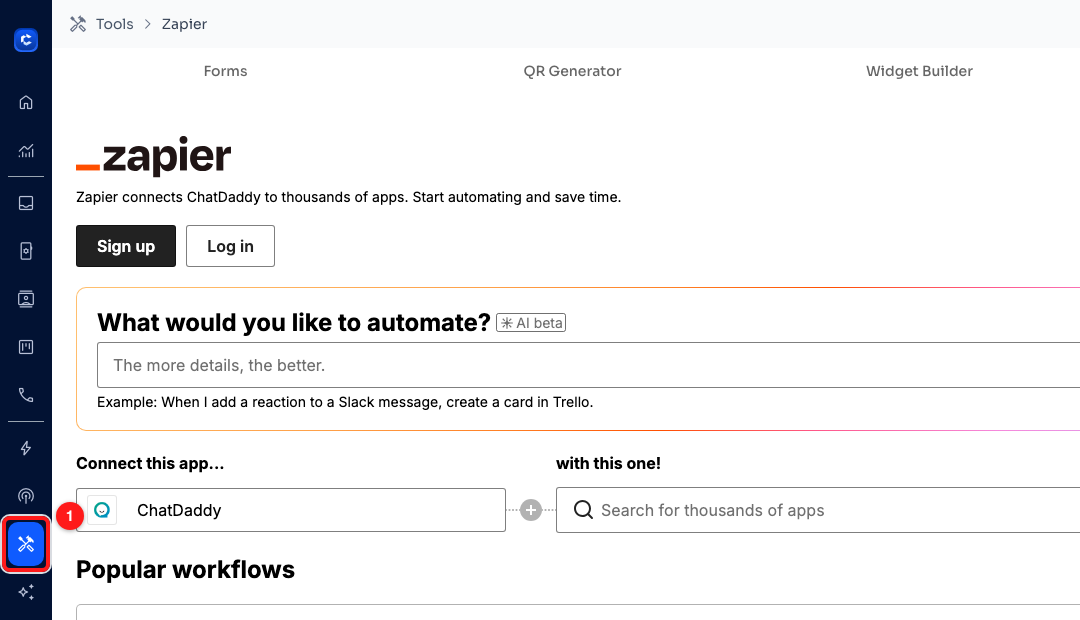
Step 2 — Tools in the left-hand menu (1).
Step 3 — Open the Zapier tab
The Tools page has four tabs — Forms, QR Generator, Widget Builder and Zapier. Open Zapier. What loads is Zapier's own full workflow builder, embedded in ChatDaddy, so you never have to leave the app.
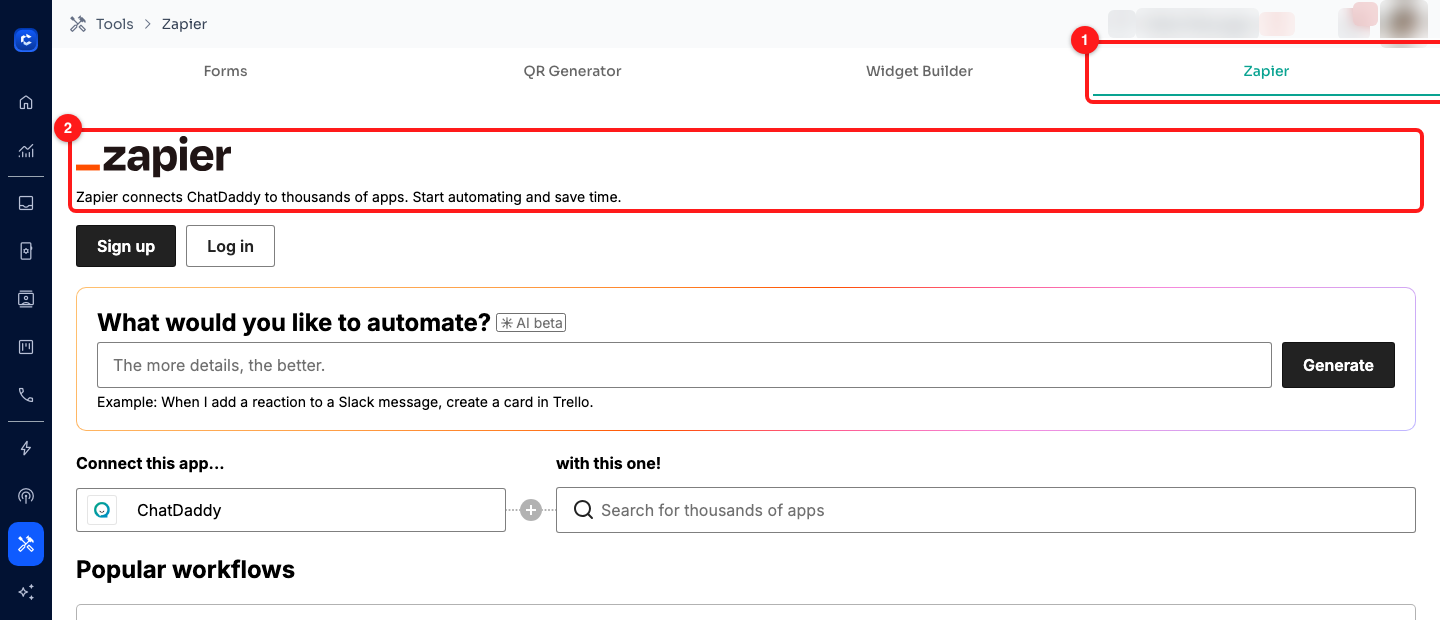
Step 3 — the Zapier tab on the Tools page (1) and the embedded Zapier builder that loads under it (2).
🔗 You can also go straight there: app.chatdaddy.tech/tools/zapier.
Step 4 — Pick Google Sheets as the other app
The builder pairs ChatDaddy with one other app. Under Connect this app… ChatDaddy, the second box — with this one! — is a search field reading Search for thousands of apps. Type Google Sheets into it.
Underneath sits Popular workflows, and the very first one is built for exactly this job: “Send ChatDaddy message flows for new Google Sheets rows.” Click Use this workflow to start from it rather than from a blank Zap.
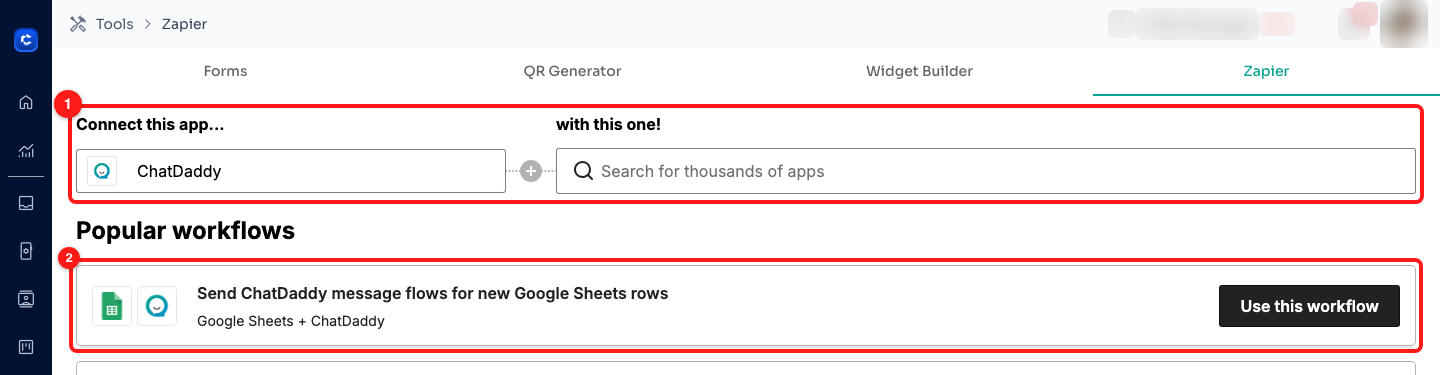
Step 4 — the app pair, with the “with this one!” search box (1), and the ready-made Google Sheets workflow with its Use this workflow button (2).
💡 Starting from the ready-made workflow only pre-fills the two apps and the events. Every choice in the steps below is still yours to make, and you can change any of it.
Step 5 — Sign in to Zapier and connect your Google account
The first time you use this page you are not signed in to Zapier — there are Sign up and Log in buttons at the top of the embedded builder. Use Log in if you already have a Zapier account, Sign up if you do not. You come straight back to the workflow afterwards.
Then set up the trigger half:
- Trigger app Google Sheets, event New Spreadsheet Row — this fires once for each row added at the bottom of the sheet. Use New or Updated Spreadsheet Row instead if you also want to react when an existing row is edited.
- Click Sign in and allow Zapier access to your Google account in the Google window.
- On the Configure tab, choose the Spreadsheet and the Worksheet (the tab inside the file).
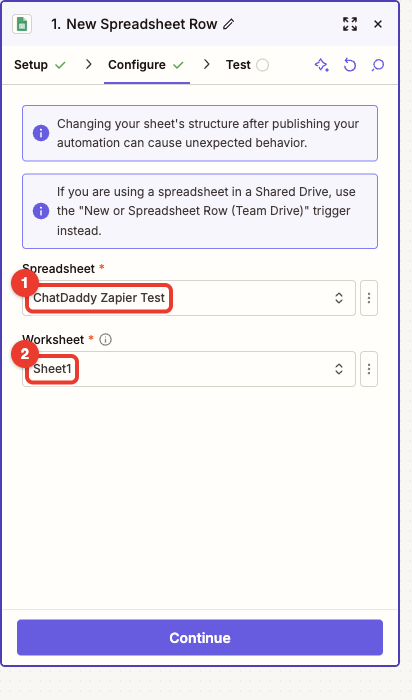
Step 5 — the trigger's Configure tab: pick the Spreadsheet (1), then the Worksheet inside it (2).
Click Continue, then Test trigger. Zapier pulls a real row out of your sheet and shows it back to you. This is what proves the sheet is readable — and the row it returns becomes the sample you map fields from in Step 7, so check the phone number looks right here.
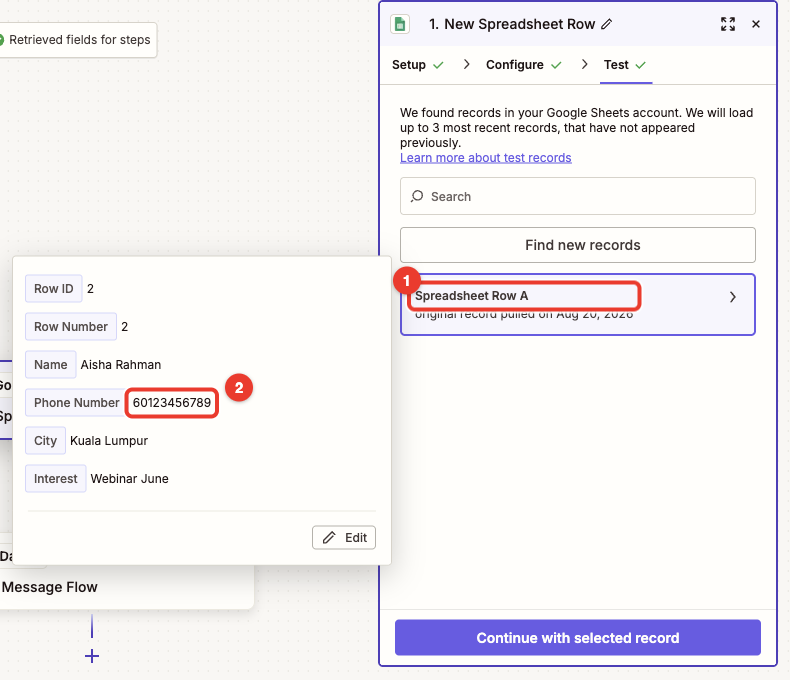
Step 5 — the test found the row (1) and shows every column it read, including the phone number (2).
⏱️ Google Sheets triggers are polled, not instant. Zapier checks the sheet on a schedule — about every 15 minutes on the free plan, more often on paid plans — so a new row starts its Zap within that window, not the second you type it. Plan reminders and confirmations with that delay in mind.
Step 6 — Connect your ChatDaddy account
Now the action half. Choose ChatDaddy as the action app, pick the event (Step 7 explains which), and click Connect a new account. A small ChatDaddy window opens asking for credentials. There are two ways to fill it in.
If you sign in to ChatDaddy with a phone number and password:
- Enter the same phone number and password you use to log in.
- If you belong to more than one team, fill in the Team ID as well, so the Zap can only touch that team. To find it, click your profile icon at the top right of ChatDaddy and use the Copy button next to your team name.
- Leave Refresh Token empty and click Yes, Continue to ChatDaddy.
If you signed up with Google and have no password:
- Fill in the Team ID, copied the same way as above.
- Generate a Refresh Token: in ChatDaddy go to Developer → Webhook, open the three-dot menu at the top right, choose Generate Refresh Token, click Generate, then copy it.
- Paste the token into the Refresh Token field and continue. Leave phone and password empty.
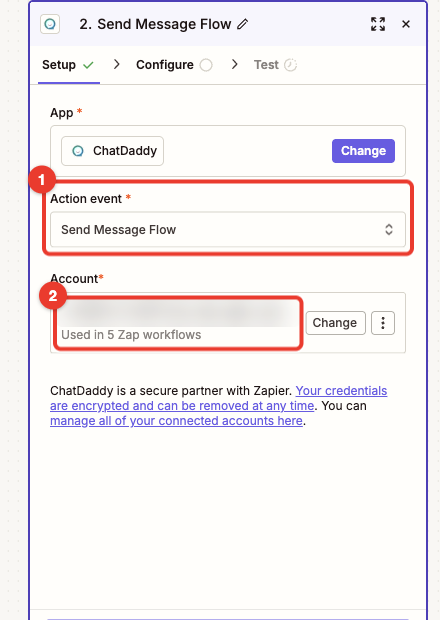
Step 6 — the action step once ChatDaddy is connected: the Action event (1) and the linked ChatDaddy account (2). One connection can serve several Zaps.
🔐 A refresh token is a credential — anyone holding it can act on your team. Paste it only into Zapier's connection window, never into a message, a sheet cell or a shared doc. Only one Zapier account can be connected to a ChatDaddy team at a time, and everyone on the team shares it.
Step 7 — Choose what ChatDaddy should do, and map the columns
These are the ChatDaddy actions Zapier offers. Pick the one that matches your goal:
- Send Message Flow — starts one of your existing message flows for that person. This is the one the ready-made workflow uses, and usually the right answer (see the warning below about the 24-hour window).
- Send Message — sends a single message you write inside Zapier.
- Create Contact — adds the person to ChatDaddy without messaging them.
- Add Tag / Custom Field to Contacts — labels the contact, e.g.
sheet-importorwebinar-june, so you can find or broadcast to them later. - Set Assignee of Contact — hands the contact to a specific team member.
Then map the fields. Click into each ChatDaddy field and pick the matching column from the Google Sheets sample Zapier fetched in Step 5 — the phone-number column into the phone field, the name column into the name field, and so on. Anything you type rather than pick stays the same on every run, which is what you want for fixed values such as the flow to start or the tag to apply.
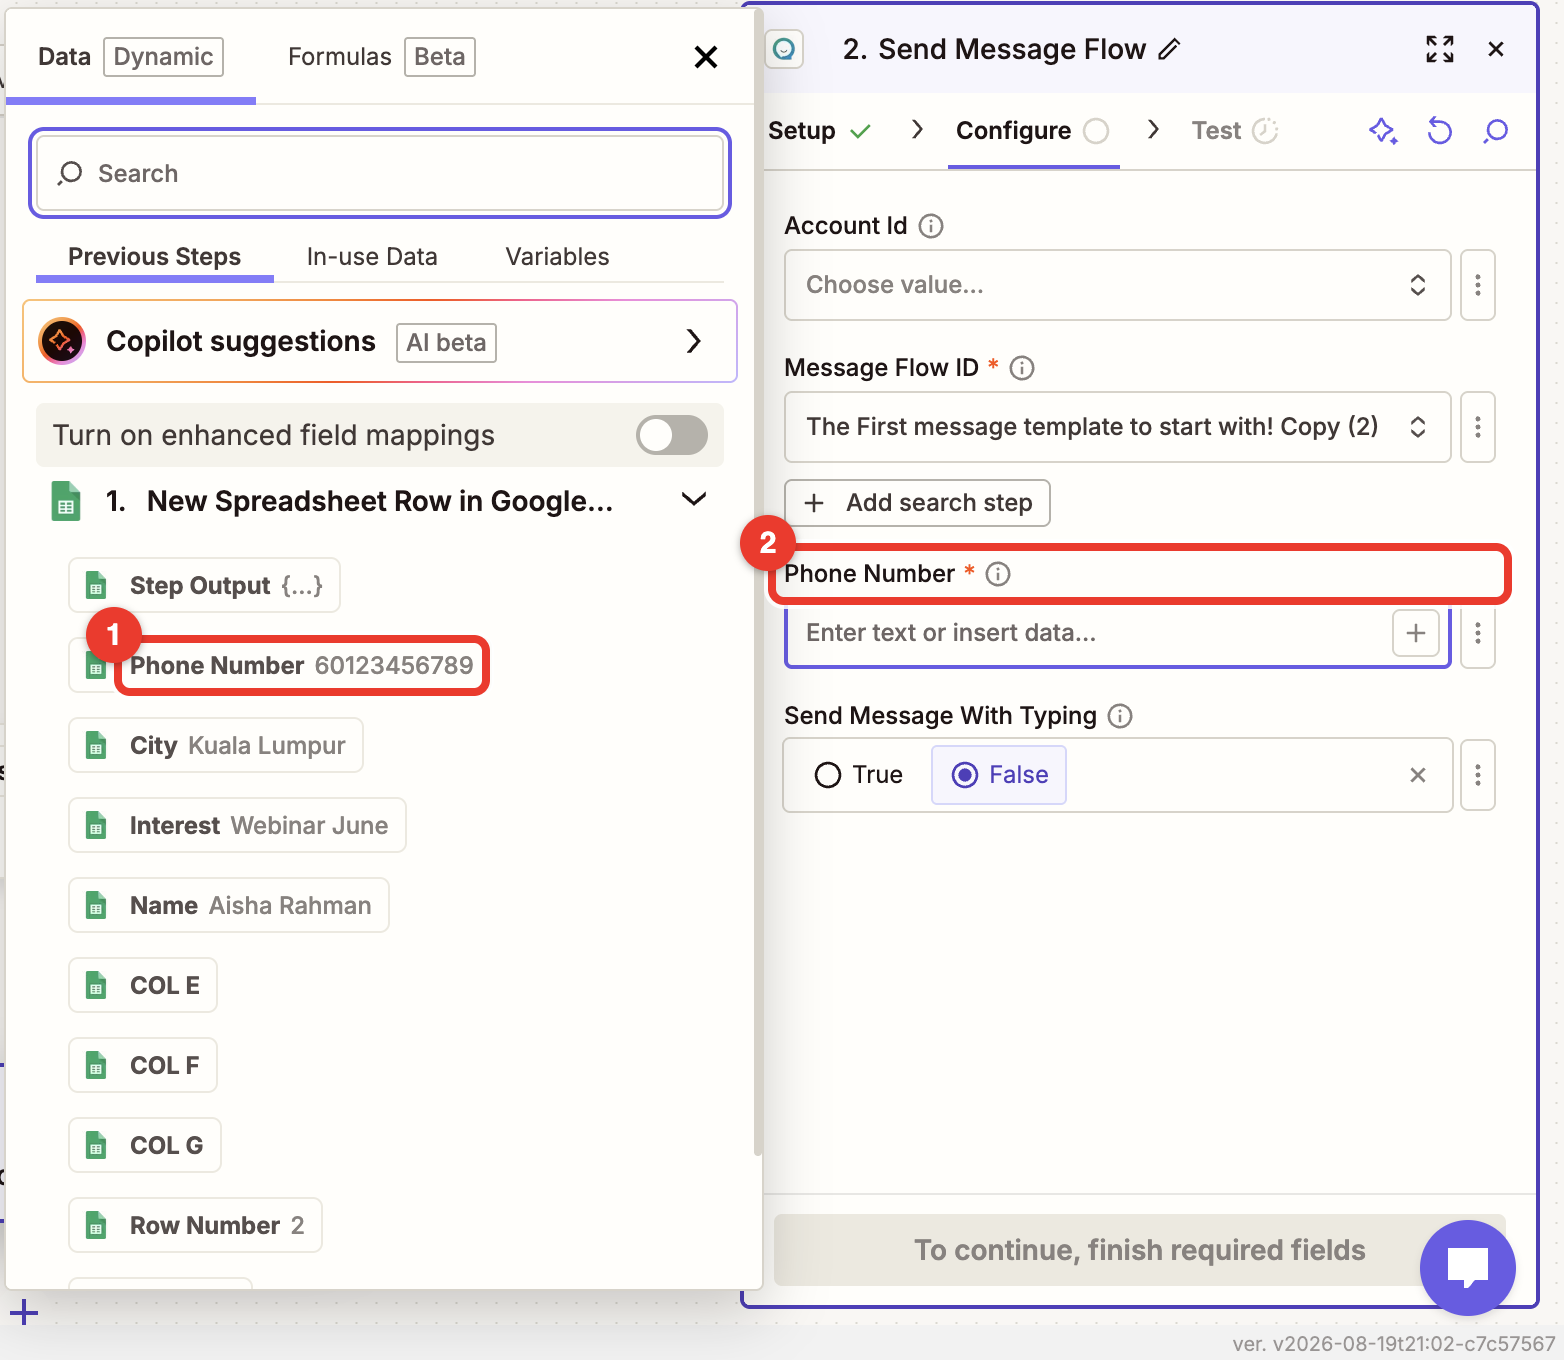
Step 7 — click into a ChatDaddy field (2) and pick the matching column from the Google Sheets sample on the left (1). Set the field to Custom first if it is offering you a fixed list instead of your sheet's columns.
🧩 If a field shows a dropdown of existing records rather than your spreadsheet columns, it is in Static mode. Open the ⋮ menu beside the field and switch it to Custom — the field then reads Enter text or insert data… and the picker offers the columns from Step 5.
📵 WhatsApp will not let you send a free-form message to someone who has not written to you in the last 24 hours. Outside that window only an approved template may be sent. Because a ChatDaddy message flow is registered with Meta as a template, Send Message Flow reaches cold contacts from a sheet where Send Message will be rejected. Use Send Message for people who are already in an open conversation.
Step 8 — Test it, then turn the Zap on
- Click Test step. Zapier runs the ChatDaddy action once, for real — use your own number in the test row so a customer does not receive a test message.
- Check ChatDaddy: the message should appear in the Inbox, and the contact on the Contacts page.
- Click Publish to turn the Zap on. It stays on until you switch it off in Zapier.
⚠️ When a Zap is first turned on, Zapier treats rows already in the sheet as history and does not message them — only rows added afterwards trigger it. If you want to reach the existing list, use a Broadcast instead (see Part 3).
Part 2 — Write ChatDaddy activity back into a sheet
The same page builds the reverse. Start a new workflow, but this time make ChatDaddy the trigger and Google Sheets the action.
ChatDaddy offers these triggers:
- New Contact Created — someone new appears in ChatDaddy. The workhorse for a lead log.
- Contact Tag Updated — a tag is added to or removed from a contact. Use it to mirror a pipeline stage, e.g. everyone tagged Paid.
- Message Flow Endpoint Reached — a contact reaches the end of a flow. Use it to record what the flow collected.
- Message Flow Action Triggered — a specific action step inside a flow ran.
- Tag Created — a new tag was created in the team.
- Team Members — team membership changed.
On the Google Sheets side choose Create Spreadsheet Row to append, or Update Spreadsheet Row to change a row that already exists. Point it at the spreadsheet and worksheet, then map each ChatDaddy field into the column you want it in. Test, then publish.
🧱 Create the header row in the destination sheet before you build this half. Zapier lists the columns it can write into by reading those headers, and an empty sheet gives it nothing to offer.
Part 3 — From a sheet to a Broadcast
Messaging every row the moment it arrives is not always what you want. A common pattern is to let the Zap do the filing and keep the sending in your hands:
- The Zap uses Create Contact, then Add Tag / Custom Field to Contacts with a tag that names the list —
webinar-june,price-list-request. - When you are ready, go to Marketing → Broadcasts and create a broadcast.
- In Select Contacts, next to Filter By, click + Condition and choose Tag. Pick the tag the Zap applies. Everything the Zap has been quietly collecting becomes the recipient list.
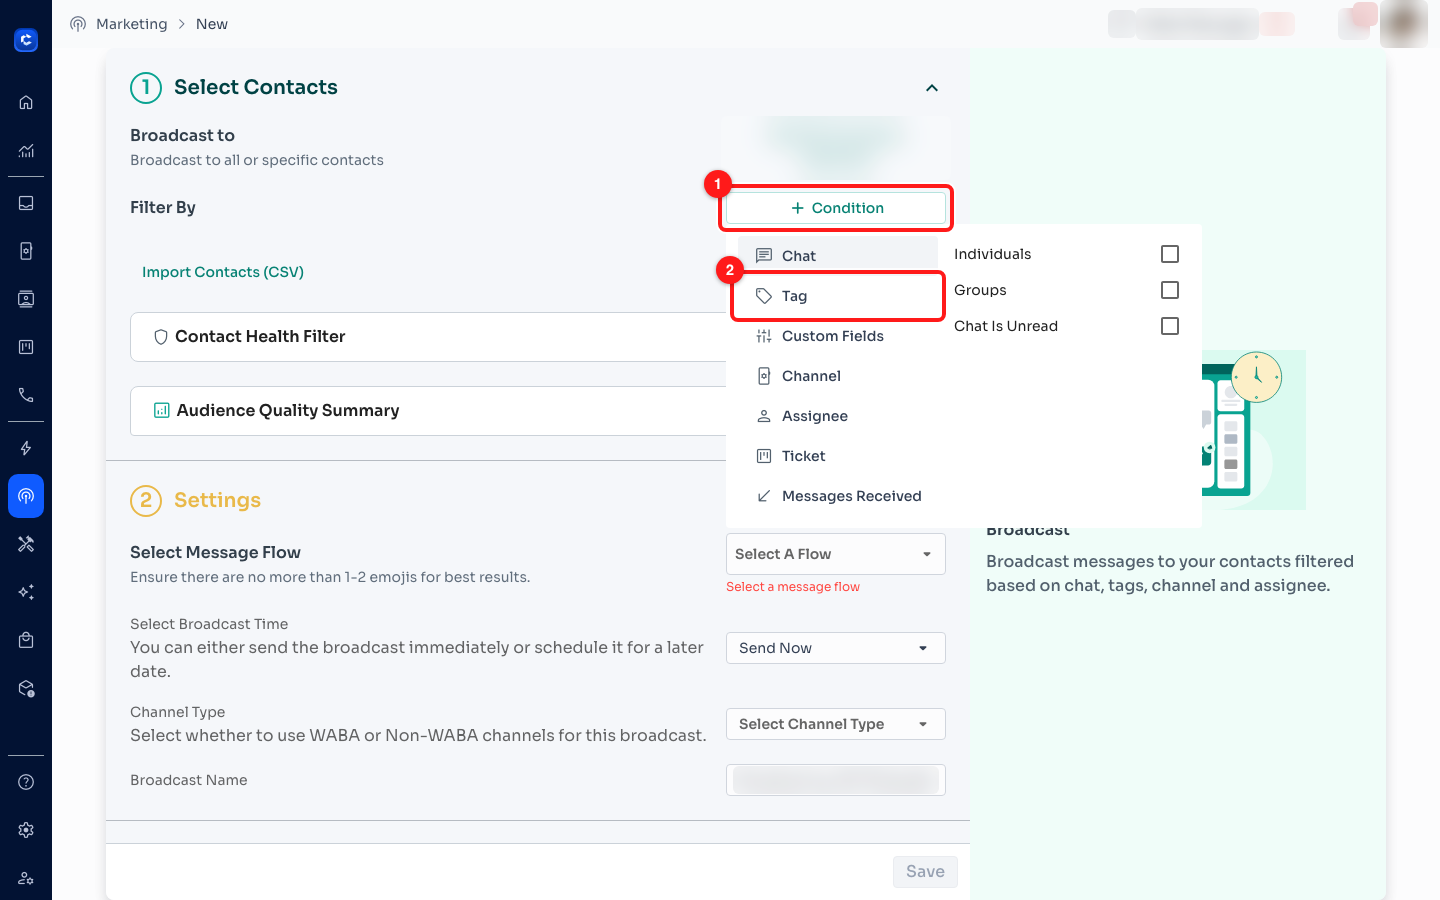
Part 3 — in a new broadcast, + Condition (1) opens the filter list, where Tag (2) narrows the audience to the contacts the Zap created.
This also solves the "rows already in the sheet" problem from Step 8: import the existing list once, tag it, and broadcast to the tag.
The other route: starting a Zap from inside a message flow
If the hand-off should happen at one particular step of a flow rather than whenever a row appears, use the Action node instead. Open your flow, add an Action node, and pick Zapier — the last option in the list. The Zapier Automation window opens, showing an authentication status line and buttons to Authenticate, Authorize ChatDaddy App for Zap and Setup Zap.
- This route always starts from ChatDaddy, so it cannot be used to have Google Sheets start a flow. For that, use Tools → Zapier as described above.
- It can only create new Zaps; an existing Zap cannot be attached to a flow step.
- Its Zapier sign-in expires after about 10 hours. If the window says Expired, click Authenticate again.
- Signing in on the Tools page does not sign you in here, and the other way round.
Troubleshooting
I searched the App Store and the App Trigger tab and there is no Google Sheets
That is correct and nothing is broken. ChatDaddy's App Store carries around twenty e-commerce, booking and payment apps, and the Flow Builder's App Trigger tab contains exactly one item — Webhook. Google Sheets is reached through Zapier only, via Tools → Zapier.
The Zap runs but nothing arrives on WhatsApp
Almost always the phone number or the 24-hour window. Check the number in the sheet is in full international format with no +, spaces or leading zero, and that the column is formatted as plain text. If the number is right, the contact has probably not messaged you in the last 24 hours — switch the action from Send Message to Send Message Flow, which sends an approved template.
Zapier cannot see my columns, or offers the wrong ones
Zapier reads the column names from row 1 and caches them. Make sure every column you need has a non-empty header, then reload the fields in the Zap editor (or re-run Test trigger) so Zapier picks up the change. A blank row in the middle of the data has the same effect — Zapier stops reading there.
New rows take a long time to trigger
Google Sheets triggers are polled on a schedule — roughly every 15 minutes on Zapier's free plan, faster on paid plans. This is a Zapier limit, not a ChatDaddy one. If you need instant delivery, trigger from the source system directly rather than from the sheet it writes to.
It worked and then stopped
Check the Zap's history in Zapier first — it records every run and the reason for each failure. The usual causes are a Google account whose permission was revoked, a renamed or moved spreadsheet or worksheet, a ChatDaddy connection whose refresh token was regenerated, or a Zapier task limit reached for the month.
Do I need a paid Zapier plan?
Not to start. Zapier's free tier covers a limited number of tasks per month and the slowest polling interval. Volume and speed are what you pay Zapier for; ChatDaddy does not charge for the integration itself, though messages sent still consume your ChatDaddy credits as usual.
Can two people on my team each connect their own Zapier account?
No. One Zapier account is connected per ChatDaddy team, and every team member shares it. Removing a Zapier action from a flow node does not delete the Zap either — it keeps running in Zapier until you switch it off there.
Related articles
- How to Use Zapier with ChatDaddy (Tools and the Action Node)
- How to connect Zapier to ChatDaddy?
- App Node, App Store, HTTP Request or Zapier: Which Integration Should You Use?
- How to Use the App Store: Connect an App and Trigger a Message Flow
- How to Use the HTTP Request Action