
How to Use Integrations in a Message Flow: Build, Test and Go Live
Everything the Flow Builder can connect to — the Webhook app trigger, the HTTP Request app, the eight other app nodes, variables — built step by step in one flow, then tested three different ways, with the reasons a flow refuses to preview or run.
Also searched as: How to Use Integrations in a Message Flow: Build, Test and Go Live, Open the flow and learn the six buttons, Understand the node catalogue before you pick anything, What is actually in the App category, Bring data IN: the Webhook app trigger, Chain the next step, Push data OUT: the HTTP Request app, Make it dynamic with variables, Flow Variables — values you define yourself, Test it. Three buttons, three different things., Preview Flow — the chat simulator, Demo Preview — walk the canvas, Test — the only one that really sends, Save, and what changes when you do, Where you see the effects afterwards
A message flow is only as useful as the systems it can reach. ChatDaddy lets a flow listen to another system (something happens over there, the flow starts here) and talk to another system (the flow reaches out mid-conversation and uses the answer). This article builds both directions in a single flow, tests them, and shows exactly what changes once it is live.
🧭 Everything below happens on one screen: Automation ➜ Message Flows ➜ open a flow, or + Create New Message Flow. Every screenshot is the real builder, and every red box is the thing to click for that step.
Before you start
- At least one connected channel. A flow can be built without one, but it cannot be tested — the Test dialog asks which channel to send from.
- Editor access to Automation. If the Save button is greyed out and stays greyed out after you change something, you are on a view-only role.
- For the HTTP Request step, an endpoint you control: it must be HTTPS and it must be a domain name. Raw IP addresses are rejected.
Step 1 — Open the flow and learn the six buttons
A brand-new flow opens on an empty canvas with a single card, Choose Starting Step ①. Everything else you will need lives in the action bar in the top right ②. Those six controls do six very different things and it is worth naming them now, because three of them are the ones people confuse when a flow "does not work".
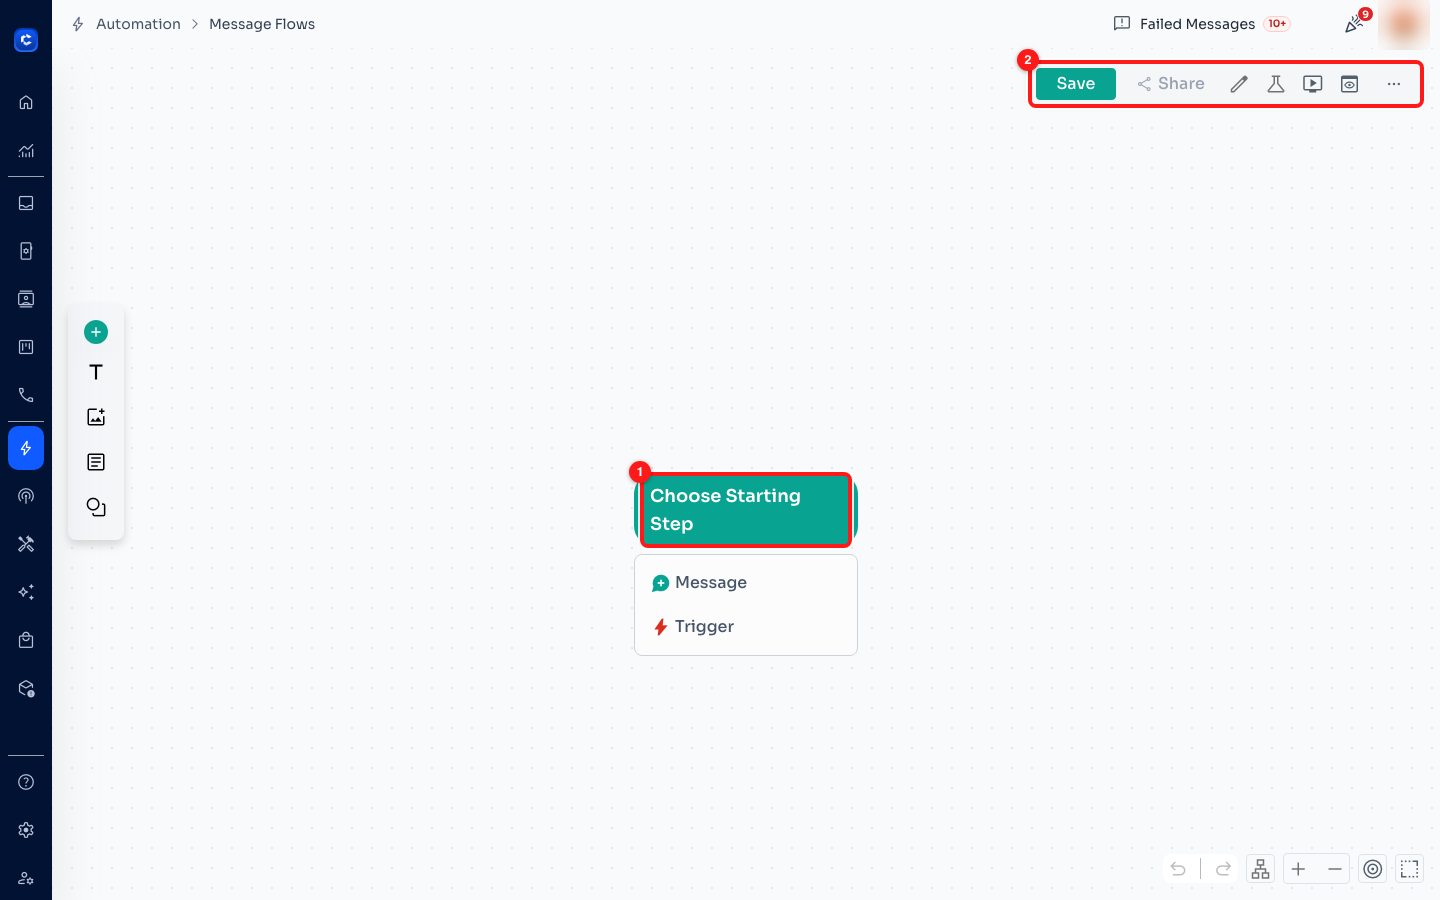
① the starting-step card — a flow must begin with a Message or a Trigger. ② the action bar.
- Save — writes the draft. Nothing you build exists outside your browser until you press it.
- Share — share the flow with teammates (greyed out until the flow has been saved once).
- Edit Flow Details (pencil) — rename the flow and edit its description.
- Test (flask) — sends the flow to a real phone number through a real channel.
- Demo Preview (play) — walks the canvas in demo mode, without sending anything.
- Preview Flow (screen) — opens the chat simulator on the right-hand side.
- ⋯ — stats, export, and Flow Variables.
Step 2 — Understand the node catalogue before you pick anything
Click Trigger on the starting-step card (or the + on the left toolbar at any time) and the Add New Node dialog opens. The five entries down the left ① are not five kinds of the same thing — they are two different questions.
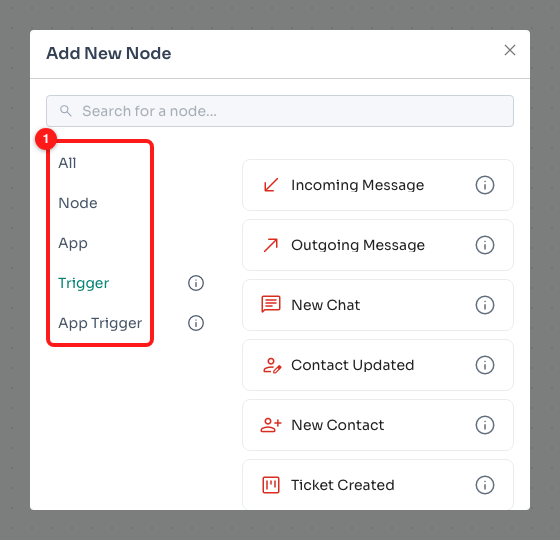
① the five categories. Trigger and App Trigger start a flow; Node and App happen inside one.
- Node — the steps a flow is made of: Message, Email, Action, Delay, Input, Condition.
- App — the ten things a flow can call out to. This is where integrations live.
- Trigger — the eight things inside ChatDaddy that can start a flow: Incoming Message, Outgoing Message, New Chat, Contact Updated, New Contact, Ticket Created, Ticket Updated, New Note.
- App Trigger — the things outside ChatDaddy that can start a flow. There is exactly one: Webhook.
- All — Node and App merged into one list. It does not contain the triggers.
❗ App Trigger is not an app directory. It holds one item, Webhook. Searching it for "Shopify", "Google Sheets" or any other product name will always come back empty — those live in the App Store and in Zapier, both covered at the end of this article.
What is actually in the App category
Click App ① and you get the full outbound list ②. Scroll it — the last two sit below the fold.
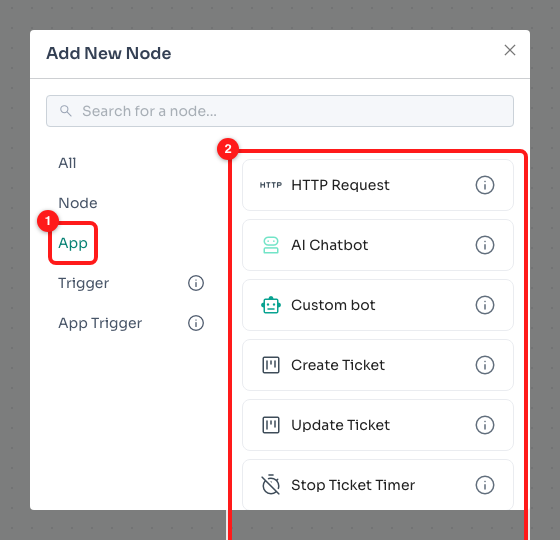
① the App category. ② the apps a flow can call. Scroll for AI Chatbot V2 and Fork (Beta).
- HTTP Request — call any HTTPS endpoint. The general-purpose integration; most of this article.
- AI Chatbot / AI Chatbot V2 — hand the conversation to an AI agent and take it back afterwards.
- Custom bot — run another bot from inside this flow.
- Create Ticket / Update Ticket / Stop Ticket Timer — drive the CRM board from the conversation.
- Modify Contact — write tags, custom fields and contact properties back into ChatDaddy.
- Notify Team Member — put a human in the loop.
- Fork (Beta) — split the run down more than one path.
Step 3 — Bring data IN: the Webhook app trigger
Use this when the other system moves first: an order is paid, a form is submitted, a CRM record changes. That system sends ChatDaddy an HTTP request, and this flow starts. Choose App Trigger ① and then Webhook ②.
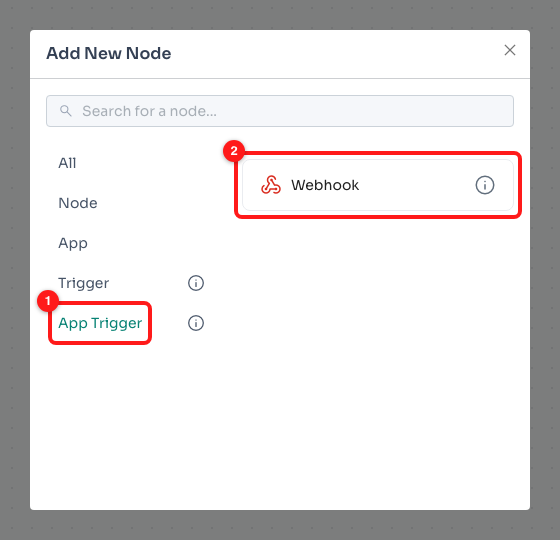
① App Trigger. ② Webhook — the only item in the category, and the whole inbound story.
The node lands on the canvas and its settings panel opens on the left. Click the node header at any time to reopen it.
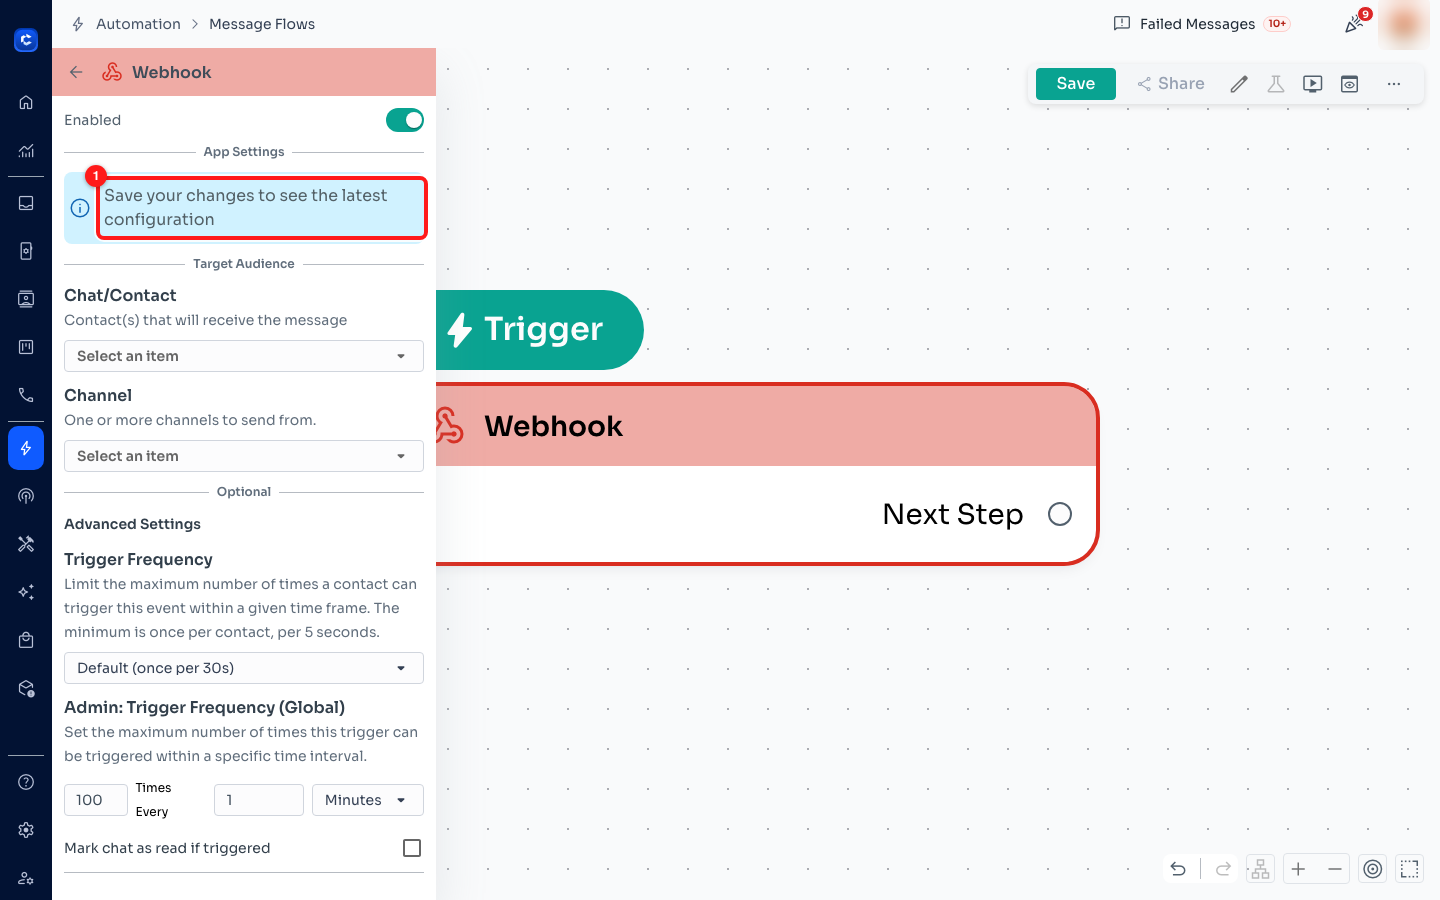
① the notice that costs people the most time: the webhook is not configured until the flow is saved.
Work top to bottom:
- Enabled — leave it on. Turning it off keeps the node on the canvas but stops it firing.
- App Settings — this is where the webhook's own configuration appears, and on an unsaved flow it says "Save your changes to see the latest configuration" ①. That is not an error. Press Save first, then come back to this panel to read the details you need to give the other system.
- Target Audience ➜ Chat/Contact — who the flow runs for. A webhook arriving from outside has no conversation attached to it, so this is how ChatDaddy knows whose chat to act on.
- Target Audience ➜ Channel — which connected channel the messages go out from.
- Advanced Settings ➜ Trigger Frequency — a per-contact cap, Default (once per 30s). The floor is once per contact per 5 seconds. This is what stops a chatty system from messaging one customer twenty times in a minute.
- Admin: Trigger Frequency (Global) — a cap for the whole trigger, not per contact (the default reads 100 times every 1 minute).
- Mark chat as read if triggered — tick it if these runs should not leave unread badges in the Inbox.
⚠️ The single most common "my webhook does nothing". The webhook arrives, the flow starts, and no message is ever sent — because Chat/Contact or Channel was left on Select an item. The trigger fired correctly; it just had nobody to talk to and nothing to talk through. Fill both in before you test.
Step 4 — Chain the next step
At the bottom of any node's panel is Choose Next Step. It opens a shortlist ① split into New Node (Message, Email, Condition, Start Flow, Delay) and New App (HTTP Request, AI Chatbot, Custom bot). The same shortlist is on the canvas as the Next Step handle on the right edge of the node.
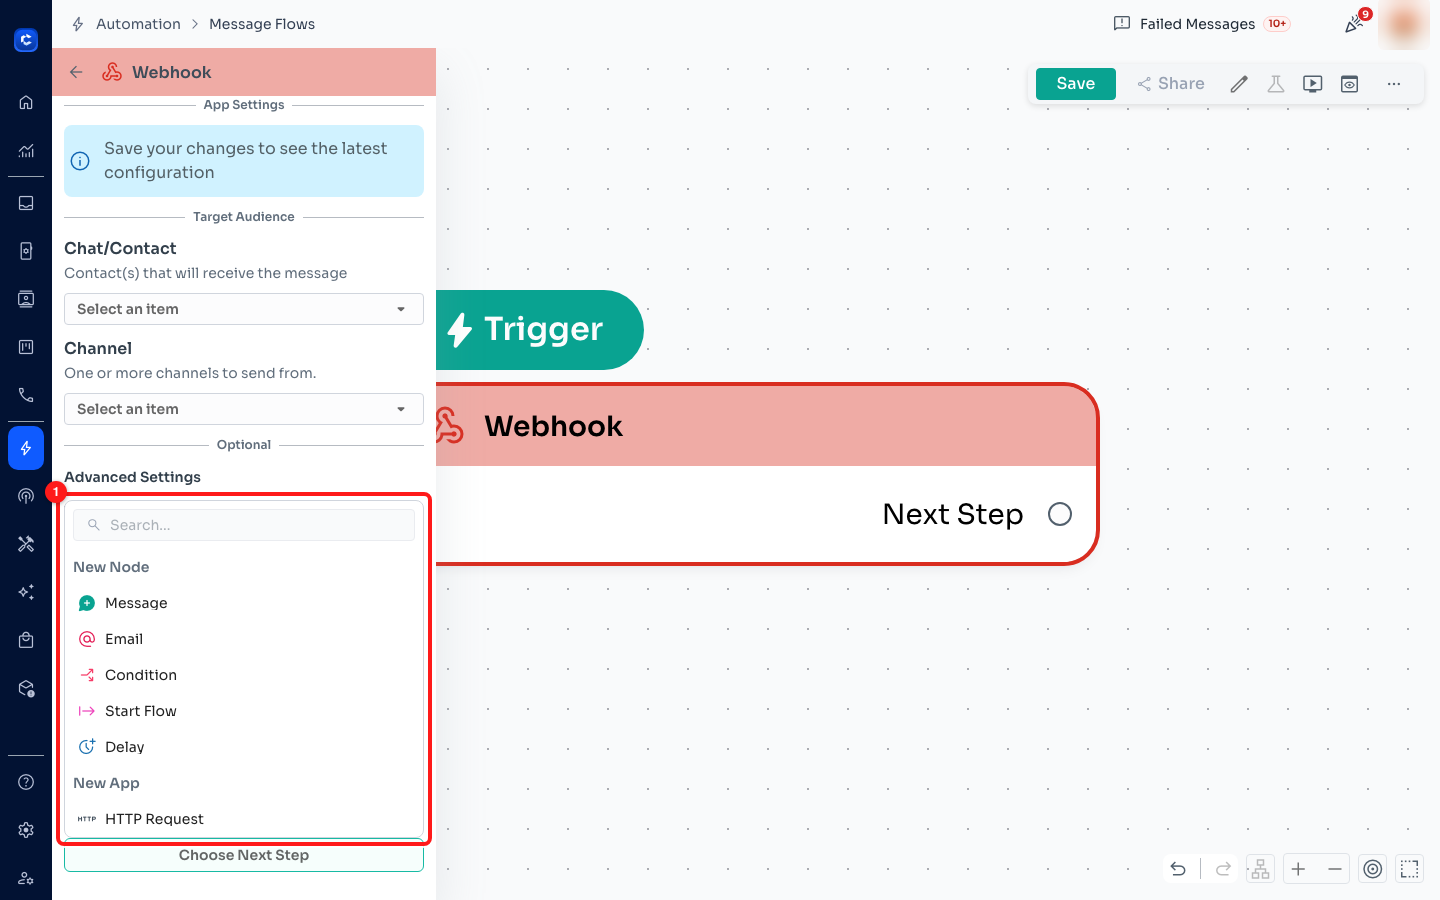
① the Choose Next Step shortlist. It is shorter than the full catalogue — use the search box, or the + toolbar, for anything not listed.
💡 The shortlist is a convenience, not the whole menu. If the step you want is not on it, type its name into the search box at the top, or close the panel and use the + button on the left toolbar to reopen the full Add New Node dialog.
Step 5 — Push data OUT: the HTTP Request app
Pick HTTP Request from the shortlist. This is the node that makes ChatDaddy talk to anything with an API — your order system, an inventory lookup, a scoring service, an internal endpoint. Open the node and you get four inputs.
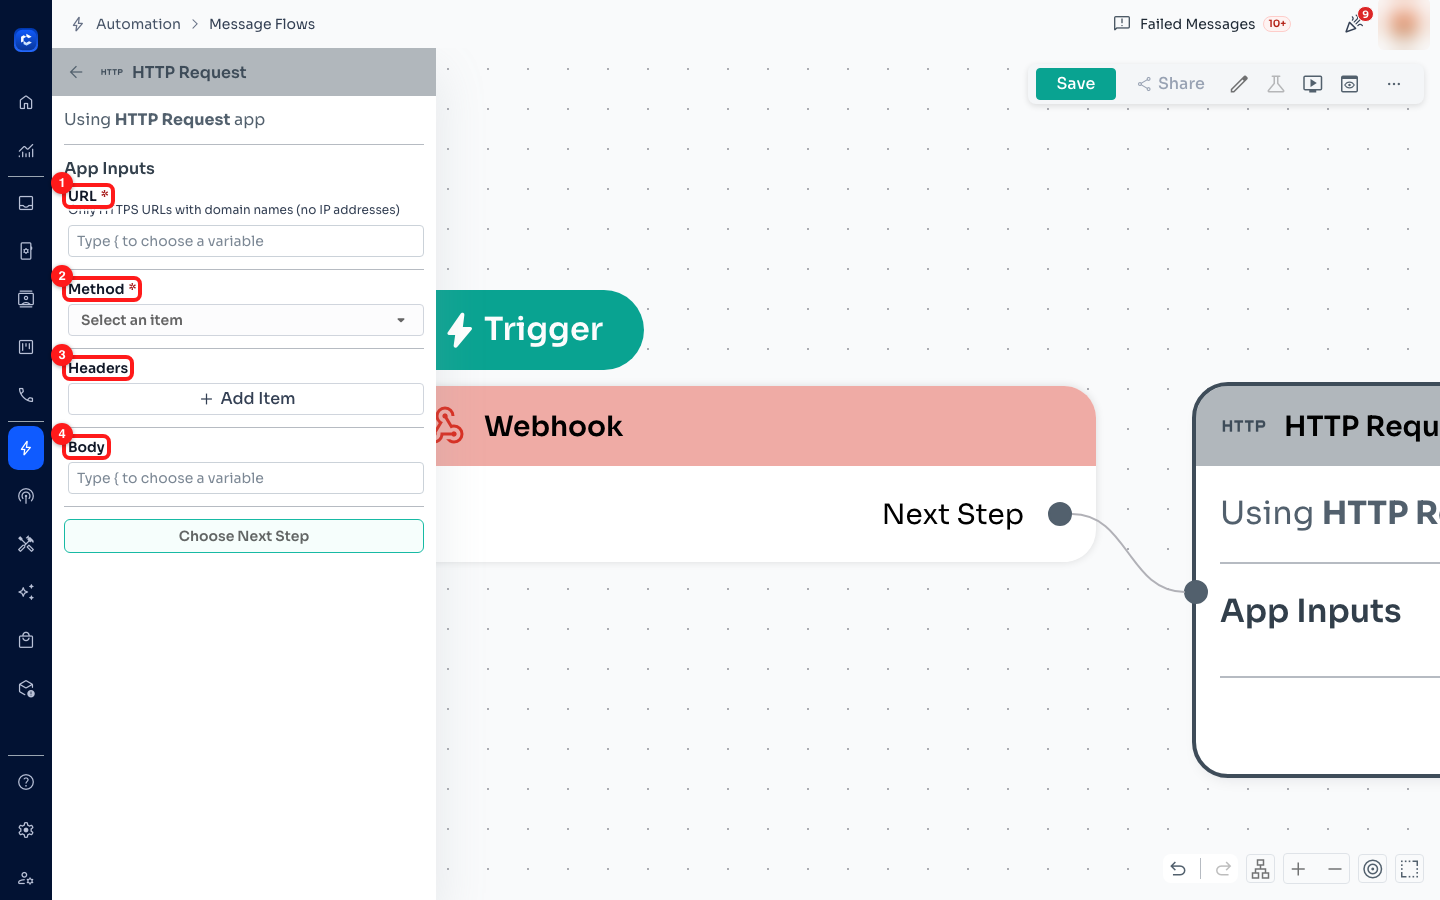
① URL (required). ② Method (required). ③ Headers. ④ Body.
- URL — required. The helper text is a hard rule, not advice: only HTTPS URLs with domain names (no IP addresses).
http://andhttps://203.0.113.10/hookwill both be rejected. - Method — required. Pick it from the list.
- Headers — + Add Item once per header. This is where an
AuthorizationorX-API-Keyheader goes. - Body — what you send. Relevant to POST, PUT and PATCH; ignored by GET.
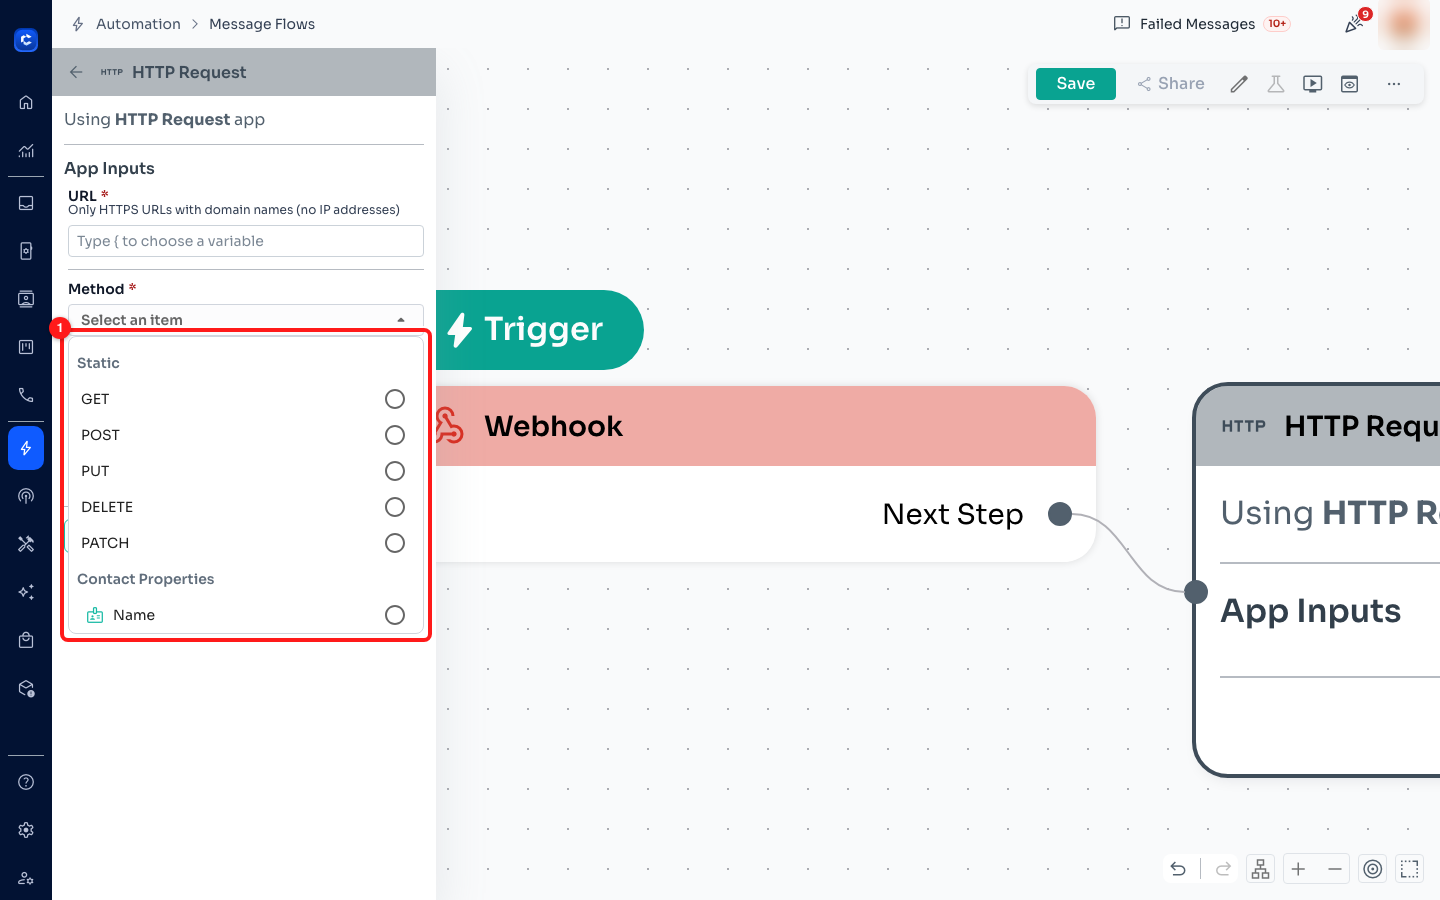
① the Method list: the five static verbs at the top, and below them the option to take the value from a contact property.
Under Static are the five verbs — GET, POST, PUT, DELETE, PATCH. Below them the same picker offers Contact Properties, because every input in this panel can be filled from data instead of typed. That is almost never what you want for the method, but it is exactly what you want for the URL and the body — which is the next step.
🔐 Treat the Headers list as a credential store. An API key pasted there is visible to everyone who can open this flow, and it travels with the flow if it is exported as
.yamlor published to the Template Market. Use a token scoped to exactly this integration, and rotate it when someone leaves the team.
Step 6 — Make it dynamic with variables
Both the URL and the Body are rich-text fields, and their placeholder is the instruction: "Type { to choose a variable". Click into the field, type a single {, and the picker opens ①.
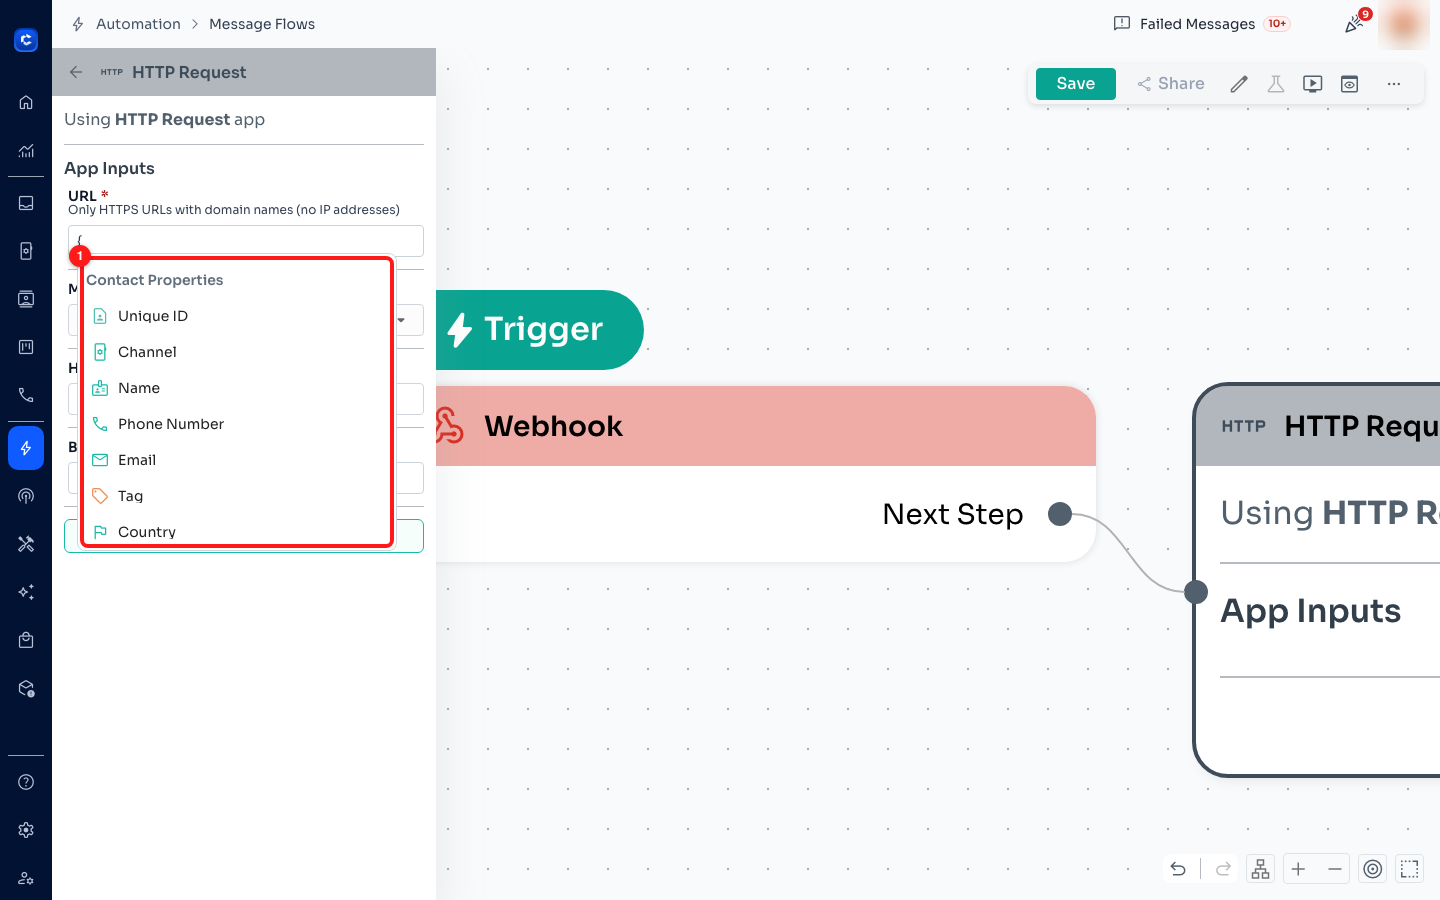
① type { in any rich-text field to insert live data — Unique ID, Channel, Name, Phone Number, Email, Tag, Country and more.
So a lookup endpoint becomes personal per contact rather than fixed — for example a URL that ends in the contact's phone number, or a JSON body that carries their name and tag. The same { picker works in Message nodes, so an answer that came back from your API can be read out to the customer in the next step.
Flow Variables — values you define yourself
Contact properties are given to you. For anything else — a base URL, a store code, a value you want to set once and reuse in ten nodes — open the ⋯ menu ①.
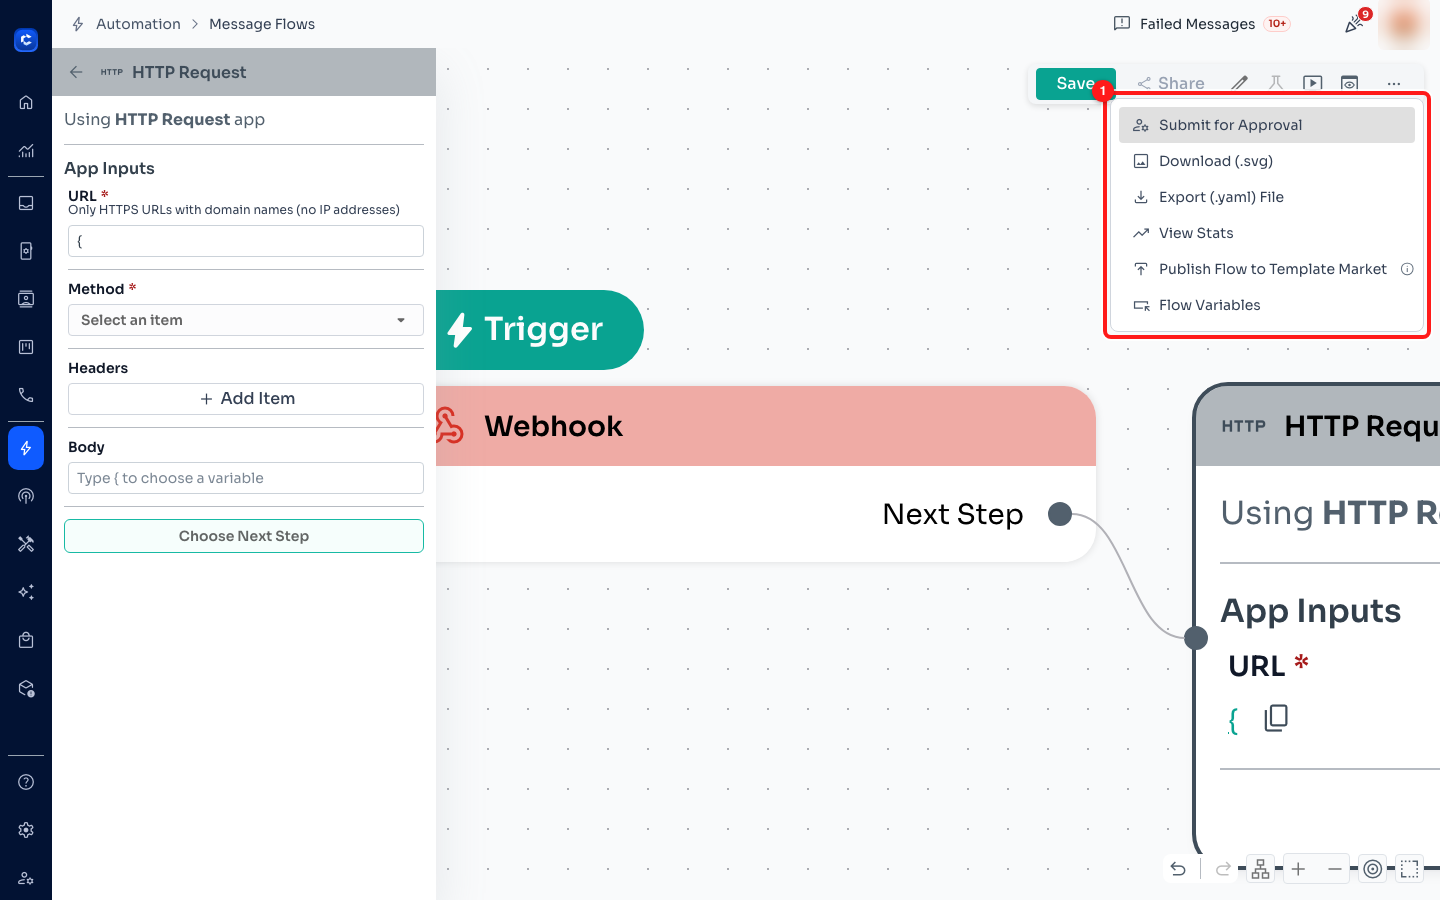
① the ⋯ menu: Submit for Approval, Download (.svg), Export (.yaml) File, View Stats, Publish Flow to Template Market, Flow Variables.
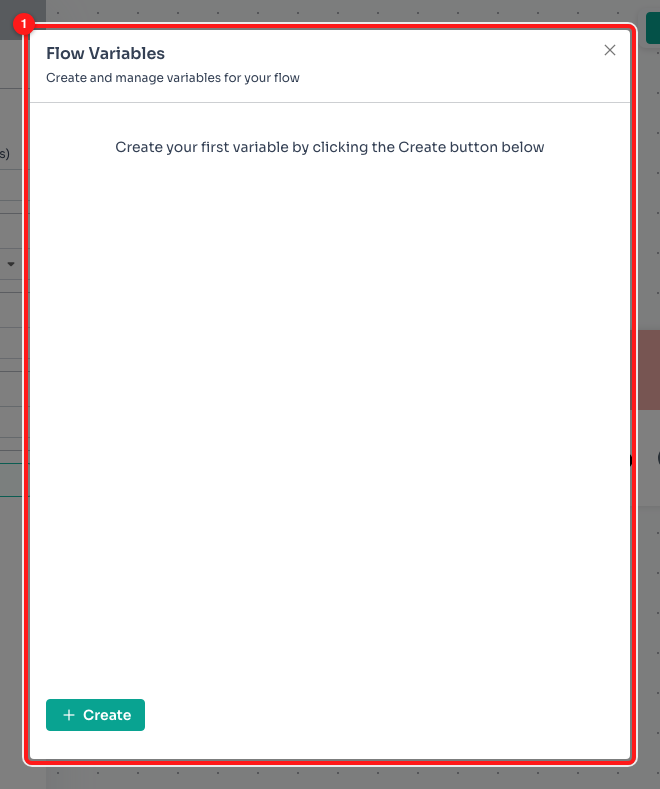
① Flow Variables — "Create and manage variables for your flow". Empty flows start with none; press Create.
Define it once here and it appears in the { picker everywhere in this flow. Changing the value later changes every node that uses it, which is the difference between editing one field and hunting through a canvas.
Step 7 — Test it. Three buttons, three different things.
This is where most "it does not work" reports actually come from: the wrong test was used for the question being asked. The three buttons are not interchangeable.
Preview Flow — the chat simulator
The screen icon ② opens the simulator on the right ①. On a flow with nothing in it, it says exactly why it cannot run: "Preview Unavailable — No Starting Message or Triggers".
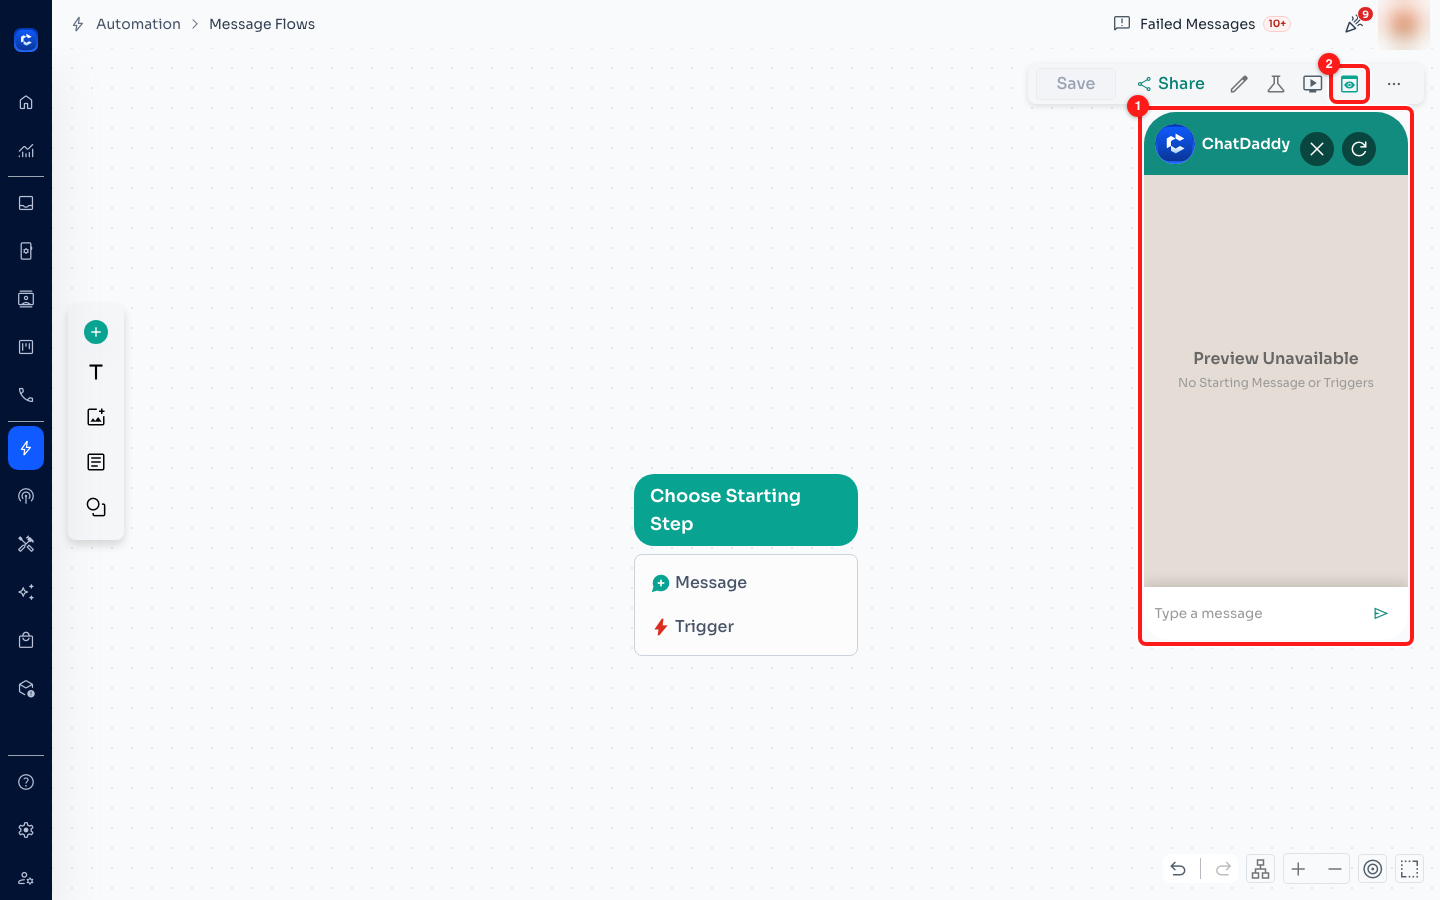
① the preview panel refusing to run, and telling you the reason. ② the Preview Flow toggle.
✅ "Preview Unavailable — No Starting Message or Triggers" is not a bug. The preview plays the flow as a customer would experience it, so it needs somewhere for a customer to come in. Give the flow a starting Message step (Choose Starting Step ➜ Message), or a trigger that has been configured and saved, and the panel becomes a live chat window with a Type a message box at the bottom.
Two more things about the preview worth knowing. It is a toggle — pressing the icon again closes it. And it exercises the conversation, not your integrations: treat it as the test for wording, buttons and branching.
Demo Preview — walk the canvas
The play icon ② puts a banner across the top ①: "You are in Demo Preview mode." Use it to walk someone through the flow on the canvas without sending anything anywhere. Close returns you to editing.
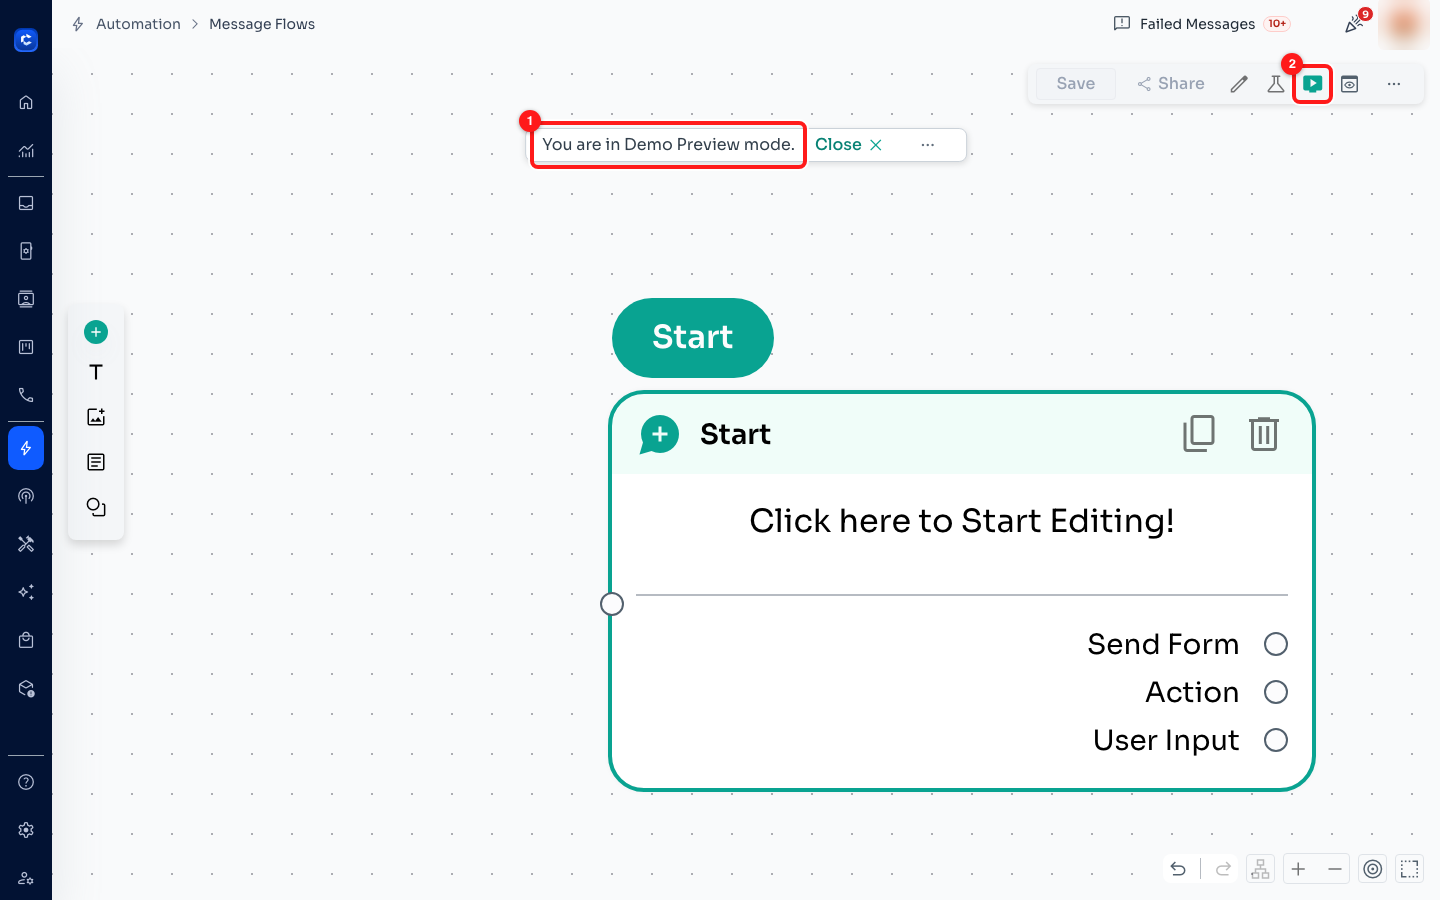
① the Demo Preview banner. ② the Demo Preview button. Nothing is sent in this mode.
Test — the only one that really sends
The flask icon opens Send Test Message to. Enter a Phone Number ① — the field pre-fills with your own account's number, so change it if you are testing against a handset you are holding — choose the channel to send from, then press Test ②.
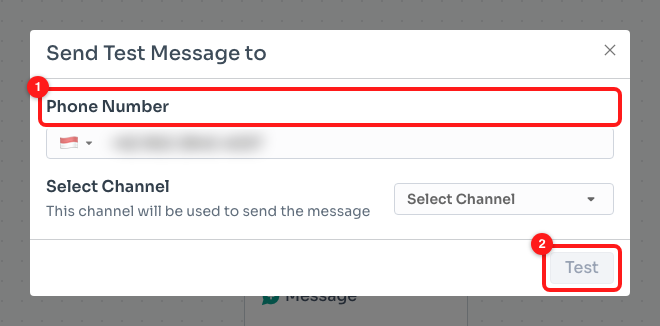
① the phone number the test goes to (blurred here). ② Test. Select Channel sits between them and must be filled in.
⚠️ This is a real send on a real channel. It reaches a real handset, it consumes credits, and on WhatsApp it is subject to the same template and 24-hour-window rules as any other message. Test against your own number, never a customer's.
Which test answers which question:
- Does the wording and the branching read right? → Preview Flow.
- Can I show this flow to a colleague? → Demo Preview.
- Does my HTTP Request actually reach the endpoint, and does the message really arrive? → Test. This is the only one of the three that leaves ChatDaddy.
Step 8 — Save, and what changes when you do
Press Save ②. Until you do, none of the above exists outside your browser tab — a refresh throws the whole draft away.
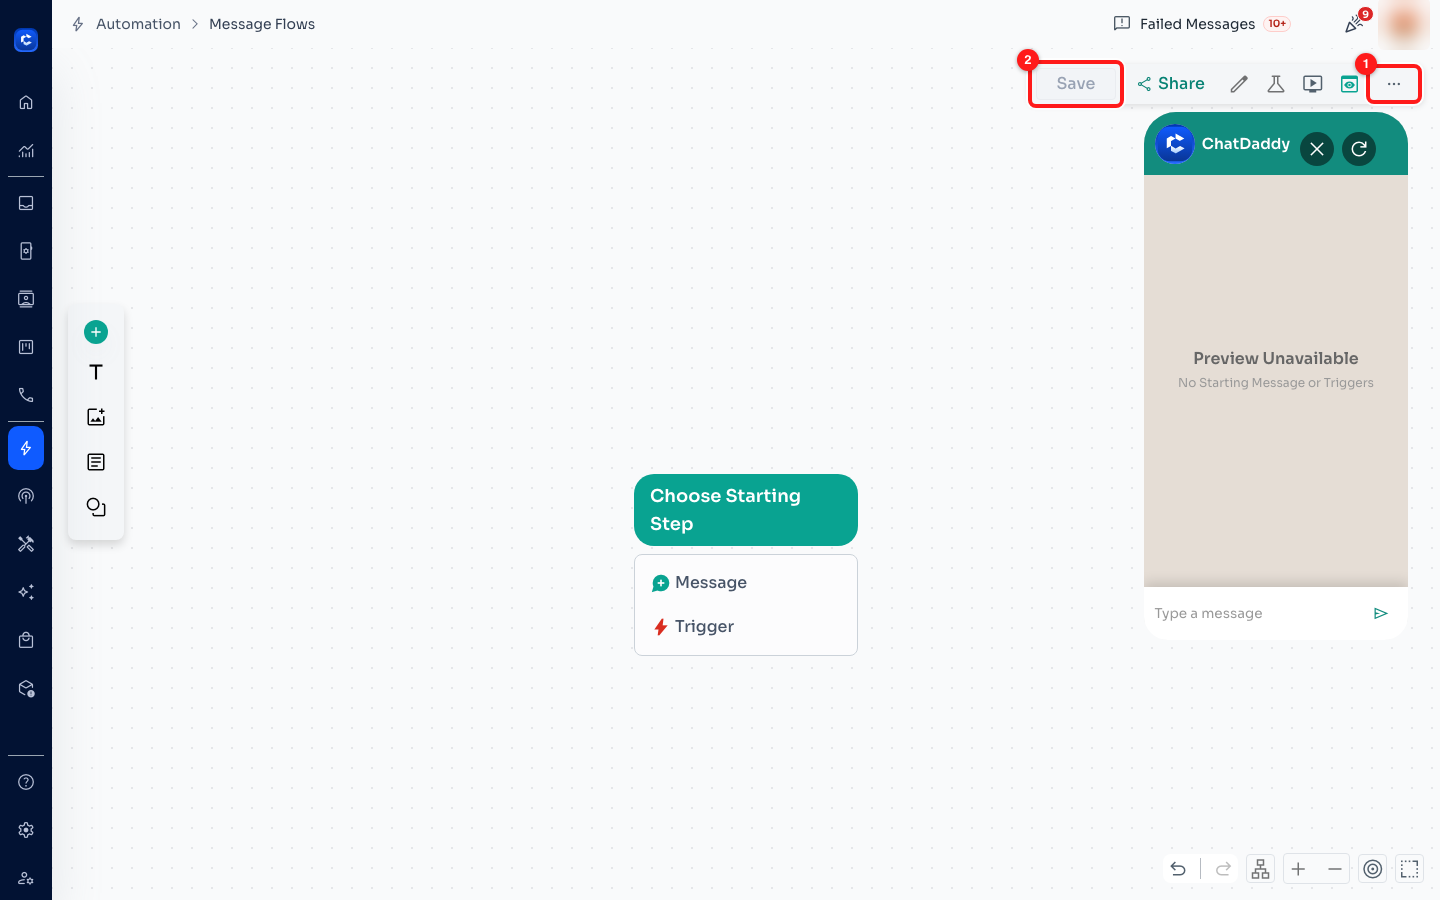
① the ⋯ menu, where View Stats lives once the flow has run. ② Save.
Saving is what turns the design into a working integration:
- The Webhook node's App Settings panel stops saying "Save your changes to see the latest configuration" and fills in with the configuration the sending system needs. Reopen the node and copy it from there.
- Share becomes available, so teammates can be given the flow.
- View Stats in the ⋯ menu starts collecting numbers for this flow.
- The flow can now be selected from other surfaces — an App Store service, a Zapier step, or another flow's Start Flow node.
Where you see the effects afterwards
- ⋯ ➜ View Stats — how many times this flow ran and how far people got through it.
- Failed Messages, in the top bar of the app — sends that were attempted and rejected. If the flow is firing but customers report nothing arrived, look here first.
- Inbox — every message a flow sends appears in the customer's conversation like any other message, attributed to the channel it went out on.
- App Store ➜ Triggered / Last Activity — for integrations wired through a connected service rather than a raw webhook, these two columns are the proof it fired.
- Credits — flow-sent messages are billed exactly like manual ones.
The two integration routes that live outside the Flow Builder
The Flow Builder covers "listen for an HTTP call" and "make an HTTP call". Two more routes exist elsewhere in ChatDaddy, and picking the wrong one is why an integration can feel impossible when it is actually two clicks away.
App Store — connected services
The App Store page is the list of services already connected to your team, not a catalogue to browse. Press + Create to connect a new one. Once a service is live, the two columns that matter are Triggered ① and Last Activity ② — they are how you tell a working integration from a configured one.
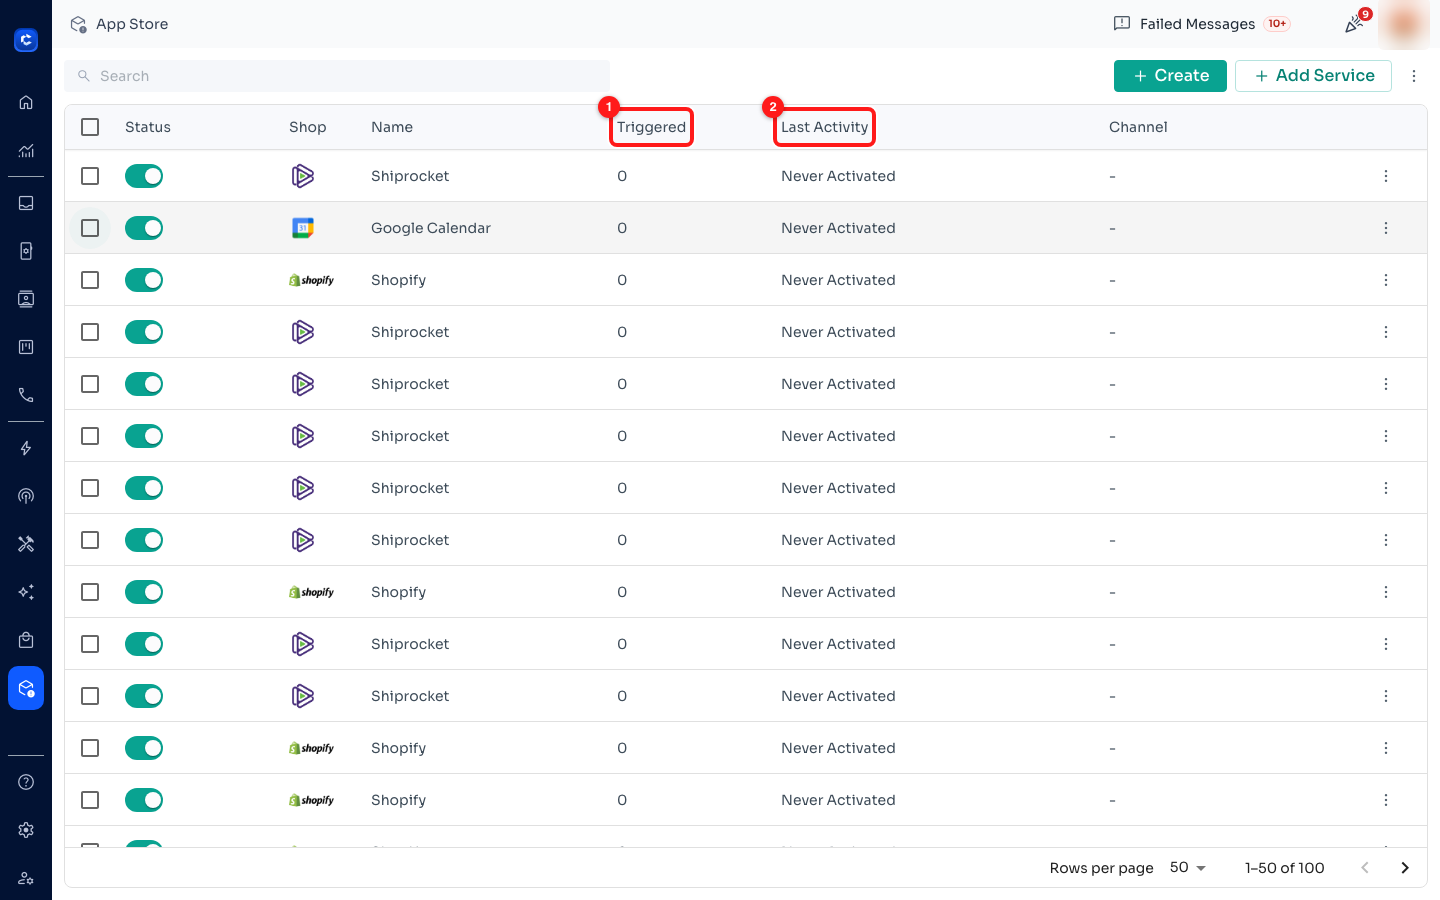
① Triggered — how many times this service has started something. ② Last Activity — "Never Activated" means it has never fired.
To wire a connected service to a flow: row ⋮ ➜ Edit ➜ Triggers ➜ New Trigger ➜ Add Custom Trigger, expand the row, and pick your flow under Message Flow.
Zapier — everything else
For any product that is neither in the App Store nor able to call a webhook, go to Tools ➜ Zapier. The Connect this app… row ① pairs ChatDaddy with anything in Zapier's catalogue, and the Popular workflows list ② has one-click templates — the first of them starts a ChatDaddy message flow from a new Google Sheets row.
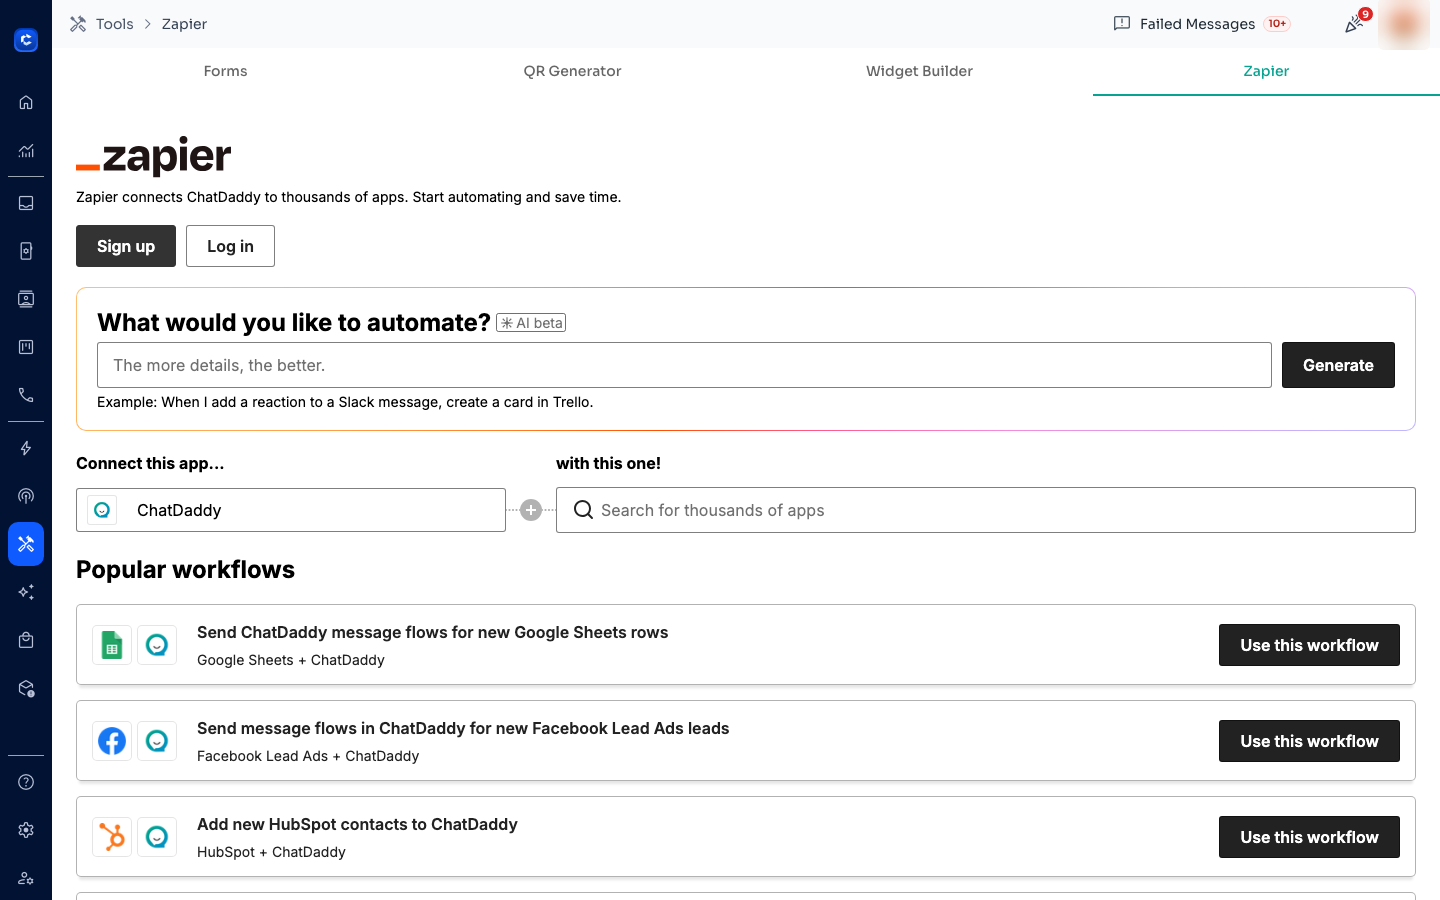
① pair ChatDaddy with any Zapier app. ② ready-made workflows, including Google Sheets ➜ message flow.
🧭 Choosing between the four routes. Is the other product in the App Store? Use it. Can the other product send an HTTP request? Use the Webhook app trigger. Do you need to call out mid-conversation? Use the HTTP Request app node. None of the above? Zapier.
When the flow will not run: the checklist
- "Preview Unavailable — No Starting Message or Triggers" → the flow has no starting Message step and no configured trigger. Add one.
- The preview panel vanished → Preview Flow is a toggle; press the screen icon again.
- The webhook has no configuration to copy → the flow has never been saved. Press Save, reopen the Webhook node, read App Settings.
- The webhook fires but nothing is sent → Chat/Contact or Channel is still on Select an item in the Webhook node's Target Audience.
- The webhook fires only once, then goes quiet for a while → Trigger Frequency. The default is once per contact per 30 seconds, and there is a global cap underneath it.
- The HTTP Request node will not accept my URL → it must be HTTPS and a domain name. IP addresses are rejected.
- The endpoint returns 401/403 → the header was added but left empty, or the key belongs to a different environment. Check Headers ➜ Add Item.
- The Test button does nothing → Select Channel has not been filled in.
- The test arrives on my phone but customers get nothing → check Failed Messages in the top bar; on WhatsApp this is usually the 24-hour window or a template rule, not the flow.
- "Shopify" / "Google Sheets" is not in App Trigger → it never will be. That tab holds only Webhook. Use the App Store or Zapier.
Quick reference
- Add New Node — + on the left toolbar, or the starting-step card on an empty flow.
- Inbound integration — App Trigger ➜ Webhook. Save the flow, then read App Settings.
- Outbound integration — App ➜ HTTP Request. HTTPS + domain name only.
- Insert live data — type
{in any rich-text field. - Reusable values — ⋯ ➜ Flow Variables.
- Rehearse — Preview Flow (simulator) and Demo Preview (canvas walk-through). Nothing is sent.
- Really send — Test (flask). Real channel, real credits, real handset.
- Check it worked — ⋯ ➜ View Stats, Failed Messages, and App Store ➜ Triggered / Last Activity.