
How to View All Tags on a Chat (and Who Added Them)
The Profile panel in the Inbox only shows the first four tags on a chat. Open All Tags to see every tag at once, hover any tag to find out who added it and when, and check Tag History for tags that were taken off.
Also searched as: How to View All Tags on a Chat (and Who Added Them), Open the chat and show the Profile panel, Read the Tags section, Open All Tags, Hover a tag to see who added it and when, Check Tag History for tags that were removed, View, Tags, Chat, Added, Them
Tags are how your team keeps track of who a customer is and what stage they are at. When a chat has a lot of them, the Profile panel in the Inbox runs out of room and only shows the first few — so ChatDaddy gives you an All Tags window that lists every tag on the contact in one place.
This guide is for anyone who works in the Inbox and needs the full picture before replying: which tags a chat carries, who put them there, and what has been removed along the way.
🏷️ The Tags section shows only the first four tags. If the contact has more, a “+N more” link appears — that link is the only way to open All Tags. With four tags or fewer there is no link, because you can already see everything.
Step-by-step
Step 1 — Open the chat and show the Profile panel
Go to your Inbox and click the conversation you want to look at. If the right-hand panel is not showing, click the panel icon in the chat header, at the top right. The panel opens on the Profile tab, and the Tags section sits just below the message counters.
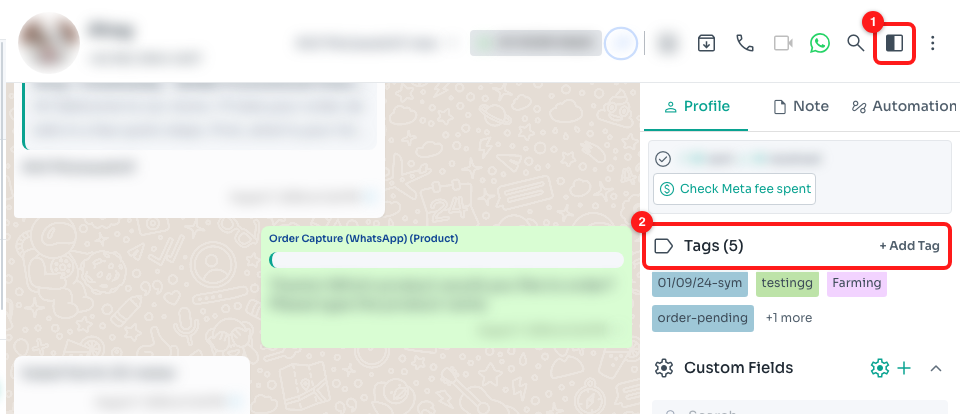
Step 1 — the panel icon in the chat header (1) opens the Profile panel, where the Tags section lives (2). Customer details are blurred here for privacy.
Step 2 — Read the Tags section
The heading reads Tags (N), where N is how many tags the contact has. Below it you get the first four as coloured chips, and then the “+N more” link if there are others. + Add Tag on the right is for putting a new tag on — you do not need it to look at the ones already there.
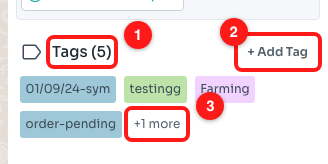
Step 2 — the tag count in the heading (1), the + Add Tag button (2), and the “+1 more” link that opens All Tags (3).
ℹ️ The count deliberately leaves some things out. Custom fields are stored as tags behind the scenes but appear in their own Custom Fields section instead, and internal tags whose name begins with an underscore are hidden. So the number here is the number of real, customer-facing tags.
Step 3 — Open All Tags
Click “+N more”. The All Tags window opens and lists every tag on the contact, wrapped over as many rows as it needs. The line under the title repeats the count and the contact’s name, so you can be sure you are looking at the right person.
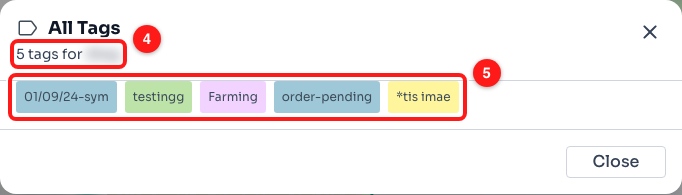
Step 3 — the count and contact name under the title (4), and the full list of tags (5). The contact’s name is blurred here for privacy.
👀 All Tags is read-only. Nothing you do in this window changes the contact — the only button is Close. To add or remove a tag, use + Add Tag back in the Profile panel.
Step 4 — Hover a tag to see who added it and when
Rest your mouse on any tag, in the window or in the panel, and a tooltip tells you where it came from — in the form “{who} on {date and time}”. If a person applied it, you get their name. If it came from a broadcast, a Message Flow or another automation, you get the name of that automation as a link you can click to open it.
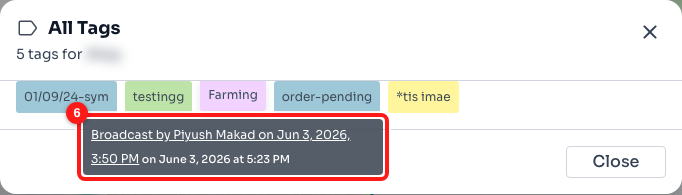
Step 4 — hovering a tag reveals who added it and when (6). This one was applied by a broadcast, so the name is a link straight to it.
- A team member’s name means someone tagged the chat by hand.
- An underlined automation name means a broadcast, Message Flow or keyword reply applied the tag; click it to open that automation.
- Unknown means ChatDaddy can no longer match the change to a current team member — for example the person has since left the team. The date and time are still correct.
Step 5 — Check Tag History for tags that were removed
If any tag has ever been taken off this contact, a Tag History (N) block appears with those tags shown faded, newest first. It shows up both in the Profile panel and inside the All Tags window. Hover a faded tag and the tooltip reads “Removed by {who} on {date and time}”.
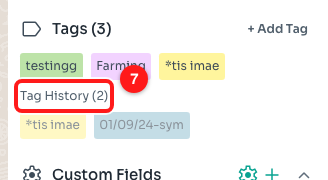
Step 5 — Tag History lists tags that were removed, in faded chips (7). This contact has three current tags and two removed ones.
When you are done, click Close. Nothing is saved or changed either way.
Troubleshooting
There is no “+N more” link on this chat.
The link only appears when a contact has more than four tags. With four or fewer, every tag is already on screen in the Profile panel, so there is nothing extra to open. Hovering still works on those chips.
A tag I know exists is not in the list.
Two kinds of tag are filtered out on purpose. Custom fields are held as tags internally, but they are shown in the Custom Fields section of the Profile panel instead of among the tags. Internal tags whose name starts with an underscore are hidden from customer-facing views altogether. Everything else on the contact will be in All Tags.
The Tags section says “No tags”.
That contact has never been tagged. Click + Add Tag to apply the first one. If you open All Tags on a contact with no tags at all, it shows “No tags available” with a prompt to add some.
I can see the tags but I cannot add or remove any.
Viewing tags is open to everyone on the team, but editing them needs the permission to update contacts. If + Add Tag is missing from your Profile panel, ask your team owner to grant your role that permission in Team Settings.
There is no Tag History block.
Tag History only appears once something has actually been removed from that contact. A contact whose tags have only ever been added will not have one. History is recorded from the moment a change happens, so tags applied long ago may not carry a full record.
The tooltip does not appear when I hover.
Hold the pointer still over the middle of the tag chip for about a second — the tooltip is on a short delay. On a touch screen there is no hover, so open the chat on a desktop browser to read the added-by details.