
How to Connect an App in the App Store — and Wire It Into Your Business
Every one of the 21 supported apps, the exact credential each one asks for and where to find it, the three different ways a connection is made, and how to turn a connected app into a WhatsApp message that actually earns something.
Also searched as: How to Connect an App in the App Store — and Wire It Into Your Business, Start at the end: decide what the integration should earn you, Find the app, Connect it. There are only three ways., Pattern A — a credential form (15 apps), Pattern B — the Chrome helper extension (3 apps), Pattern C — nothing to fill in (3 apps), Save, and check it actually landed, Give the other system the webhook URL, Tell it who sends, and to whom, Point it at the message flow, Test it without touching a customer, Prove it is working, later, Four setups worth copying, Online shop — cut "where is my order?"
"Connecting an app" in ChatDaddy means giving ChatDaddy permission to hear about things that happen in a system you already run — your shop, your booking page, your payment provider — so a WhatsApp message can go out the moment they happen. This article covers the connection itself: what each of the 21 supported apps asks you for, where to find it, and what to do once the app is in.
🧭 The full chain is connected app ➜ notification settings ➜ trigger ➜ message flow. This article is about link one, and then takes you through the other three. If you already have the app connected and just want the trigger side, jump to Step 5.
Start at the end: decide what the integration should earn you
Connect an app "to see what it does" and it will do nothing. Decide the sentence first — "when X happens in my business, my customer should get Y on WhatsApp" — and the rest of the setup is mechanical. These are the sentences that pay for themselves:
- "When an order is paid, confirm it and share tracking." Cuts where is my order messages, which for most shops is the single biggest support cost. Apps: Shopify, Woo Commerce, Shopline, Boutir, Shopage, Tokopedia, WhatsApp Shop, Shiprocket.
- "When a payment succeeds or fails, tell them." A failed payment recovered in ten minutes is revenue; a failed payment discovered next week is a lost customer. Apps: Stripe, Razorpay, Hotmart.
- "When someone books, confirm it, then remind them the day before." No-shows are the whole cost base of a service business. Apps: Calendly, Booknetic, Google Calendar.
- "When someone fills in my form, start the conversation." A lead answered in minutes converts far better than one answered tomorrow. Apps: Google Form, Paperform.
- "When a guest books a stay, send the check-in details." Apps: Hostex, Host Platform.
- "When a sale rings up in store, follow up for the review or the reorder." App: Genius POS.
💡 Write your sentence down before you start. You will need it twice: once to choose which app to connect, and once to decide what the message flow should actually say.
Step 1 — Find the app
Go to App Store ➜ + Create. You land on step ① Shop Selection. There are two ways to get to your app: the search box ① or the category filter ②, whose counts tell you how many apps are in each group.
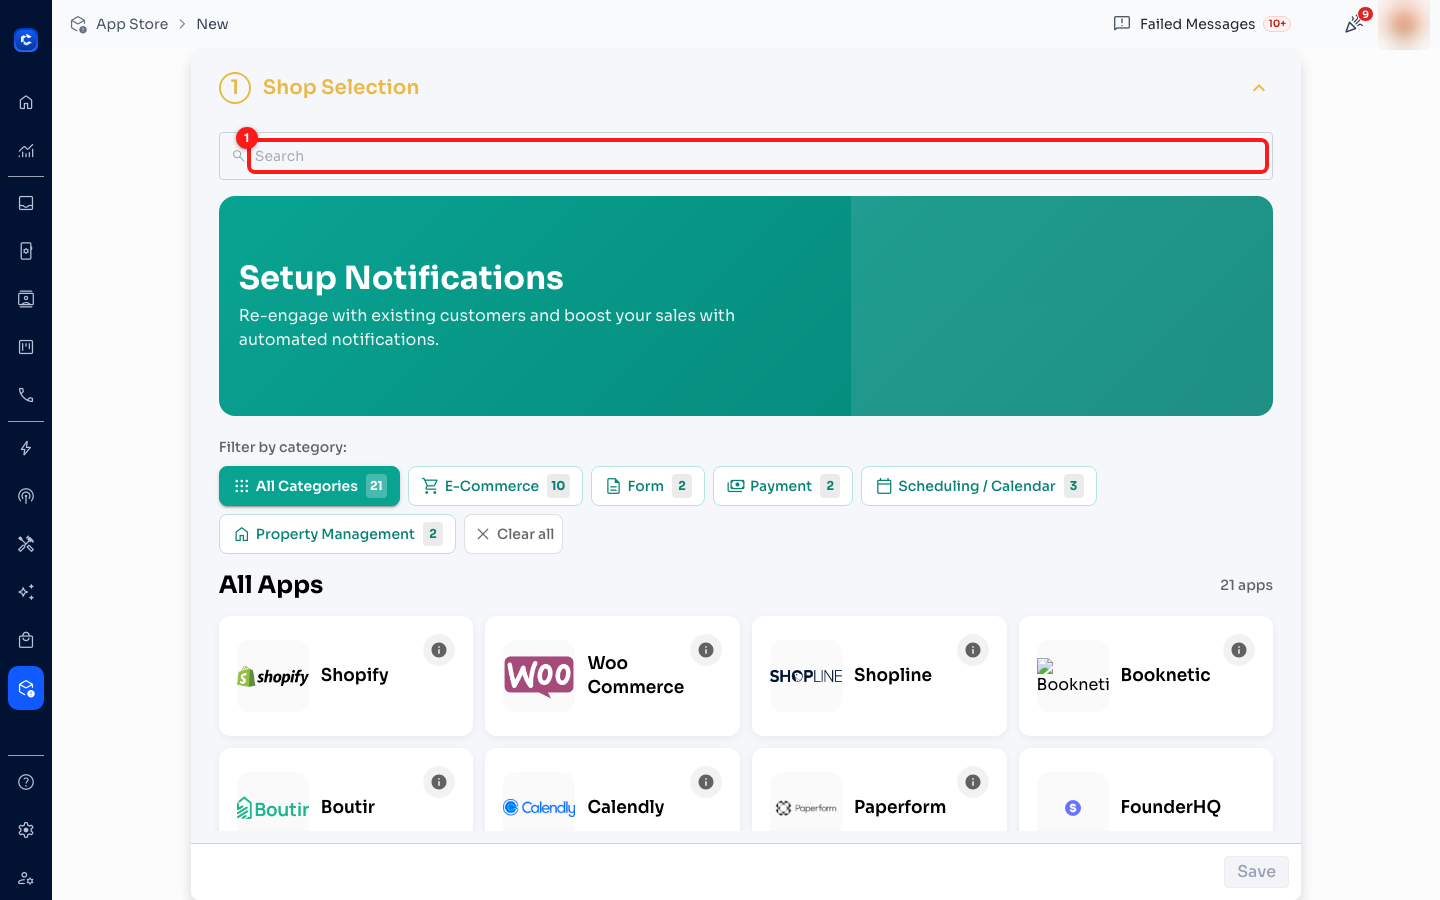
① search. ② the category filter — All Categories 21 · E-Commerce 10 · Form 2 · Payment 2 · Scheduling / Calendar 3 · Property Management 2.
The 21 supported apps are:
- E-Commerce (10) — Shopify, Woo Commerce, Shopline, Shopline Global, Shopage, Boutir, Tokopedia, WhatsApp Shop, Shiprocket, Hotmart.
- Form (2) — Google Form, Paperform.
- Payment (2) — Stripe, Razorpay.
- Scheduling / Calendar (3) — Google Calendar, Calendly, Booknetic.
- Property Management (2) — Hostex, Host Platform.
- Plus Genius POS and FounderHQ.
❗ There is no "other" option. If your system is not one of these 21, the App Store is not your route — use Tools ➜ Zapier, or the Webhook app trigger in the Flow Builder if your system can send an HTTP request. Nothing you type in the search box will surface an unsupported app.
Step 2 — Connect it. There are only three ways.
Click the app and a Configure your integration settings panel opens on the right. What you see there falls into exactly three shapes, and knowing which one you are in tells you what to go and fetch.
Pattern A — a credential form (15 apps)
Most apps ask for a login, an API key, or an ID. The placeholder text in each box tells you exactly what shape the value is — read it before you go hunting.
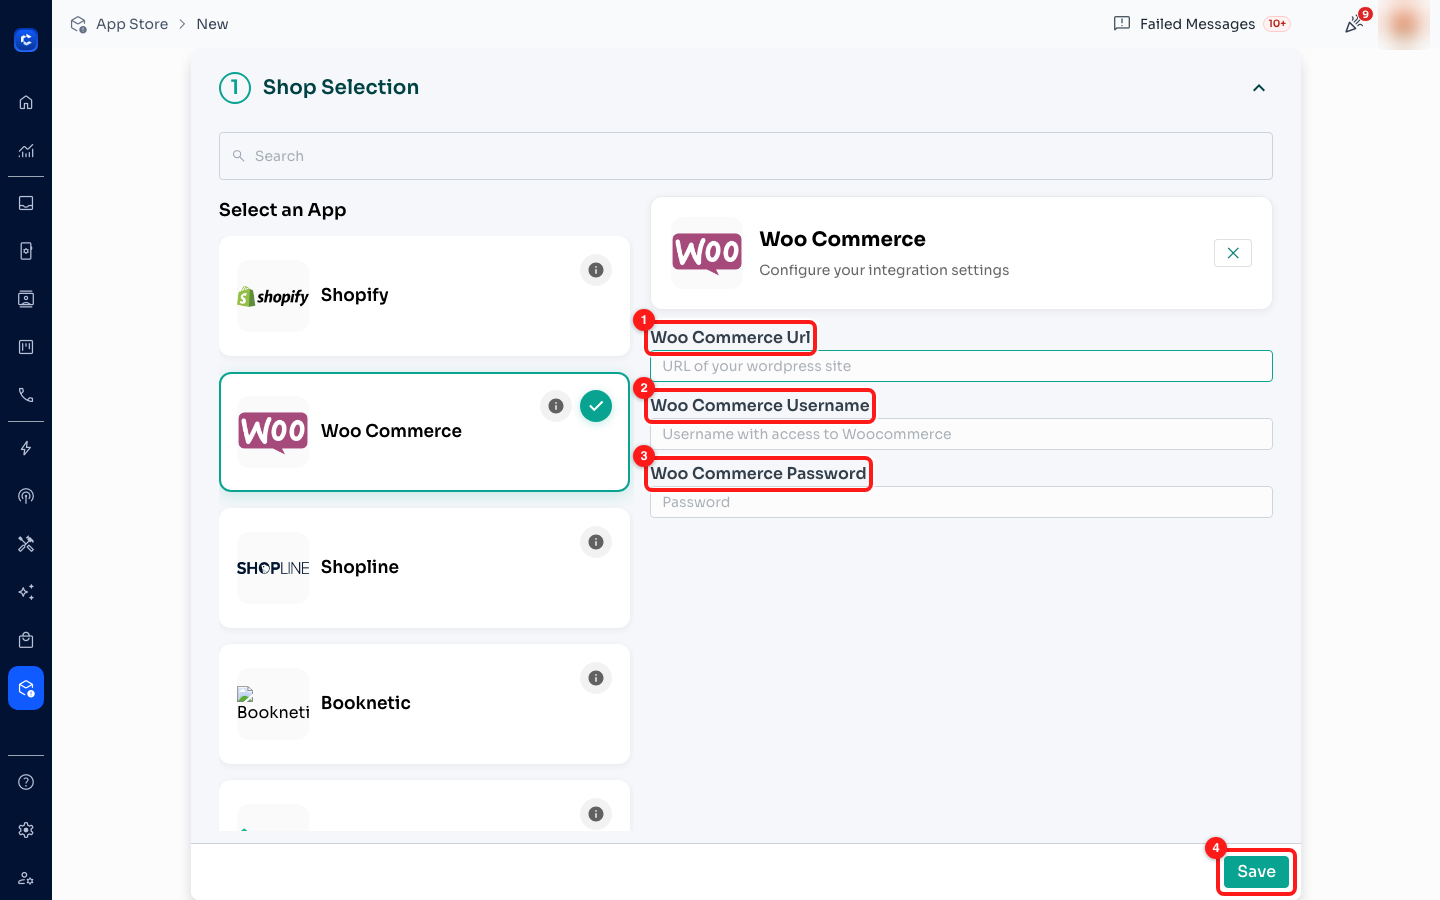
Woo Commerce needs three: ① the URL of your WordPress site, ② a username with WooCommerce access, ③ its password. ④ Save.
A payment provider needs one secret key, and the placeholder even shows you the prefix so you can tell a live key from a test key ②.
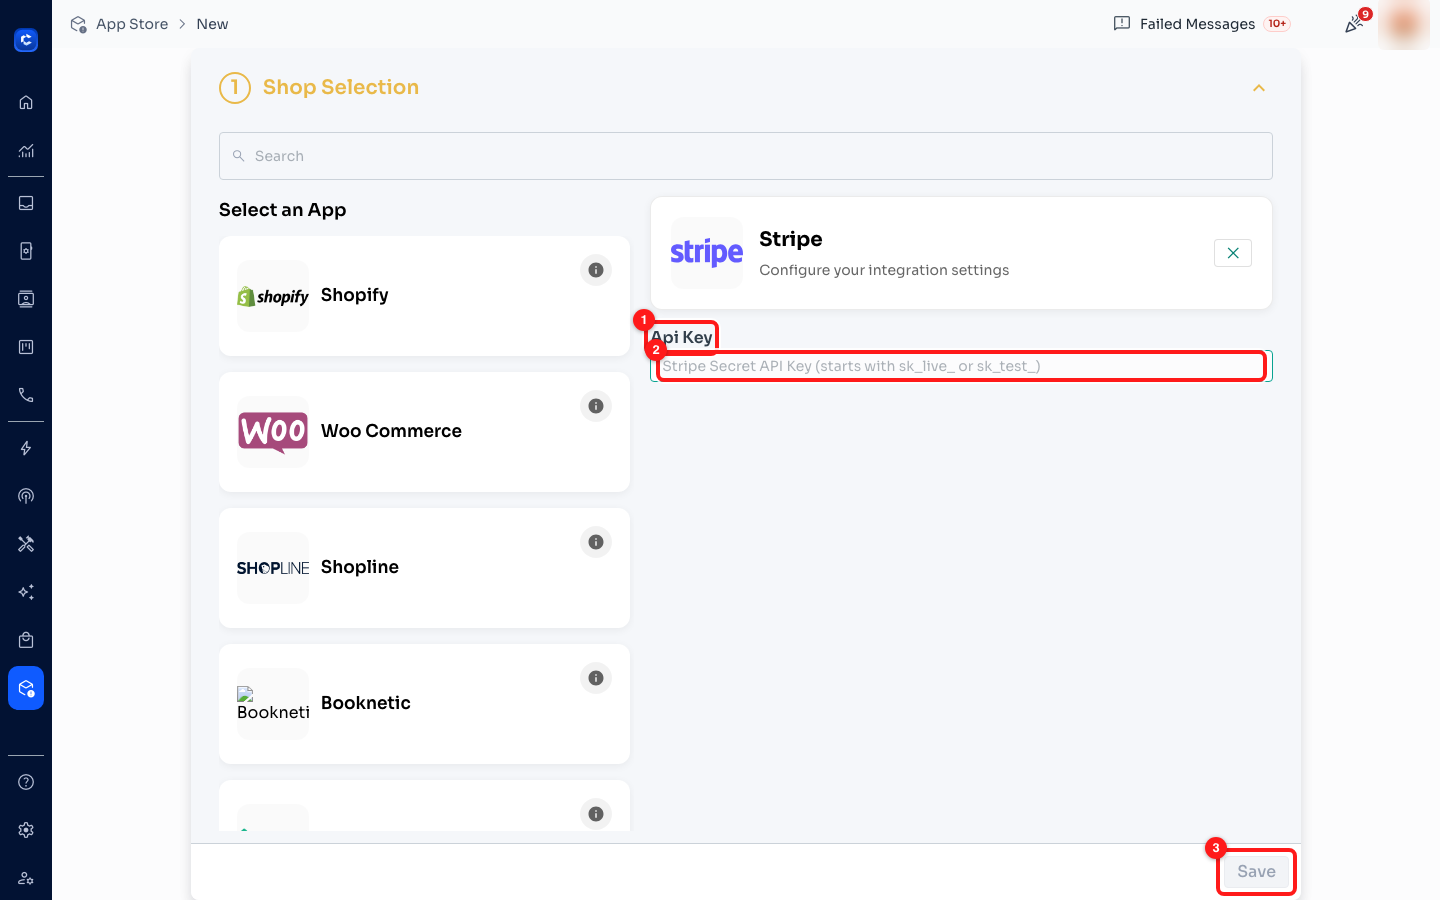
Stripe: ① Api Key. ② the placeholder — a Stripe Secret API Key, starting sk_live_ or sk_test_. ③ Save.
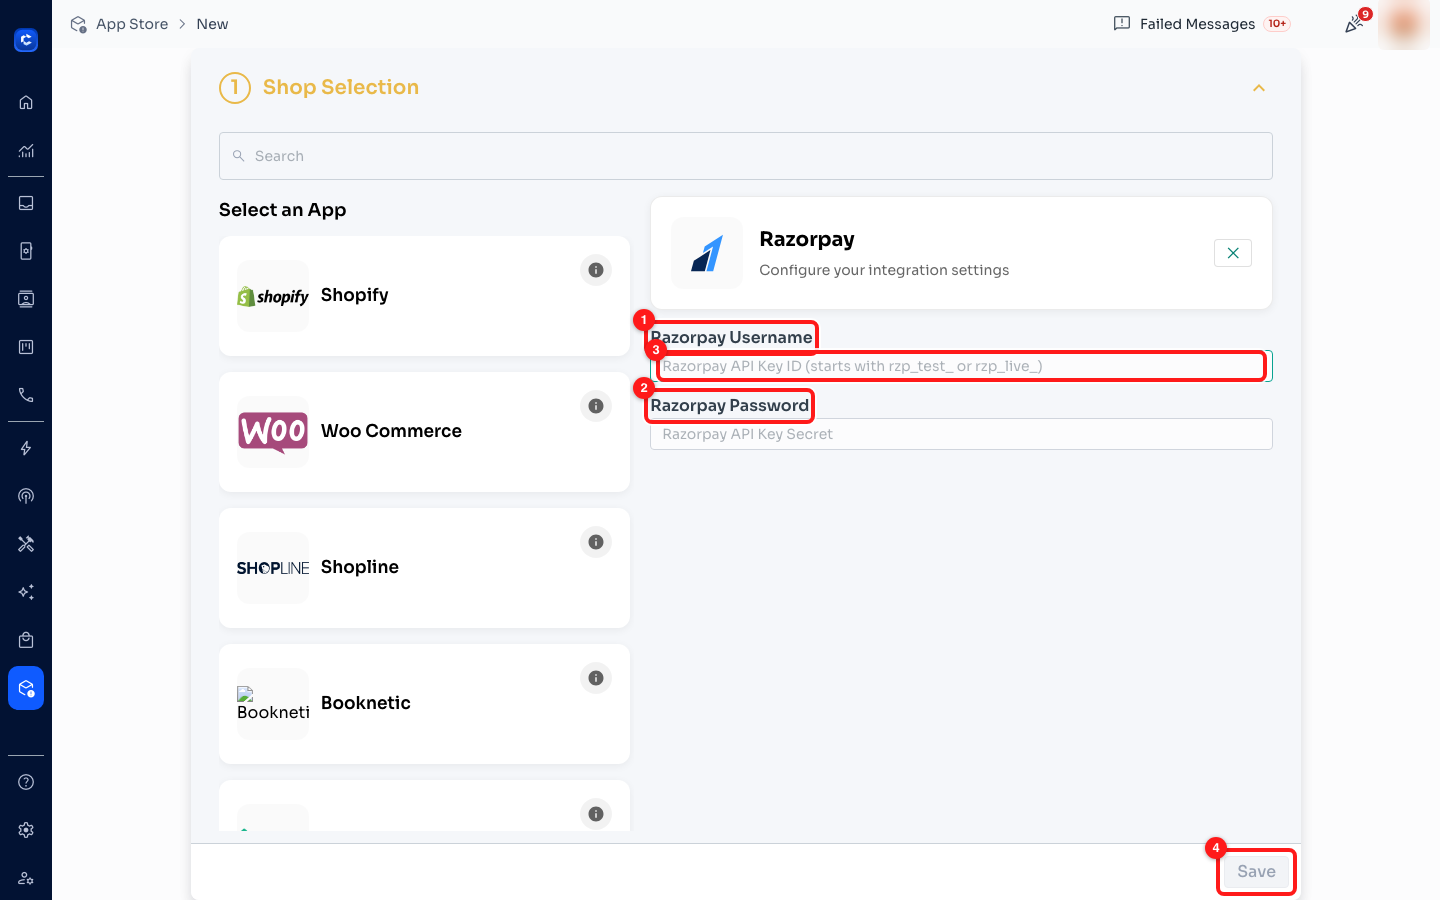
Razorpay takes a pair: ① the API Key ID (rzp_test_ / rzp_live_) as the username, ② its Key Secret as the password.
Booking and calendar apps take a personal token, and Calendly's placeholder even carries the address to generate it at ②.
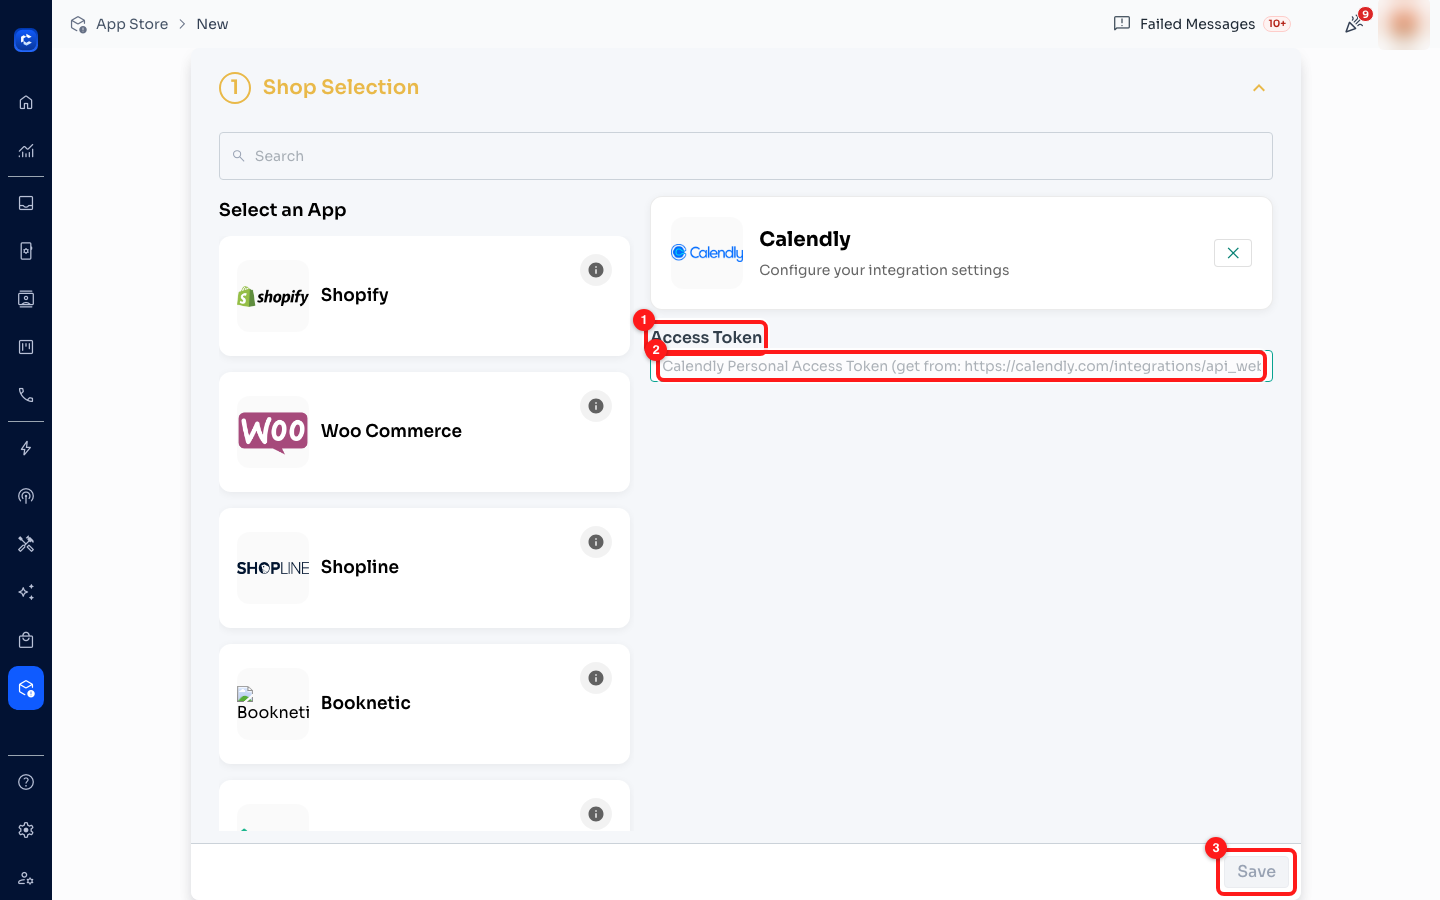
Calendly: ① Access Token, ② generated at calendly.com/integrations/api_webhooks.
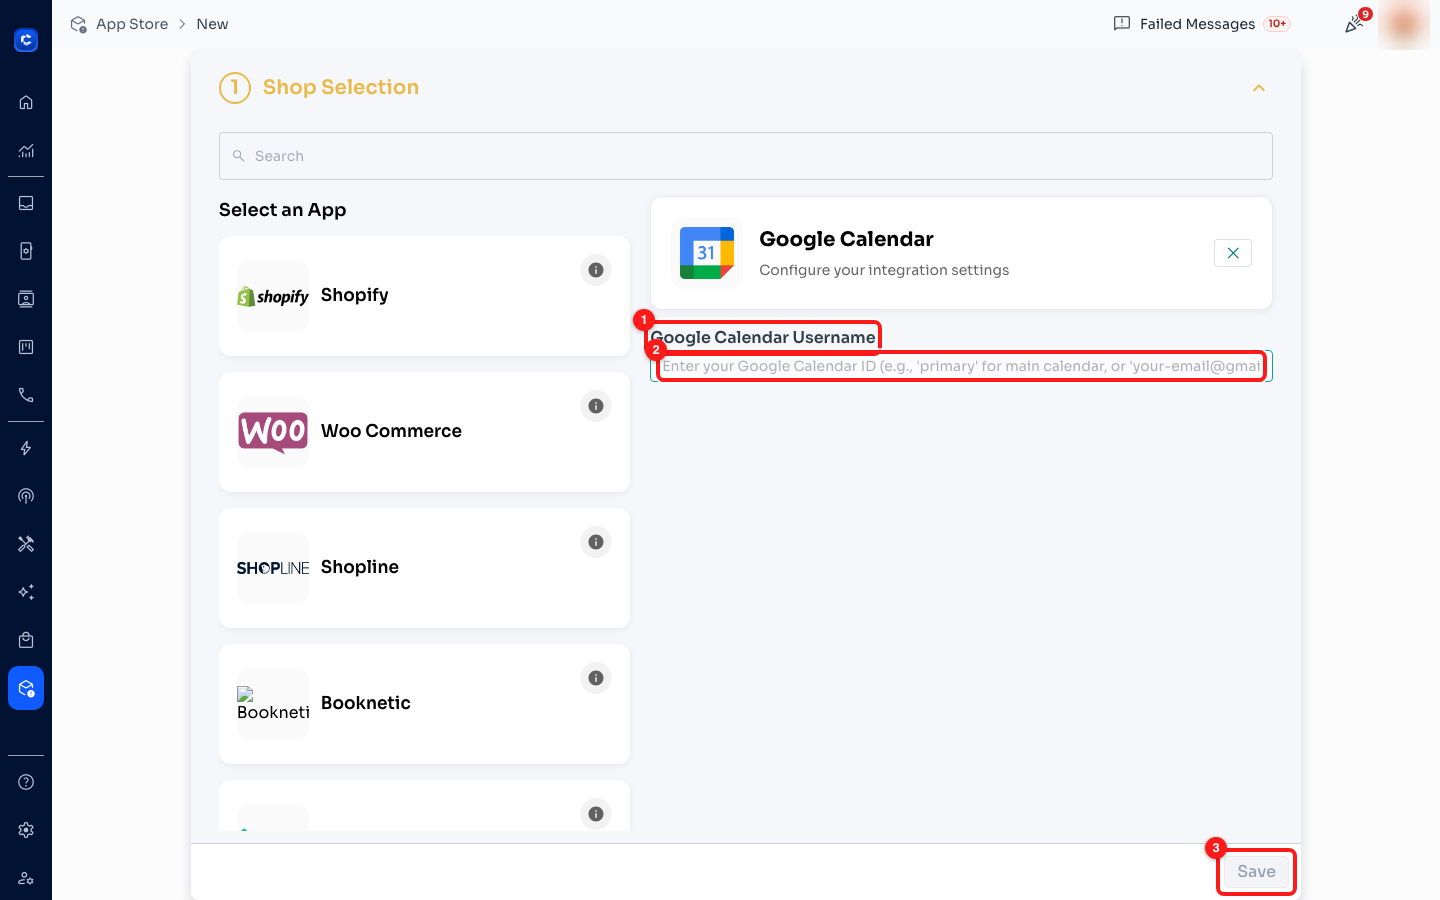
Google Calendar wants a calendar ID, not a login: ② primary for your main calendar, your Gmail address, or a …@group.calendar.google.com id for a shared calendar.
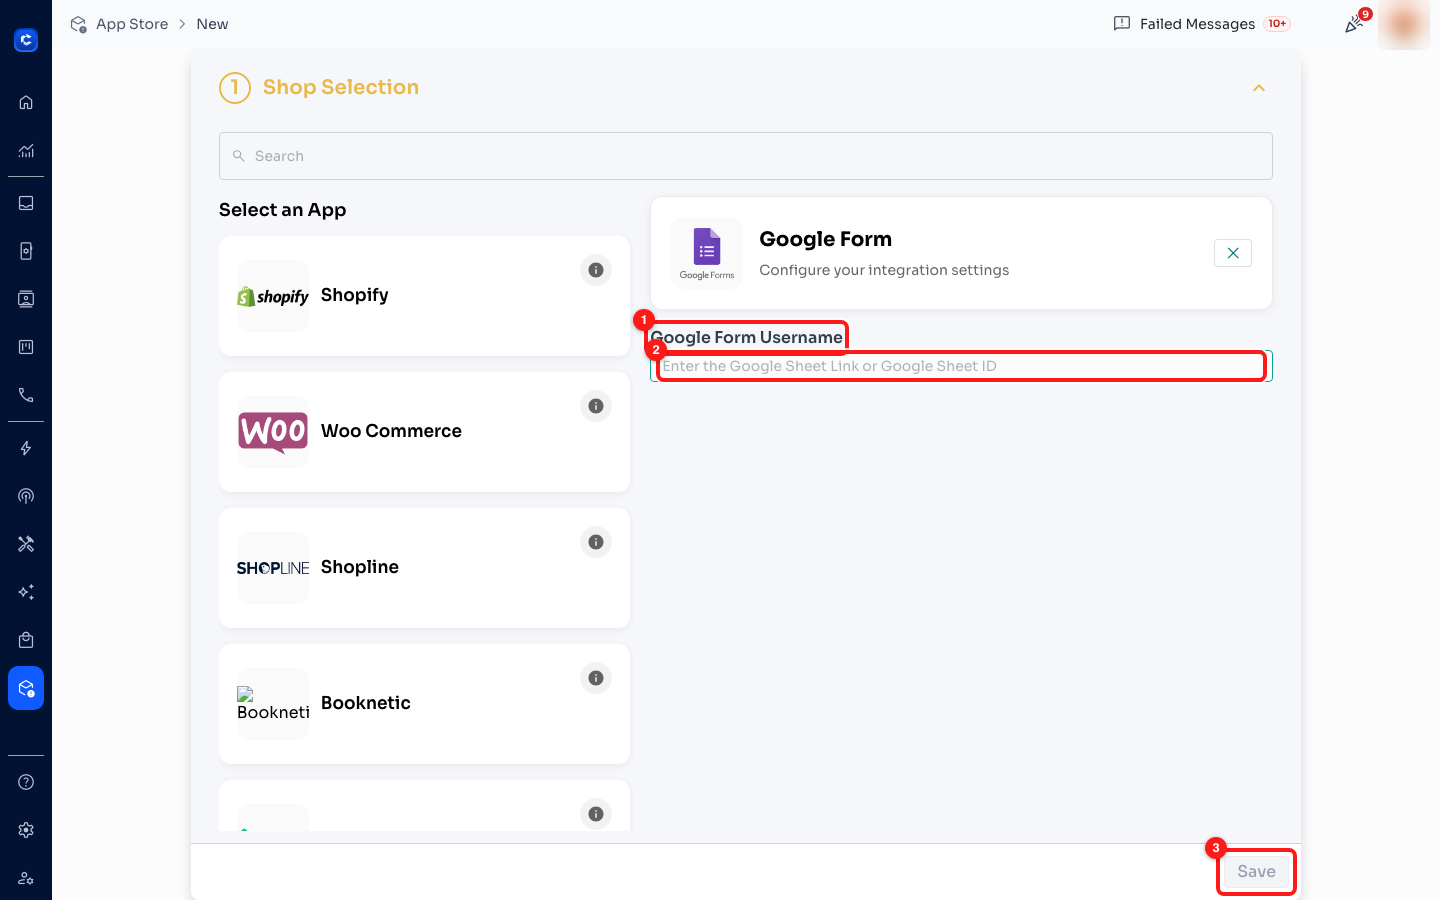
Google Form is really the form's response sheet: ② paste the Google Sheet link or the Sheet ID.
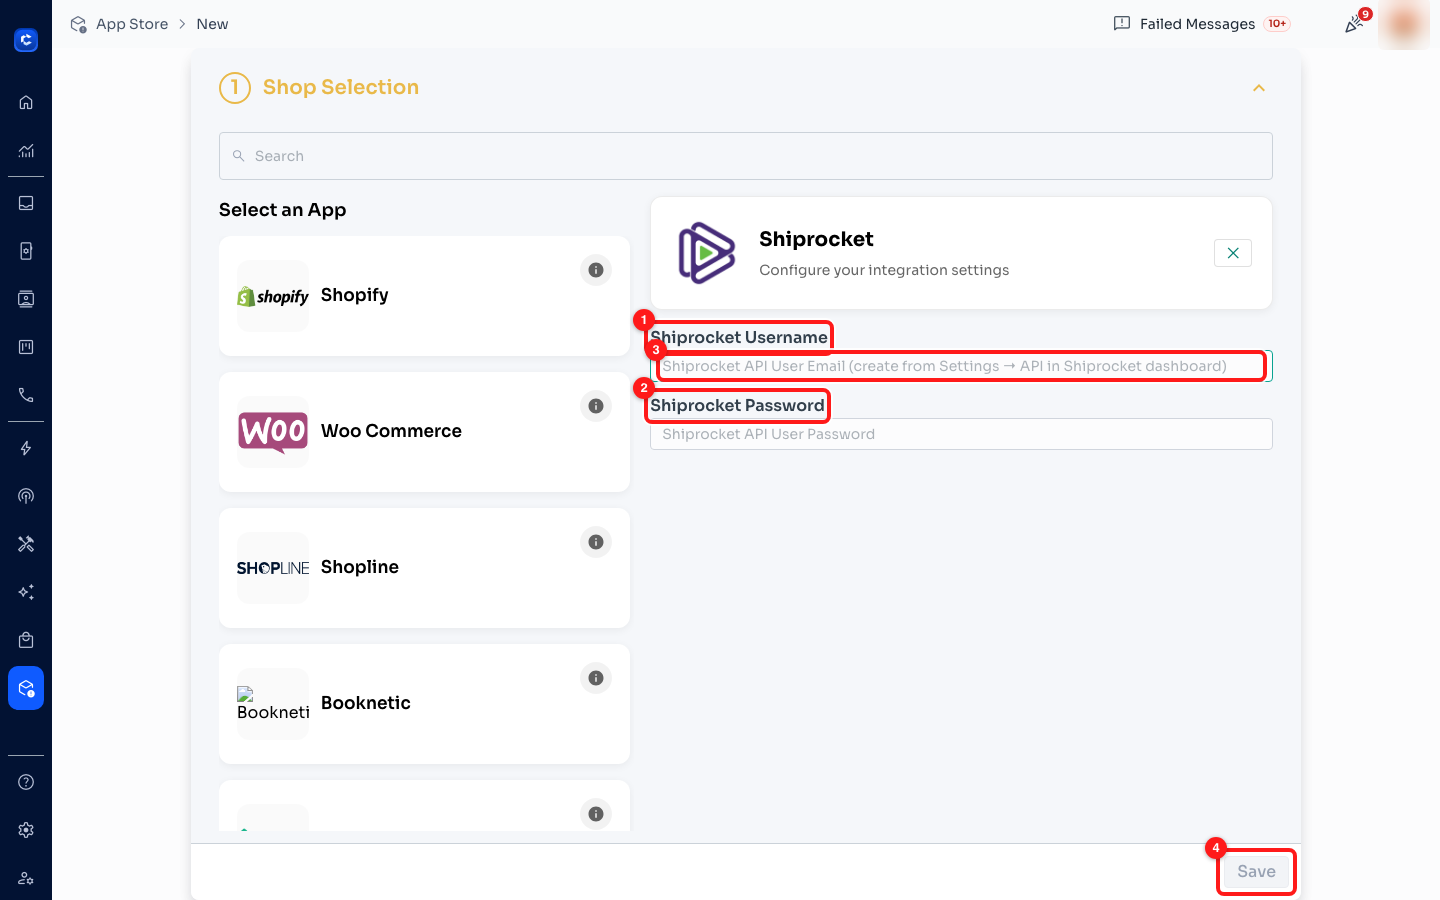
Shiprocket: ② create a dedicated API user under Settings ➜ API in Shiprocket, then use that email and password here — not your own login.
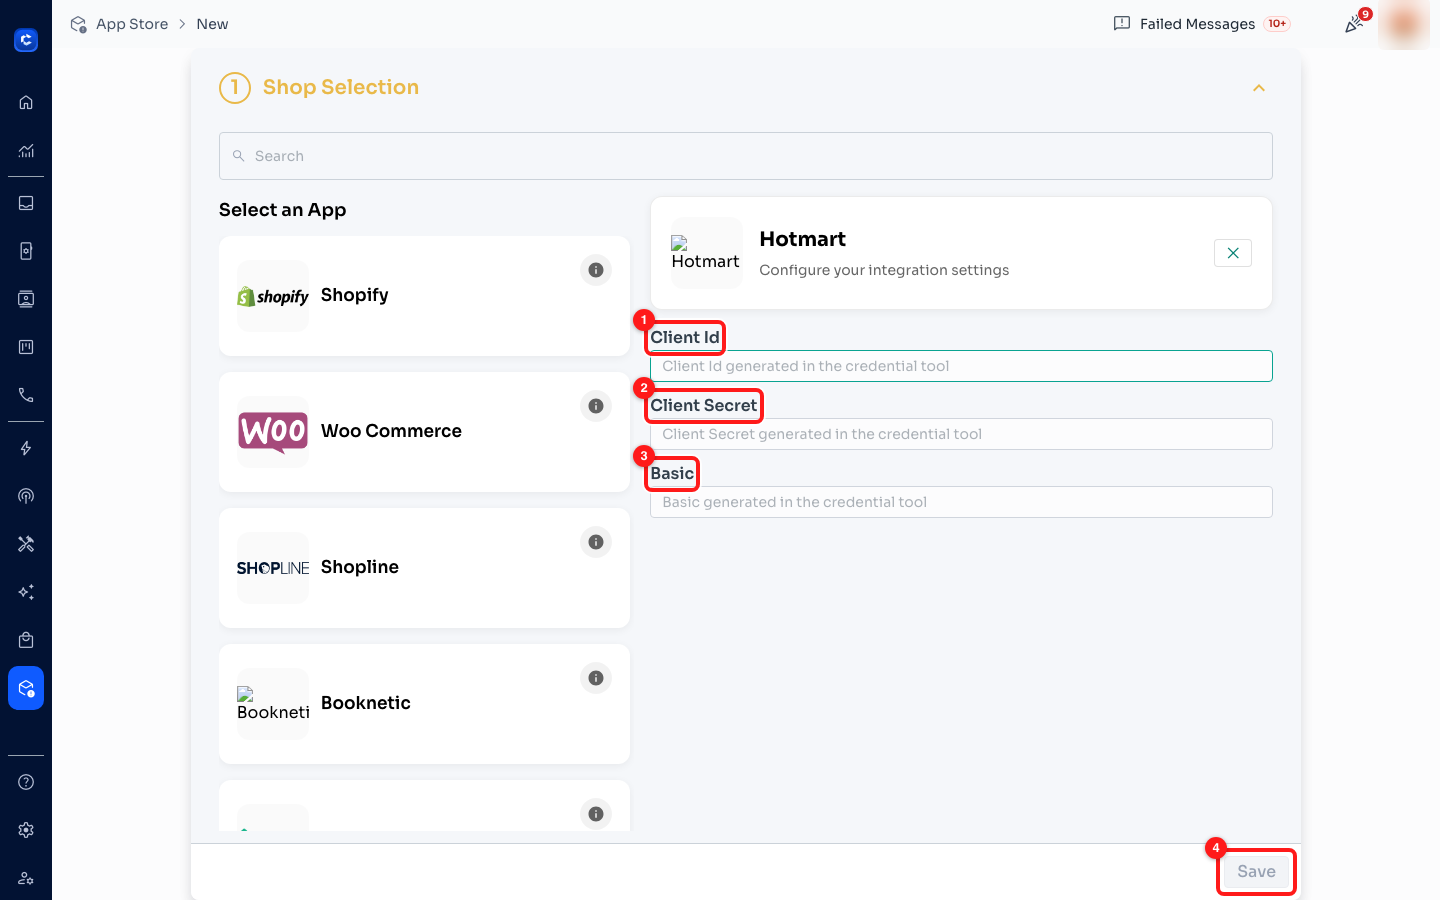
Hotmart takes three values from its credential tool: ① Client Id, ② Client Secret, ③ Basic.
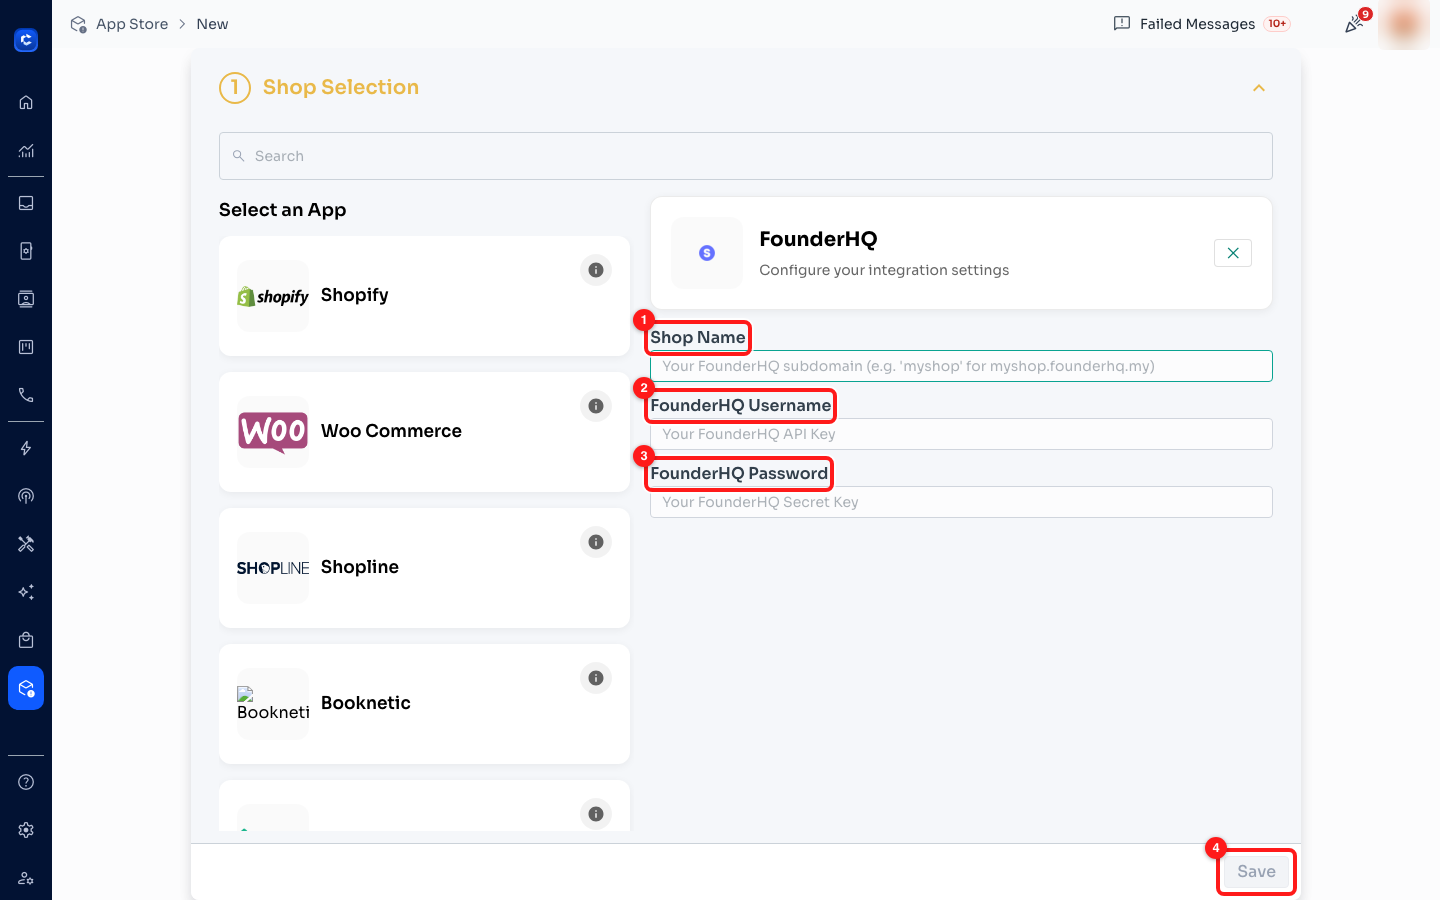
FounderHQ: ① your subdomain (the myshop of myshop.founderhq.my), ② API Key, ③ Secret Key.
Every credential app, and exactly what it asks for:
- Shopage — Username, Password.
- Boutir — the Boutir login email address, and its password.
- Woo Commerce — your WordPress site URL, a username with WooCommerce access, that password.
- Shiprocket — an API user email created under Settings ➜ API in Shiprocket, and its password.
- Hotmart — Client Id, Client Secret and Basic, all three from Hotmart's credential tool.
- Stripe — one Secret API key (
sk_live_…orsk_test_…). - Razorpay — API Key ID (
rzp_live_…orrzp_test_…) plus API Key Secret. - Calendly — a Personal Access Token from
calendly.com/integrations/api_webhooks. - Google Calendar — the calendar ID (
primary, your Gmail address, or a…@group.calendar.google.comid). - Google Form — the Google Sheet link or Sheet ID of the form's responses.
- Paperform — a Time Key.
- Hostex and Host Platform — an Access Token generated in that platform's credential tool.
- Genius POS — its API Key.
- FounderHQ — subdomain, API Key, Secret Key.
🔐 Use a dedicated credential, not your own login. Shiprocket says so outright (create an API user); do the same everywhere you can — a separate WooCommerce user, a restricted Stripe key. When someone leaves the team, or a key leaks, you revoke that credential without locking yourself out of your own shop. And on Stripe and Razorpay, check the prefix before you paste: a
testkey connects fine and then never sees a real order.
Pattern B — the Chrome helper extension (3 apps)
Shopline, Shopline Global and Tokopedia have no credential form at all. Their panel says the app requires the ChatDaddy Chrome helper extension ①, with an Install Now button ② — the extension logs you into the shop in your own browser rather than storing a password in ChatDaddy.
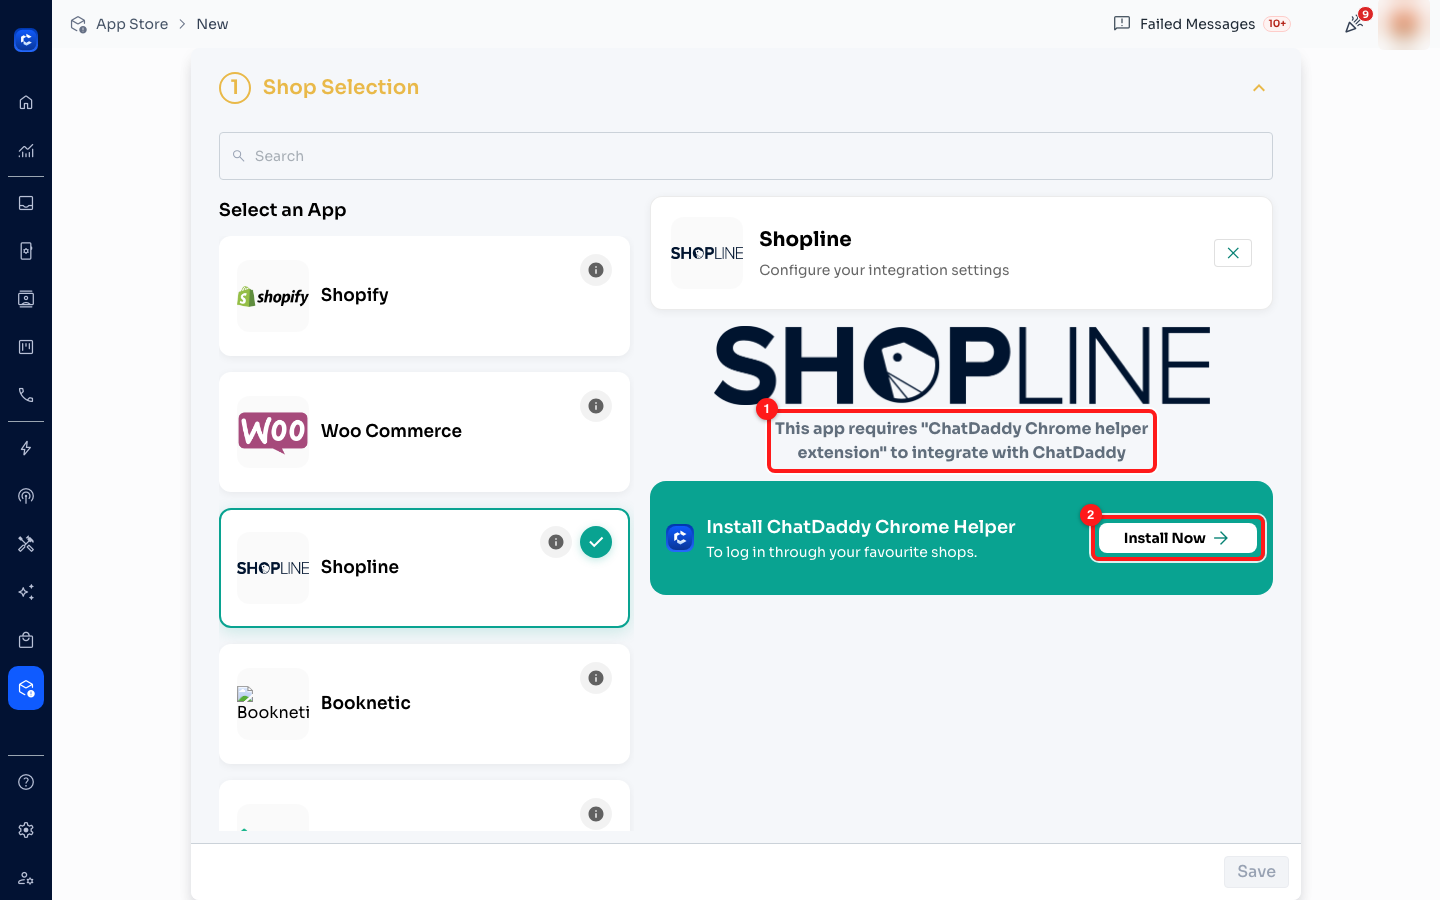
① "This app requires ChatDaddy Chrome helper extension to integrate with ChatDaddy". ② Install Now.
- You need Google Chrome on the machine you set this up from.
- Install the extension, then log into the shop through it, then come back and Save.
- If the connection later goes stale, this is the pattern where you use ⋮ ➜ Relogin on the App Store row rather than re-entering anything.
Pattern C — nothing to fill in (3 apps)
Shopify, Booknetic and WhatsApp Shop show a panel with a header ① and a Save button ③ and nothing in between. That is not a bug and nothing is missing: for these, the connection is made from the other side — you save the service here, then paste ChatDaddy's webhook URL into that system.
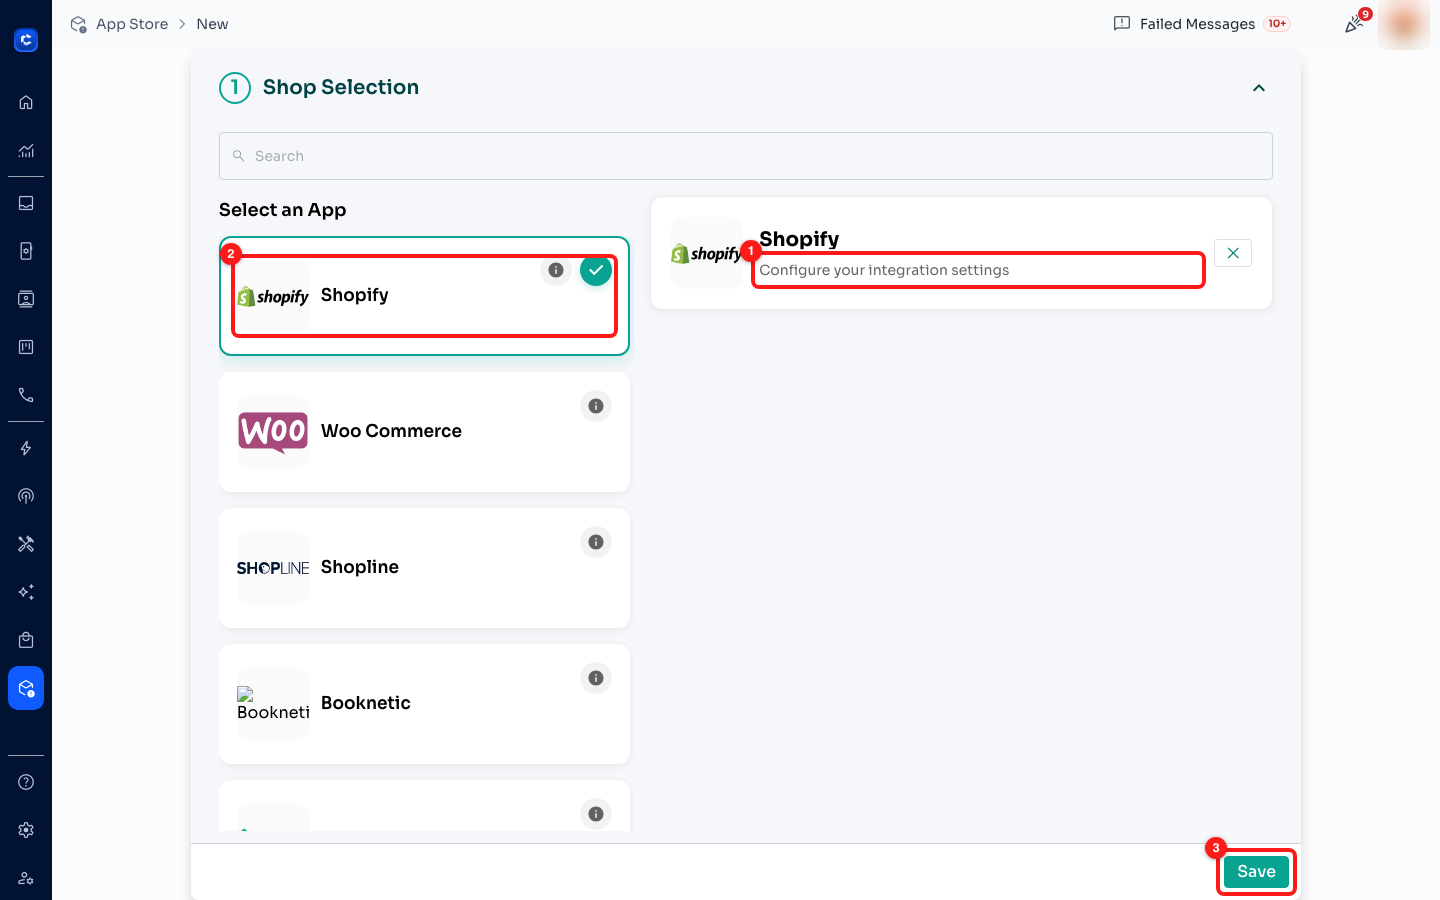
① the panel has no fields. ② the selected app. ③ Save anyway — then go and get the webhook URL.
Step 3 — Save, and check it actually landed
Press Save. The service now appears as a row on the App Store list. If it does not, use the toolbar ⋮ ➜ Reload My Services before assuming anything failed.
- A row exists with the right app Name.
- The Status toggle is on.
- Triggered reads
0and Last Activity readsNever Activated— correct at this stage, because you have not connected the other side yet.
Step 4 — Give the other system the webhook URL
This is the step people skip, and it is why a perfectly configured integration sits at Never Activated forever. ChatDaddy does not go and poll your shop. The shop has to call ChatDaddy. Open the service (⋮ ➜ Edit) and press Show Webhook URL ③.
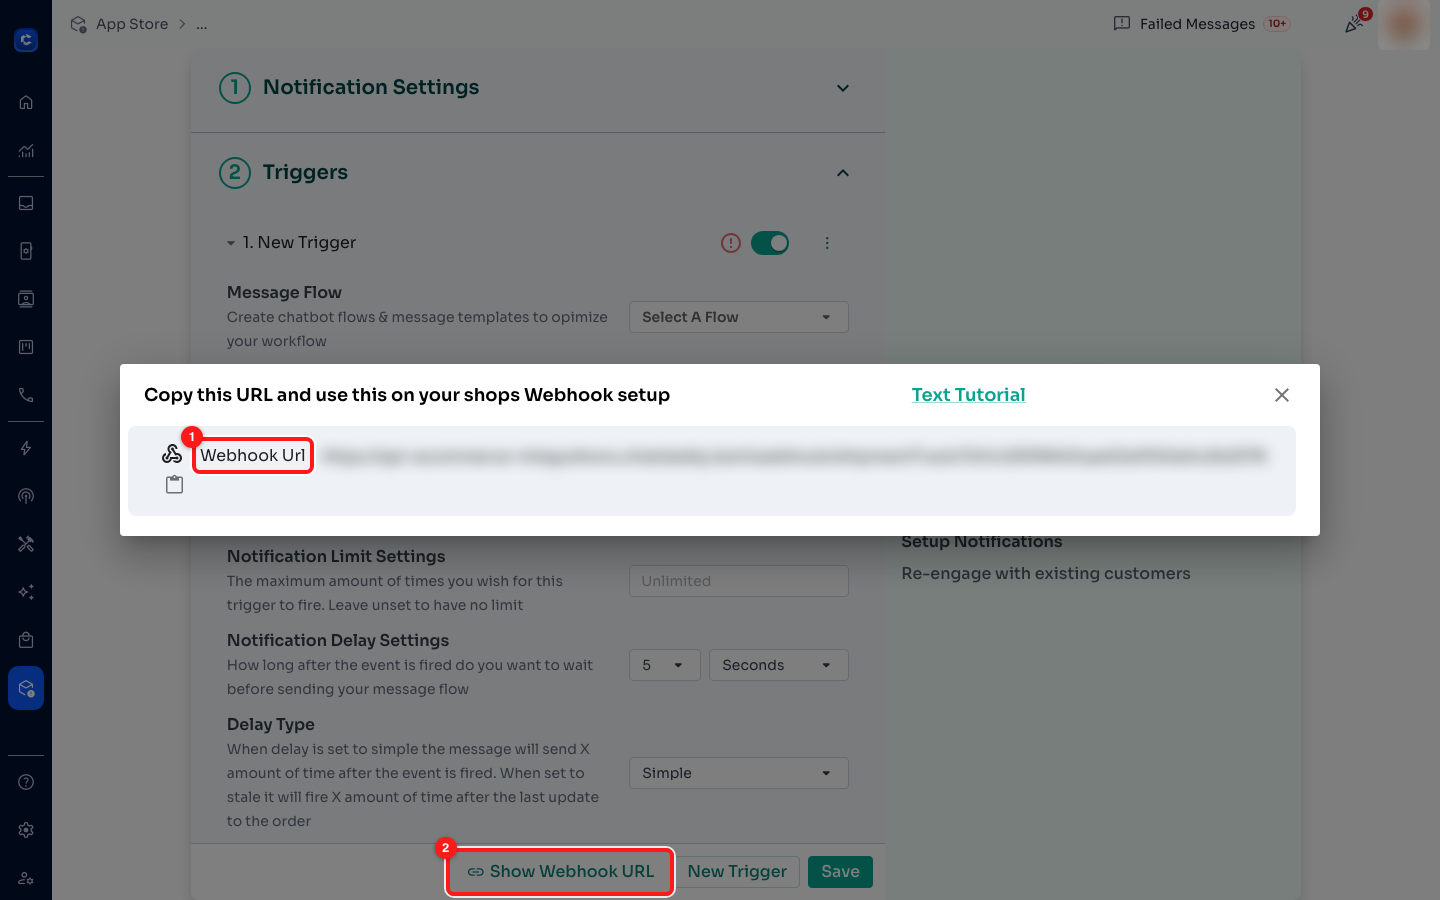
① the URL to paste into your shop's webhook settings (blurred here). ② Text Tutorial — the per-app instructions. ③ Show Webhook URL.
- Copy the URL with the copy button.
- Open Text Tutorial — it is the per-app guide to where that URL goes.
- In your own system, find its webhook / notification / integration settings and paste it in.
- Trigger one real event over there (a test order, a test booking) and watch Triggered on the ChatDaddy list.
🔐 That URL is a credential. Anyone holding it can push events into your team and make your flows send WhatsApp messages on your account. It belongs in your shop's webhook settings and nowhere else — not in a screenshot, a support ticket, or a shared doc. If it leaks, delete the service and reconnect it to get a new one.
Step 5 — Tell it who sends, and to whom
Still in Edit, press New Trigger ➜ Add Custom Trigger to open step ① Notification Settings.
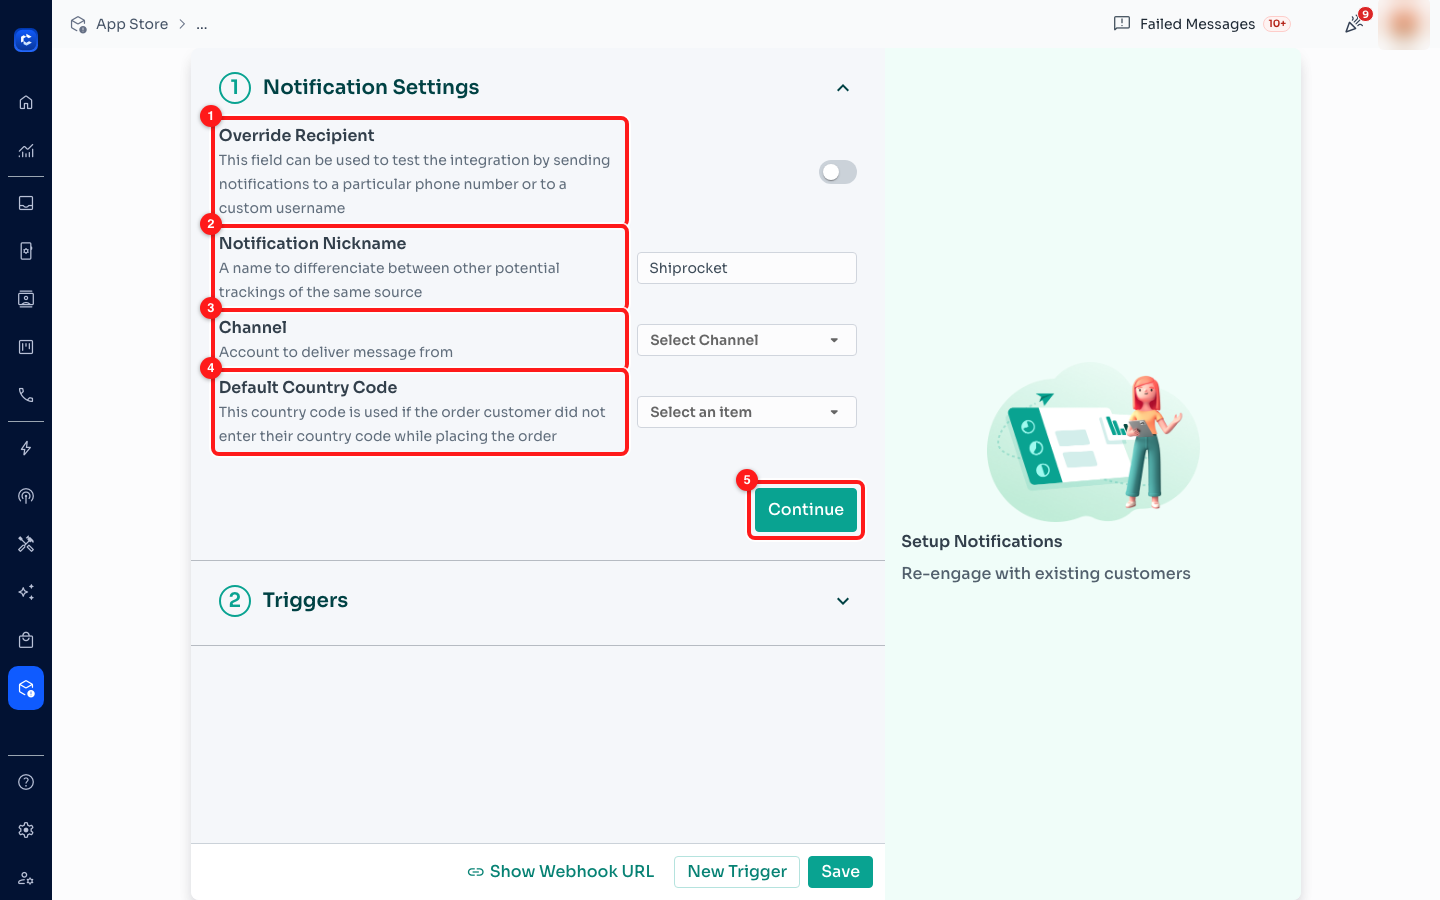
① Override Recipient. ② Notification Nickname. ③ Channel. ④ Default Country Code. ⑤ Continue.
- Override Recipient — send everything to one number instead of the real customer. Turn it on now, for testing. Turning it off is the last thing you do before going live.
- Notification Nickname — name it after the business outcome, not the app: "Order paid – confirm + tracking" beats "Shopify 2" when there are six of them.
- Channel — which WhatsApp channel it sends from. Leave it unset and the integration fires and sends nothing.
- Default Country Code — the country most of your orders come from.
⚠️ Default Country Code is the one that quietly breaks live integrations. Most checkouts accept a local-format number like
012 345 6789with no country code. Without a default, ChatDaddy cannot turn that into a WhatsApp number and the message is simply never sent — with nothing on screen to tell you. Set it at the start, not after the first complaint.
Step 6 — Point it at the message flow
Press Continue, expand the trigger, and open Select A Flow ①. This is where your sentence from the top of this article becomes real: the flow is the "…should get Y on WhatsApp" half.
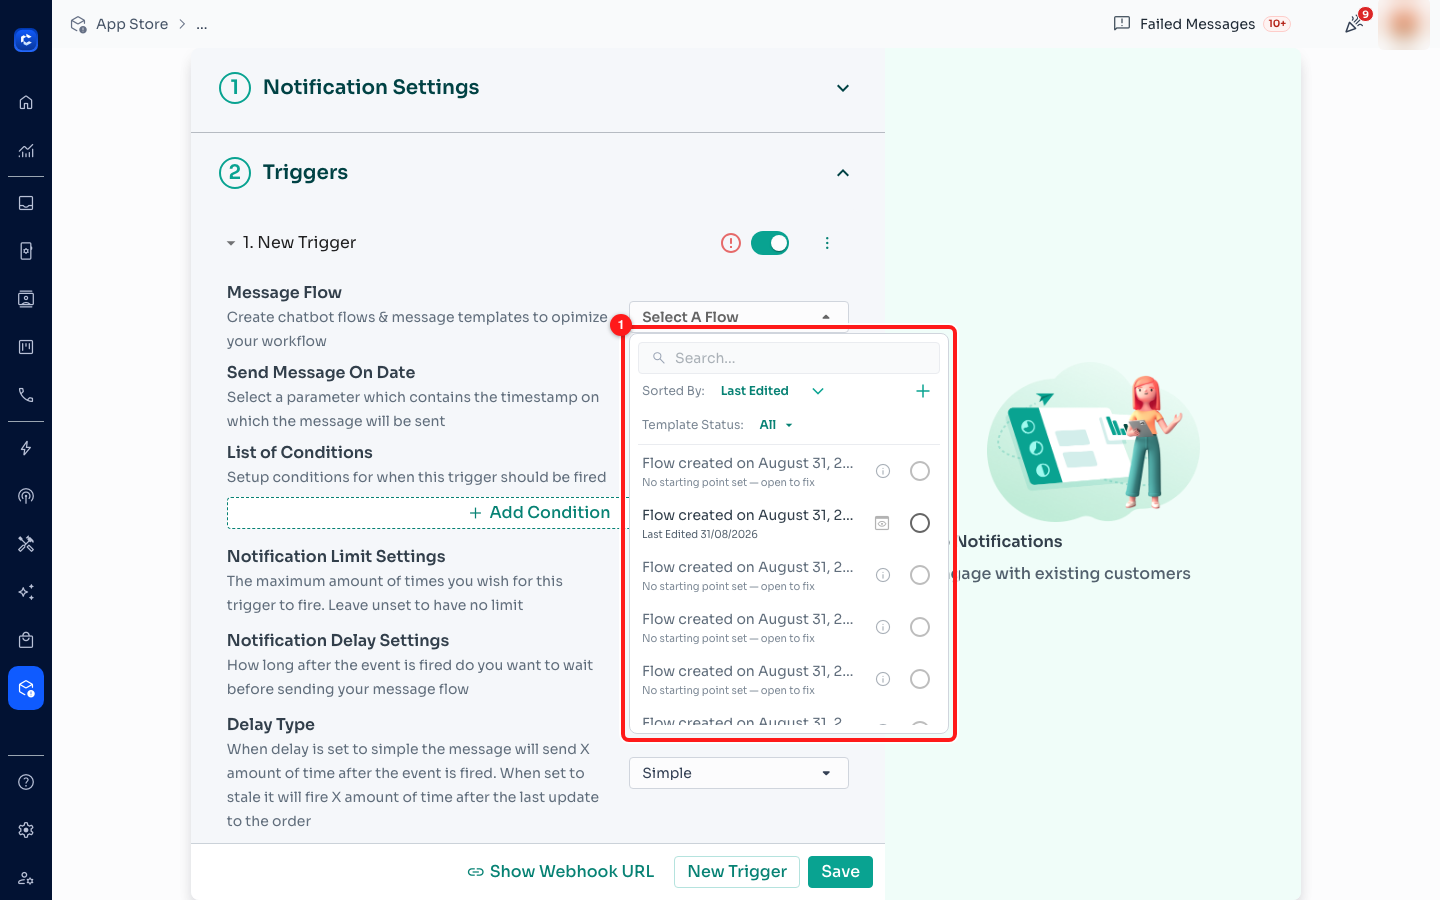
① the flow picker. Read the grey sub-label on each row: a healthy flow shows "Last Edited"; a broken one says "No starting point set — open to fix".
⚠️ "No starting point set — open to fix" will still let you select the flow. The trigger fires, Triggered counts up, and no message is ever sent, because the flow has no starting step to run. Open it in the Flow Builder, add a starting Message step, save, then come back. This is the most common cause of a "connected but dead" integration.
While you are in the trigger, the other fields are how you keep the integration polite and cheap:
- List of Conditions — only fire for some events. The parameters come from the event itself: Event, Order Number, Order Date, Order Customer, Order Customer Phone, Order Customer Email, Total, and more. This is how you say "only orders over 200" or "only paid, not pending".
- Notification Limit Settings — a hard cap on total sends. Leave it blank for no limit; set it on your first live integration so a misconfigured shop cannot message ten thousand people.
- Notification Delay Settings — how long to wait after the event. Default 5 seconds.
- Delay Type — Simple counts from the event. Stale counts from the last update to the order, so an order that keeps changing keeps resetting the clock. Stale is what you want for abandoned-checkout style messages.
Step 7 — Test it without touching a customer
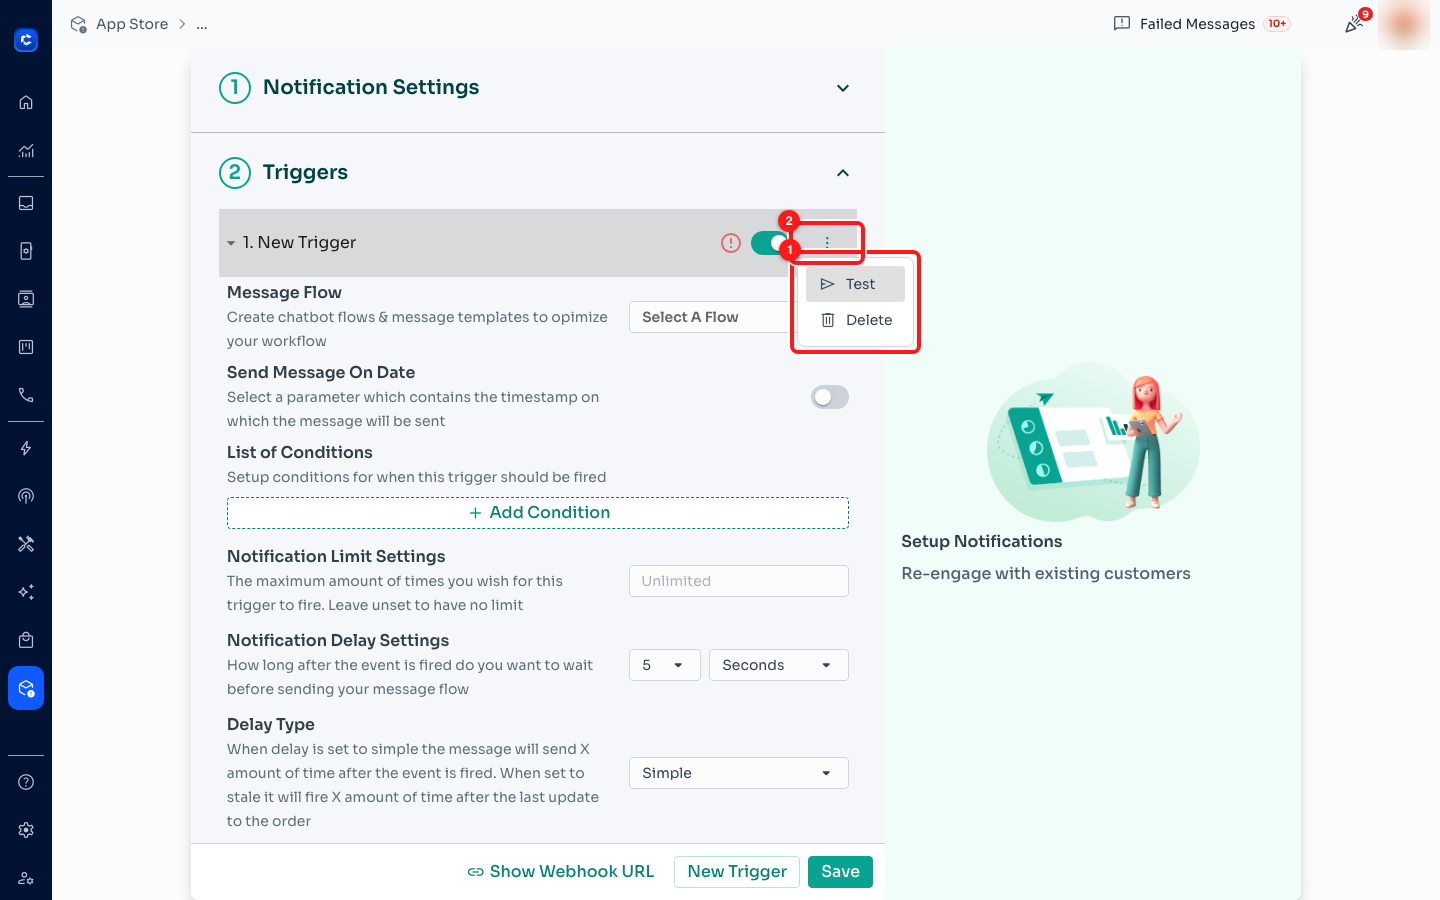
① the trigger's own ⋮ menu — Test fires just this trigger. ② the trigger's enable toggle.
- Override Recipient on, with your own number in it.
- Channel filled in; the flow does not say No starting point set.
- Press Save — an unsaved trigger is not a trigger.
- Trigger ⋮ ➜ Test. The message should reach your handset.
- Do one real event in the other system (a test order) and check Triggered goes up.
- Turn Override Recipient off. You are live.
⚠️ Test sends a real WhatsApp message on a real channel and spends credits. That is what makes it a real test — and exactly why Override Recipient goes on first.
Step 8 — Prove it is working, later
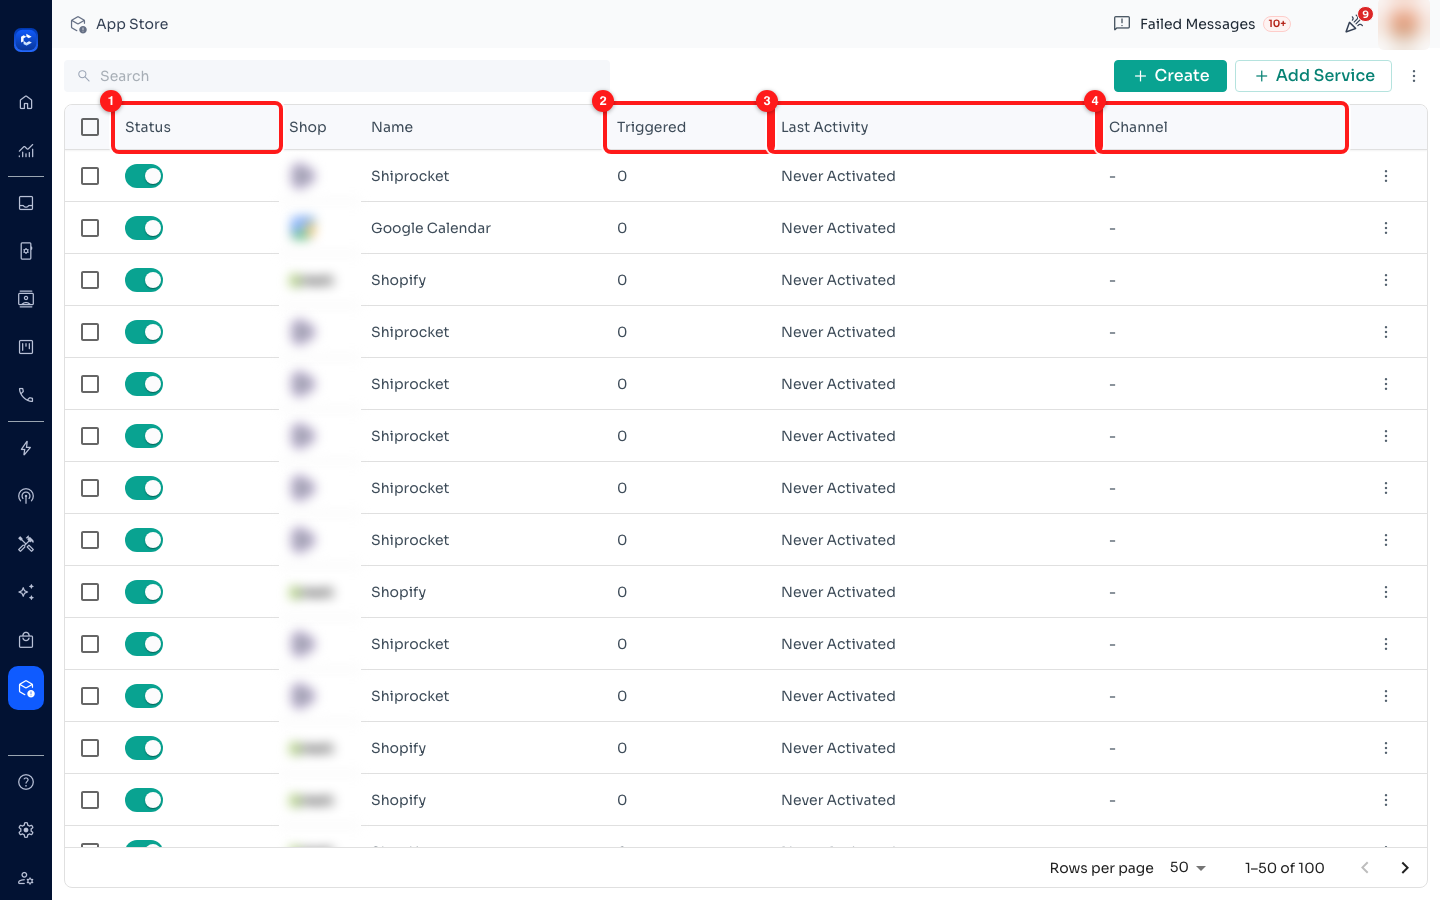
① Status. ② Triggered — your proof of life. ③ Last Activity. ④ Channel. (Shop names blurred.)
- Triggered climbing = the other system is calling ChatDaddy. Stuck at 0 = it is not, and nothing inside ChatDaddy will fix that.
- Last Activity tells you when it last fired.
- Inbox — every message the integration sends sits in the customer's conversation like any other message.
- Failed Messages, top bar — attempted and rejected sends. Look here when Triggered rises but customers say nothing arrived.
- Credits — integration messages are billed like manual ones. A busy shop is a real line on the bill; Notification Limit Settings is the brake.
Four setups worth copying
Online shop — cut "where is my order?"
- Connect Shopify / Woo Commerce / Shopline for the order, and Shiprocket for the shipment if you use it.
- Trigger 1: order paid ➜ a flow that confirms the order and sets expectations on delivery time.
- Trigger 2: shipped ➜ a flow that sends the tracking link. Delay Type: Simple, delay a few minutes so the courier record exists.
- Condition idea: Total above your free-shipping threshold ➜ a different, warmer flow.
Service business — kill no-shows
- Connect Calendly or Booknetic.
- Trigger 1: booking created ➜ confirm immediately.
- Trigger 2: the reminder. Turn on Send Message On Date and point it at the appointment timestamp so the reminder lands relative to the appointment, not to the booking.
Lead capture — answer in minutes, not tomorrow
- Connect Google Form (paste the response sheet) or Paperform.
- Trigger: new response ➜ a flow that greets them by name, answers the obvious first question, and offers a time to talk.
- Keep the delay short. The whole value here is speed.
Payments — recover the failures
- Connect Stripe or Razorpay with a live key.
- Trigger 1: payment succeeded ➜ receipt and next steps.
- Trigger 2: payment failed ➜ a short, non-blaming message with the retry link. This is usually the highest-return trigger in the whole App Store.
- Set Notification Limit Settings on the failure trigger so a retry loop cannot spam one customer.
When the connection itself is the problem
- The app is not in the list → it is not supported here. Use Tools ➜ Zapier or the Webhook app trigger.
- Saved, but the row does not appear → toolbar ⋮ ➜ Reload My Services.
- The panel has no fields and I have nothing to enter → you are on Shopify, Booknetic or WhatsApp Shop. That is correct. Save, then Show Webhook URL.
- It asks for a Chrome extension → Shopline, Shopline Global and Tokopedia connect through the ChatDaddy Chrome helper. You need Chrome; there is no credential to type.
- Credentials rejected → check you used a dedicated API user where the app asks for one (Shiprocket), and check key prefixes:
sk_live_vssk_test_,rzp_live_vsrzp_test_. - Connected, but Triggered stays 0 → the webhook URL has not been pasted into the other system, or was pasted into the wrong field there.
- It worked, then stopped → the credential expired or the password changed. Row ⋮ ➜ Relogin.
- Triggered is rising but nothing sends → Channel unset, or the chosen flow says No starting point set.
- Only some customers get it → Default Country Code unset, and those orders carried local-format numbers.
Quick reference
- Find it — App Store ➜ + Create ➜ search, or filter by category.
- Pattern A (15 apps) — fill the credential form; the placeholder tells you the exact shape.
- Pattern B (Shopline, Shopline Global, Tokopedia) — install the ChatDaddy Chrome helper.
- Pattern C (Shopify, Booknetic, WhatsApp Shop) — no fields; Save, then use the webhook URL.
- Connect the other side — Show Webhook URL ➜ paste into that system ➜ Text Tutorial for the per-app steps.
- Deliver — Channel + Default Country Code in ① Notification Settings.
- Act — ② Triggers ➜ Select A Flow (never one that says No starting point set).
- Test — Override Recipient on ➜ Save ➜ ⋮ ➜ Test ➜ Override Recipient off.
- Verify — Triggered and Last Activity on the App Store list.