
How to Connect Calendly to ChatDaddy and Message Every Booking on WhatsApp
Connect Calendly in the App Store, paste ChatDaddy's webhook URL into Calendly, and let a message flow confirm every booking and every cancellation automatically — the full setup, step by step.
Also searched as: How to Connect Calendly to ChatDaddy and Message Every Booking on WhatsApp, Part 1 — Connect Calendly in ChatDaddy, Step 1. Open the App Store and click + Create, Step 2. Filter to Scheduling / Calendar, Step 3. Pick Calendly, Step 4. Read the built-in checklist (the ⓘ button), Step 5. Create your Calendly Personal Access Token, Step 6. Paste the token into ChatDaddy, Step 7. Save, Part 2 — Tell ChatDaddy how to send, Step 8. Fill in Notification Settings, Step 9. Copy the Webhook URL, Part 3 — Point Calendly at that URL, Step 10. Create the webhook subscription in Calendly, Part 4 — Decide what gets sent
When somebody books a slot in your Calendly, they get an email. That is usually where the conversation stops — and it is why people forget the call, or cancel an hour before it. This integration closes that gap: Calendly tells ChatDaddy the moment a booking is made or cancelled, and ChatDaddy sends that person a WhatsApp message from your own number.
The whole setup takes about ten minutes and touches two places: ChatDaddy → App Store, and your Calendly → Integrations → API & Webhooks page. You will move one value in each direction — a token from Calendly into ChatDaddy, and a webhook URL from ChatDaddy into Calendly.
🧭 The shape of it: Calendly fires an event → ChatDaddy receives it on your private webhook URL → a trigger matches the event → the message flow attached to that trigger sends to the invitee's phone number, from the channel you picked.
Before you start
- A connected messaging channel in ChatDaddy (WhatsApp Business API or WhatsApp Coexistence). Without one, the integration will accept events and send nothing.
- A Calendly account that can create webhook subscriptions. Webhooks live under Integrations → API & Webhooks; if you cannot see Webhook Subscriptions there, your Calendly plan does not include them yet.
- A phone number on the booking. ChatDaddy messages the invitee on WhatsApp, so the invitee has to give you a number when they book — either through a phone-number question on your Calendly event, or by using a Calendly event location that asks for the invitee's phone number. A booking with no number cannot be messaged.
- A message flow to send. ChatDaddy can create two for you (see Step 10), so you do not need to build anything up front.
Part 1 — Connect Calendly in ChatDaddy
Step 1. Open the App Store and click + Create
In the left sidebar, open App Store. This page lists every external service your team has connected, with the number of times each one has Triggered and when it was Last Active. Click + Create to add a new one.
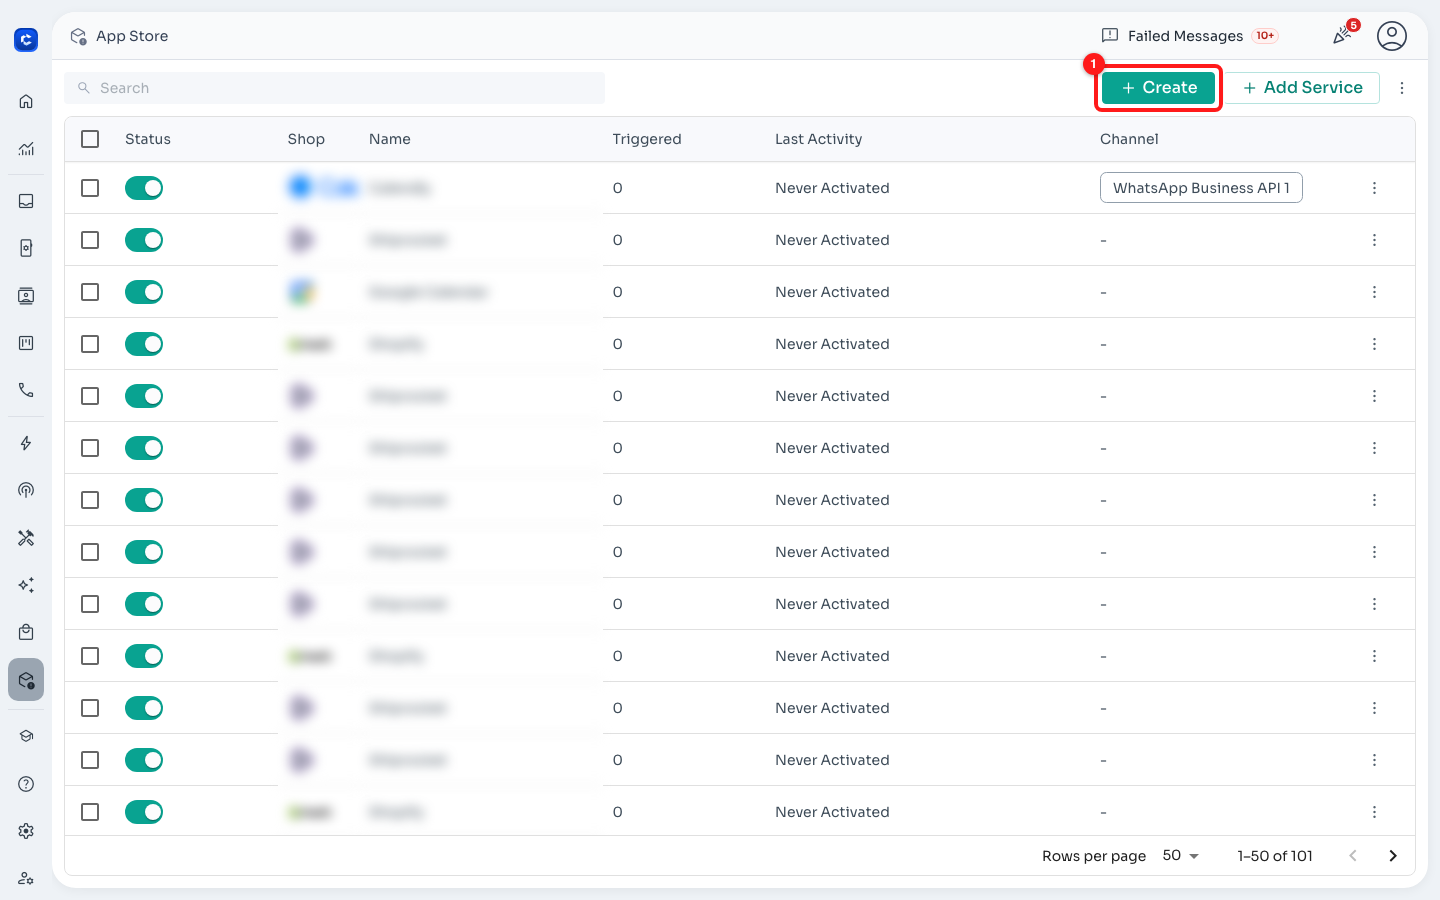
App Store → + Create starts a new connection.
Step 2. Filter to Scheduling / Calendar
Step ① Shop Selection opens with all 21 apps. Click the Scheduling / Calendar category to cut the list down to the three booking tools — Booknetic, Calendly and Google Calendar.
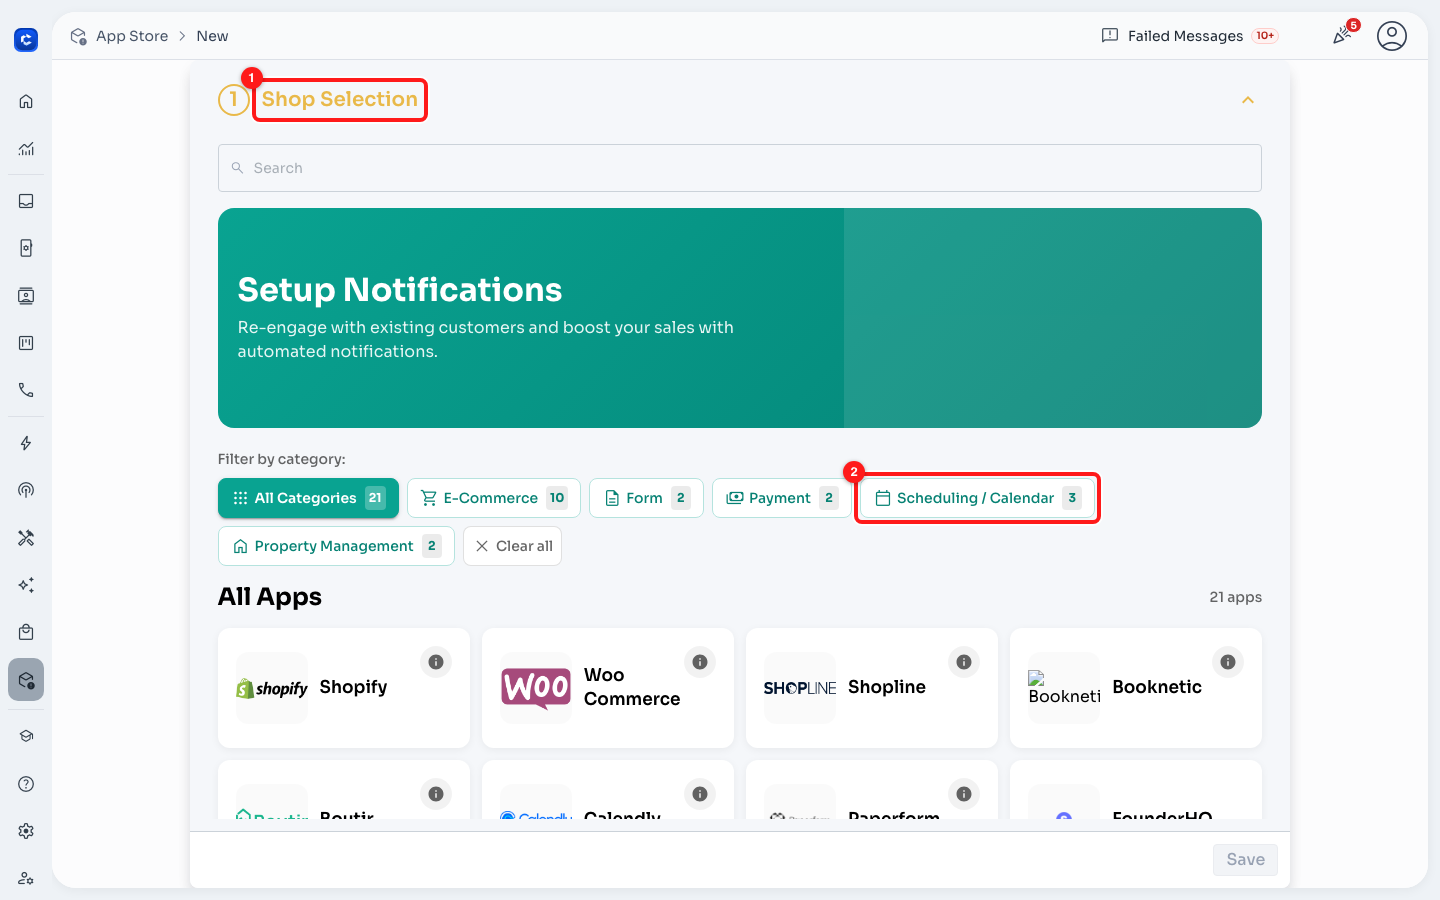
The category row filters the app grid. Scheduling / Calendar holds three apps.
Step 3. Pick Calendly
Click the Calendly card. A tick appears on the card and a configuration panel opens on the right.
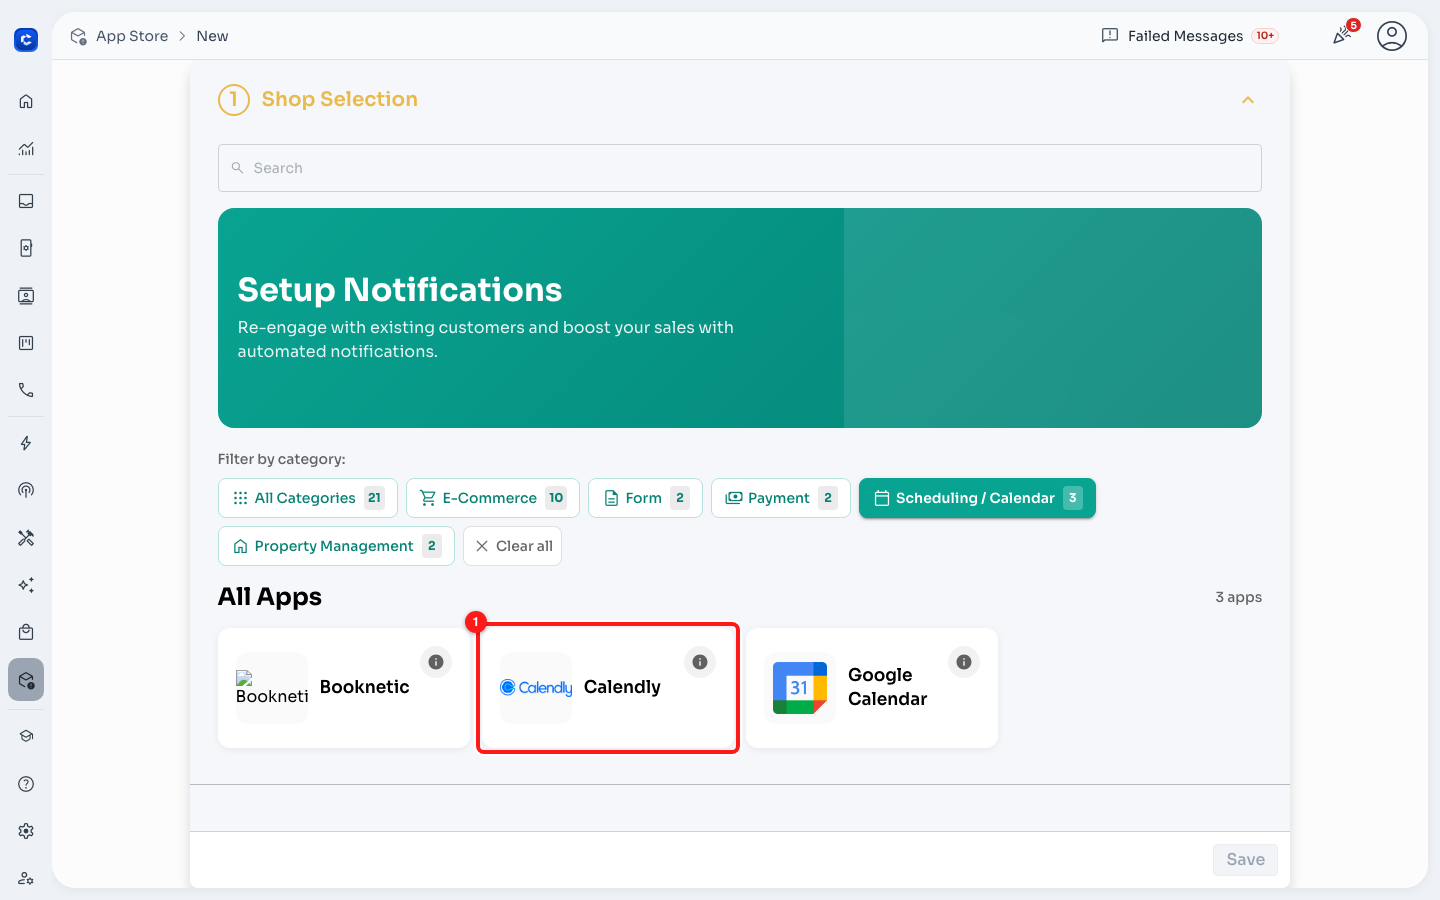
The Calendly card. The small ⓘ in its top-right corner opens the setup checklist.
Step 4. Read the built-in checklist (the ⓘ button)
Every app card carries a small ⓘ button. For Calendly it opens an eleven-step checklist covering both sides of the setup — the token, and the webhook you will create later. It is the fastest answer to "where do I get this value", and it is easy to miss.
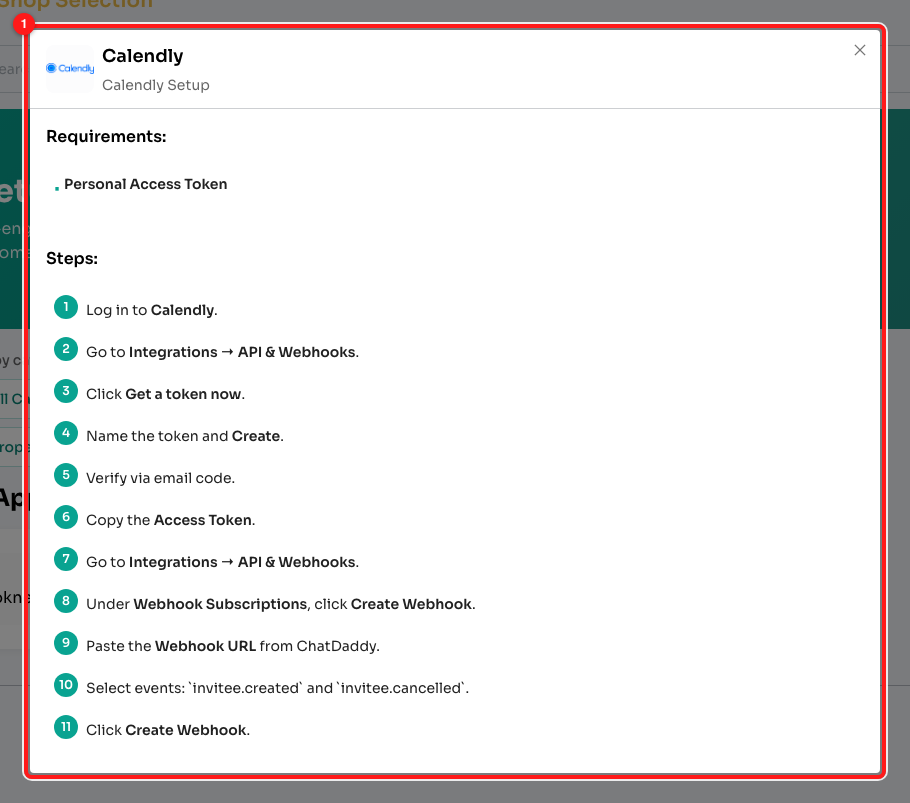
Calendly ⓘ → the full setup checklist, requirements at the top and all eleven steps below.
Close the checklist to return to the app grid.
Step 5. Create your Calendly Personal Access Token
Leave ChatDaddy open in one tab and go to Calendly in another:
- Log in to Calendly.
- Go to Integrations → API & Webhooks (calendly.com/integrations/api_webhooks).
- Under Personal Access Tokens, click Get a token now.
- Give the token a name you will recognise later —
ChatDaddyworks — and click Create. - Calendly emails you a verification code. Enter it.
- Copy the Access Token. Calendly shows it once and never again, so paste it straight into ChatDaddy in the next step. If you lose it, delete the token in Calendly and create a new one.
🔒 A Personal Access Token acts as you. Anyone holding it can read and change your Calendly account, so never paste it into a chat, a ticket or a screenshot.
Step 6. Paste the token into ChatDaddy
Back on the Calendly panel, paste the token into Access Token. The field's placeholder repeats where the value comes from.
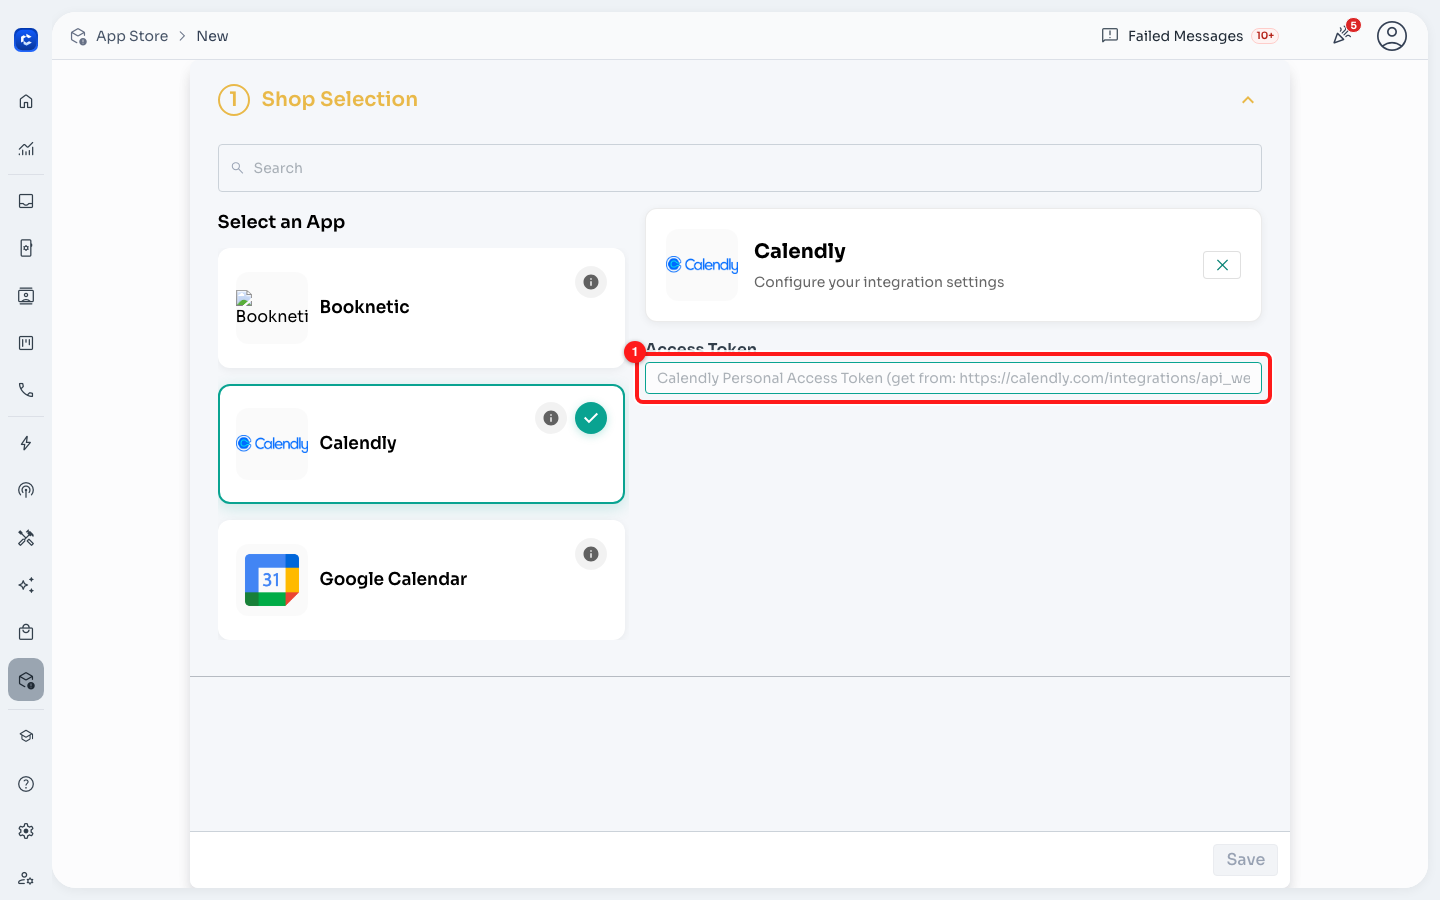
One field, one value: the Calendly Personal Access Token.
Step 7. Save
Save stays greyed out until the token field has something in it. Click it, and ChatDaddy checks the token with Calendly before creating the connection.
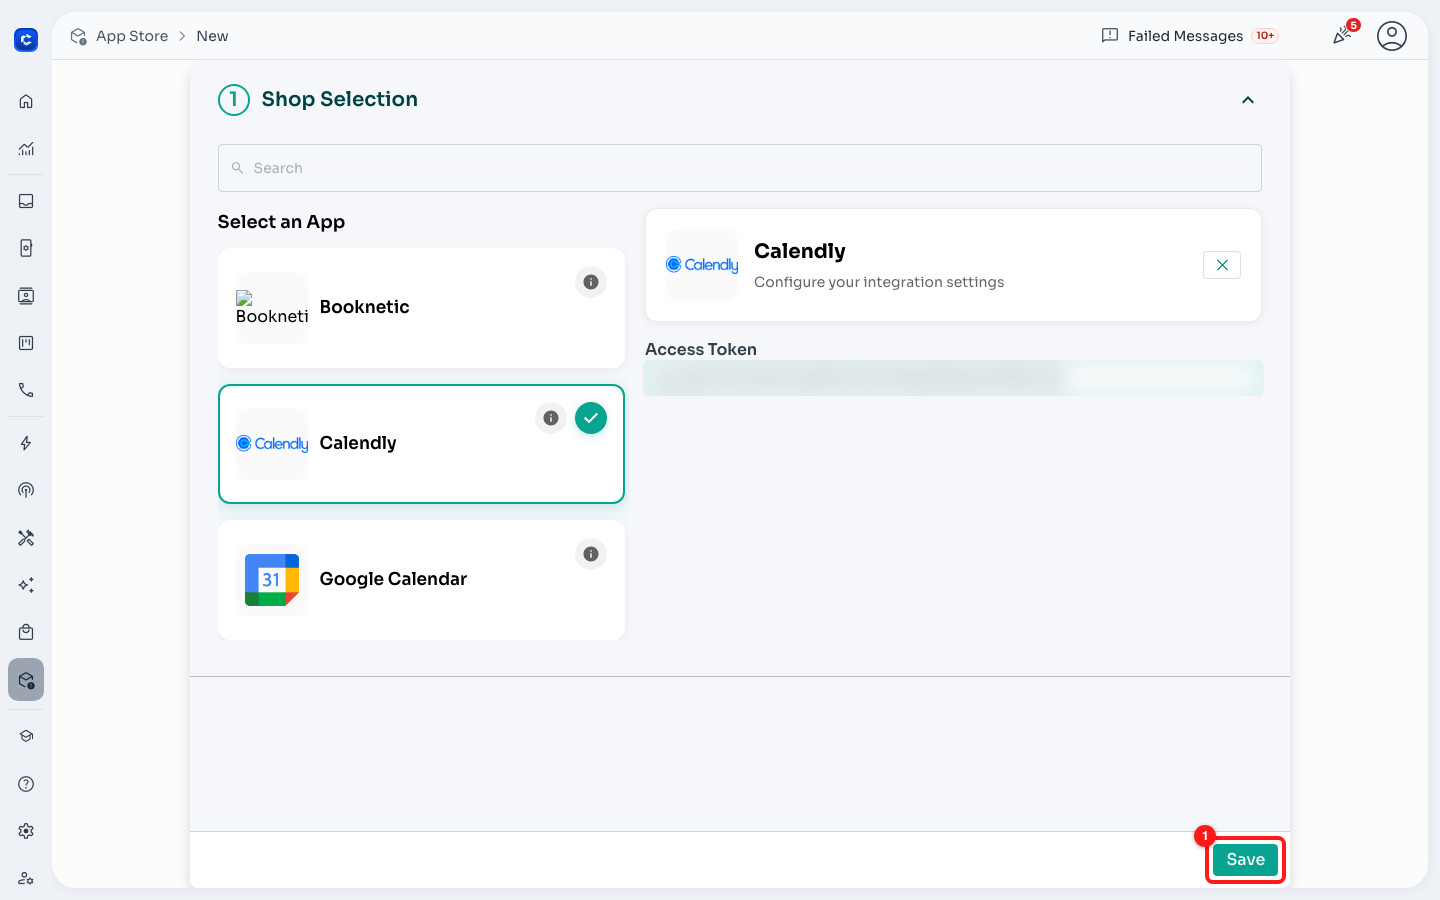
Save sits at the bottom right of the wizard. (The token is blurred here.)
⚠️ "Invalid credentials provided" means the token was rejected — it is mistyped, truncated, expired, or it was deleted in Calendly. Copy it again from Integrations → API & Webhooks and retry; nothing else on this screen causes that error.
Part 2 — Tell ChatDaddy how to send
Saving turns the one-step wizard into the real editor, which now has two sections: ① Notification Settings and ② Triggers.
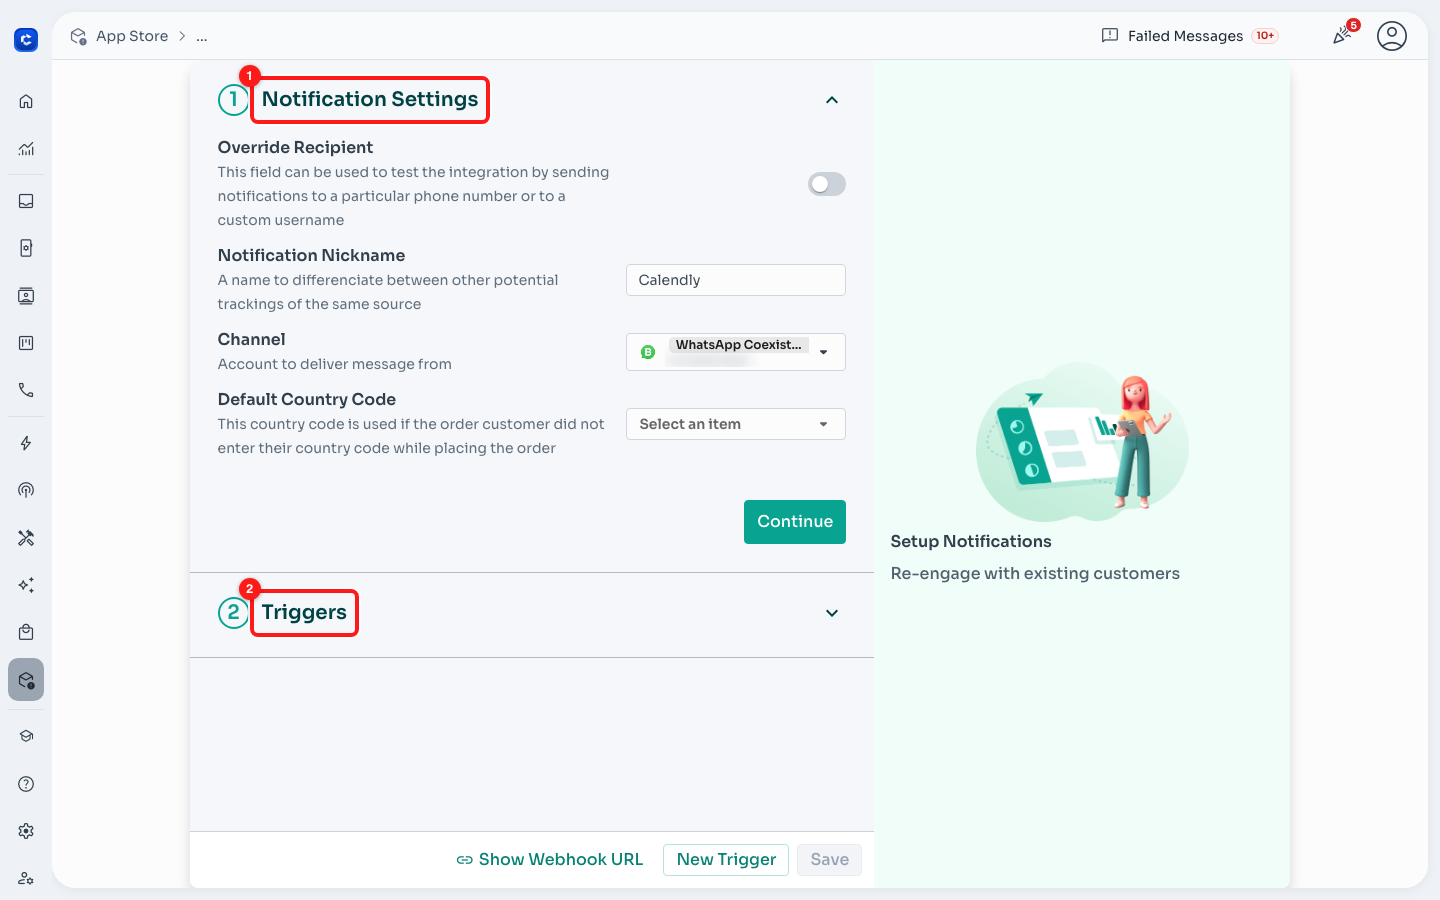
After saving: section ① holds the delivery settings, section ② the triggers.
Step 8. Fill in Notification Settings
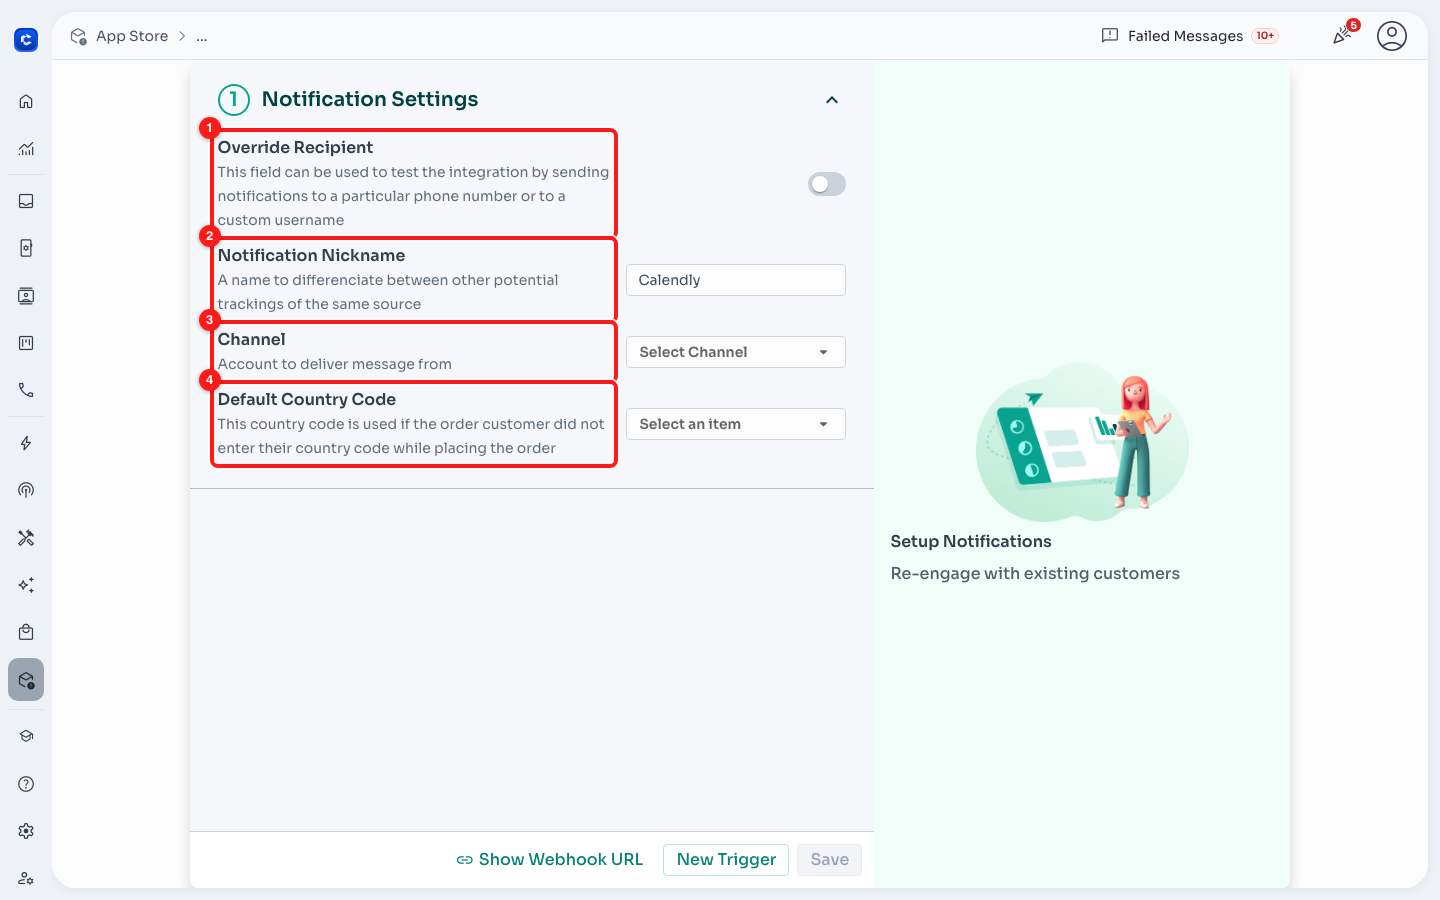
The four settings that decide how — and to whom — messages go out.
- Override Recipient — a test switch. Turn it on and every notification from this connection goes to one phone number or username you type, instead of to the invitee. Useful while you are setting up; turn it off before you go live or your customers will never receive anything.
- Notification Nickname — the name this connection shows under in the App Store list. Defaults to Calendly. Rename it if you will connect more than one Calendly account.
- Channel — the account the message is sent from. This is the one people forget. A connection left on the empty value shows a dash in the Channel column of the list, and it will never send anything, no matter how many events Calendly delivers.
- Default Country Code — used when the invitee types a local-format number with no country code. Set it to the country most of your bookings come from. Without it, a number typed without its country code cannot be resolved into a WhatsApp contact and the message is dropped.
Click Continue when the four are set.
Step 9. Copy the Webhook URL
At the bottom of the editor, click Show Webhook URL.
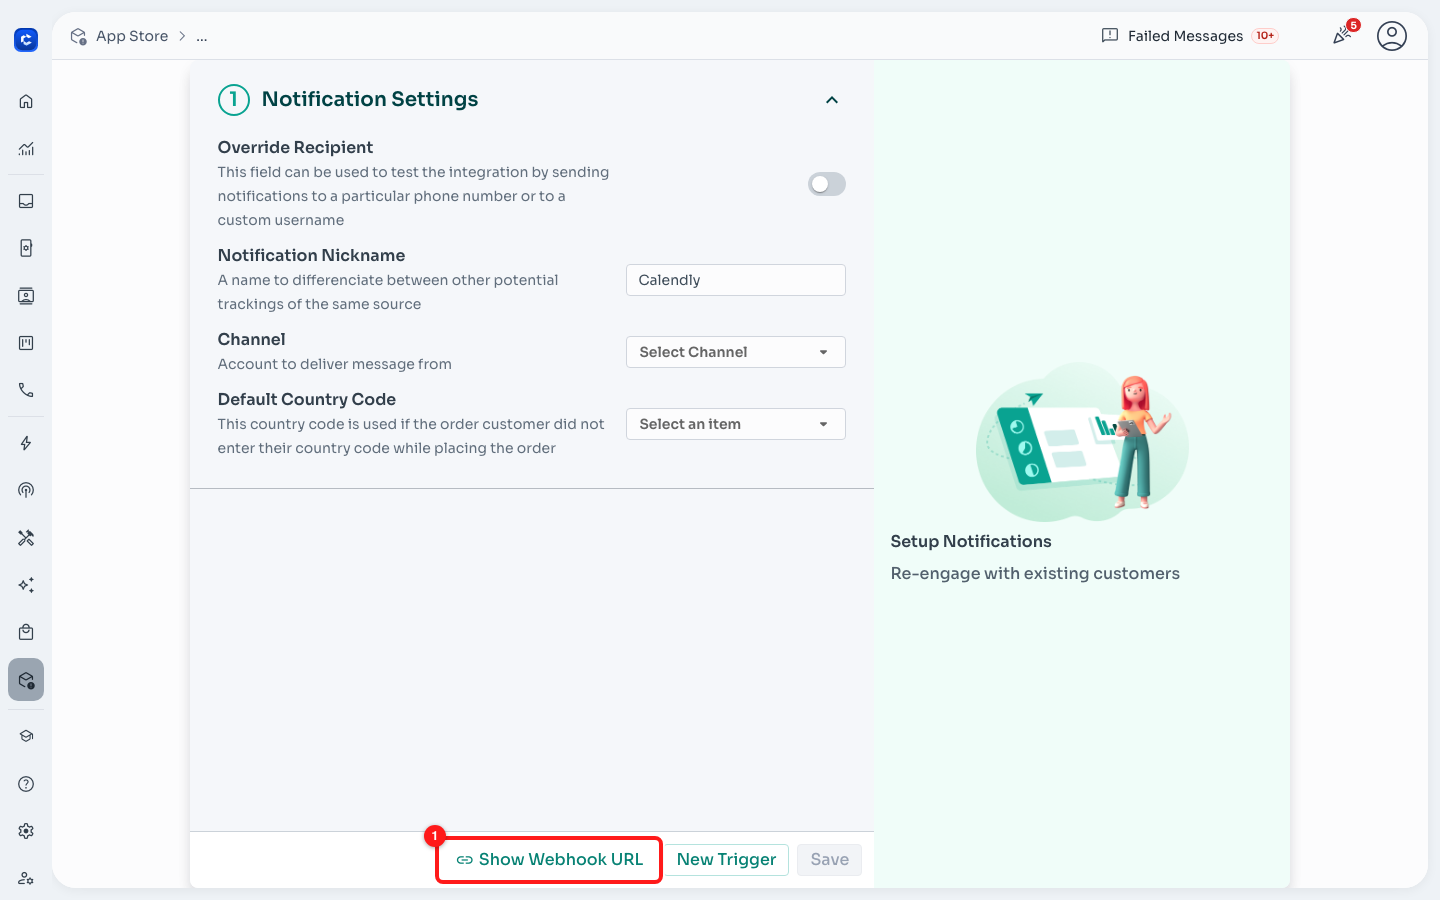
Show Webhook URL appears only after the connection has been saved.
Copy the URL with the clipboard button on the right.

The webhook URL (blurred here). Copy it with the button on the right.
🔑 This URL contains a secret unique to this connection — treat it like a password. It cannot be regenerated: if it leaks, delete the connection and create a new one. Paste it only into Calendly.
Part 3 — Point Calendly at that URL
Step 10. Create the webhook subscription in Calendly
- In Calendly, go back to Integrations → API & Webhooks.
- Under Webhook Subscriptions, click Create Webhook.
- Paste the Webhook URL you copied from ChatDaddy.
- Tick the events
invitee.createdandinvitee.cancelled. These are the two ChatDaddy understands; anything else is ignored. - Choose the scope (your user, or the whole organisation — pick the organisation if bookings arrive on more than one team member's calendar), then click Create Webhook.
💡 The connection is now two-way: the token lets ChatDaddy read your Calendly, and the webhook lets Calendly push bookings to ChatDaddy. Miss the webhook and nothing ever arrives — the connection will simply sit at Never Activated.
Part 4 — Decide what gets sent
Step 11. Add the two default triggers
Back in ChatDaddy, click New Trigger at the bottom of the editor. It opens two choices.
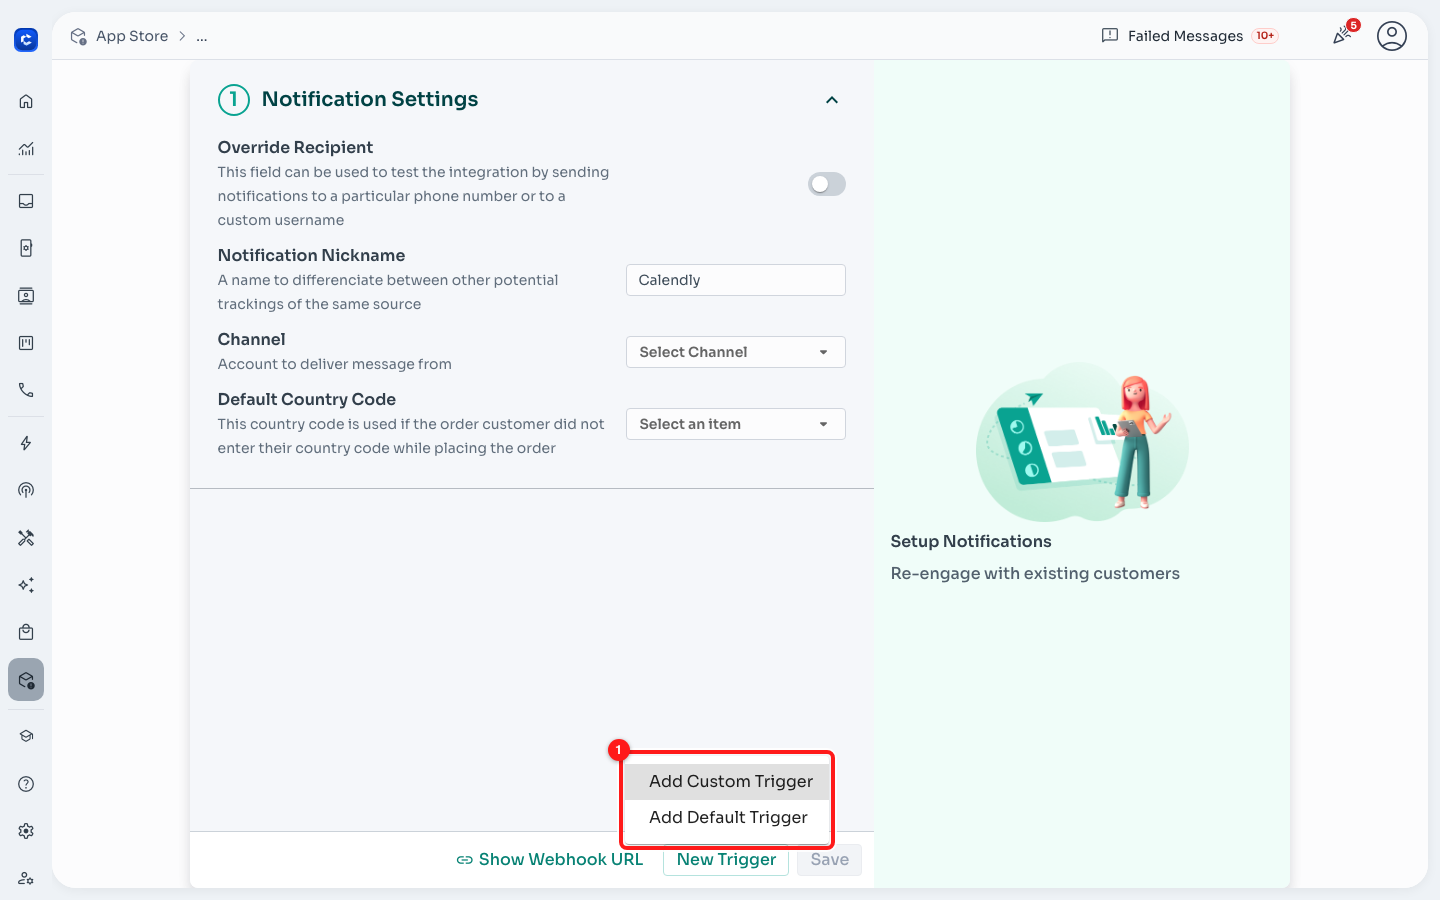
Add Custom Trigger builds one from scratch; Add Default Trigger uses ChatDaddy's ready-made Calendly pair.
Choose Add Default Trigger. Pick your language, tick 📅 New Appointment Booked and ❌ Appointment Cancelled, and click Confirm. ChatDaddy creates both triggers and the message flows behind them, already wired to the right Calendly events.
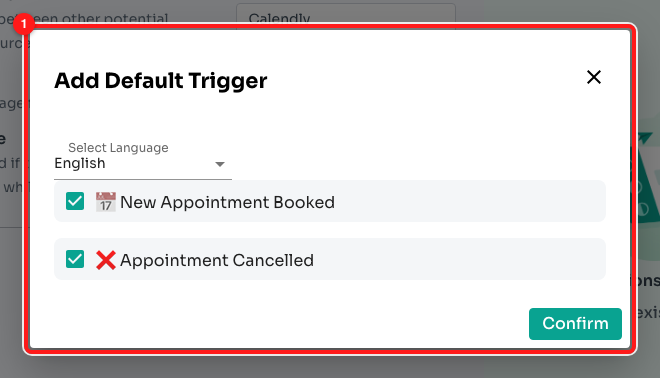
The two ready-made Calendly triggers. English, 中文(繁體) and 中文(简体) are available.
Step 12. Check each trigger
Section ② Triggers now lists them. The toggle on each row switches that trigger on and off; the ⋮ holds Test and Delete.
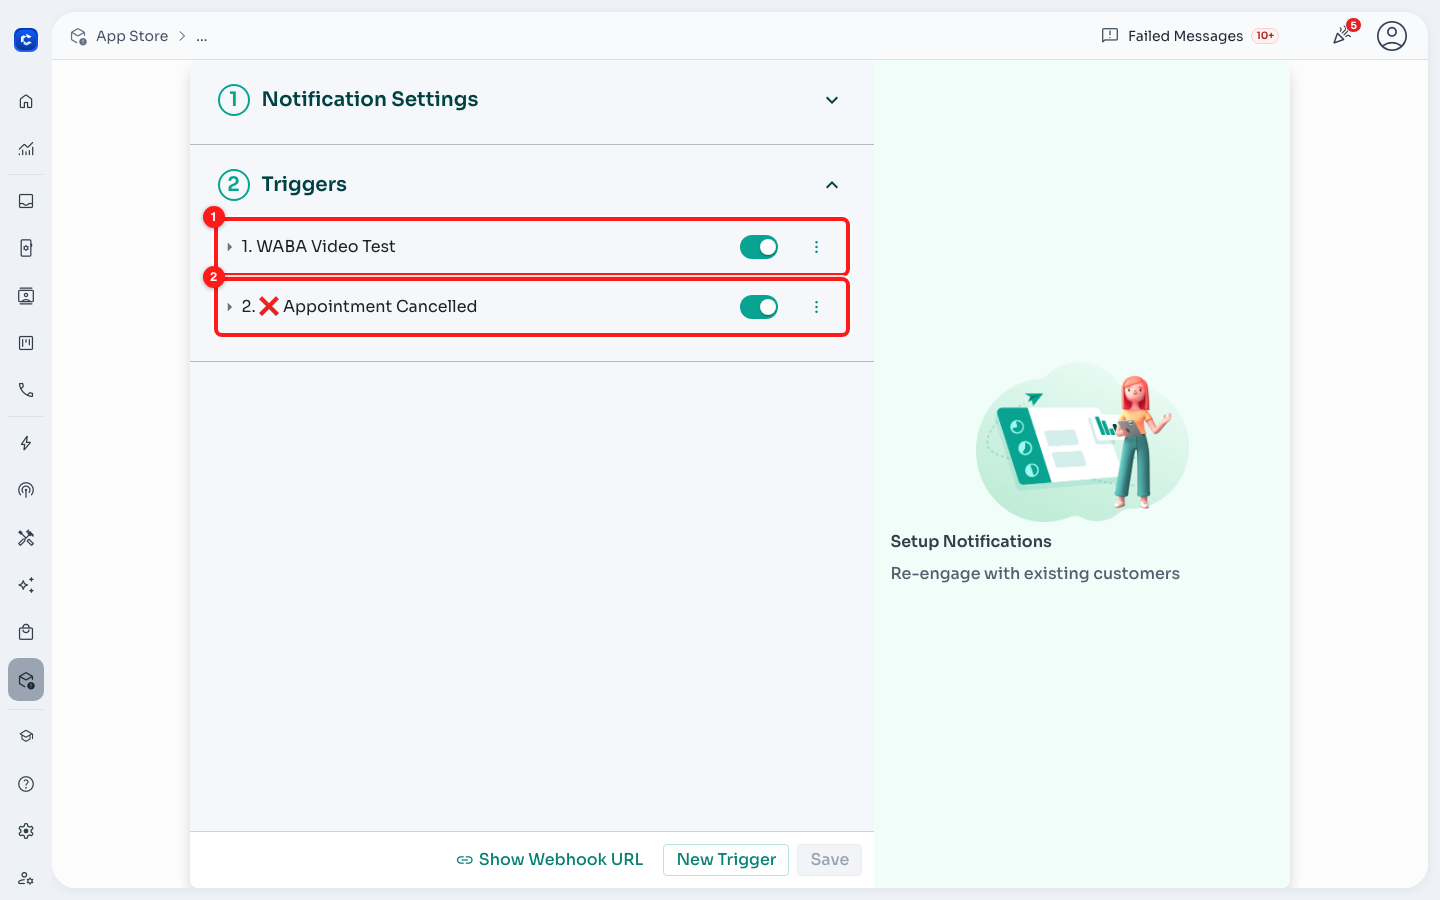
One row per trigger. Both must be toggled on to fire.
Click the little arrow on the left of a row to open it. Two things matter here: which Message Flow it sends, and the condition that decides when it fires.
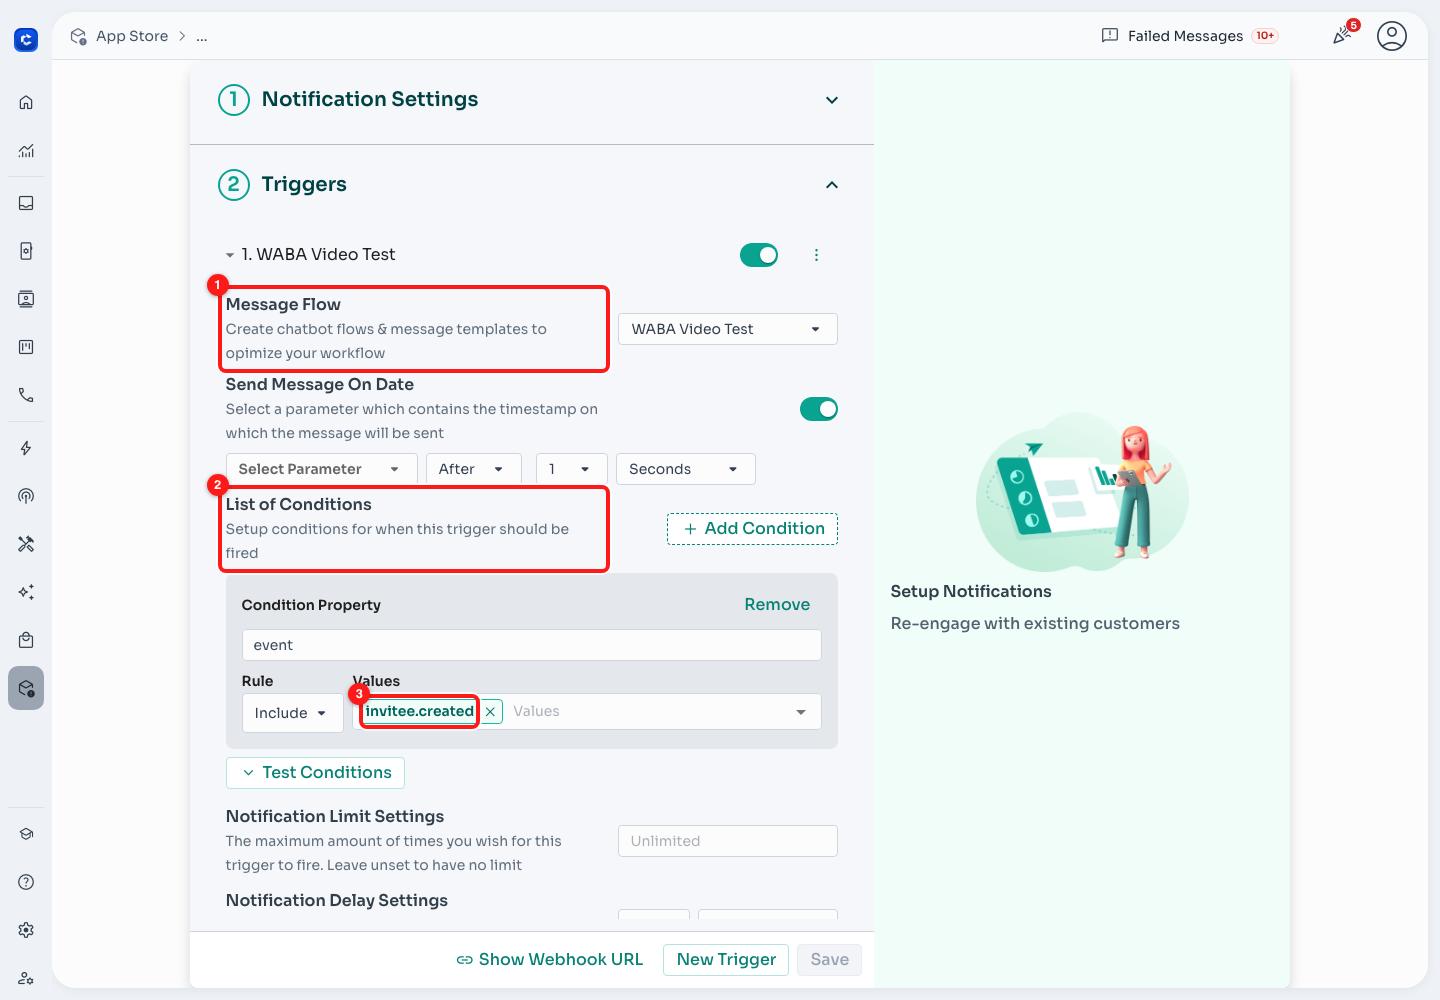
The booking trigger: it sends the chosen flow whenever the Calendly event is invitee.created.
- Message Flow — the message that goes out. Open the dropdown to swap it for one of your own.
- List of Conditions —
eventIncludeinvitee.createdfor the booking trigger,invitee.cancelledfor the cancellation one. Leave these alone unless you know what you are changing: an empty condition list makes the trigger fire on both events, and your invitees get a booking confirmation when they cancel. - Send Message On Date — off by default. Turn it on to schedule the message relative to a timestamp in the event rather than sending it immediately (for example, a reminder a day before the appointment).
Step 13. Swap in your own message flow (optional)
The Message Flow dropdown lists every flow on your team, newest first, with a search box at the top.
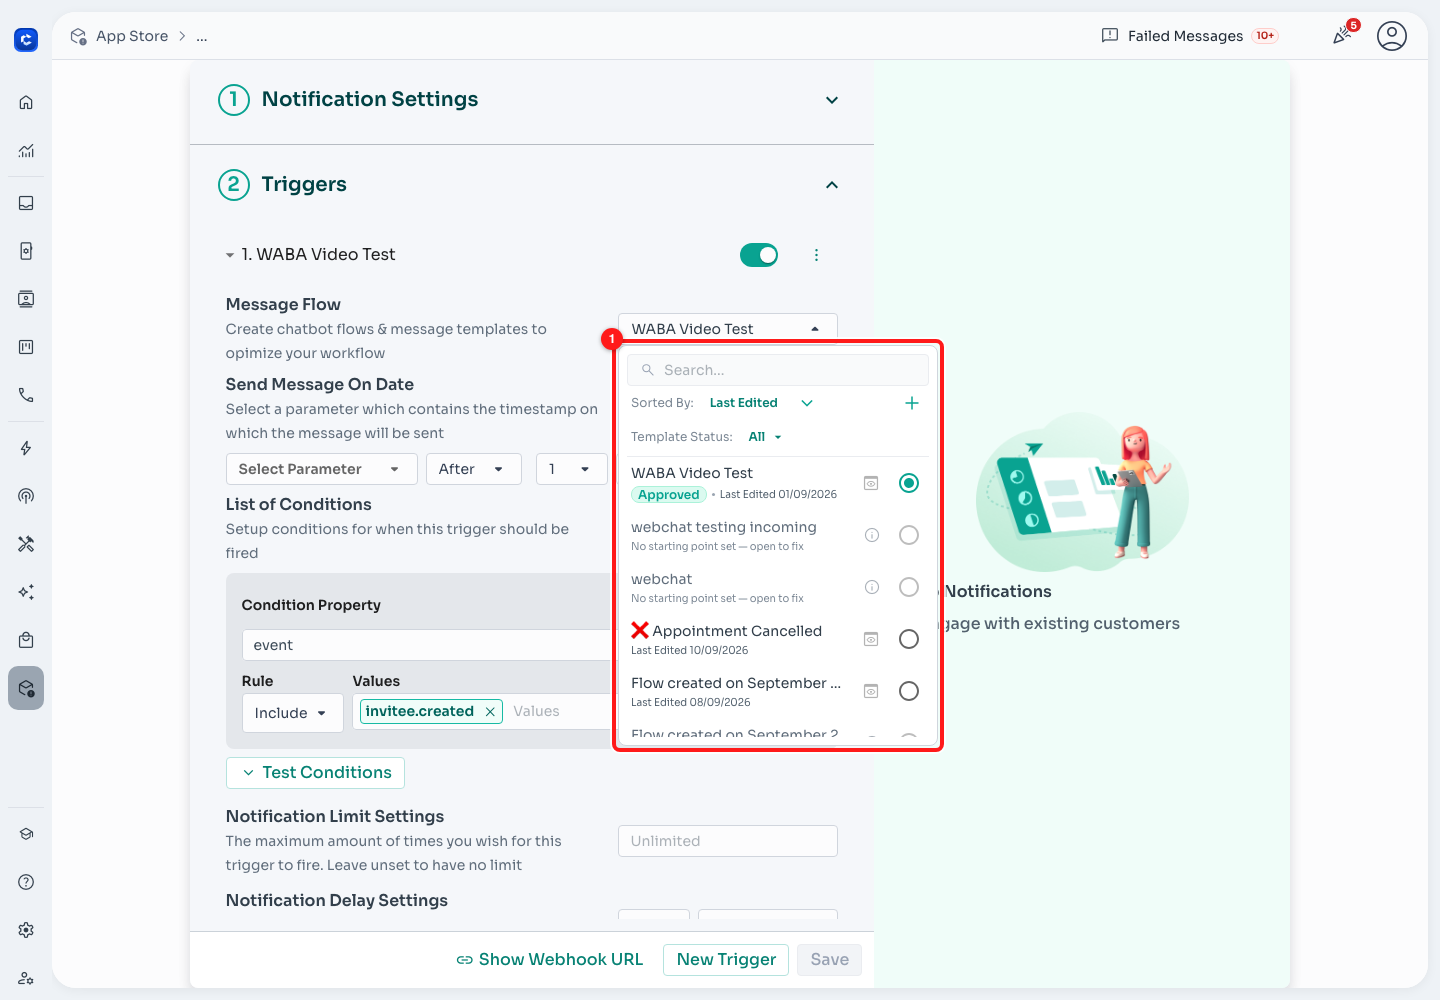
The flow picker. Note the grey subtitles — they are a warning, see below.
🚩 A flow whose subtitle reads "No starting point set — open to fix" can still be selected, and it will still count as Triggered — but it sends nothing. If a trigger fires and no message arrives, this is the first thing to check.
Step 14. Limits, delay and delay type
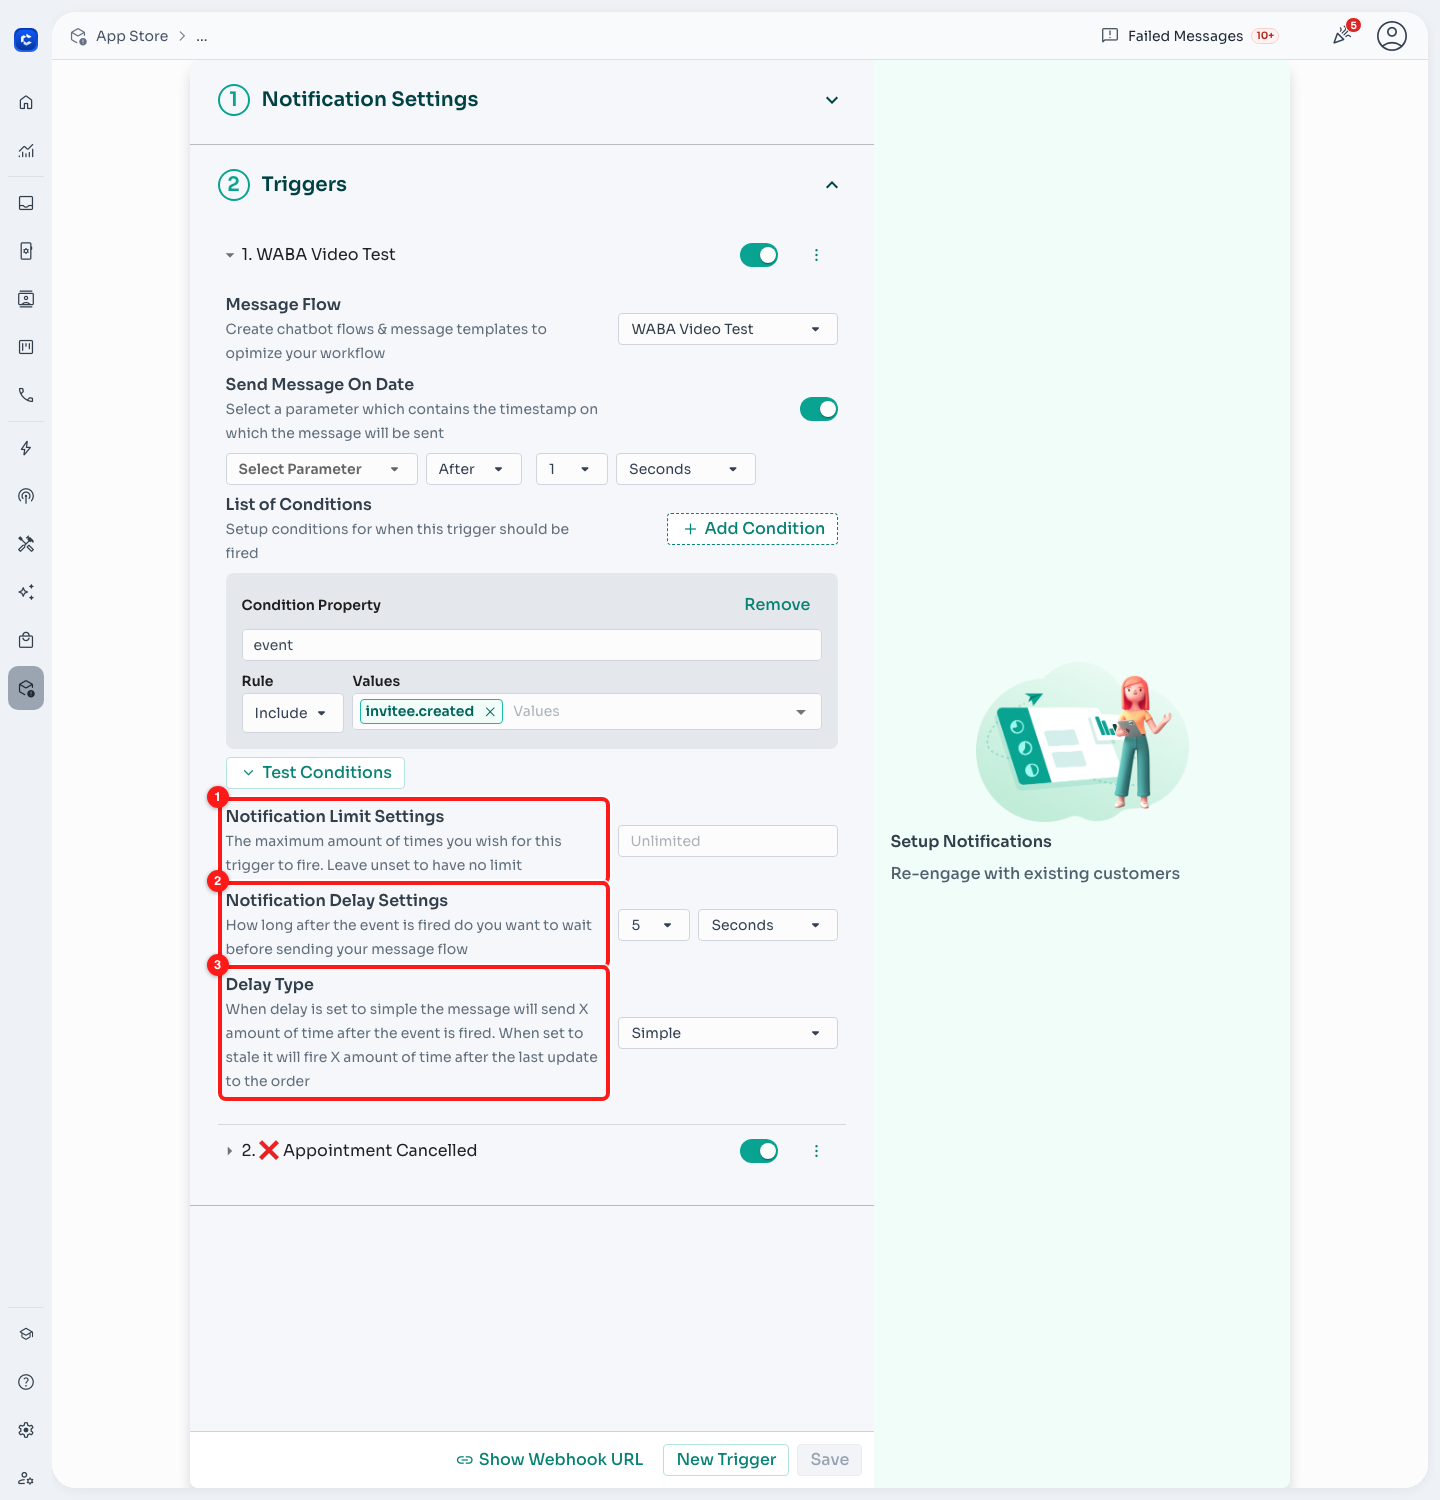
The three settings below the conditions.
- Notification Limit Settings — the maximum number of times this trigger may ever fire. Leave it empty for unlimited.
- Notification Delay Settings — how long to wait after the event before sending. The default is 5 seconds, which is right for a booking confirmation.
- Delay Type — Simple counts from the moment the event fires. Stale restarts the clock every time the booking is updated, so a guest who reschedules twice only gets one message, after they stop fiddling.
Click Save when you are done. Save stays greyed out until something has actually changed — if it is grey, your work is already saved.
Part 5 — Test it and go live
Step 15. Send yourself a test message
Open the ⋮ on a trigger row and choose Test.
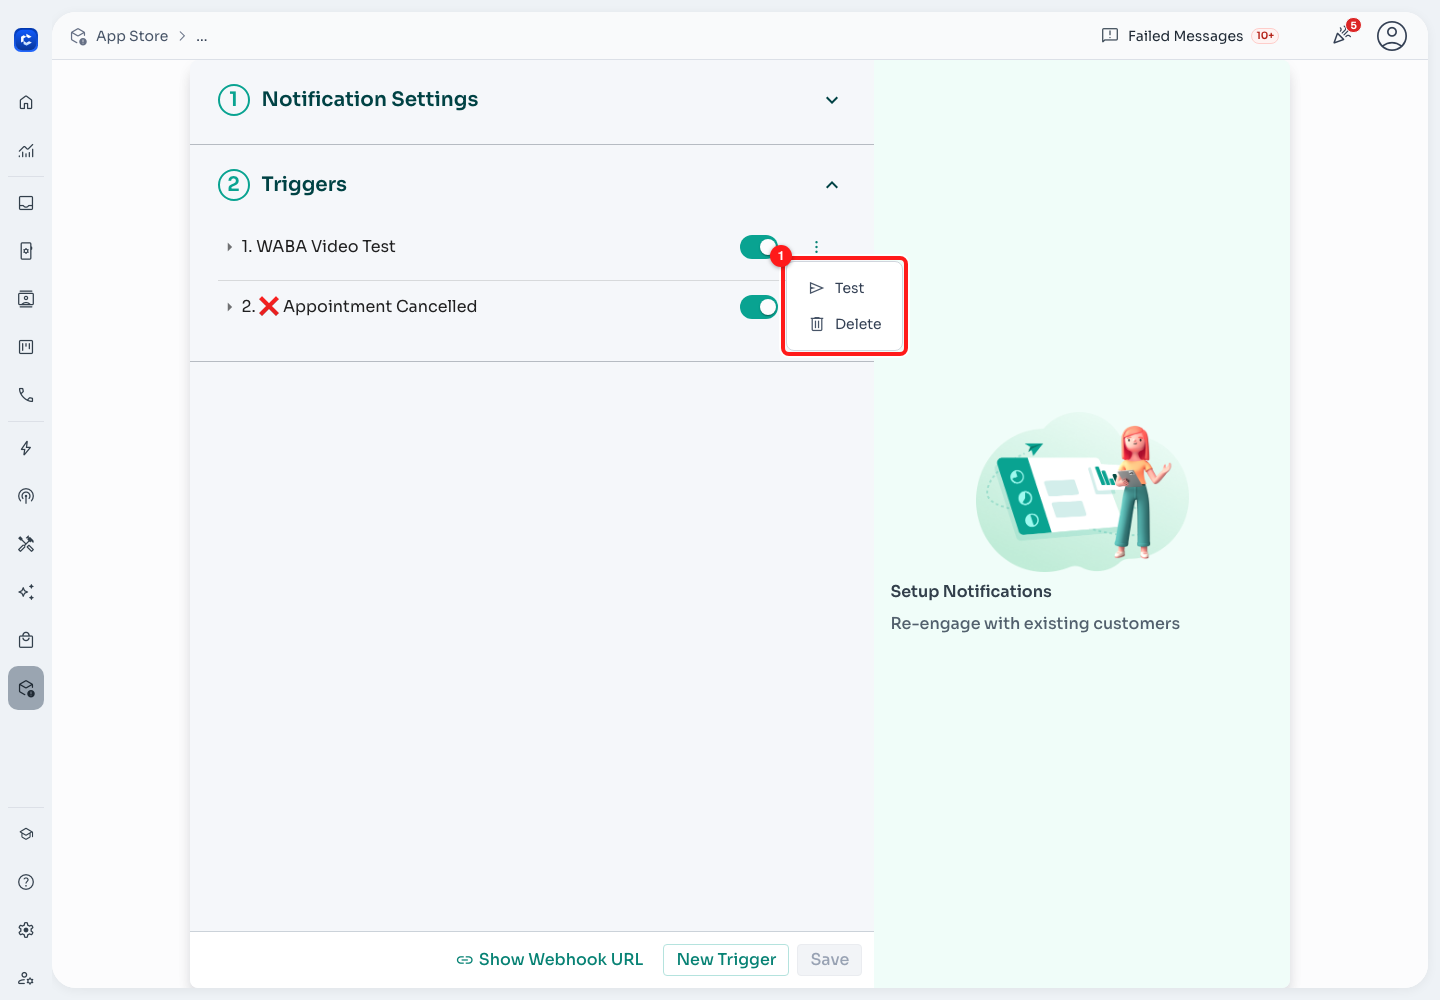
Test sends the trigger's flow to a number you choose. Delete removes the trigger.
Type your own number and click Test. The message is sent through the channel you picked in Step 8, so this checks the whole delivery path in one click — channel, template and phone-number formatting.
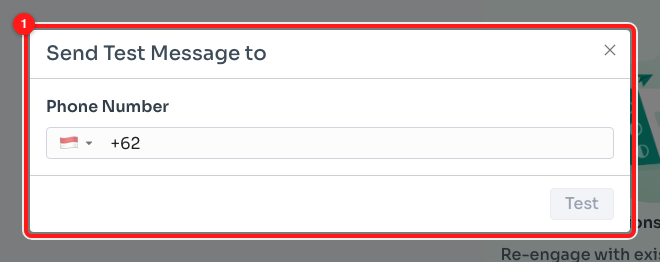
Send Test Message to — pick the country and enter your number.
✅ A test proves ChatDaddy can send. It does not prove Calendly can reach ChatDaddy. For that, book a real slot on your own Calendly link, with a phone number, and watch the Triggered count go up.
Step 16. Confirm it on the App Store list
Go back to App Store. A healthy Calendly connection has the Status toggle on, a real Channel — not a dash — and, after your first booking, a Triggered count above zero with a recent Last Activity.
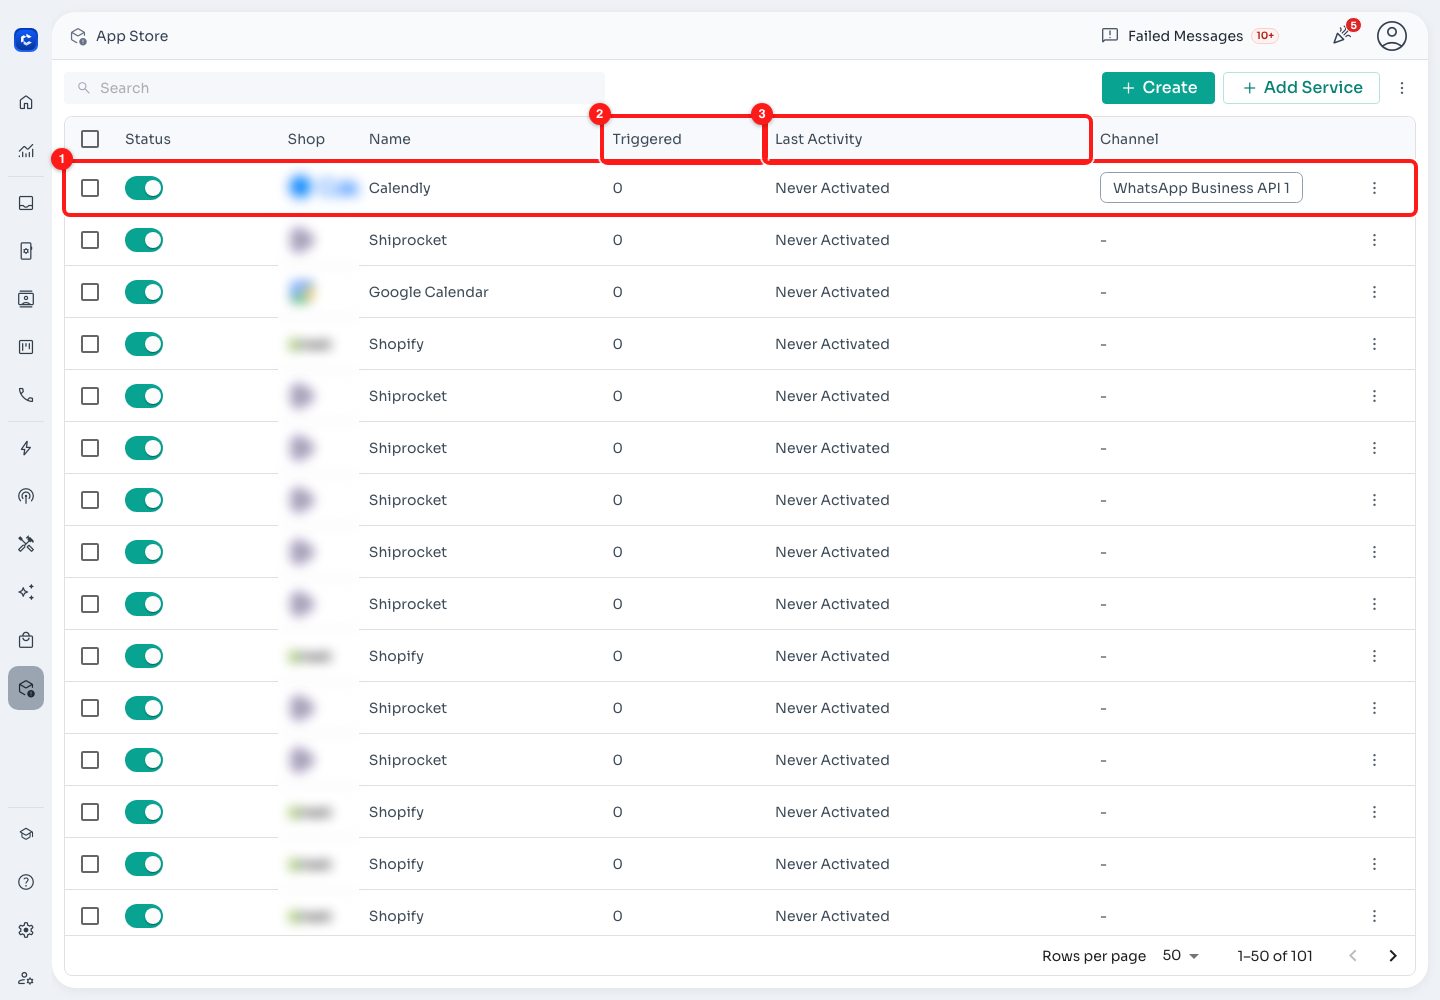
A connected Calendly row. Triggered still reads 0 and Last Activity "Never Activated" until the first real booking arrives.
What the message can say
The two ready-made flows already use Calendly's own details. The same placeholders work in any flow you write yourself:
{{inviteeName}}— the person who booked{{eventName}}— the name of the Calendly event type{{eventStartTime}}— the start date and time{{eventDuration}}— the length, in minutes{{eventLocation}}— the meeting location or link{{cancellationUrl}}— the reschedule / cancel link (booking messages){{cancellationReason}}— the reason given, if any (cancellation messages)
Troubleshooting
"Invalid credentials provided" when I click Save
Calendly rejected the token. Copy it again from Integrations → API & Webhooks — tokens are long and easy to truncate — and check it has not been deleted or revoked in Calendly. Nothing else on that screen produces this message.
The connection shows "Never Activated" after a real booking
Calendly is not reaching ChatDaddy. Check the webhook subscription still exists in Calendly, that its URL matches the one under Show Webhook URL exactly, and that invitee.created and invitee.cancelled are ticked. A webhook created against the wrong scope (your user instead of the organisation) will miss bookings made on a colleague's calendar.
Triggered goes up but no message arrives
Three usual causes, in order of how often they happen: the Channel field is empty (a dash in the App Store list); the selected message flow reads "No starting point set — open to fix"; or the booking carried no usable phone number — either the invitee never gave one, or they typed a local-format number and Default Country Code is unset.
Invitees get the wrong message when they cancel
Open the trigger and check its condition. Each trigger should have exactly one condition: event Include invitee.created, or event Include invitee.cancelled. A trigger with no conditions fires on every Calendly event.
People who reschedule get several messages
Set Delay Type to Stale on the booking trigger. The delay then restarts on every update, so only the final state is announced. You can also cap the trigger with Notification Limit Settings.
I need to change the token later
Open the row's ⋮ in the App Store list and choose Edit to update the credentials. The webhook URL does not change, so you do not need to touch Calendly.
What to do next
- Edit the two generated flows to match your tone, and add a reminder flow the day before the appointment using Send Message On Date.
- Turn Override Recipient off once you are finished testing.
- Connect a second Calendly account the same way if different team members own different booking pages — give each connection its own Notification Nickname.