
How to Manage Channel Settings (and the Danger Zone)
Every channel has its own settings screen: history syncing, auto-assign rules, transcription, privacy and a red Danger Zone. Learn what each section controls, which settings your channel type shows, and what the two Danger Zone actions really do.
Also searched as: How to Manage Channel Settings (and the Danger Zone), Open the channel’s settings, Check you are on the right channel, and rename it if you need to, Set how history syncs and who picks up new chats, Turn on the automation and privacy options you want, Open Advanced Settings only if you need them, Treat the Danger Zone with care, Why does my channel show fewer sections?, Manage, Channel, Settings, Danger, Zone
Each channel you connect to ChatDaddy — a WhatsApp number, a WhatsApp Business API account, a Messenger page, an Instagram account, e-mail — has its own settings screen called Manage Channel Settings. It is where you rename the channel, decide how much chat history is pulled in, choose who new chats go to, and switch features such as voice-message transcription on or off.
The settings are grouped into collapsible sections so the screen stays readable, and the two actions that destroy data are kept apart in a red Danger Zone that starts closed.
💾 There is no Save button. Every change is saved the moment you make it, and it applies to that one channel only — not to your whole team.
Before you start
- You reach this screen from Manage Channels in the left sidebar.
- The sections you see depend on the channel type. A WhatsApp number connected by QR code shows the most; e-mail and SMS channels show the fewest.
- A few WhatsApp settings can only be changed while the channel is disconnected — they appear greyed out with the note “Disconnect channel first to change this setting”.
Step-by-step
Step 1 — Open the channel’s settings
Go to Manage Channels, find the channel in the list, and click the three-dot menu at the end of its row. Choose Settings. Clicking anywhere else on the row opens the same screen, so either way works.
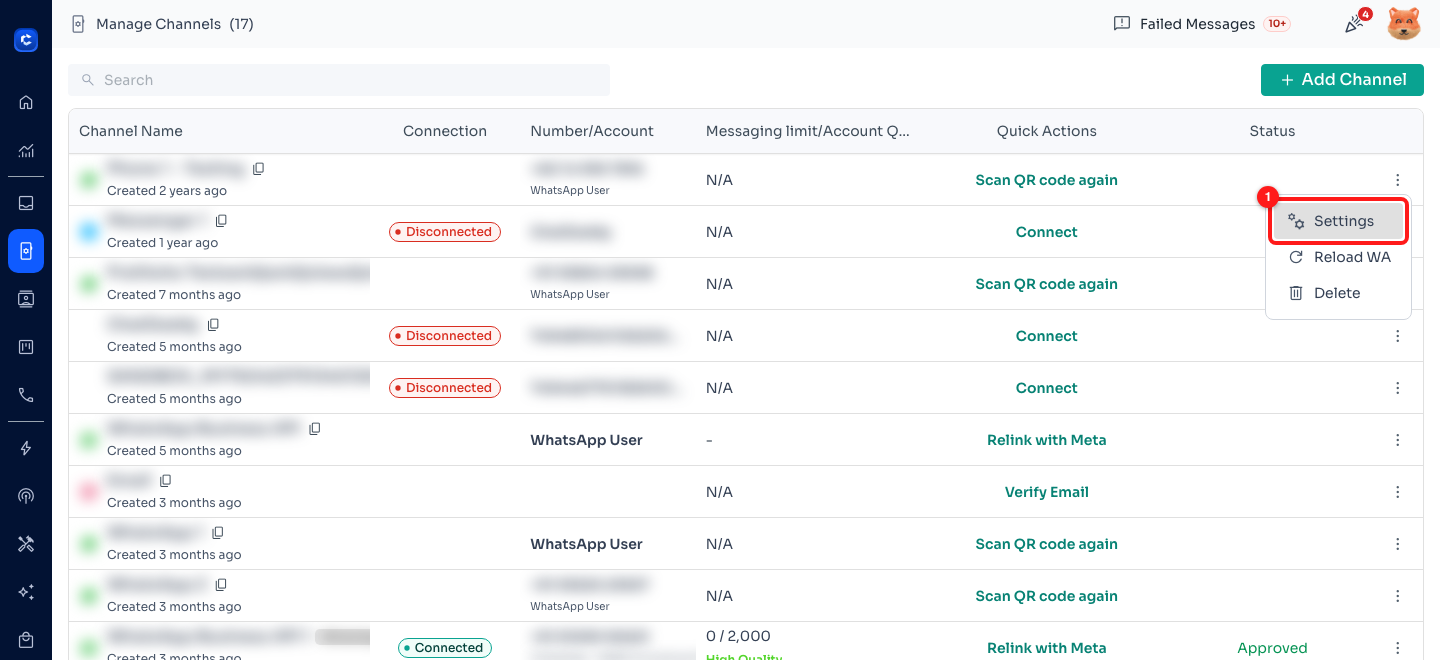
Step 1 — the three-dot menu on a channel row, with Settings at the top (1).
Step 2 — Check you are on the right channel, and rename it if you need to
The header of the dialog shows the channel’s nickname with a small pencil next to it, and the Channel ID with a copy button. Click the pencil to rename the channel — the new name is saved as soon as you finish typing, and an empty name is ignored. Use the copy button when support asks you which channel a problem is on; the Channel ID identifies it exactly.
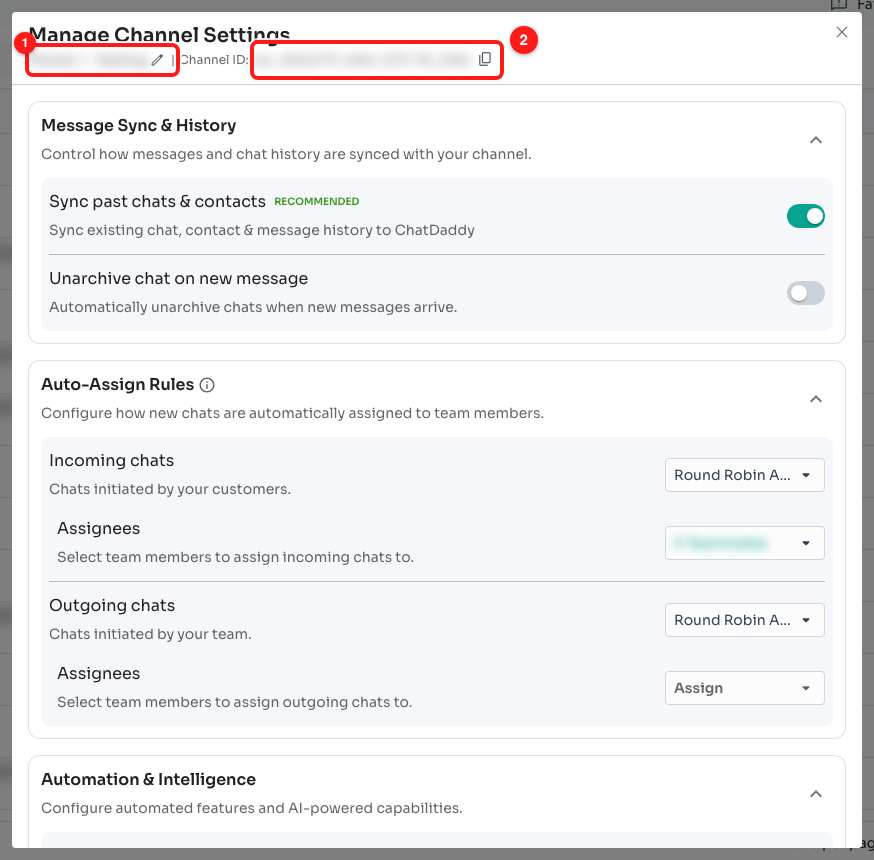
Step 2 — the channel nickname and its pencil (1), and the Channel ID with its copy button (2). Both are blurred here because they are specific to one account.
Step 3 — Set how history syncs and who picks up new chats
The first two sections cover what arrives and where it goes.
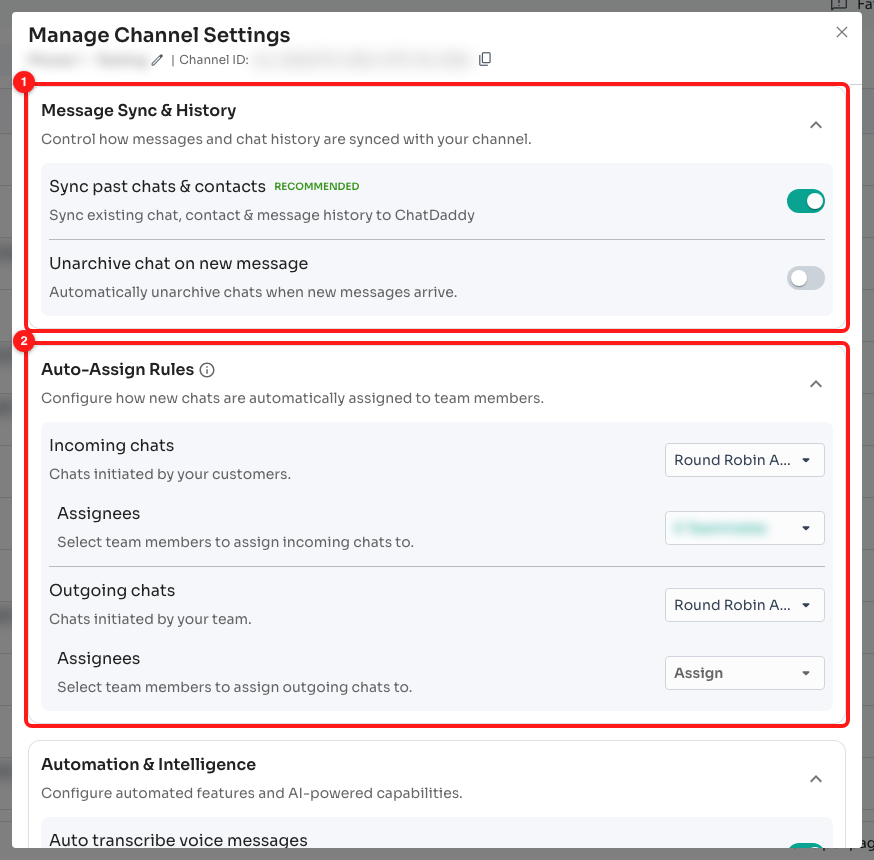
Step 3 — Message Sync & History (1) and Auto-Assign Rules (2).
- Sync past chats & contacts — pulls your existing chats, contacts and message history into ChatDaddy. It is marked Recommended and is on by default. Switching it off asks you to confirm, because from then on you only see messages sent or received after the channel was connected.
- Unarchive chat on new message — brings an archived chat back into the inbox when the customer writes again. Off by default.
- Incoming chats / Outgoing chats — choose Disabled, Smart Assign or Round Robin Assign for chats your customers start and for chats your team starts. Smart Assign gives the chat to whoever currently has the fewest; Round Robin Assign shares them out in turn.
- Assignees — appears only once you pick Smart or Round Robin. Choose which team members are in the rota; leave it empty and nobody is assigned.
ℹ️ Message Sync & History only appears on WhatsApp channels connected by QR code. On other channel types the screen starts at Auto-Assign Rules.
Step 4 — Turn on the automation and privacy options you want
The middle two sections hold the day-to-day conveniences and the data-retention choices.
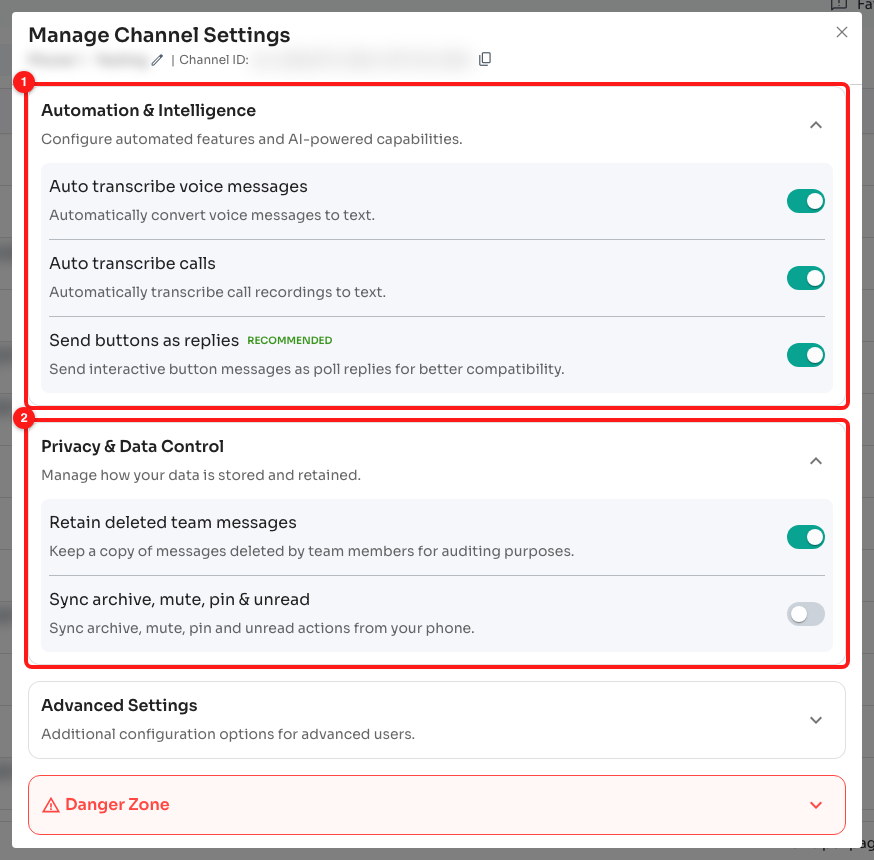
Step 4 — Automation & Intelligence (1) and Privacy & Data Control (2).
- Auto transcribe voice messages — turns voice notes into text you can read and search.
- Auto transcribe calls — does the same for call recordings.
- Send buttons as replies — sends interactive button messages as poll replies, which more phones display correctly. Marked Recommended. WhatsApp QR channels only.
- Retain deleted team messages — keeps a copy of any message a teammate deletes, so you have an audit trail.
- Sync archive, mute, pin & unread — mirrors those actions from your phone into ChatDaddy. You can only change it while the channel is disconnected.
📣 Messenger and Instagram channels get one extra option here — Silence comments — so comments on live videos or posts do not push a chat back to the top of your inbox. WhatsApp Business API accounts get Enable welcome message and Show 24h window status instead.
Step 5 — Open Advanced Settings only if you need them
Advanced Settings starts collapsed. Click the section header to open it. It appears on WhatsApp QR channels only, and both settings inside are greyed out until the channel is disconnected.
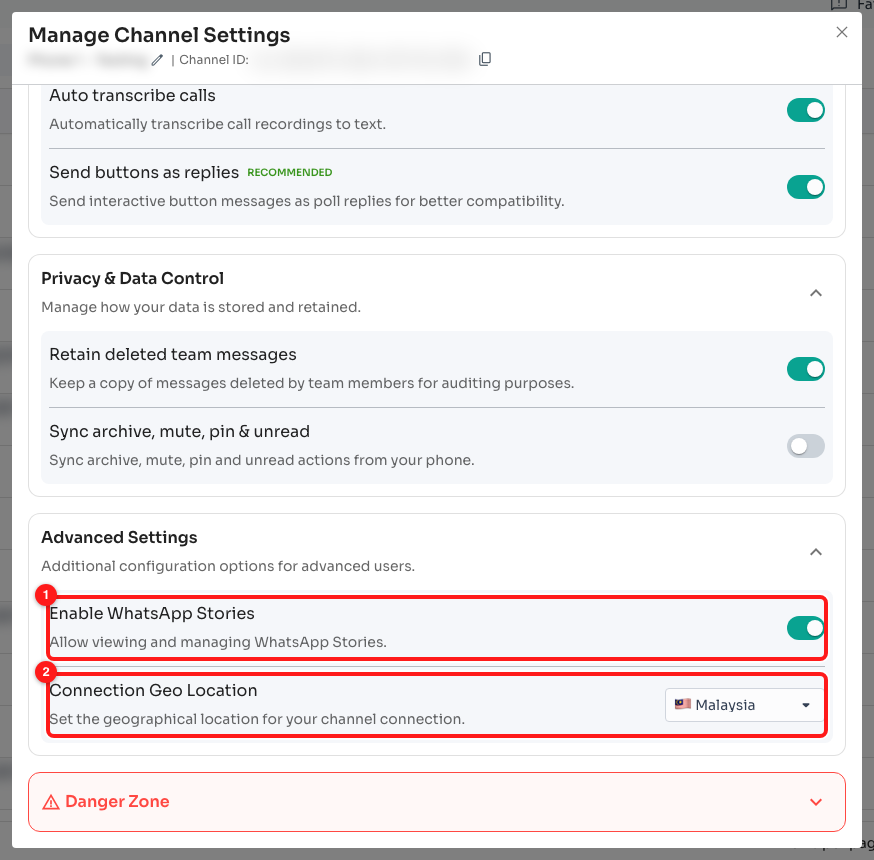
Step 5 — Enable WhatsApp Stories (1) and Connection Geo Location (2), inside the expanded Advanced Settings section.
- Enable WhatsApp Stories — lets you view and manage WhatsApp Stories from ChatDaddy.
- Connection Geo Location — sets the country ChatDaddy connects your channel from. Leave it on Automatic unless support asks you to pick a country.
Step 6 — Treat the Danger Zone with care
The Danger Zone is the red section at the very bottom, and it is closed until you click it. Both actions ask you to confirm first, and neither can be undone.
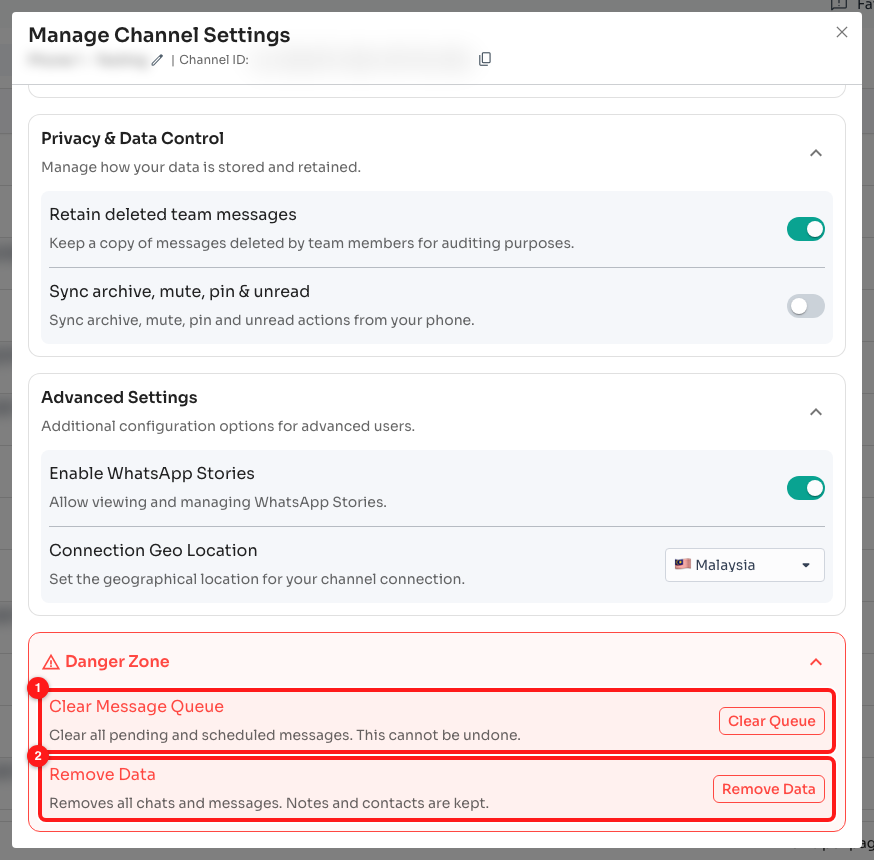
Step 6 — Clear Message Queue (1) and Remove Data (2) in the expanded Danger Zone.
- Clear Message Queue — “Clear all pending and scheduled messages. This cannot be undone.” Use it when a broadcast or flow has queued messages you no longer want to go out. The button is Clear Queue, and the confirmation warns that all scheduled messages will be lost.
- Remove Data — “Removes all chats and messages. Notes and contacts are kept.” The confirmation adds that you will have to rescan the QR code to get the history back. This action exists on WhatsApp QR channels only. Once it has run, the button reads Done. Remove Again.
⚠️ Remove Data wipes the conversation history for that channel inside ChatDaddy. Export anything you need to keep before you run it — see the related article on exporting chat history.
Why does my channel show fewer sections?
ChatDaddy only shows the settings a channel type actually supports, so two channels in the same team can look quite different. Below is a WhatsApp Business API channel: no Message Sync & History, no Advanced Settings, and only one privacy toggle.
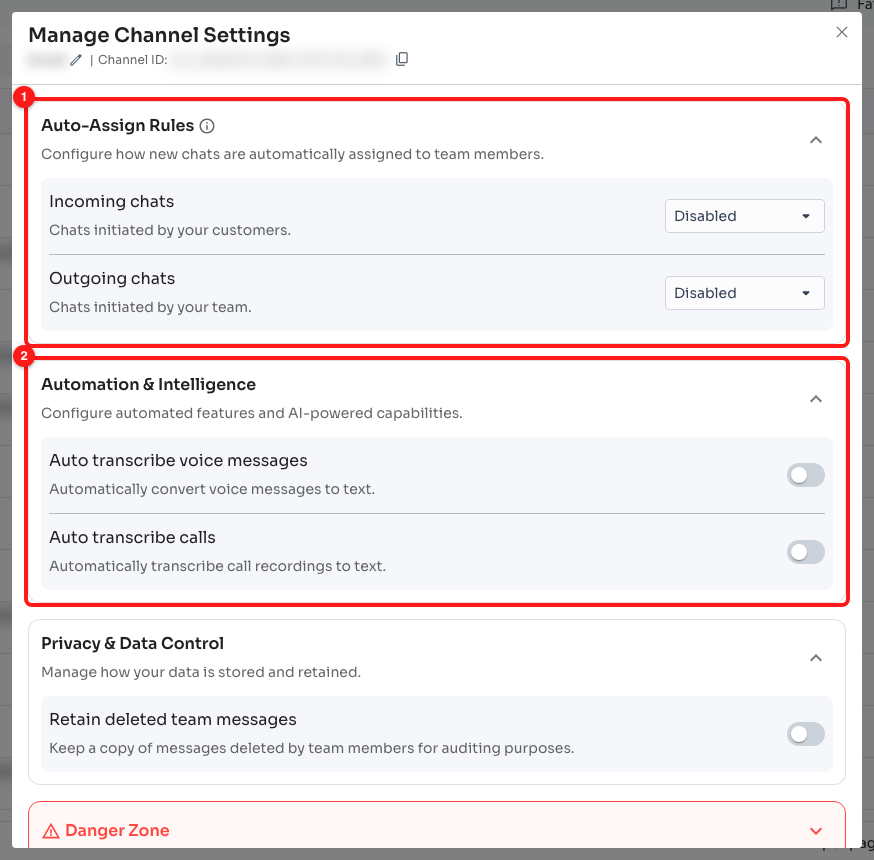
A WhatsApp Business API channel starts at Auto-Assign Rules (1), followed by Automation & Intelligence (2) — there is no sync or advanced section.
- WhatsApp (QR code) — everything: Message Sync & History, Send buttons as replies, Sync archive/mute/pin/unread, Advanced Settings, and Remove Data in the Danger Zone.
- WhatsApp Business API — Auto-Assign Rules, transcription, Retain deleted team messages, and Clear Message Queue. Accounts on the newer Meta setup also get a welcome-message option, the 24-hour window indicator and a WhatsApp Calling section.
- Messenger and Instagram — the same core sections plus Silence comments.
- E-mail and SMS — auto-assign, transcription, Retain deleted team messages and Clear Message Queue only.
Frequently asked questions
Where is the Save button?
There isn’t one. Each toggle, dropdown and rename saves by itself as soon as you change it, and you can close the screen with the X in the top-right corner at any time.
A setting is greyed out and I cannot switch it.
Hover over it. If the tooltip says “Disconnect channel first to change this setting”, it is one of the three WhatsApp settings that can only be changed while the channel is offline: Sync archive/mute/pin & unread, Enable WhatsApp Stories and Connection Geo Location. Disconnect the channel, change the setting, then reconnect.
Does changing a setting here affect my other channels?
No. Everything on this screen applies to the one channel named in the header. If you want the same behaviour everywhere, open each channel’s settings in turn.
What is the difference between Clear Message Queue and Remove Data?
Clear Message Queue only cancels messages that have not been sent yet — pending and scheduled ones. Remove Data deletes the chats and messages already in ChatDaddy for that channel, while keeping your notes and contacts.
I turned off “Sync past chats & contacts” by mistake.
Turn it back on in the same section. New history syncing starts again from that point; older messages that were never pulled in may need the channel to be reconnected before they appear.
The Delete option in the row menu is greyed out.
Deleting a channel is permission-controlled and the tooltip reads “Contact support to delete this channel.” Ask your team owner or contact ChatDaddy support. Note that Delete sits in the row menu, not inside the Danger Zone.