
How to Use the App Store: Connect an App and Trigger a Message Flow
Connect a shop or booking app in the App Store, point its events at a message flow, test the whole chain without messaging a customer, and read the two columns that tell you whether it is really firing — with the reasons an integration silently does nothing.
Also searched as: How to Use the App Store: Connect an App and Trigger a Message Flow, Read the App Store page correctly, The two ⋮ menus, Where Service ID and Service URL actually come from, Connect the app (+ Create), Google Form: what goes in the credential field, Notification Settings: who sends, and to whom, Point the trigger at your message flow, Choosing the flow — and the warning most people miss, Test it before a customer sees it, The webhook URL — the step that lives outside ChatDaddy, Where to find the webhook URL — and why it is sometimes not there, The flow side of the chain, What changes once it is live, When the integration does nothing: the checklist
The App Store is how ChatDaddy listens to the systems you already sell in. An order is paid in Shopify, a booking is made in Calendly, a form is submitted in Google Form — and a message flow runs on WhatsApp. This article builds that chain end to end and, just as importantly, shows you how to prove it works before a customer is on the other end.
🧭 The chain has exactly four links: a connected app ➜ notification settings ➜ a trigger ➜ a message flow. Every "my integration does nothing" is one of those four links being incomplete, and this article walks them in order.
Before you start
- A connected channel. The integration sends WhatsApp messages, so it needs a channel to send them from.
- A saved message flow with a starting point. Build it first — an App Store trigger points at a flow, it does not create one. If you have not built one yet, do that before you come back here.
- Admin access to the other system, because for most apps you will paste a webhook URL into that system's own settings.
Step 1 — Read the App Store page correctly
Open App Store from the left rail. The first thing to understand is that this page is the list of services already connected to your team — it is not a catalogue to browse. The two buttons top right are the only ways to add anything: + Create ① and + Add Service ②.
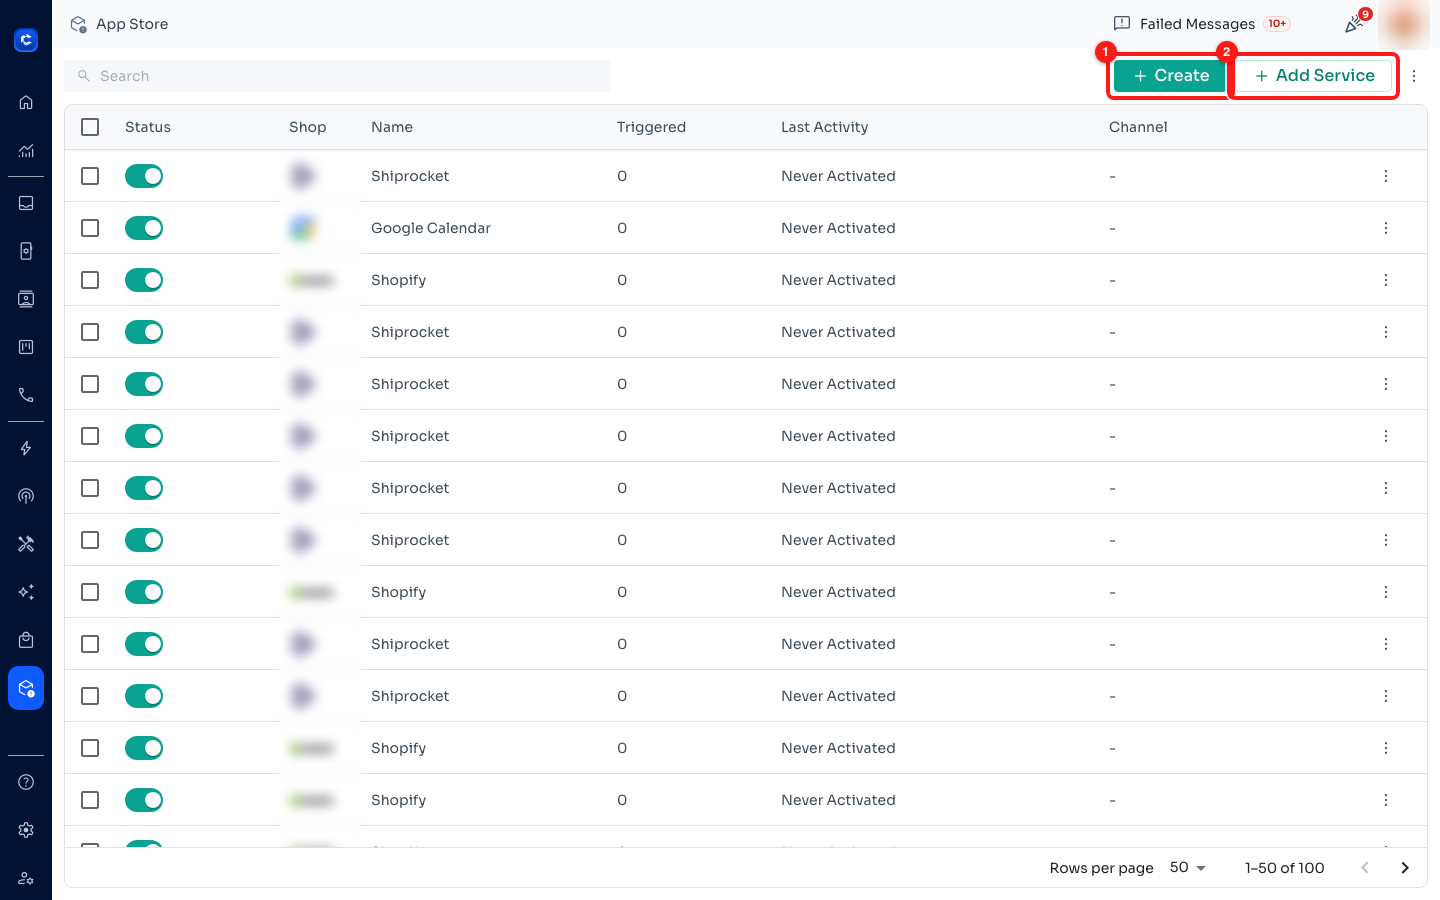
① + Create — connect a new app from the 21 supported ones. ② + Add Service — attach a service you already have an ID and URL for.
💡 + Create and + Add Service are not the same thing. + Create walks you through connecting a supported app. + Add Service is a two-field form — Service ID and Service URL — for attaching a service that already exists. If you are setting up Shopify or Calendly for the first time, you want + Create.
The columns are the dashboard for every integration you own, and four of them matter:
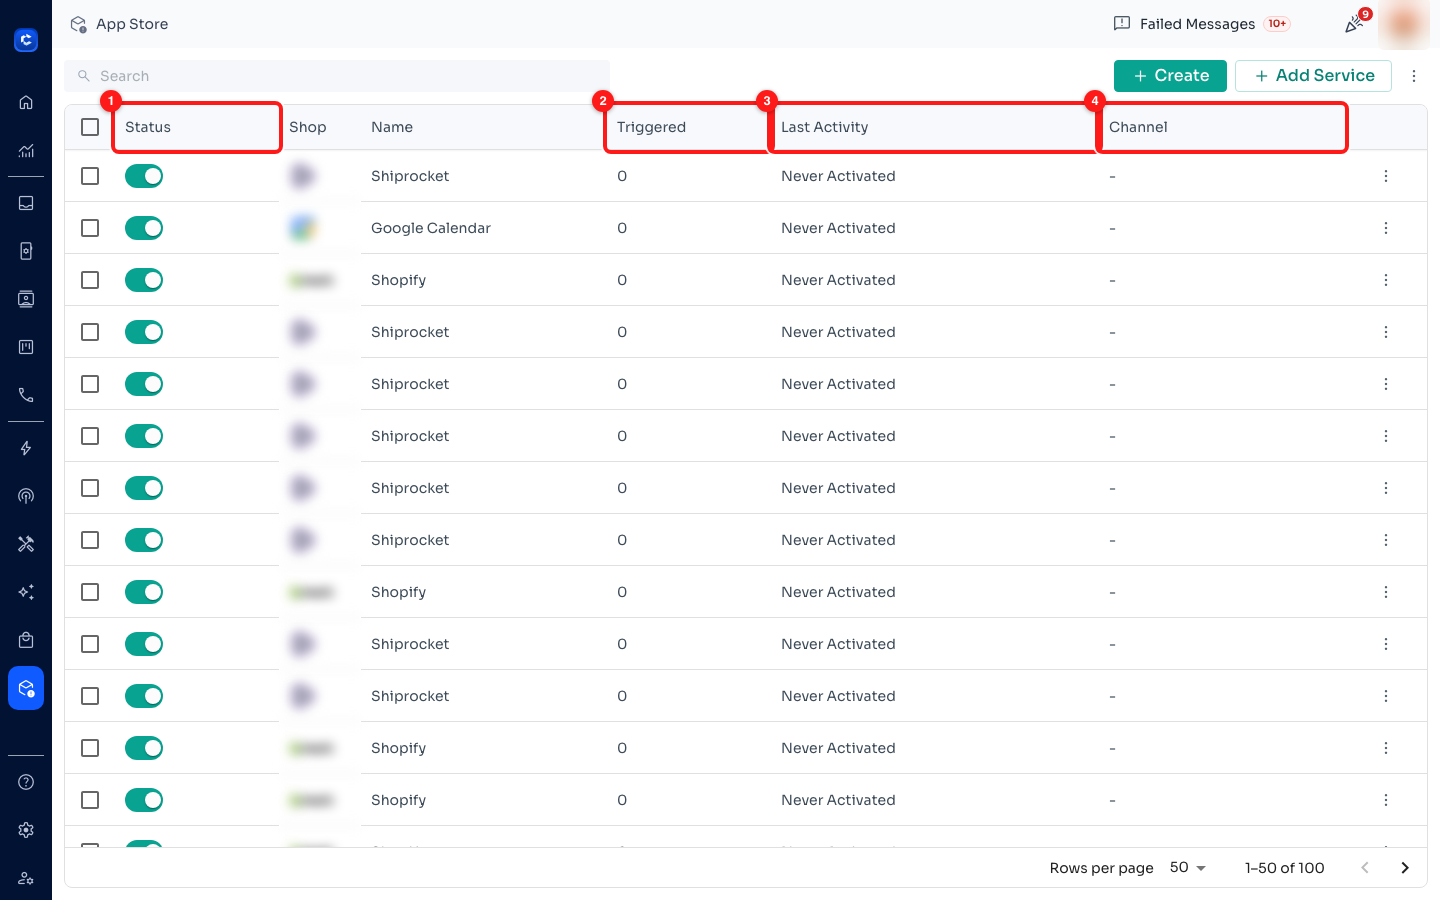
① Status — the service on/off switch. ② Triggered — how many times it has fired. ③ Last Activity. ④ Channel. (Shop names blurred.)
- Status — the toggle for the whole service. Off here and nothing downstream matters.
- Triggered — the number of times this service has actually started something. This is your proof of life.
- Last Activity —
Never Activatedmeans it has not fired once since it was connected. - Channel — which channel its messages go out on. A
-here is a red flag.
🔎 Triggered
0+ Last ActivityNever Activatedis the single most useful diagnostic in the feature. It tells you the problem is upstream — the other system has never called ChatDaddy — so there is no point debugging your message flow yet.
The two ⋮ menus
Each row has its own ⋮ ①, and it holds the three things you will ever do to a connected service.
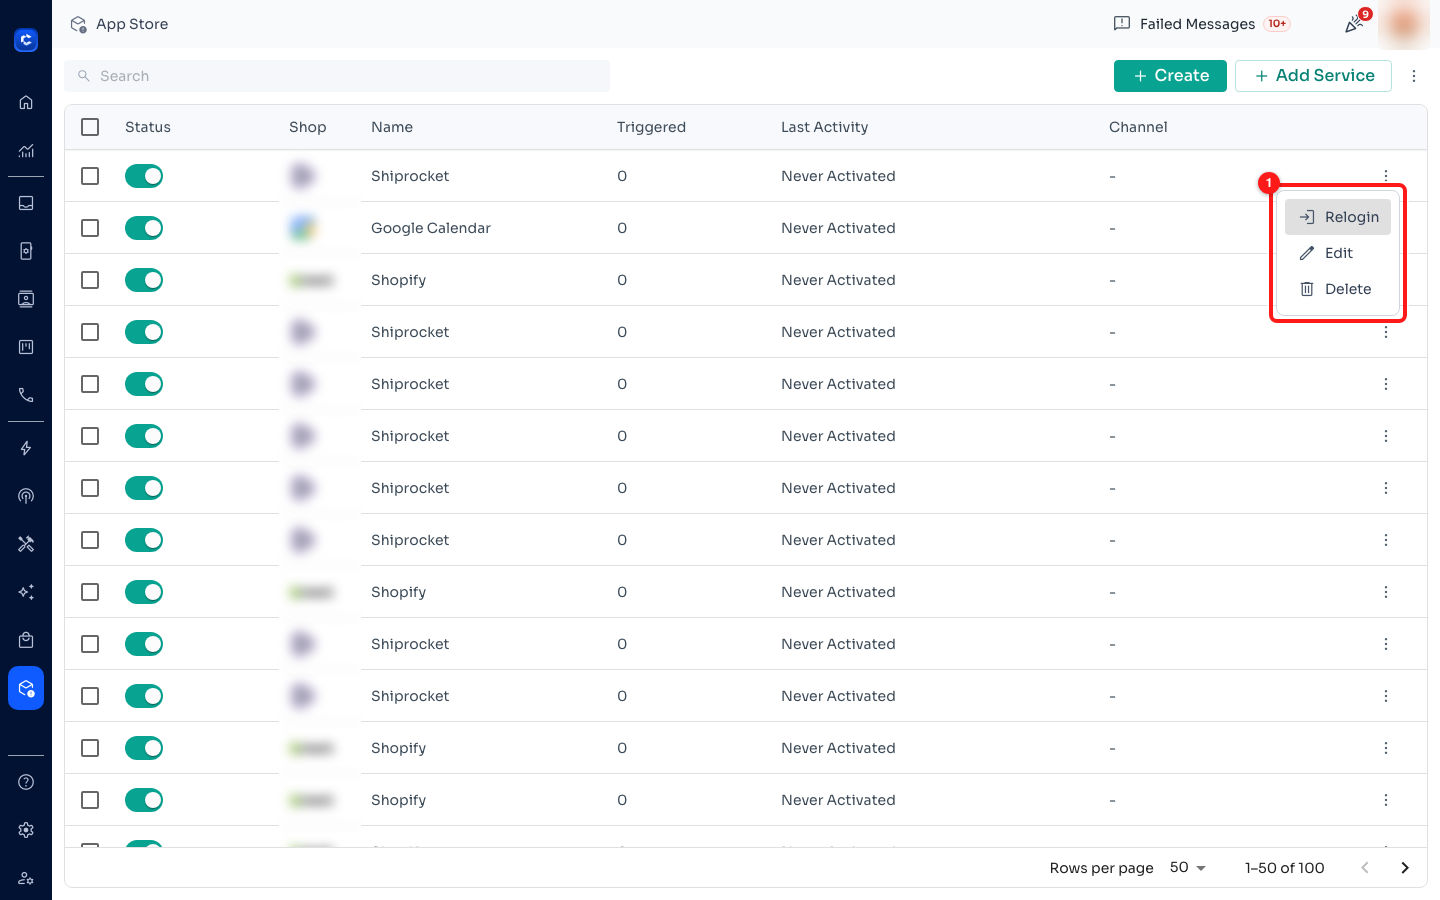
① the row menu — Relogin, Edit, Delete.
- Relogin — re-authorise the connection. Use this when the other system says the token expired or you changed your password there.
- Edit — where the rest of this article happens.
- Delete — removes the service and every trigger on it.
The ⋮ at the far right of the toolbar ① is a different menu with one item.
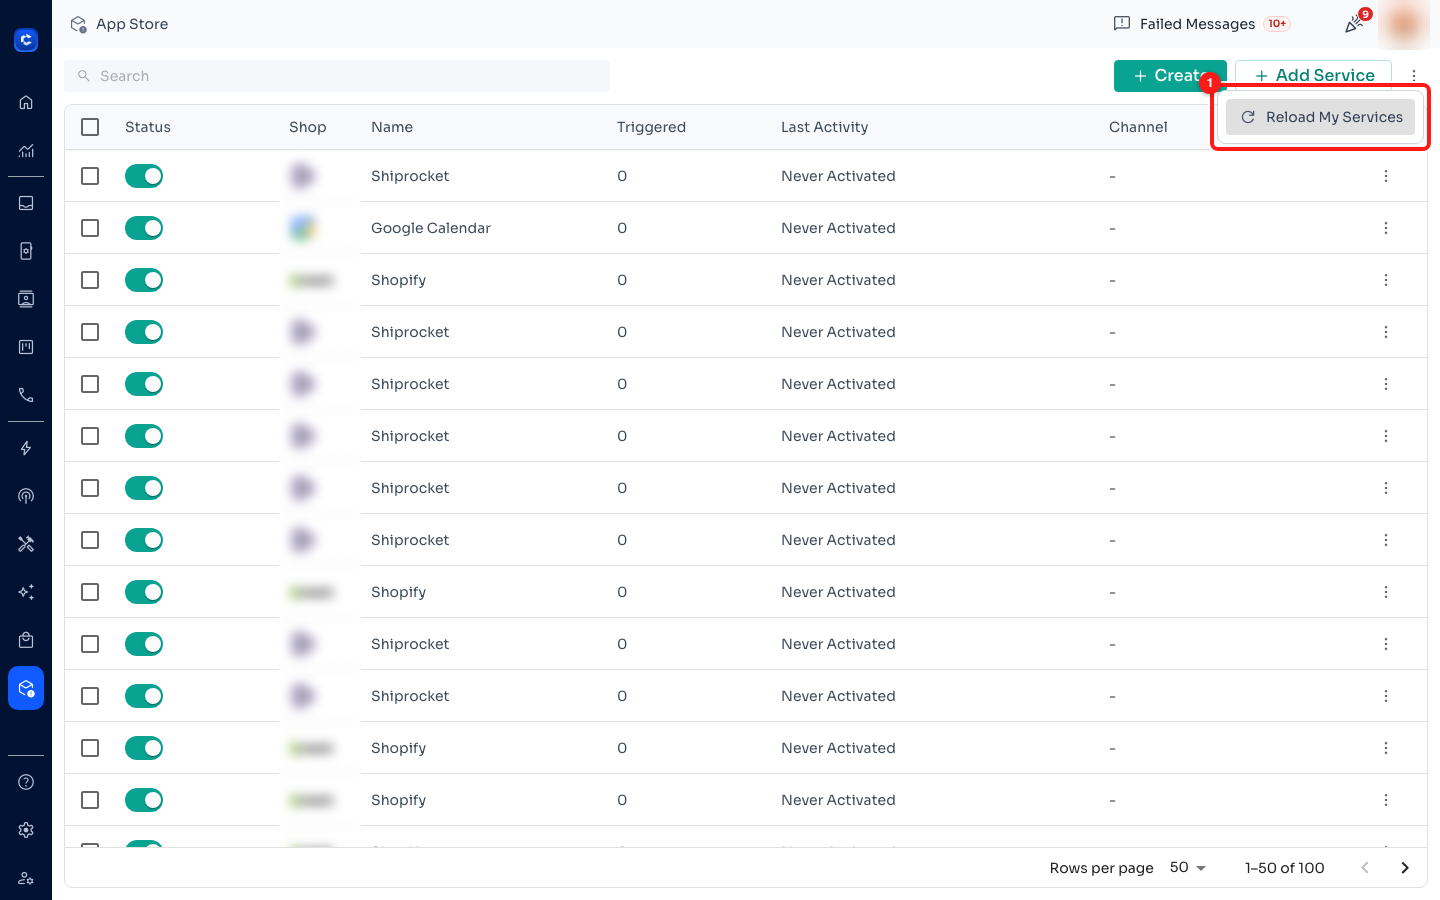
① Reload My Services — re-fetches the list from the connected accounts. Use it when a shop you just connected is not showing up.
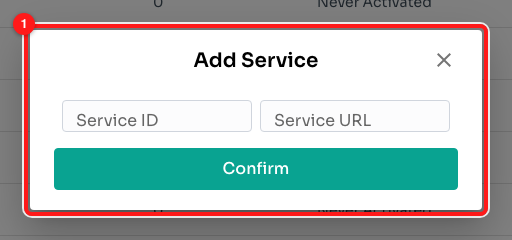
The + Add Service form: Service ID and Service URL, then Confirm. Only useful if the other system has already given you both values.
Where Service ID and Service URL actually come from
This is the question this form always raises, so here is the honest answer: neither field is anything from your shop. They do not come from your Shopify admin, your store address, or your form. + Add Service registers a connector — the small program that sits between a platform and ChatDaddy and speaks both languages. The 21 apps under + Create are connectors ChatDaddy has already registered for everyone; this form is for one that is not on that list because it was built specially.
- Service ID — the connector's own short identifier, in the same style as the built-in ones (
shopify,googleForm,razorpay). It has to match what the connector calls itself, so it is a value you are given, not one you invent. - Service URL — the connector's base address: the root that ChatDaddy appends its own paths onto when it talks to it, for example
https://my-connector.example.com. It is not your storefront address, and it is not a webhook URL.
So the practical answer to "where do I get them" is: from whoever built or hosts the connector. In practice that is one of two people — ChatDaddy support, if a custom integration was built for your team, or your own developer, if your company wrote one. If nobody has handed you both values already, this is not the form you are looking for.
🚧 Most teams never touch + Add Service. If you came here to connect Shopify, Google Form, Stripe, Calendly or any of the other 21 supported apps, close this dialog and press + Create instead. Typing a shop address into Service URL creates a service that never receives anything.
Step 2 — Connect the app (+ Create)
Press + Create. You land on step ① Shop Selection ① with a category filter ② above the app grid.
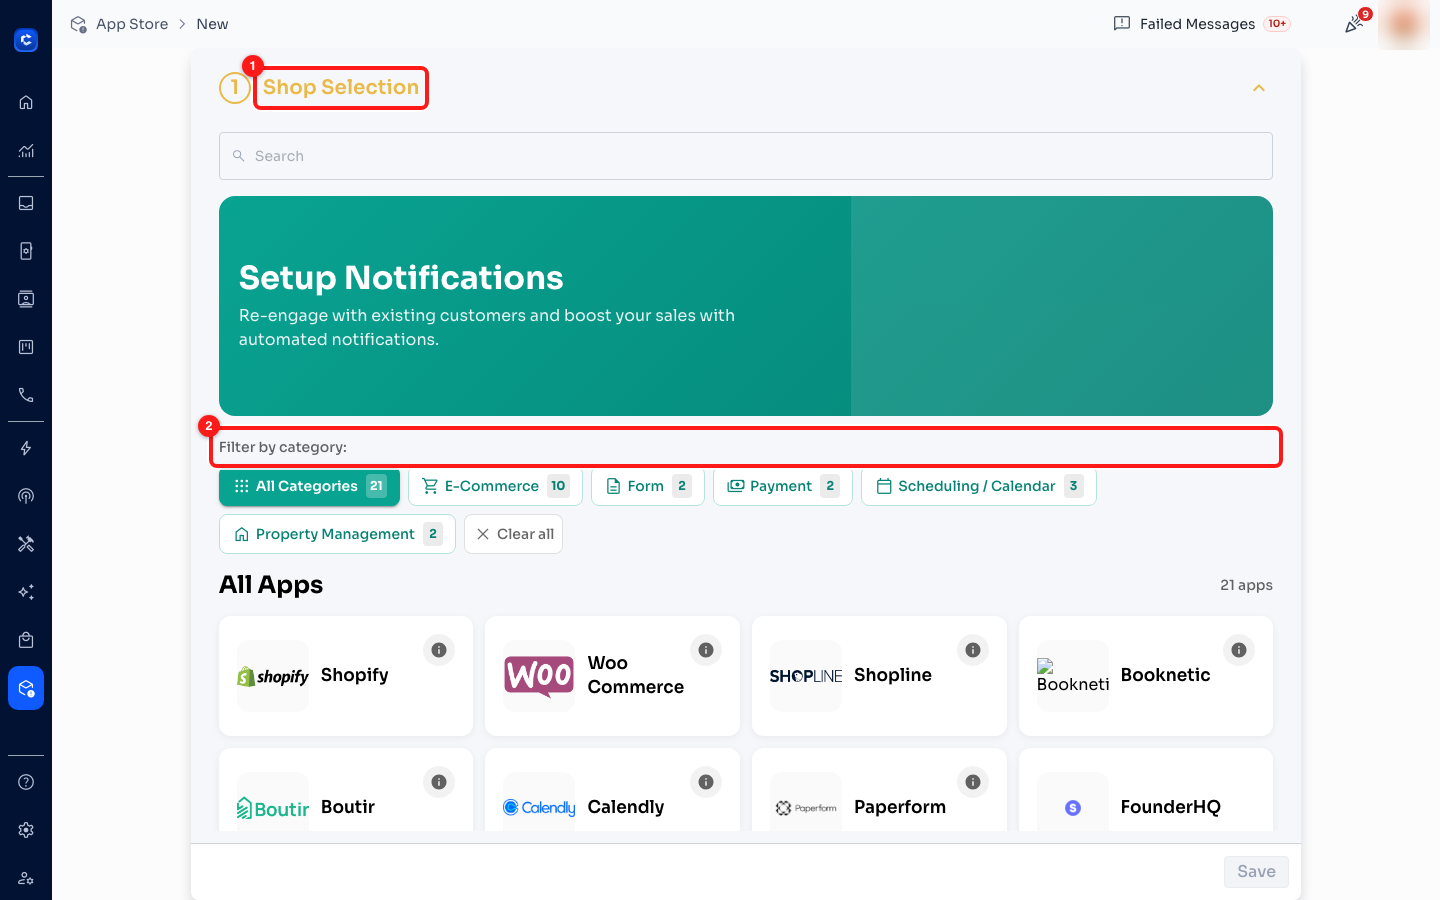
① step ① Shop Selection. ② the category filter — the counts tell you how many apps are in each group.
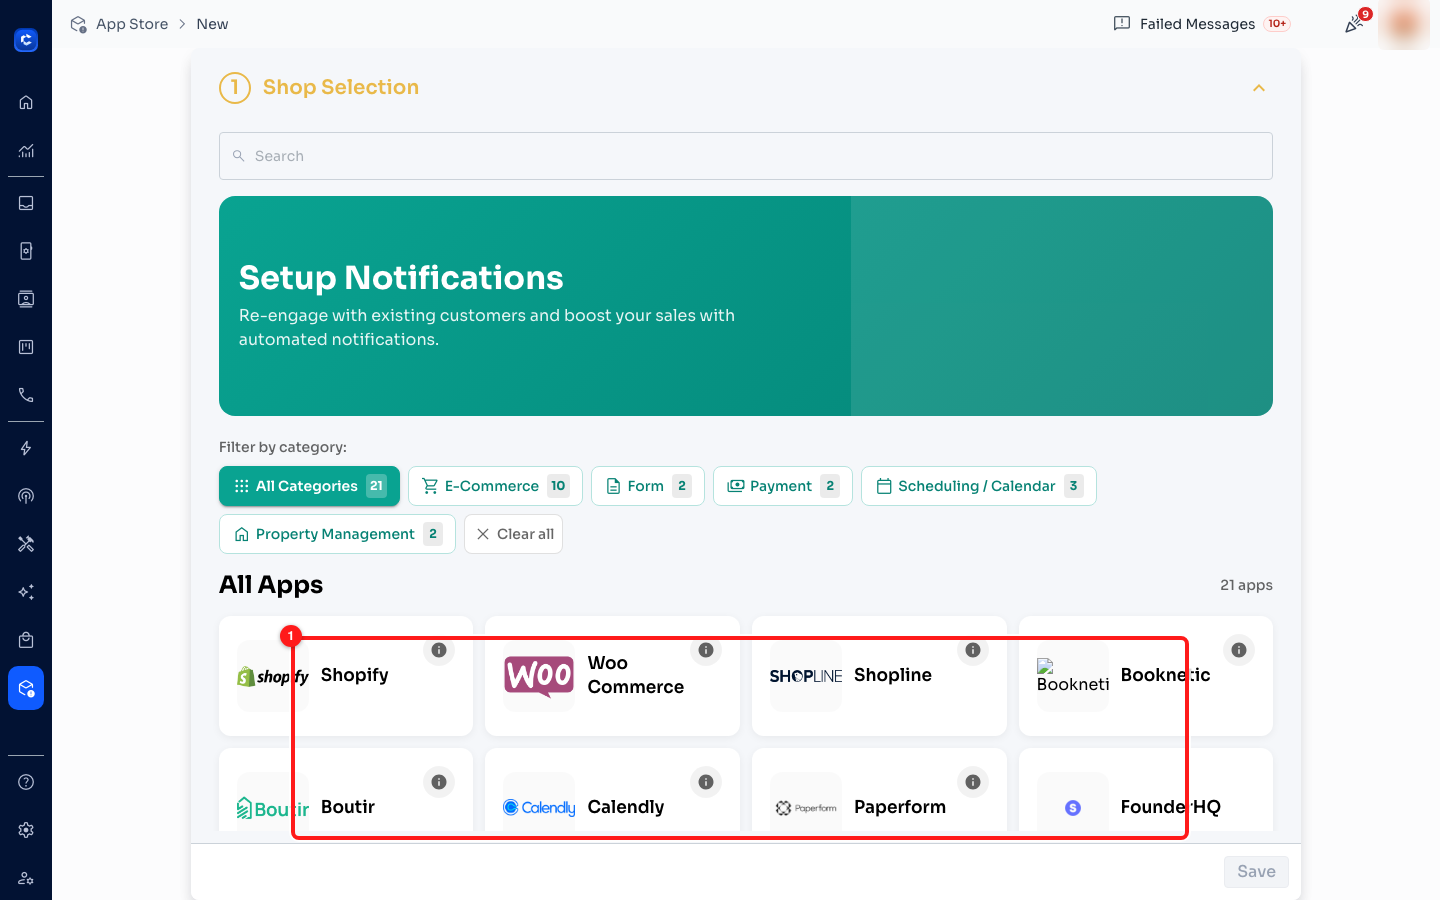
① the app grid — 21 supported apps, filtered by All Categories 21 · E-Commerce 10 · Form 2 · Payment 2 · Scheduling / Calendar 3 · Property Management 2.
The full list of supported apps is:
- E-Commerce — Shopify, Woo Commerce, Shopline, Shopline Global, Shopage, Boutir, Tokopedia, WhatsApp Shop, Shiprocket, Hotmart.
- Form — Google Form, Paperform.
- Payment — Stripe, Razorpay.
- Scheduling / Calendar — Google Calendar, Calendly, Booknetic.
- Property Management — Hostex, Host Platform.
- Plus Genius POS and FounderHQ.
❗ If your product is not on this list, the App Store is not your route. There is no "other" option here. Use Tools ➜ Zapier for anything in Zapier's catalogue, or the Webhook app trigger in the Flow Builder if your product can send an HTTP request. Searching this grid for an unsupported name will always come back empty.
Click the app you want. The grid becomes Select an App with a tick on your choice, and a configuration panel appears on the right ①. Each app asks for something different — Google Form asks for the sheet, a shop platform will ask you to authorise the store. Fill in the field ② and press Save ③.
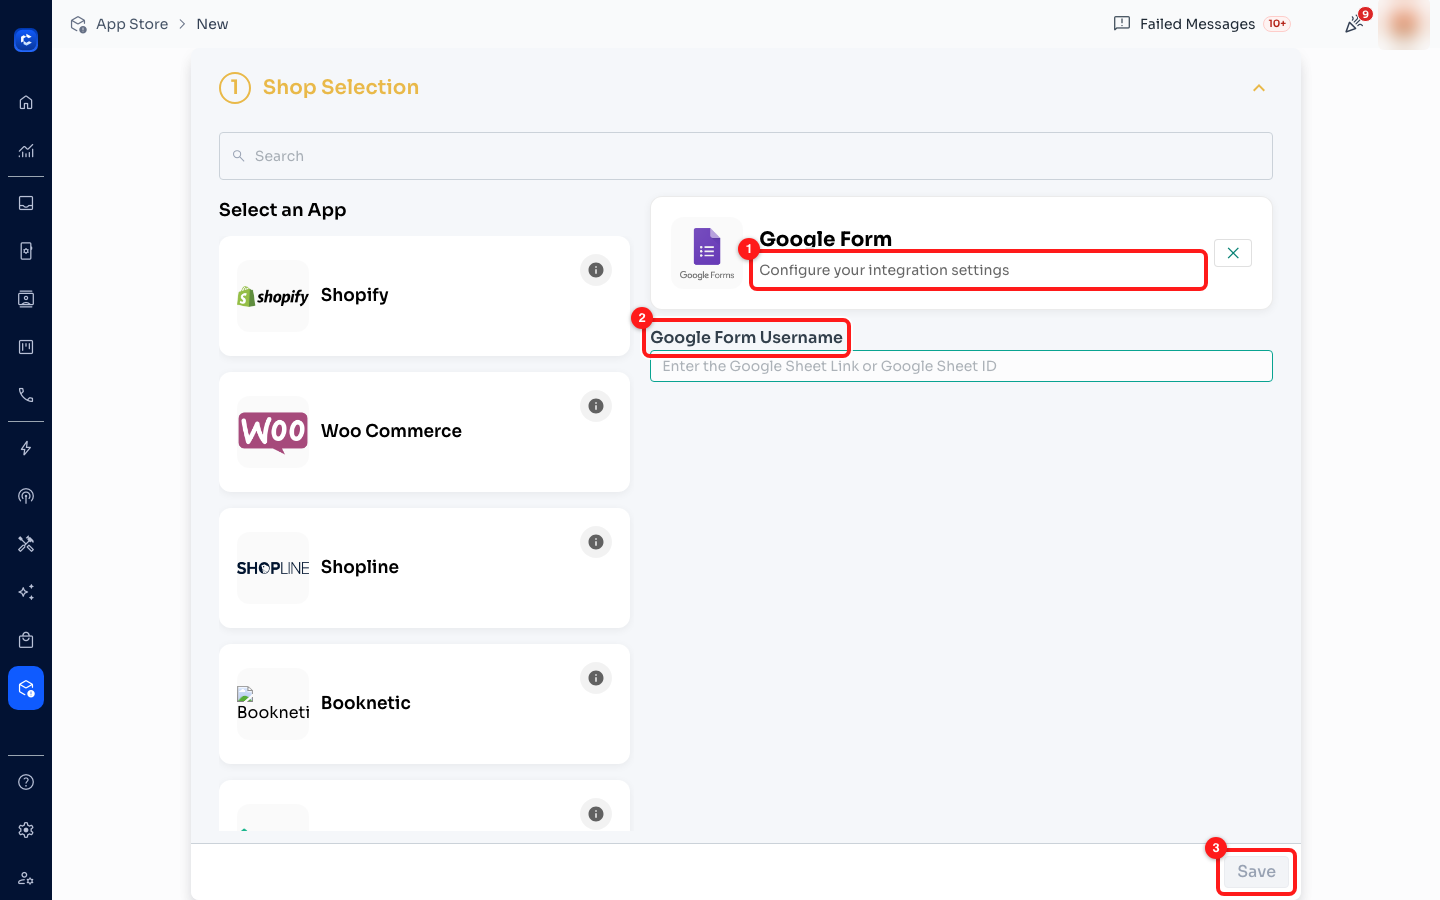
① the app's own configuration panel. ② its credential field — for Google Form this is the Google Sheet link or Sheet ID. ③ Save.
ℹ️ Every app card has an ⓘ button in its top-right corner, and it is the fastest answer to "what do I paste here". It opens that app's own setup instructions — what you need before you start, and the numbered steps, written for that one app. Press it before you go hunting through the other system's settings.
Google Form: what goes in the credential field
Google Form is worth walking through in full, because its field is misleadingly named. The label reads Google Form Username, but the placeholder inside it tells the truth: "Enter the Google Sheet Link or Google Sheet ID". ChatDaddy does not read your form. It reads the response spreadsheet your form writes into. So the value it wants is a Google Sheet, and you have to give ChatDaddy permission to read that sheet.
- Add a phone number question to the form. In the form, add a short-answer question called something like WhatsApp Number, and ask for the country code. A response with no phone number in it has nobody to send a message to.
- Link the form to a sheet. In the form, open the Responses tab, press the Sheets icon (Link to Sheets) and choose Create a new spreadsheet. Google builds a sheet whose top row is your questions and whose every new row is a new response.
- Share that sheet with ChatDaddy. Open the spreadsheet, press Share, and add
infoautomation523@gmail.comwith Viewer access. That is the Google account ChatDaddy reads responses with. Skip this step and nothing will ever arrive, however correct the ID you paste is — the App Store list will simply sit at Never Activated. - Copy the Sheet ID out of the address bar. With the spreadsheet open, the address looks like
https://docs.google.com/spreadsheets/d/1AbCdEfGhIjKlMnOpQrStUvWxYz/edit#gid=0. The Sheet ID is the long middle section — everything between/d/and/edit. You may paste either that ID on its own or the whole link; the field takes both. - Paste it into Google Form Username and press Save. Then carry on with Notification Settings and a trigger exactly as in the rest of this article.
⚠️ It has to be the live response sheet — not a copy, not an export. If you duplicate the sheet, download it, or later link the form to a different spreadsheet, the ID you pasted stops being the one new responses land in, and the integration goes quiet with no error anywhere. Re-link, re-share, and paste the new ID.
💡 Your question wording becomes your column headers, and those headers are what your flow reads. Rewording a question in the form renames the column, and a flow step that referred to the old name comes out blank. Settle the wording before you build the flow, and re-check the flow if you ever edit the form.
Step 3 — Notification Settings: who sends, and to whom
Back on the list, open the service's ⋮ ➜ Edit. The editor is two numbered steps. Start a trigger with New Trigger ② ➜ Add Custom Trigger ① — this is also what opens step ① for editing.
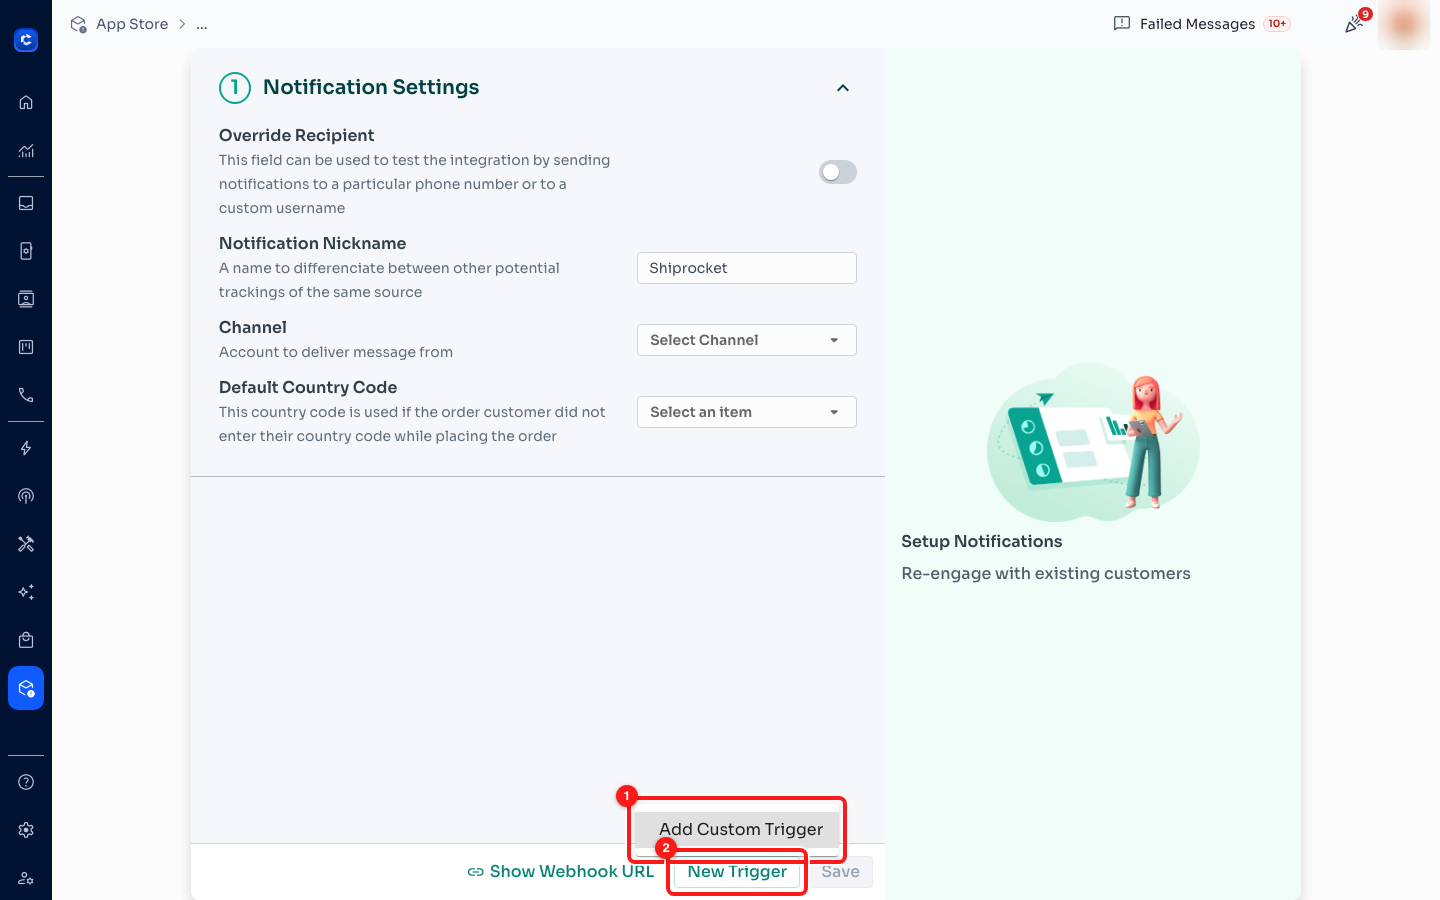
① Add Custom Trigger — the only item under ② New Trigger.
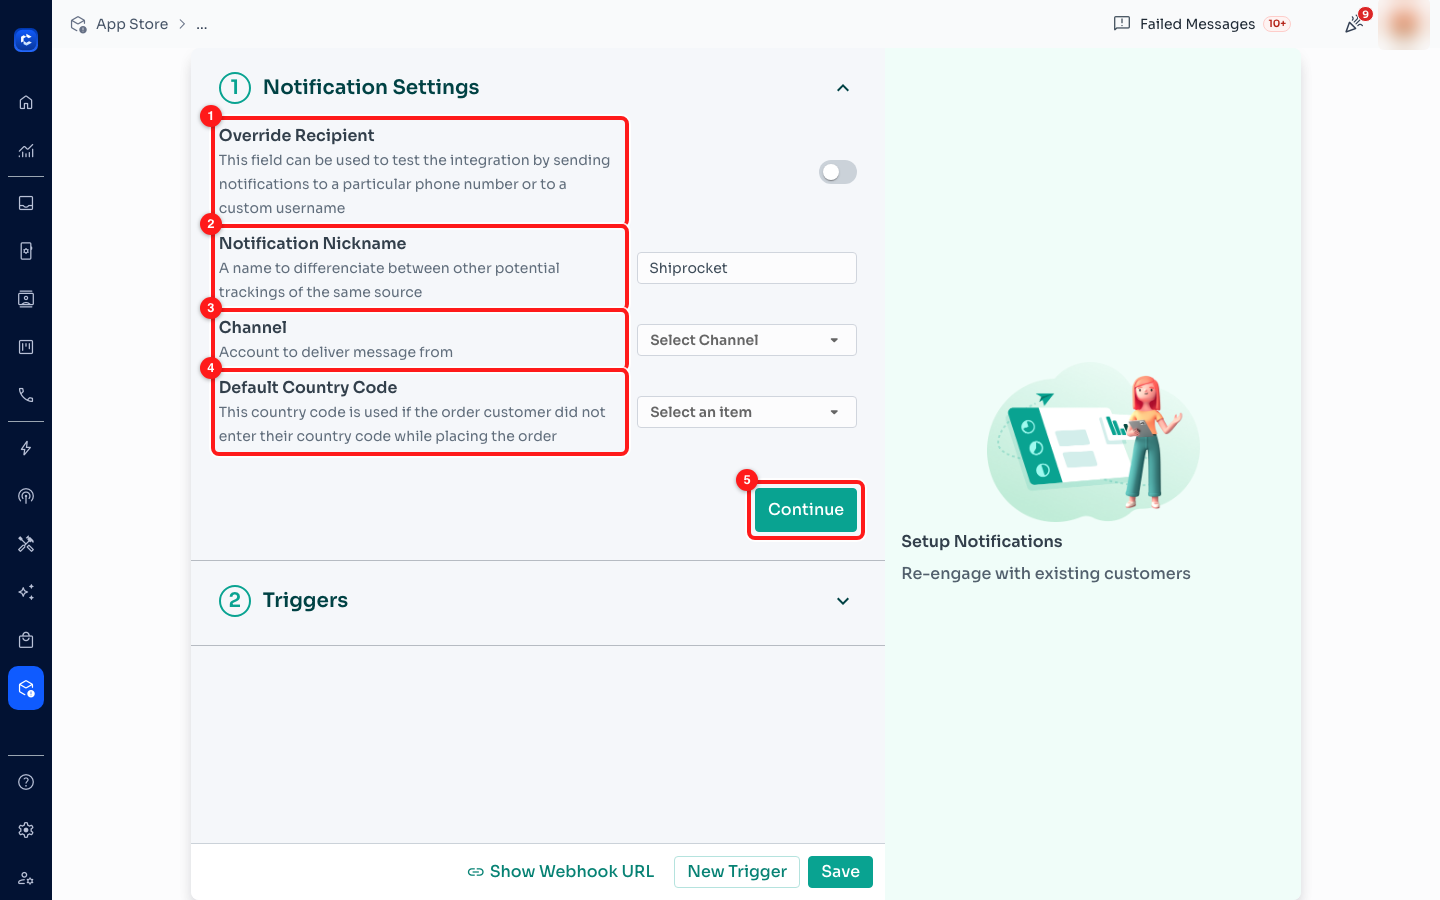
① Override Recipient. ② Notification Nickname. ③ Channel. ④ Default Country Code. ⑤ Continue.
- Override Recipient — "This field can be used to test the integration by sending notifications to a particular phone number or to a custom username." Turn it on while you are setting up: every notification goes to you instead of the real customer. Turn it off before you go live or your customers will never receive anything.
- Notification Nickname — a label so you can tell two integrations of the same type apart. If you run three Shopify stores, name them here or you will be guessing later.
- Channel — "Account to deliver message from." This is the channel the WhatsApp message goes out on. Leave it unset and the integration will fire and send nothing.
- Default Country Code — "used if the order customer did not enter their country code while placing the order." Set it to the country most of your orders come from. Without it, a local-format phone number from your shop cannot be turned into a WhatsApp number.
- Press Continue to move to step ② Triggers.
⚠️ Default Country Code is the quiet one that breaks real integrations. Most shop checkouts accept
012 345 6789without a country code. If ChatDaddy has no default, that number cannot be resolved and the message is never sent — and nothing on the page tells you that is what happened. Set it once, at the start.
Step 4 — Point the trigger at your message flow
Step ② Triggers ① now holds the trigger you created ②. Use the arrow on the left of the row to expand it.
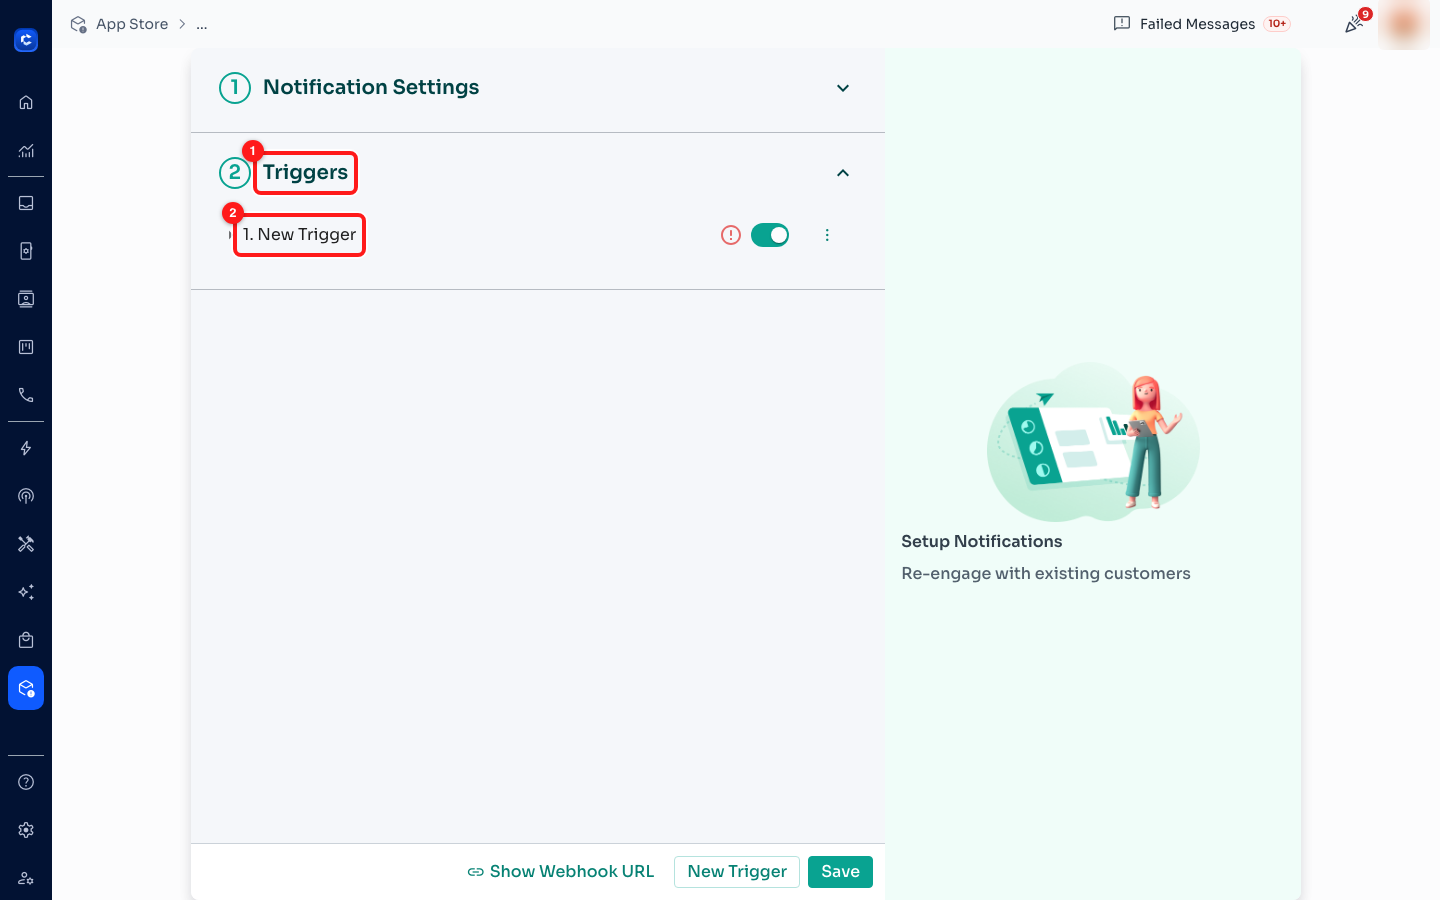
① step ② Triggers. ② the new trigger row. The red warning icon stays until the trigger is complete.
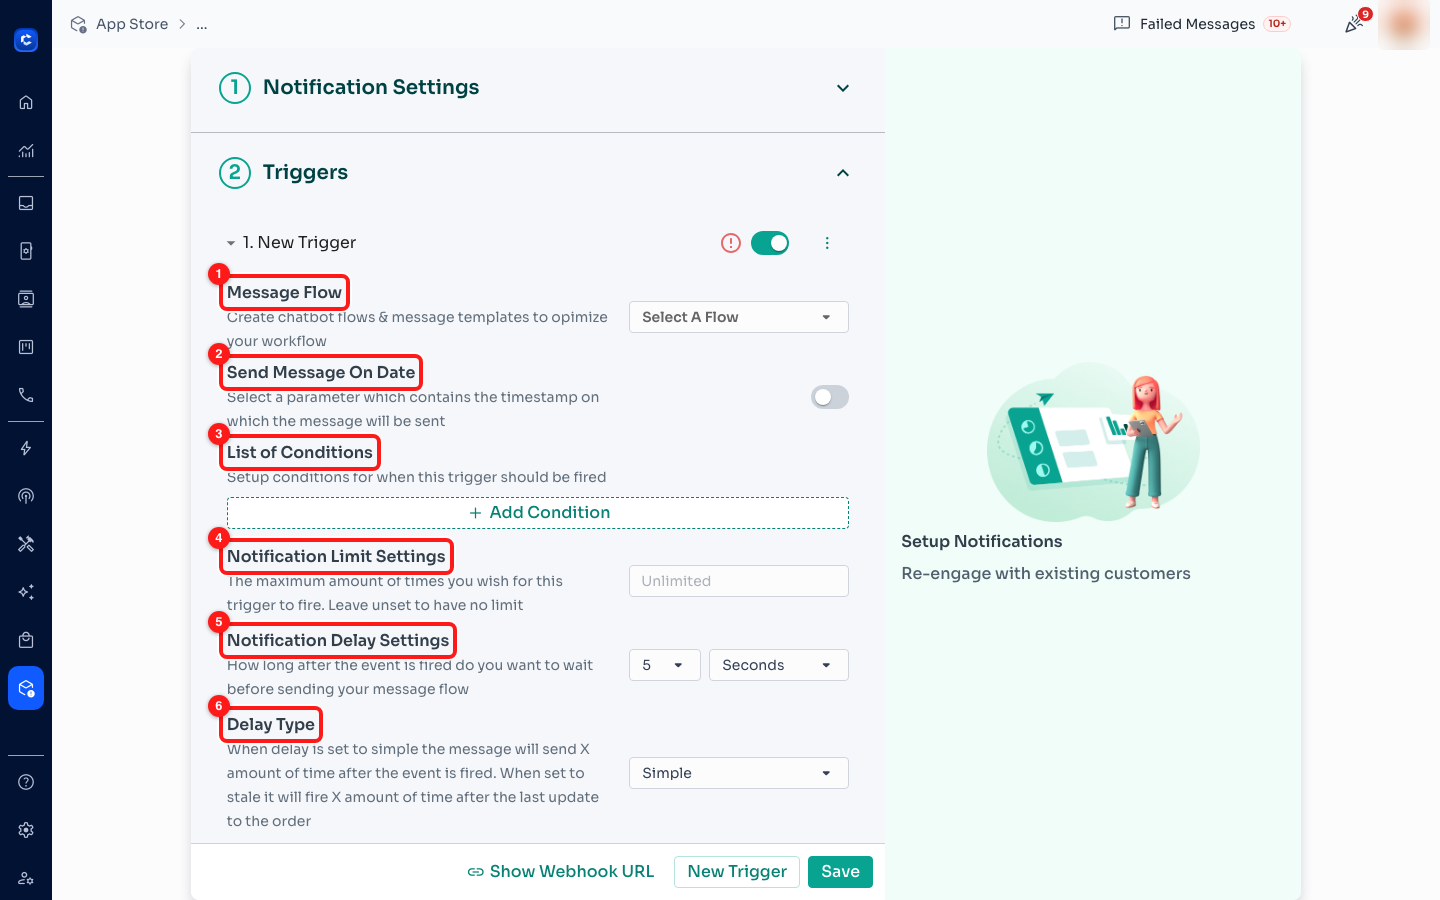
① Message Flow. ② Send Message On Date. ③ List of Conditions. ④ Notification Limit Settings. ⑤ Notification Delay Settings. ⑥ Delay Type.
- Message Flow ➜ Select A Flow — the flow that runs when this event fires. This is the link between the App Store and the Flow Builder.
- Send Message On Date — off by default. Turn it on to schedule the message off a timestamp carried in the event (an appointment date, a delivery date) instead of sending immediately.
- List of Conditions ➜ + Add Condition — only fire for some events. Without a condition the trigger fires on everything the app sends.
- Notification Limit Settings — the cap on how many times this trigger may ever fire. The placeholder reads Unlimited; leave it blank for no limit.
- Notification Delay Settings — how long to wait after the event before sending. Defaults to 5 seconds.
- Delay Type — Simple sends X after the event fires. Stale sends X after the last update to the order, so an order that keeps changing keeps resetting the clock. Use stale for "the customer stopped mid-checkout" style messages.
Choosing the flow — and the warning most people miss
Open Select A Flow ① and you get a searchable picker, sorted by Last Edited. Read the small grey line under each flow name.
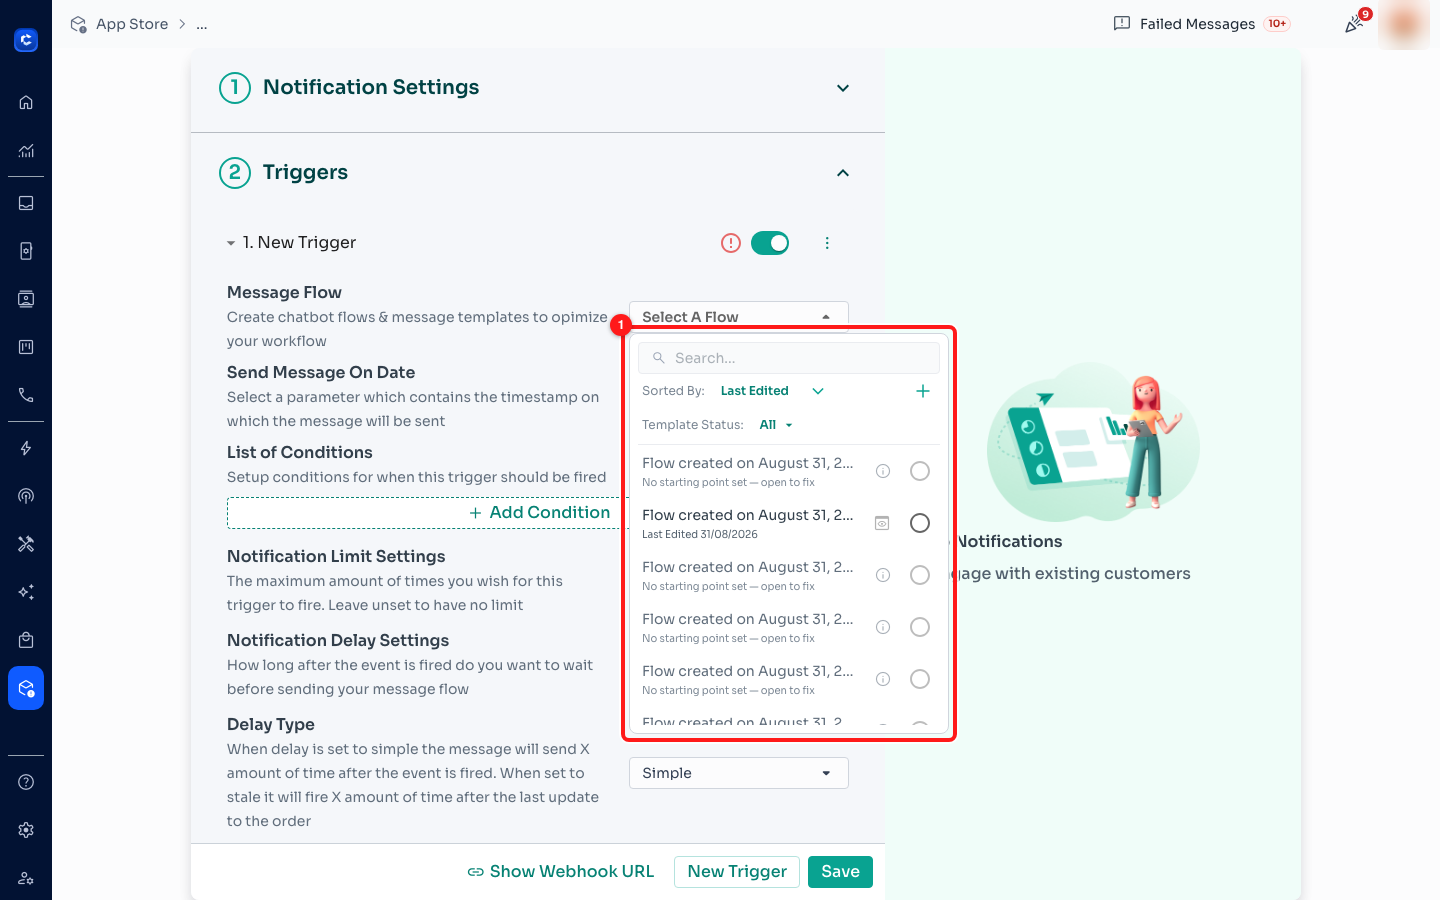
① the flow picker. Note the sub-labels: a healthy flow shows "Last Edited"; a broken one says "No starting point set — open to fix".
⚠️ "No starting point set — open to fix" is the number-one cause of an App Store integration that fires and does nothing. ChatDaddy will happily let you pick that flow. The trigger will fire, the Triggered count will go up, and no message will ever be sent, because the flow has no starting step to run. Open that flow in the Flow Builder, give it a starting Message step, save it, then come back and pick it again.
Conditions work the same way as anywhere else — pick a parameter from the event, then compare it. The parameter list is the shape of the event the app sends ①.
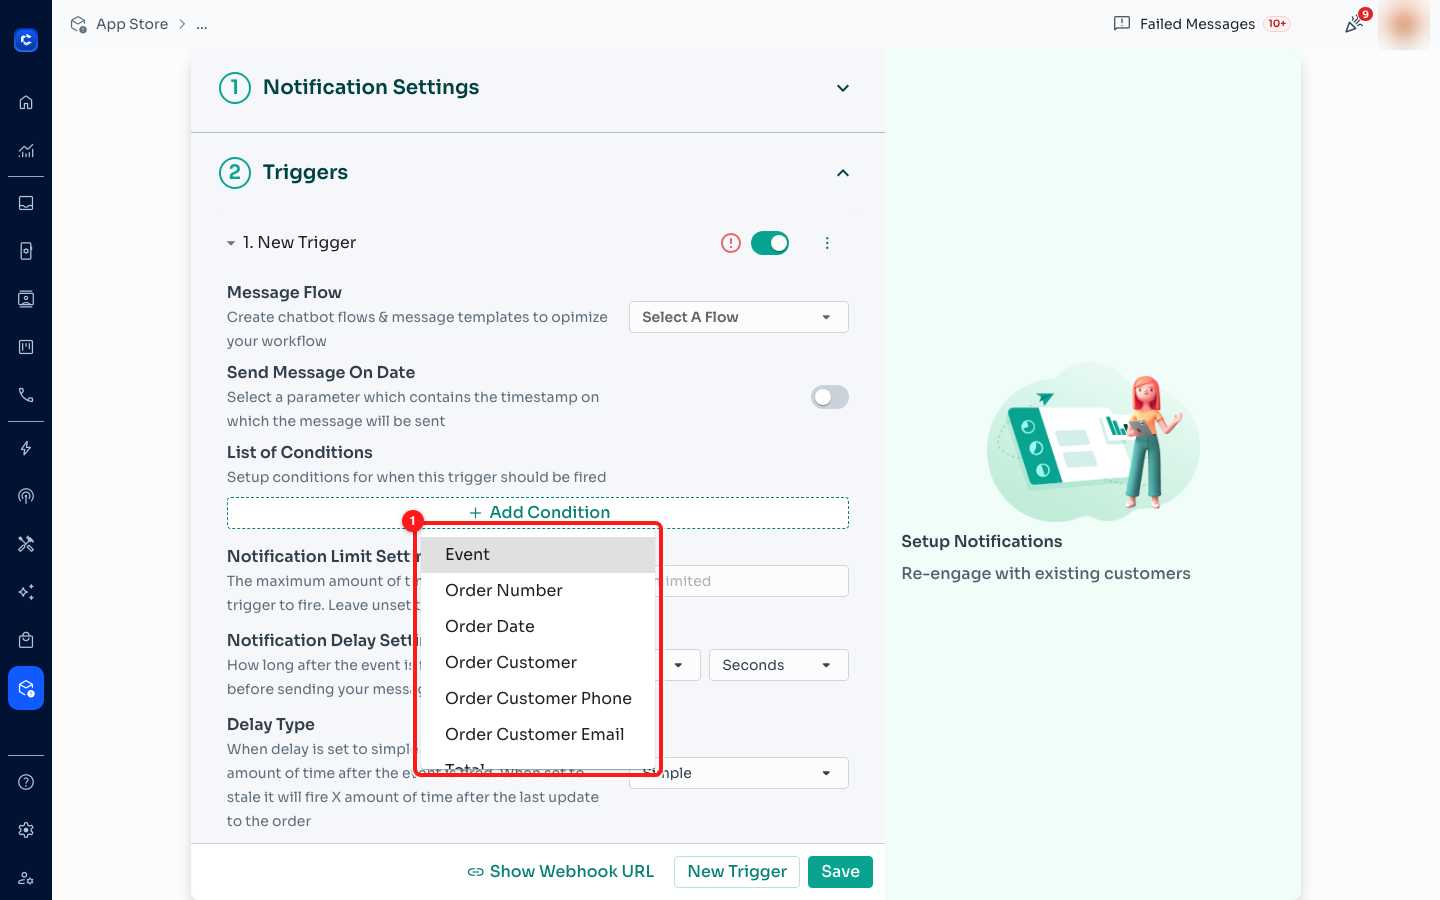
① the condition parameters — Event, Order Number, Order Date, Order Customer, Order Customer Phone, Order Customer Email, Total, and more below.
Step 5 — Test it before a customer sees it
The trigger row has its own ⋮, and it holds the test ①.
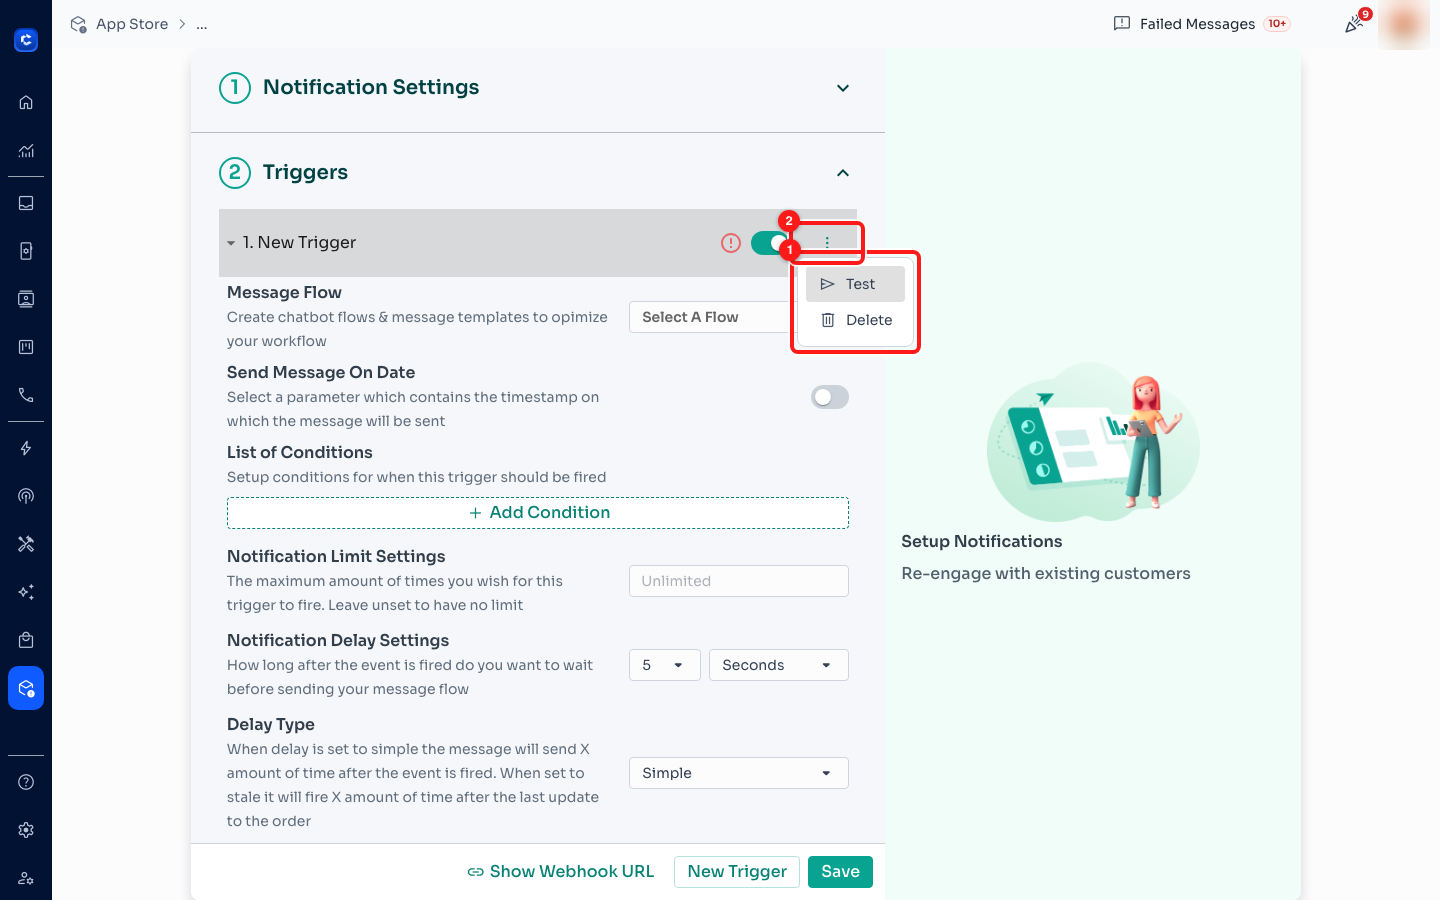
① the trigger's own menu — Test fires this one trigger; Delete removes it.
The safe testing recipe, in order:
- Turn Override Recipient on in step ① and put your own number in it. Nothing can reach a customer while this is set.
- Make sure Channel is filled in, and that the flow you picked does not say No starting point set.
- Press Save. An unsaved trigger is not a trigger.
- Open the trigger's ⋮ ➜ Test. The message should arrive on your handset within the delay you configured.
- Go back to the App Store list and check that Triggered went up and Last Activity is no longer Never Activated.
- Only then turn Override Recipient off, and do one real transaction in the other system as a final end-to-end check.
⚠️ Test sends a real WhatsApp message on a real channel and consumes credits. That is the point — it proves the whole chain — but it is exactly why Override Recipient goes on first.
The webhook URL — the step that lives outside ChatDaddy
For most apps, ChatDaddy does not go and fetch anything: the other system has to call ChatDaddy. Press Show Webhook URL ③ and you get the address to paste into that system ①, plus a Text Tutorial link ② with the per-app instructions.
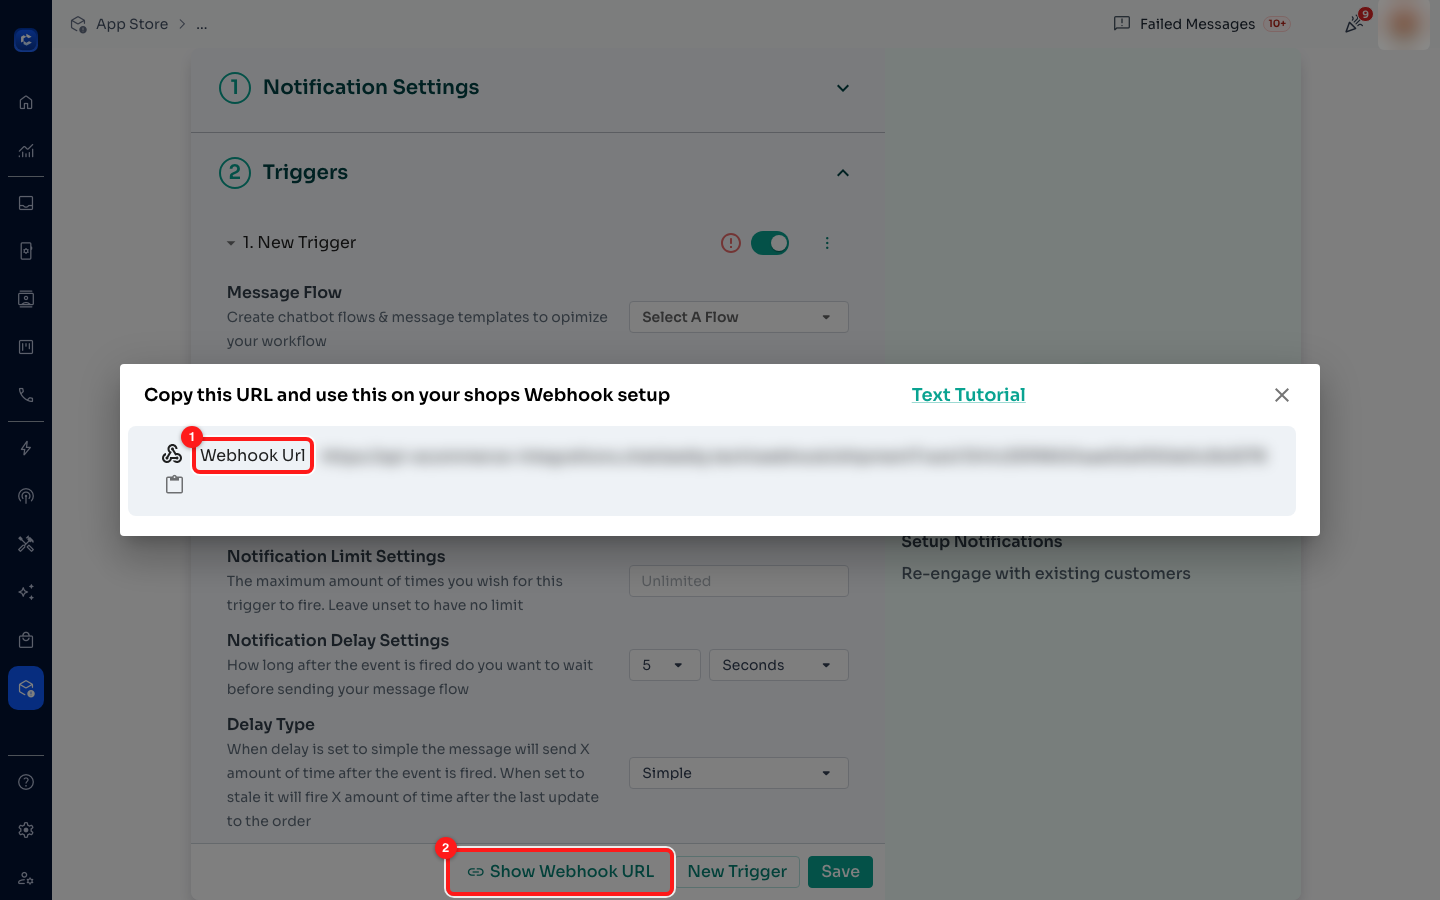
① the per-service webhook URL (blurred — treat it as a password). ② Text Tutorial, the per-app setup guide. ③ Show Webhook URL.
🔐 That URL is a credential. Anyone who has it can push events into your team and make your flows send WhatsApp messages. Paste it only into the shop's own webhook settings — never into a public ticket, a screenshot, or a shared doc. If it leaks, delete the service and reconnect it to get a new one.
Where to find the webhook URL — and why it is sometimes not there
The button sits at the bottom of the service editor, so the full path to it is App Store ➜ the service's row ⋮ → Edit ➜ Show Webhook URL. Two things have to be true or the button is not on screen at all, which is where most of the confusion comes from:
- The service has to be saved first. The URL has that one service's identity baked into it, so it cannot exist before the service does. If you have just picked your app and filled in its credential, press Save, then reopen the service with ⋮ → Edit — the button is there the second time.
- The app has to be one that uses a webhook. Several do not. The Chrome-extension apps (Shopline, Shopline Global, Tokopedia) are connected by installing ChatDaddy's browser extension instead, and others are read through the credential you already gave — Google Form is read from the shared sheet, for instance. For those, no button and no URL is correct, not a fault.
What you get back is one long address unique to this single service. It is built from ChatDaddy's integrations host, this service's own id, and a secret generated for it alone — which is exactly why it counts as a password, and why a URL copied from another service, another team, or a colleague's screenshot will never work for yours.
- Press Show Webhook URL, then the copy icon beside the address. Copy it — do not retype it; one wrong character fails silently.
- In the other system, find its webhook or notification settings and paste it in. In Shopify that is Settings ➜ Notifications ➜ Webhooks with the format set to JSON; every platform words it differently.
- Choose which events that system should send — order paid, booking created, payment failed — and save it there. This half of the wiring lives outside ChatDaddy, and nothing inside ChatDaddy can confirm you got it right.
- Do one real action in that system, then come back to the App Store list. Triggered going up is your proof the URL is pasted correctly.
The Text Tutorial link at the top of the dialog opens per-app setup notes where ChatDaddy has written them — it is filled in for some apps and not others. If it goes nowhere, use that app's own webhook documentation alongside the four steps above.
🔁 There is no "regenerate" button. The only way to change a webhook URL is to delete the service and connect it again, which issues a fresh one — and means going back into the other system to replace the old address everywhere you pasted it. Worth knowing before you put it somewhere you later regret.
Finally, press Save ①. Nothing you configured exists until you do.
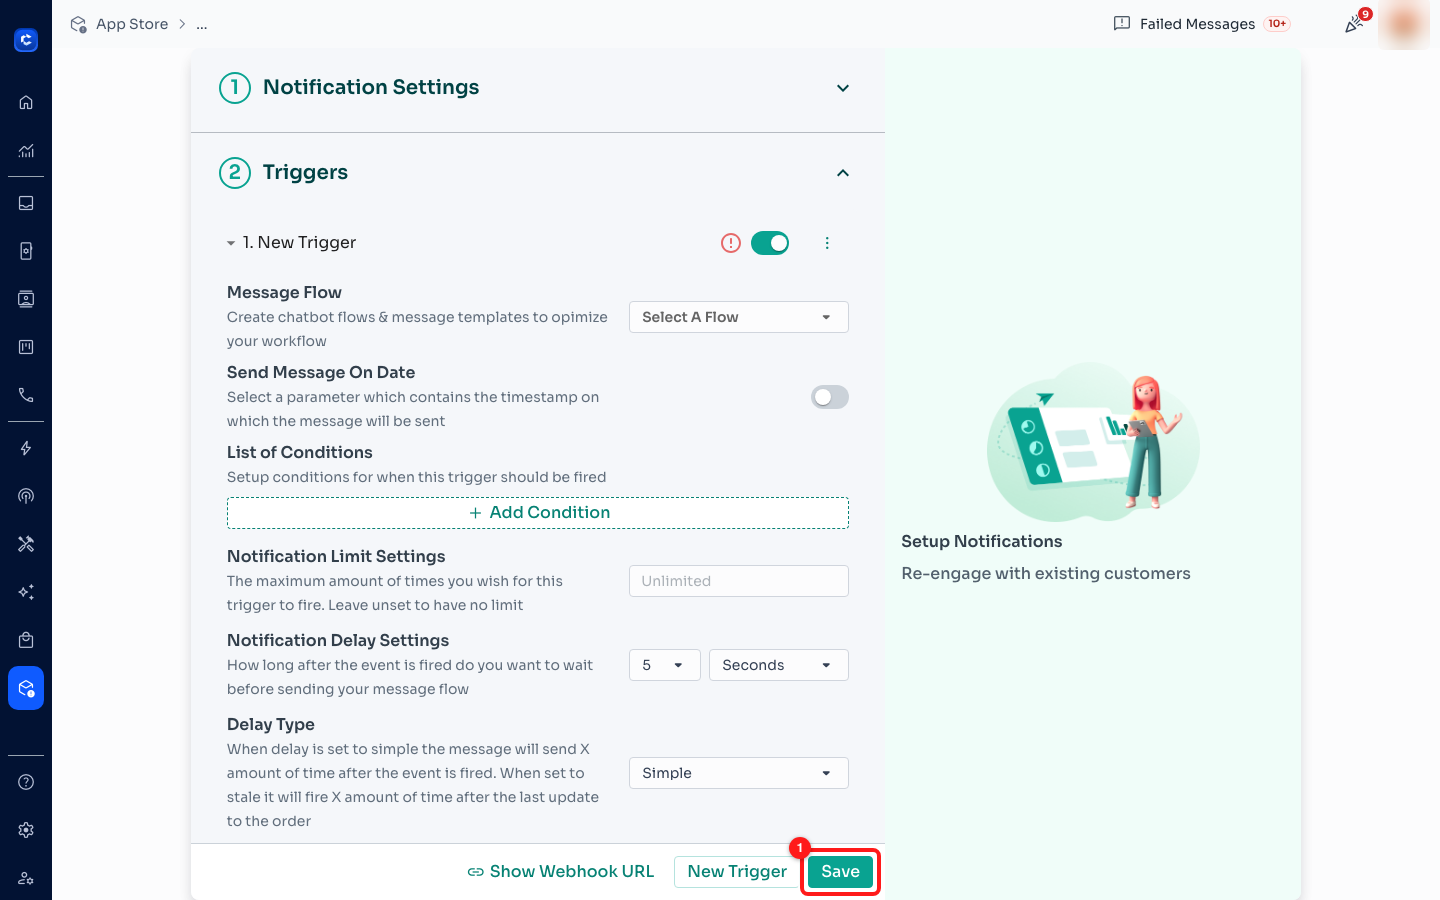
① Save. An unsaved trigger never fires.
Step 6 — The flow side of the chain
The App Store only decides when to run and which flow. What the customer actually reads lives in the Flow Builder, so open the flow you picked and check three things ①②③.
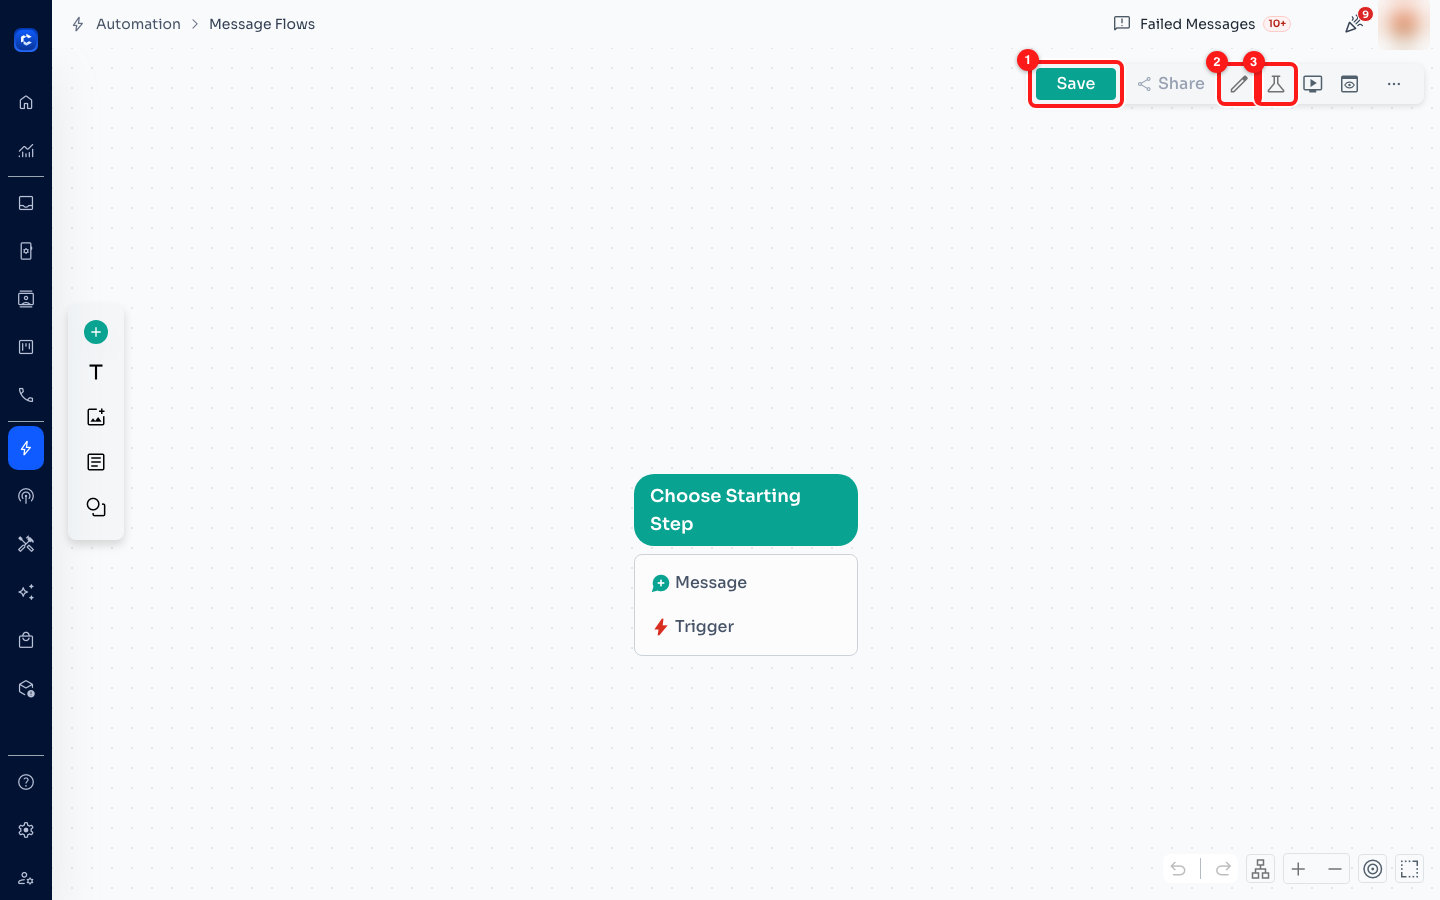
① Save — the flow must be saved to appear in Select A Flow. ② Edit Flow Details — give it a name you will recognise in the picker. ③ Test — send the flow to your own number.
- The flow has a starting step. This is the same thing the picker warns about.
- The flow is saved — an unsaved draft cannot be selected.
- The flow has a name you will recognise. A picker full of "Flow created on August 31, 2026 at 9:29 AM" is how the wrong flow gets wired up. Rename it with Edit Flow Details.
What changes once it is live
- App Store ➜ Triggered counts up every time the app fires the trigger.
- App Store ➜ Last Activity shows when it last happened.
- Inbox — the messages the flow sends appear in each customer's conversation like any other message, on the channel you chose.
- Failed Messages, in the top bar — sends that were attempted and rejected. Check here when Triggered is going up but customers say nothing arrived.
- Credits — every message an integration sends is billed exactly like a manual one, so a busy shop is a real line on the bill. Notification Limit Settings is the brake.
When the integration does nothing: the checklist
Work it in this order — it goes from the outside in, so you stop at the first thing that is wrong instead of debugging the wrong end.
- Triggered is 0 / Last Activity is
Never Activated→ the other system has never called ChatDaddy. The webhook URL is not pasted into it, or is pasted wrong. Start at Show Webhook URL and its Text Tutorial. - Triggered is going up but nothing sends → either Channel is unset in step ① Notification Settings, or the flow you chose says No starting point set.
- The trigger row shows a red warning icon → it is not finished. The usual missing piece is Message Flow.
- It worked in testing but not for customers → Override Recipient is still on. Turn it off.
- Some customers get it, some do not → Default Country Code is unset and those orders had no country code on the phone number.
- It fires but the message is late → Notification Delay Settings, and check whether Delay Type is on stale (the clock restarts every time the order is updated).
- It stopped after a while → Notification Limit Settings has been reached.
- Nothing at all, everything looks right → check the Status toggle on the list row and the enable toggle on the trigger itself. They are two separate switches.
- The other system says the connection expired → row ⋮ ➜ Relogin.
- A shop you just connected is not in the list → toolbar ⋮ ➜ Reload My Services.
- There is no Show Webhook URL button → either the service has not been saved yet (save it, then reopen it with ⋮ → Edit), or this app does not use a webhook at all — the Chrome-extension apps and Google Form do not.
- Google Form: Triggered stays 0 → the response sheet has almost certainly not been shared with
infoautomation523@gmail.comas Viewer. The other common cause is pasting the form's link instead of the response spreadsheet's. - + Add Service is asking for values you do not have → you are in the wrong dialog. Service ID and Service URL describe a custom connector and are handed to you by whoever built it; to connect a supported app, use + Create.
- Your app is not in the 21 → it never will be here. Use Tools ➜ Zapier, or the Webhook app trigger in the Flow Builder.
Quick reference
- Connect an app — App Store ➜ + Create ➜ pick from 21 ➜ fill its credential ➜ Save.
- Configure delivery — row ⋮ ➜ Edit ➜ ① Notification Settings ➜ Channel + Default Country Code ➜ Continue.
- Wire it to a flow — ② Triggers ➜ New Trigger ➜ Add Custom Trigger ➜ expand ➜ Select A Flow.
- Connect the other system — row ⋮ → Edit ➜ Show Webhook URL (it only appears once the service is saved) ➜ copy ➜ paste into that app's own webhook settings.
- Google Form — link the form to a response sheet ➜ share that sheet with
infoautomation523@gmail.comas Viewer ➜ paste the sheet link or ID into Google Form Username. - Any app's credential — press the ⓘ on its card in the + Create grid for that app's own setup steps.
- Test safely — Override Recipient on ➜ Save ➜ trigger ⋮ ➜ Test ➜ check Triggered went up ➜ Override Recipient off.
- Prove it is live — App Store ➜ Triggered and Last Activity.