
How to Control How Often a Message Flow Trigger Fires
Every trigger in a Message Flow has a Trigger Frequency setting that decides how often one contact can set the same flow off. Learn where it is, what “Default (once per 30s)” really means, how to set your own interval, and what the extra timing controls on a scheduled broadcast do.
Also searched as: How to Control How Often a Message Flow Trigger Fires, Where to find it, Open the trigger and check it is switched on, Find Trigger Frequency under Advanced Settings, Choose Default or set your own interval, Set the number and the unit, Decide whether the chat should be marked as read, Save the flow, The overall limit on a trigger, Extra timing controls on a scheduled broadcast, Control, Often, Message, Flow, Trigger
A trigger is the event that starts a Message Flow — a new message arriving, a ticket changing, a contact being created. Left alone, a trigger fires every time that event happens, which means a chatty customer can set the same flow off again and again in a few seconds.
Trigger Frequency is the setting that stops that. It puts a cooling-off period between one contact and the next run of the same flow. It is worth checking on any flow that replies to incoming messages, and on anything that sends a greeting, a reminder or a notification.
👤 Trigger Frequency is counted per contact, not for your whole team. Setting it to once per hour does not stop the flow running for a hundred different people in that hour — it stops the same person setting it off more than once.
Where to find it
Go to Automation → Message Flows, open the flow you want to change, and look for the Trigger node on the canvas. It is the node the flow starts from, marked with a small lightning label.
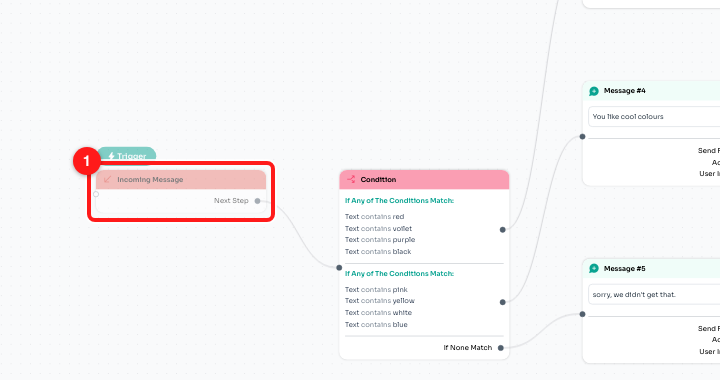
The Trigger node on the flow canvas (1). Click it to open its settings.
Step-by-step
Step 1 — Open the trigger and check it is switched on
Click the Trigger node. Its settings open in a panel on the left, headed with the name of the event — Incoming Message in the example below. The first control is Enabled. A trigger with this switch off never fires, whatever the rest of the settings say, so check it before you go any further.
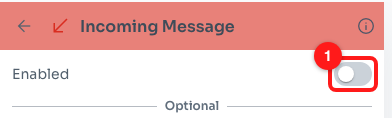
Step 1 — the Enabled switch (1). Here it is off, so this trigger is dormant.
Step 2 — Find Trigger Frequency under Advanced Settings
Scroll past the Optional divider to Advanced Settings. Trigger Frequency is the first thing there, with the rule spelled out underneath it: “Limit the maximum number of times a contact can trigger this event within a given time frame. The minimum is once per contact, per 5 seconds.”
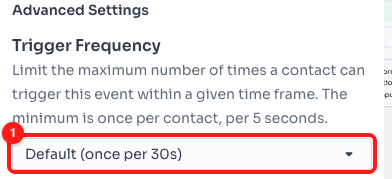
Step 2 — the Trigger Frequency dropdown (1), showing the default setting.
Step 3 — Choose Default or set your own interval
Open the dropdown and you get two choices.
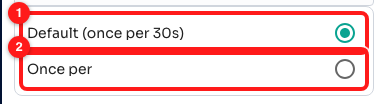
Step 3 — Default (once per 30s) (1) and Once per (2).
- Default (once per 30s) — the setting every new trigger starts on. The same contact cannot set this flow off more than once in any 30 seconds.
- Once per — you choose the gap yourself. Pick this when 30 seconds is too short (a welcome message you only want sent once a day) or when you need it tighter.
👆 Click the circle on the right-hand side of the row, not the words. Clicking the label itself leaves the list open and changes nothing — the easiest way to think you have switched to Once per when you have not.
Step 4 — Set the number and the unit
Choosing Once per adds a second row underneath: a number box and a unit. It starts at 30 Seconds, which matches the default you have just replaced. Type the number you want, then click somewhere else in the panel — the value is only taken once the box loses focus.
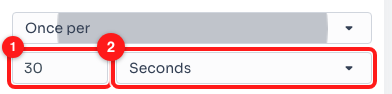
Step 4 — the interval (1) and its unit (2).
The unit dropdown offers Seconds, Minutes and Hours, so anything from a few seconds to a whole day is possible — 12 Hours, for example, lets a contact restart the flow twice a day.
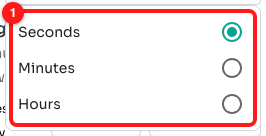
The three units available for the interval (1).
⏱️ The floor is 5 seconds. Enter anything shorter and ChatDaddy quietly raises it back to 5 seconds when you leave the box, so a runaway flow can never answer the same contact faster than that.
Step 5 — Decide whether the chat should be marked as read
The last control in Advanced Settings is Mark chat as read if triggered. Tick it if you do not want conversations this flow handles to keep sitting in your unread list; leave it clear if you would rather see every conversation the automation touched.

Step 5 — Mark chat as read if triggered (1).
Step 6 — Save the flow
Nothing you change in this panel takes effect until you click Save at the top right of the builder. Until then the flow keeps running on its old settings.
The overall limit on a trigger
Underneath Trigger Frequency you will see a line of grey text reading “Overall, this trigger is allowed to run a maximum of 100 times every 1 minute. To request a higher limit, please contact support.” That is a separate, account-wide ceiling and it is not something you can edit yourself.
- Trigger Frequency is the limit per contact — you set it.
- The overall limit is the total number of runs across all your contacts in the window — we set it, and by default it is 100 runs a minute.
- If a busy campaign is likely to push past that, contact ChatDaddy support before you launch it and ask for the limit to be raised.
Extra timing controls on a scheduled broadcast
A flow whose trigger is a broadcast — one that goes out at a set date and time rather than in response to something a contact does — has a different set of controls in the same panel. Trigger Frequency is replaced by a sending speed, and the panel gains a Step 1 / Step 2 layout.
- Start Broadcast at — the date and time the send begins. Once it has run, the panel says “Sending next at …”, or warns you the broadcast has already been sent.
- Send — 24 Hours sends around the clock, or switch to Custom to add a start and an end time so the broadcast only goes out during your business hours. Custom hours start at 8:00 AM–8:00 PM in your own timezone.
- Repeats — Does not repeat, or every day, week, month or year. Choosing any repeat adds an End Broadcast at date, after which it stops.
- Sending Speed (Average) — how fast messages leave, from the fastest option (about two messages a second) down to the safest (about one message every five minutes). There is also a Custom option with a slider.
⚠️ Pick a fast speed on an ordinary WhatsApp channel and a warning appears: “Sending messages so quickly can cause your number to get banned. Please keep it to a minimum of 5s or select a channel that supports Whatsapp Business Api.” Take it seriously — a banned number is far more expensive than a slow send.
These broadcast controls only appear on triggers that already run on a schedule. If you want to set one up, see Broadcast Trigger and How to create a broadcast.
Troubleshooting
I clicked “Once per” but the box still says “Default (once per 30s)”.
The list only responds to the round tick control at the right-hand end of the row. Clicking the words does nothing at all. Reopen the dropdown and click the circle beside “Once per” — the Save button at the top of the builder turning active is how you know it registered.
I typed an interval and it changed to something else.
Two things can do that. Anything under 5 seconds is raised to 5 seconds, because that is the hard minimum. And the number is only read when the box loses focus, so if you typed a value and immediately hit Save, the old value may be what got saved. Click elsewhere in the panel first, check the number, then Save.
My flow still replies twice to the same person.
Check three things. First, that you clicked Save after changing the frequency. Second, that the two replies really came from the same flow — a second flow with its own trigger has its own separate frequency setting. Third, that the two messages are further apart than your interval; the limit is a gap between runs, not a cap of one run ever.
The flow never runs at all.
Start with the Enabled switch at the top of the trigger panel — a trigger that is off never fires, and flows imported from a template arrive with their triggers switched off. Then check the flow itself is active on the Message Flows list. Trigger Frequency only delays runs; it never blocks them entirely.
Should I set a long interval to save credits?
It can help on flows that answer incoming messages, because each run that does not happen is a message that does not get sent. But be careful with anything a customer is waiting on: if someone messages you twice about different things and your interval is an hour, the second message goes unanswered by the automation.
Does changing the frequency affect a flow that is already running?
It applies from the moment you save. A run that has already started finishes as normal; the new interval governs the next time that contact tries to set the flow off. Nothing that has already been sent is undone.