
How Workspace Permissions Work
Every teammate on a ChatDaddy team has a role, and the role decides which pages and buttons they get. Learn what Admin, Editor, Agent and Viewer each include, how to fine-tune a single permission, and what to do when a teammate is told they do not have access.
Also searched as: How Workspace Permissions Work, Roles at a glance, Open Settings → Members, Pick the right role, Open Manage Access to see the detail, Switch a single permission, Decide which channels they can work in, Check the result on the Members list, “You do not have access to this page”, Workspace, Permissions, Work
Everyone you add to your ChatDaddy team gets a role. The role decides which pages appear in their navigation bar, which buttons they can press, and which chats and contacts they can see. On top of the role you can switch individual permissions on and off, so a teammate gets exactly the access their job needs and nothing more.
This article is for whoever looks after the team — the owner or an admin — and for any teammate who has been told they do not have access to something and wants to know who can fix it.
🔑 Permissions live in Settings → Members. To change them for someone else you need the Update team details and Update/delete team members permissions — in practice, the team owner or an Admin. Nobody can edit their own access, and only the owner can edit the owner's access.
Roles at a glance
ChatDaddy has four roles, plus the Owner — the person who created the team. Each role is a ready-made set of permissions:
- Owner — the account that created the team. Has everything, and is the only one who can change the owner's own access. The Owner row cannot be edited by anyone else.
- Admin — “Access to everything.” Use this for the people who run the workspace: billing, channels, team members and all settings.
- Editor — “Can edit & create but not delete. Cannot view billing.” A good default for staff who build broadcasts, flows and products but should not remove things or see invoices.
- Agent — “Can create & access keyword replies and message flows. Only assigned chats visible.” Built for support staff working the Inbox.
- Viewer — “Can view most features. Does not have edit access.” Read-only, for stakeholders who just need to look.
ℹ️ Roles are a starting point, not a cage. After you pick one you can tick or untick any single permission for that teammate — see Step 4 below.
Step-by-step
Step 1 — Open Settings → Members
Click the settings icon at the bottom of the left-hand navigation bar, then choose Members. You get one row per teammate, with their role in the Team Permissions column and a Manage Access link on the right.
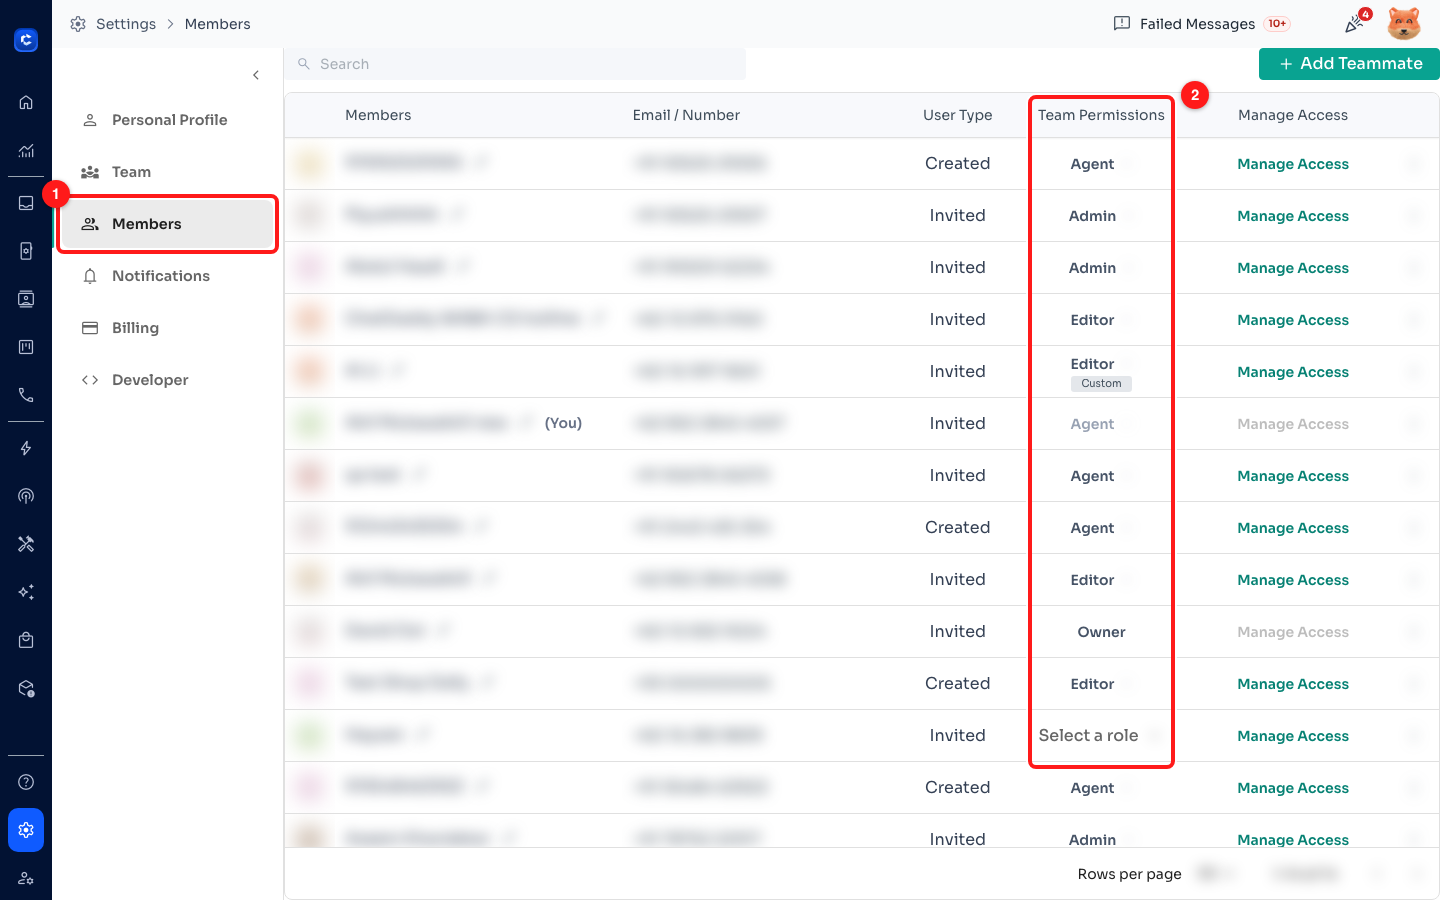
Step 1 — the Members tab in Settings (1) and the Team Permissions column, which shows every teammate's current role (2).
🚫 If this page reads “You do not have access to this information” instead of a list, your own role does not include Read the members of your team. Ask the team owner or an admin to switch it on for you.
Step 2 — Pick the right role
Click the role next to a teammate's name. The dropdown lists all four roles with a one-line summary of each, so you can compare them before choosing. Selecting a role saves straight away.
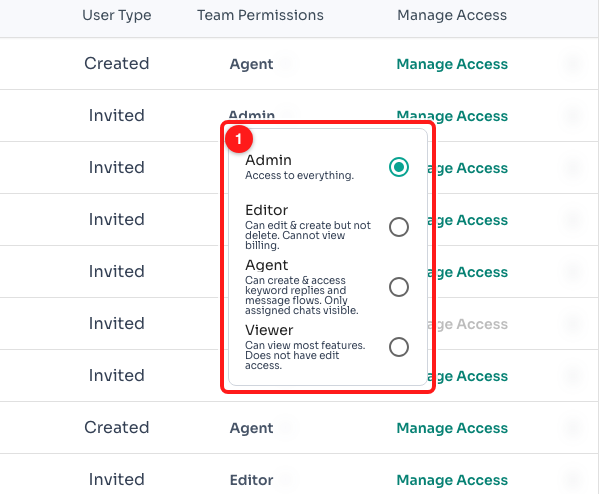
Step 2 — the role dropdown with the description of each role (1).
⚠️ Choosing a role replaces that teammate's whole permission list with the standard set for the new role. Any single permissions you had switched on or off by hand are reset, so set the role first and fine-tune afterwards.
Step 3 — Open Manage Access to see the detail
Click Manage Access on the teammate's row. Their permissions are grouped into the sections of the app — Analytics, CRM, Inbox, Calls, Automation, Tools, App Store & API, Shop and Settings — and each group has a single tick box that tells you where they stand.
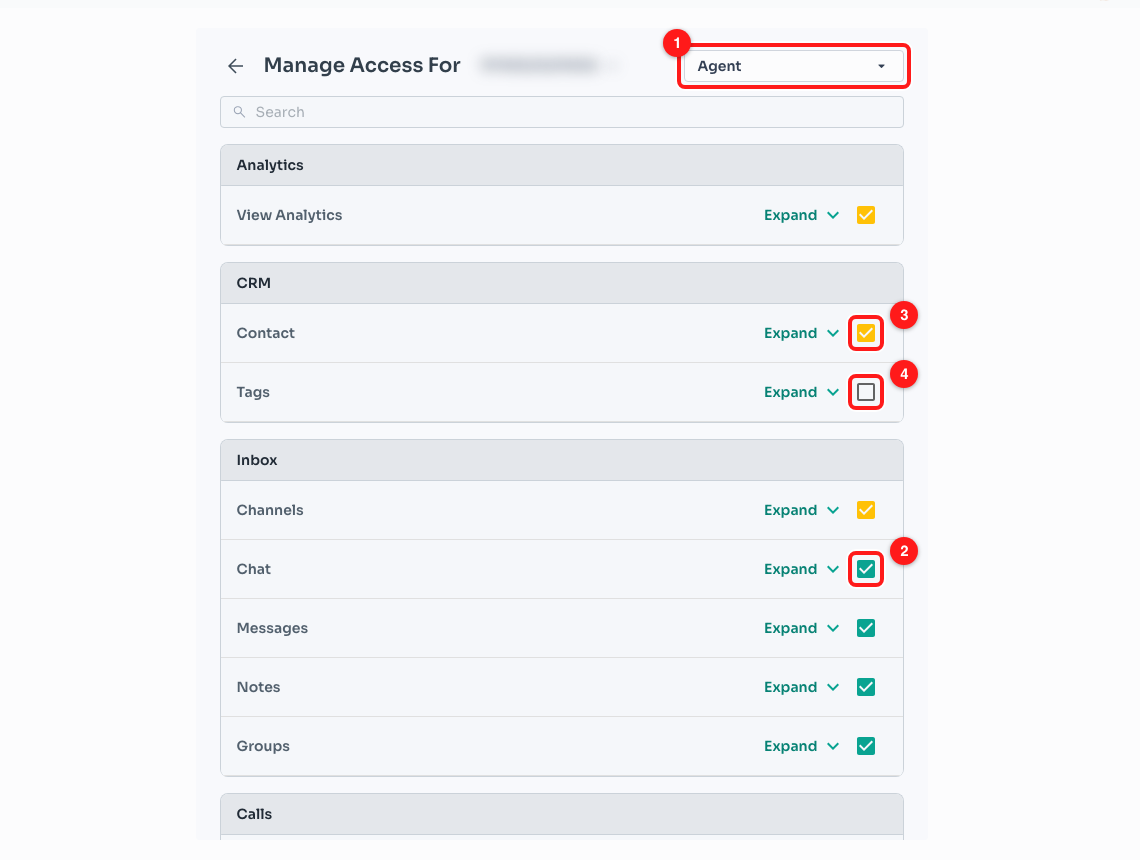
Step 3 — the role for this member (1); a green tick means the whole group is on (2); an amber tick means only some of it is (3); an empty box means none of it is (4).
- Green tick — the teammate has every permission in that group.
- Amber tick — they have some of them. Expand the group to see which.
- Empty box — they have none of them.
Ticking or unticking the group box switches every permission inside it at once. The Search field at the top filters the whole page down to the permissions whose name matches what you type, which is the quickest way to find one setting without hunting through the sections.
Step 4 — Switch a single permission
Click Expand on any group to see the permissions inside it, each with its own tick box. Changes save as you make them — there is no Save button.
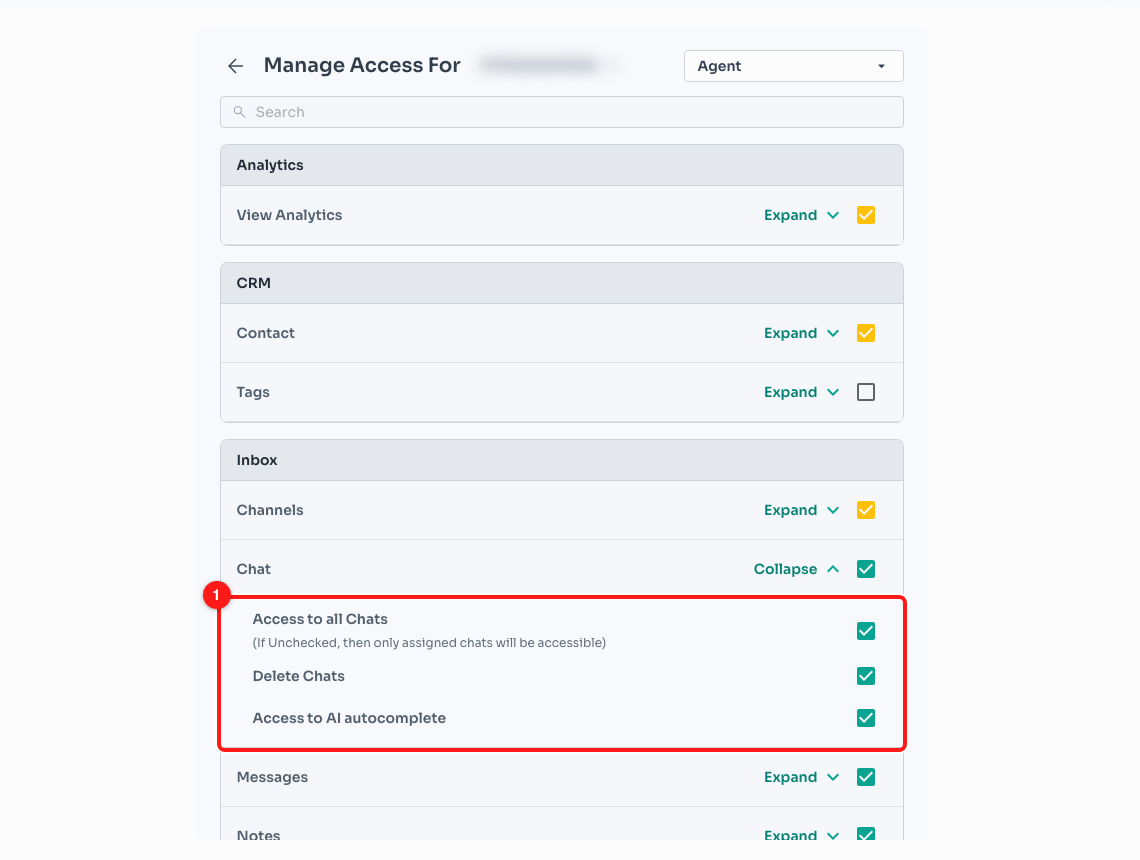
Step 4 — the Inbox → Chat group expanded, showing its three individual permissions (1).
💬 The most important one lives here: Access to all Chats. Untick it and the note under it applies — “(If Unchecked, then only assigned chats will be accessible)”. The teammate then sees only the conversations assigned to them. Send Messages and Read All contacts behave the same way.
Step 5 — Decide which channels they can work in
The Inbox → Channels group controls channels rather than chats. Add a Channel, Update a Channel and Delete a Channel are the actions; Read all available Channels is the one that decides how much they see.
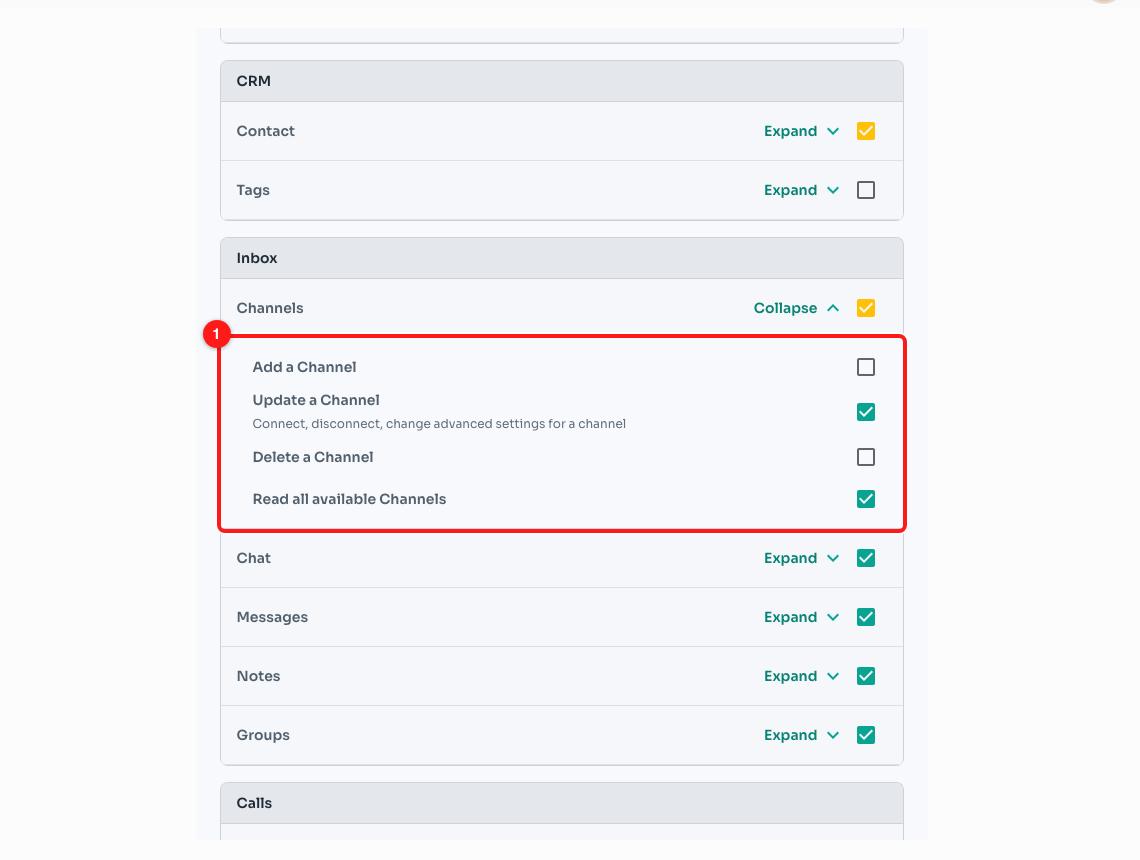
Step 5 — the Channels group expanded (1). “Read all available Channels” is on here, so this teammate can see every channel on the team.
Leave Read all available Channels ticked and the teammate can work in every channel on the team. Untick it and the group expands into a list of your channels with a tick box each, so you can assign only the ones they should handle — useful when one team runs several brands or countries from a single workspace.
Step 6 — Check the result on the Members list
Go back to Settings → Members. A small Custom label under a role means that teammate's permissions no longer match the standard set for that role — in other words, somebody has fine-tuned them. It is a reminder, not a problem.
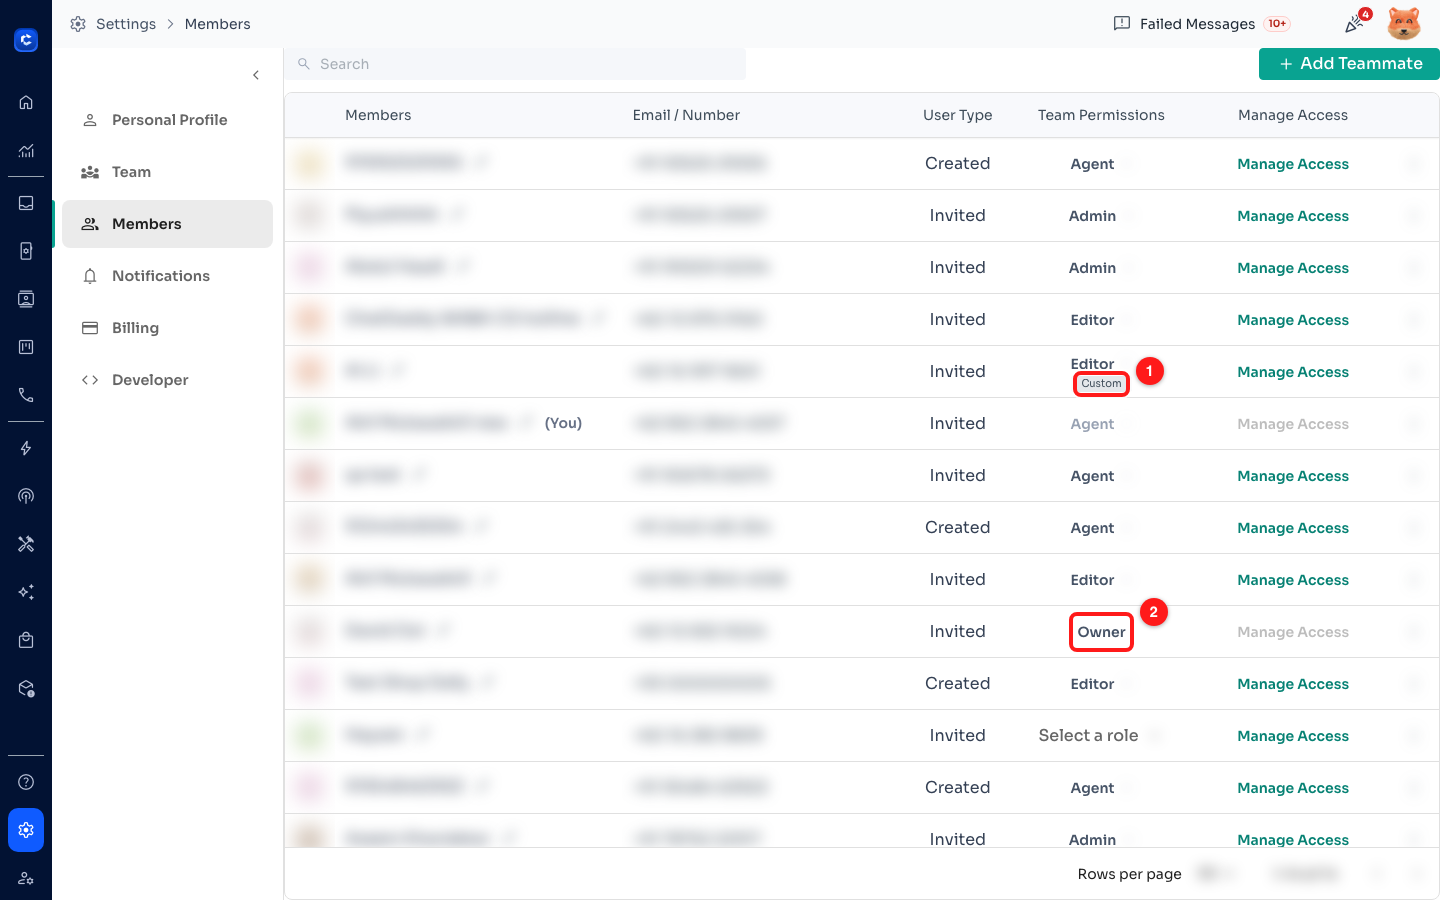
Step 6 — the Custom label marks fine-tuned permissions (1); the team Owner has no role dropdown and no Manage Access link (2).
“You do not have access to this page”
ChatDaddy hides the pages a teammate cannot open, so most of the time they simply never see them in the navigation bar. They meet an access message when they arrive at a page some other way — an old bookmark, or a link a colleague pasted into a chat.
- A whole page they are not allowed to open tells them the page is not available to them. Nothing is broken and nothing was lost — the page exists, their role just does not include it.
- A section inside a page they are not allowed to see reads “You do not have access to this information”, with the rest of the page working normally.
- A button they cannot use is greyed out, and hovering over it explains why — for example “You do not have access to make outgoing calls”.
✅ The fix is always the same: a team owner or admin opens Settings → Members → Manage Access for that person and switches the permission on. The teammate should then refresh the page.
Frequently asked questions
Why is Manage Access greyed out for some rows?
Two rows always have it disabled: your own, because nobody can edit their own access, and the team Owner's, because only the owner can change the owner's access. Everyone else should be clickable if you have the permission to manage members.
I opened Manage Access but every tick box is greyed out.
A line of grey text above the list says why. The usual reasons are: “You do not have sufficient 'Team Access' to manage members” (you are missing the Update team details or Update/delete team members permission), “Non-admins cannot manage admins”, or “You cannot manage members with higher access than you”. Ask the team owner or an admin to make the change.
Does changing someone's role wipe the permissions I set by hand?
Yes. Picking a role from the dropdown replaces the whole list with that role's standard permissions. Set the role first, then fine-tune the individual tick boxes — and the Custom label on the Members list will remind you that you did.
Can I stop a teammate seeing customers' phone numbers?
Yes. Untick Access Contact's Personal Information in the CRM → Contact group. Phone numbers and email addresses are then partly hidden for that teammate.
How do I limit an agent to their own conversations?
In Manage Access, expand Inbox → Chat and untick Access to all Chats. They keep access to the chats assigned to them and lose the rest. Do the same with Send Messages under Inbox → Messages, and with Read All contacts under CRM → Contact, if you want the same limit there.
Who can see billing?
Only Admins and the Owner. The Billing permissions — Read Billing History and Update/make new payments — sit in the Settings → Billing group and are not part of the Editor, Agent or Viewer roles.
Do permission changes apply straight away?
They save as soon as you tick the box. The teammate may need to refresh their browser tab before a newly granted page appears in their navigation bar.