
Bulk Actions in the Inbox: Pin, Mute, Archive, Mark as Read and Delete
Tick several chats in your Inbox and act on all of them at once. Learn how the selection bar works, what each of the seven bulk actions does, and what to check before you run one.
Also searched as: Bulk Actions in the Inbox: Pin, Mute, Archive, Mark as Read and Delete, What you can do in bulk, Tick the chats you want, Check the selection bar, Open Bulk Actions and choose what to do, Confirm, if you chose Delete, Bulk, Actions, Inbox, Mute, Archive, Mark, Read, Delete
When your Inbox has built up, changing chats one at a time is slow. Tick a few chats instead and a selection bar appears at the top of the chat list with a Bulk Actions button, which applies one change to every chat you have ticked.
This is useful for tidying up after a busy day — archiving everything you have finished with, marking a run of chats as read, or muting a set of noisy groups.
⚠️ Bulk actions apply only to the chats you have ticked, and a bulk run cannot be stopped once it starts — a progress box appears and stays until every chat has been updated. Check your selection before you choose an action.
What you can do in bulk
The Bulk Actions menu has seven items. Most are toggles: the wording changes to match what you have selected, so if every ticked chat is already pinned the first item reads Unpin Chats rather than Pin Chats.
- Pin Chats / Unpin Chats — keeps chats at the top of the list. Note that ChatDaddy allows a maximum of 3 pinned chats; if you go over, the extra chats are skipped.
- Mute Notifications — silences alerts for the ticked chats. Choosing it again on a set of already-muted chats unmutes them.
- Archive Chats / Unarchive Chats — moves chats out of the main list without deleting anything. This is the safe way to clear a backlog.
- Mark Chat as Read — despite the wording, this one also toggles: if every ticked chat is already read, choosing it marks them all as unread instead.
- Clear All Pending Messages — deletes messages still queued to send in those chats. It does not touch messages that have already gone out.
- Delete Chat — deletes the ticked chats and their conversations. This cannot be undone, and it asks you to confirm first.
- Export Chat History — downloads the full history of the ticked chats. This one is a paid action and opens its own dialog.
ℹ️ Looking for bulk assign or bulk tag? Those are not in this menu. Assigning a teammate and adding tags are done on each chat row individually — see the related articles at the end.
Step-by-step
Step 1 — Tick the chats you want
Open the Inbox from the left-hand menu. Hover over a chat and a small checkbox appears on the corner of its profile picture — click it to select that chat. Once one chat is ticked, the checkboxes stay visible on every row, so you can carry on ticking without hovering.
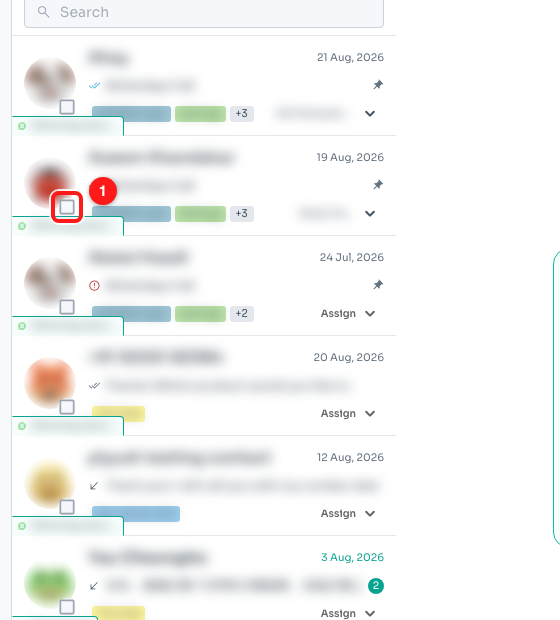
Step 1 — the checkbox (1) sits on the corner of each chat’s profile picture and only appears when you hover the row.
Step 2 — Check the selection bar
A bar appears above the chat list showing how many chats you have picked, for example “3 Selected”. The checkbox at the left of that bar selects every chat currently loaded in the list; clicking it again clears the whole selection.
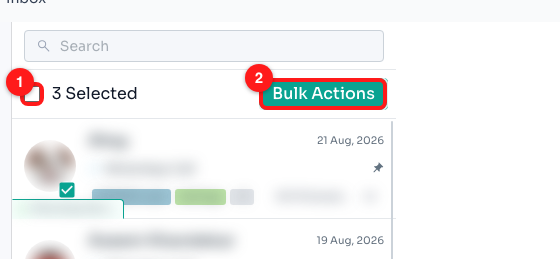
Step 2 — the select-all checkbox (1) and the green Bulk Actions button (2), with the running count between them.
📜 The select-all checkbox covers the chats already loaded in the list, not every chat that matches your filter. If you have a long list, scroll down to load more chats before using it, and check the count in the bar is the number you expect.
Step 3 — Open Bulk Actions and choose what to do
Click the green Bulk Actions button to open the menu, then click the action you want. Apart from Delete Chat, actions start immediately — there is no second confirmation.
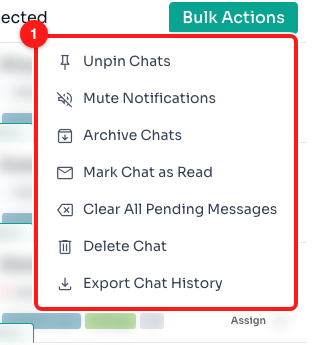
Step 3 — the full Bulk Actions menu (1). The first item reads “Unpin Chats” here because all three selected chats were already pinned.
While the change is applied you will see an Updating Chats box with a progress count such as 4 / 12. Chats are updated one at a time, so a large selection takes a little while. The box cannot be closed or cancelled, so please let it finish rather than reloading the page.
When it is done, ChatDaddy confirms with “Chats were updated Successfully” and your selection is cleared automatically. If some chats could not be updated, the message instead tells you how many succeeded, how many failed, and why.
Step 4 — Confirm, if you chose Delete
Deleting is the only bulk action that asks first. A Delete box warns you that “You cannot recover those chats' conversations after deleting.” Click the red Delete button to go ahead.
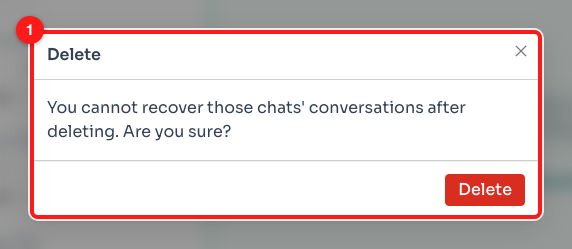
Step 4 — the delete confirmation (1). To back out, close the box with the ✕ in the corner — there is no Cancel button.
🗄️ If you only want the chats out of your way, use Archive Chats instead of Delete Chat. Archiving is reversible; deleting is not.
Troubleshooting
I cannot see any checkboxes on my chats.
The checkboxes are hidden until you hover over a chat row. Move your mouse over a chat and look at the bottom corner of its profile picture. On a touch screen, bulk selection is only available in the web app on a computer.
“Delete Chat” or “Export Chat History” is greyed out.
Both are permission-controlled. Hovering over a greyed-out item shows “You do not have permission to perform this action”. Ask your team owner to give your user the delete or export permission.
Some chats did not get pinned.
ChatDaddy allows a maximum of 3 pinned chats. If your selection would take you over that, the extra chats are skipped and you will see “Cannot pin more than 3 chats”. Unpin something first, or pin fewer chats.
I chose “Mark Chat as Read” but my chats became unread.
That item is a toggle even though its wording does not change. If every chat you ticked was already read, choosing it marks them all as unread. Choose it once more to switch them back.
The selection cleared before I finished.
Your selection is cleared automatically after every bulk action, and also after you close the export dialog. This is normal — tick the chats again for your next action.
The count in the bar is lower than the number of chats I want.
The select-all checkbox only covers chats that have loaded into the list. Scroll to the bottom of the chat list so more chats load, then tick select-all again. For very large jobs, filter the list first so the chats you want are together.