
How to Create and Manage Webhooks
Send ChatDaddy events to your own server in real time. Learn where the Web Hooks list lives, how to create a subscription, which events you can choose, and how to edit, pause or delete one.
Also searched as: How to Create and Manage Webhooks, Open Settings → Developer → Web Hooks, Read the list you already have, Start a new webhook, Enter the URL that will receive the events, Choose which events to listen for, Check Enabled, then Save, Edit, pause or delete a webhook later, What ChatDaddy actually sends, Create, Manage, Webhooks
A webhook tells ChatDaddy to send a message to your own server the moment something happens in your team — a new message arrives, a contact is updated, an automation runs. Instead of your system asking ChatDaddy “anything new?” every few minutes, ChatDaddy pushes the event to you as it happens.
This is for developers and for anyone wiring ChatDaddy into another tool. If you only want to connect ChatDaddy to an app such as Google Sheets or a CRM, Zapier is usually the easier route — it gives you a webhook URL to paste in here.
🔗 Webhooks live in Settings → Developer → Web Hooks. A webhook needs two things: a URL that accepts a POST request, and at least one event to listen for. Save stays greyed out until you have set both.
Before you start
- You need a URL that is reachable from the internet and answers POST requests. A
localhostaddress will not work. - Deleting a webhook is permission-controlled. If Delete does nothing for you, ask your team owner to check your role.
- Webhooks are set per team. If you run several ChatDaddy teams, add the webhook in each one.
- Just testing? Use a free request bin such as
webhook.site, paste the URL it gives you, and you can watch the events land without writing any code.
Step-by-step
Step 1 — Open Settings → Developer → Web Hooks
Click the gear icon at the bottom of the left rail to open Settings, then Developer in the settings menu. The page opens on the Web Hooks tab; the API Token tab next to it is where you manage API keys, which are a separate thing.
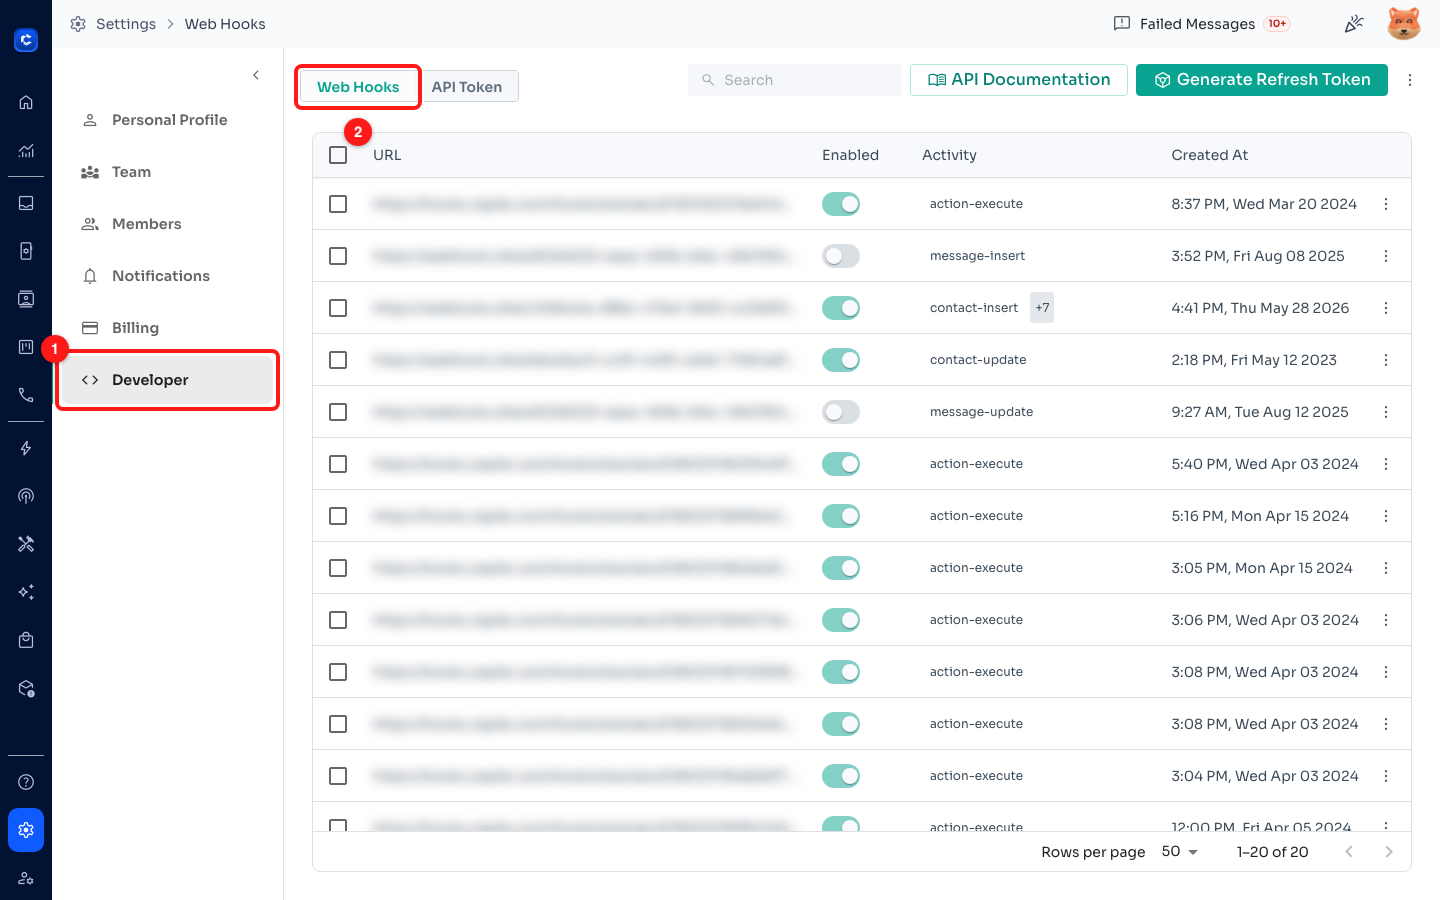
Step 1 — Developer in the settings menu (1), and the Web Hooks tab (2). The endpoint URLs in this example are blurred.
Step 2 — Read the list you already have
Every webhook on the team is listed with four columns:
- URL — the address ChatDaddy posts to. Use the Search box above the table to filter the list by any part of a URL.
- Enabled — whether the webhook is currently firing. This switch is read-only here; to turn a webhook on or off you open it with Edit (Step 6).
- Activity — the events it listens for. Only the first event is shown as a chip; a badge like +7 means there are seven more. Open the webhook with Edit to see the full list.
- Created At — when the webhook was added.
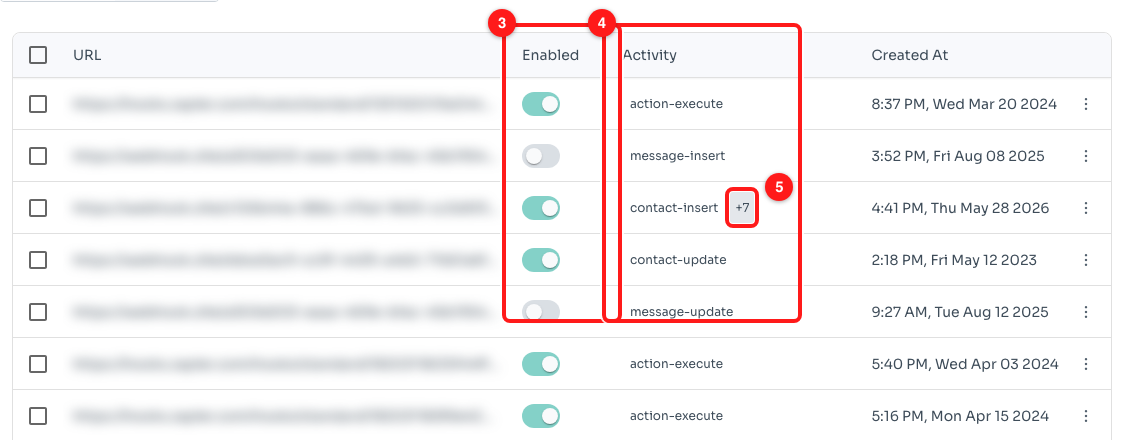
Step 2 — the Enabled column (3), the Activity column (4), and the “+7” badge that hides the remaining events (5).
Step 3 — Start a new webhook
Click the ⋮ button at the top right of the table, then Create. (The button sits in that overflow menu rather than on the toolbar, next to API Documentation and Generate Refresh Token.)
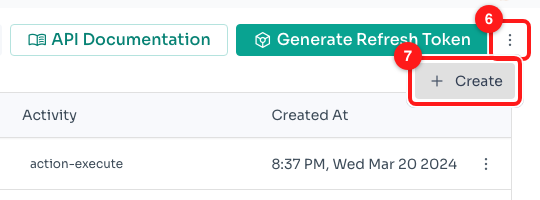
Step 3 — the ⋮ menu at the top right of the table (6) and the Create option inside it (7).
Step 4 — Enter the URL that will receive the events
In the Create Webhook dialog, type the full address of your endpoint into the URL field, including https:// — for example https://example.com/chatdaddy-webhook. ChatDaddy sends a POST request to this exact address every time one of your chosen events fires.
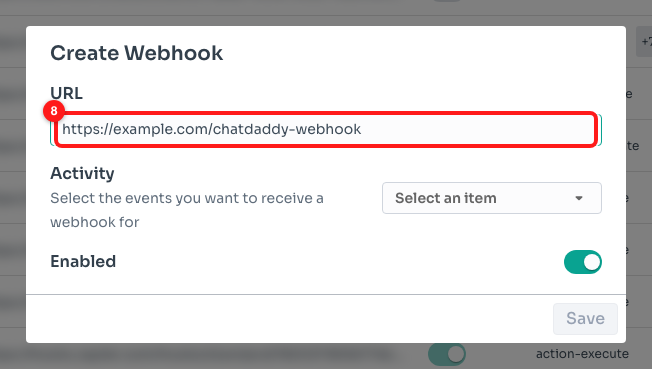
Step 4 — the URL field, with an example endpoint filled in (8).
Step 5 — Choose which events to listen for
Under Activity, click Select an item to open the event list. It is a multi-select with a search box, so you can type part of an event name — message, contact, order — instead of scrolling. Tick every event you want; the dropdown stays open so you can pick several.
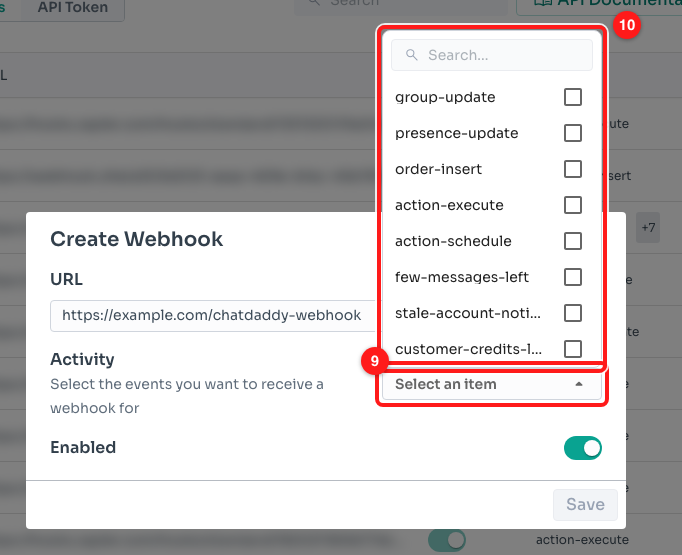
Step 5 — the Activity dropdown (9) and the searchable event list (10).
The events are named <object>-<what happened>. The ones people use most often are:
message-insert— a message was sent or received. This is the busiest event on most teams.message-update— a message changed status, for example delivered or read.contact-insert,contact-update,contact-delete— someone was added to, changed in, or removed from your contacts.chat-insert,chat-update— a conversation was created or changed, including assignment and tags.action-execute— an automation step ran. This is the event Zapier integrations normally subscribe to.order-insert— a new shop order.crm-ticket-insert,crm-ticket-update,crm-ticket-delete— ticket activity on a CRM board.
⚠️ Subscribe only to what you actually need.
message-inserton a busy team can mean thousands of requests a day, and every one of them hits your server.
Step 6 — Check Enabled, then Save
The Enabled switch is on by default, which means the webhook starts firing as soon as you save it. Turn it off if you want to set the webhook up now and switch it on later. Then click Save — you will see a “Created webhook successfully” confirmation and the new row appears at the bottom of the list.
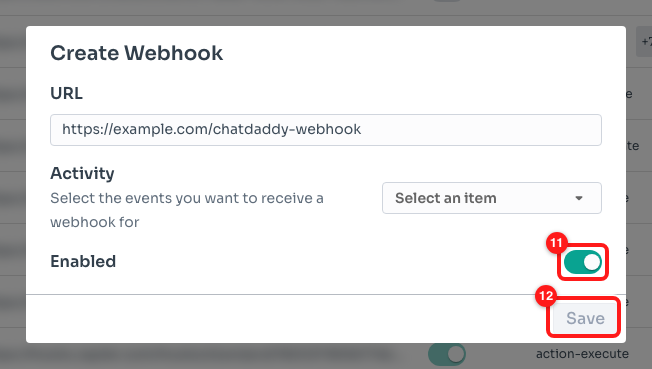
Step 6 — the Enabled switch (11) and the Save button (12). Save is greyed out here because no event has been chosen yet.
Step 7 — Edit, pause or delete a webhook later
Click the ⋮ at the end of any row for Edit and Delete.
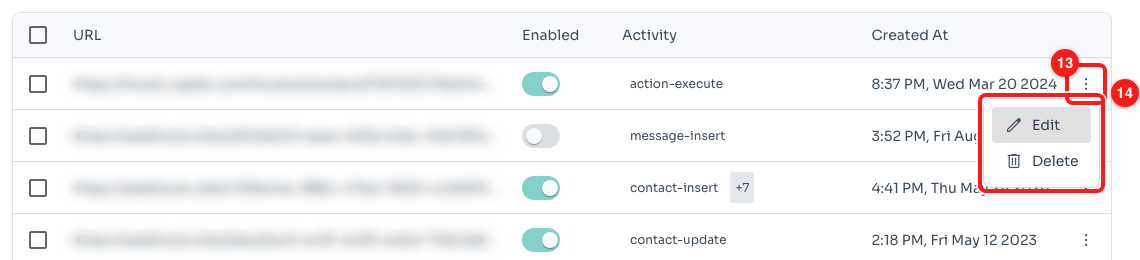
Step 7 — the row menu (13) with Edit and Delete (14).
- Edit reopens the same dialog, titled Edit Webhook, with the current URL, events and Enabled state filled in. This is also the only place you can pause a webhook — switch Enabled off and save. The webhook is kept, it just stops firing.
- Delete removes the subscription for good. There is no undo, so if you only want to stop the traffic for a while, switch it off instead.
To remove several at once, tick the checkboxes at the left of the rows and use the delete action that appears above the table.
What ChatDaddy actually sends
Each event becomes an HTTP POST to your URL with a JSON body containing the event name and the record that changed. Your endpoint should answer quickly with a 2xx status and do the slow work afterwards.
The dashboard does not show you the body, and there is no “send test event” button. The quickest way to see the exact shape for the events you picked is to create one webhook pointing at a request bin such as webhook.site, trigger the event once in ChatDaddy, and read what arrives. The field-by-field reference is in the ChatDaddy API documentation, which is also the API Documentation button above the table.
🛡️ Treat your webhook URL as a secret. Anyone who has it can post fake events to your endpoint, so keep the random part of the address private and verify what you receive before acting on it.
Troubleshooting
Save is greyed out and I cannot click it
Save only becomes active once the webhook has both a URL and at least one event selected under Activity, and once something has actually changed. If you opened an existing webhook with Edit and changed nothing, Save stays greyed out — that is normal, just close the dialog.
I created a webhook but nothing is arriving
Check these in order: the Enabled column shows the switch on; the URL is exactly right, including https:// and any path; your server is reachable from the public internet (not a localhost or private address); and the event you are expecting is really in the Activity list — open the webhook with Edit, because the list only shows the first event as a chip. If all of that is right, point a second webhook at a request bin such as webhook.site and trigger the same event to see whether ChatDaddy is sending at all.
Where do I see failed deliveries or retries?
The Web Hooks page lists your subscriptions only — it does not keep a delivery log, and there are no retry settings to configure in the dashboard. Log the incoming requests on your own server so you have a record, and design your endpoint to cope with the same event arriving more than once.
My server was down for an hour — will I get the missed events?
Do not rely on it. Webhooks are a live push, not a queue you can replay from the dashboard. If you need to be sure nothing was lost, fetch the records you care about through the ChatDaddy API once your server is back up.
The Enabled switch in the list will not move when I click it
That is by design — the switch in the table is a status indicator, not a control, so nobody can silently stop a live integration with a stray click. Open the row menu, choose Edit, change Enabled in the dialog and save.
Do I need an API token as well?
Not for webhooks themselves — ChatDaddy pushes to your URL without one. You need an API token only when your code calls ChatDaddy back, for example to send a reply after receiving an event. Create it on the API Token tab next to Web Hooks.
Can I use one webhook for several teams?
You can point several teams at the same URL, but you have to add the webhook separately in each team. Read the team id from the event body so your server knows which team it came from.