
How to Customise a CRM Board View (Table, Card, Columns)
Set up a CRM board the way you work: switch between the Board and Table layouts, choose which details appear on a ticket card, expand cards by default, and show or hide table columns — all saved as a named view.
Also searched as: How to Customise a CRM Board View (Table, Card, Columns), Where to find it, Find the view bar, Add a view and give it a name, Open View settings, Choose which details show on a ticket card, Check what you have hidden, Show more of each card at a glance, Switch the view to the Table layout, Show or hide table columns, Sharing a view with your team, Customise, Board, View, Table
A view is your saved arrangement of a CRM board: the layout it opens in, which details show on each ticket, and which columns you see. You can keep several views on the same board and switch between them, so one board can be a drag-and-drop pipeline one minute and a dense spreadsheet the next.
This is useful if you share a board with colleagues who care about different things — sales wants Budget and Assignee on every card, while someone chasing overdue work would rather see a table they can sort.
👤 Views are saved in the browser you are using, not on your team account. Your views are yours alone: colleagues will not see them, and they will not follow you to another computer or to the mobile app. The board itself — its stages, tickets and custom fields — is shared with the team as normal.
Where to find it
Open CRM from the left-hand menu and choose a board. Everything in this article lives on the row just under the board tabs: your view tabs on the left, and the board actions — sort, filter, search, View settings and new ticket — on the right.
Step-by-step
Step 1 — Find the view bar
Every board opens on a view called Default View. Its tab sits at the left-hand end of the view bar, with a + next to it for adding more. The icons at the right-hand end are the board actions, and the cog is where the view settings live.
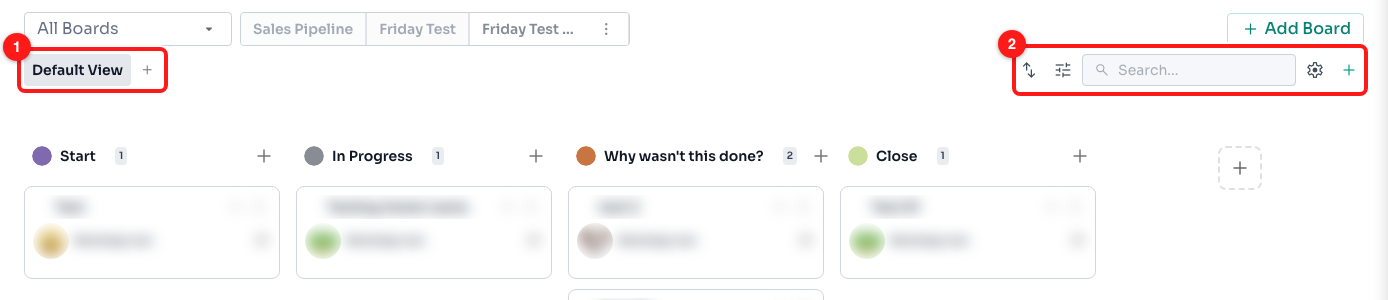
Step 1 — the view tabs and the + for a new view (1), and the board actions with the View settings cog (2).
Step 2 — Add a view and give it a name
Click the + next to the view tabs. A new tab appears straight away, already in rename mode, so type the name you want and press Enter. Call it something you will recognise later — Table view, My open work, Budget check.
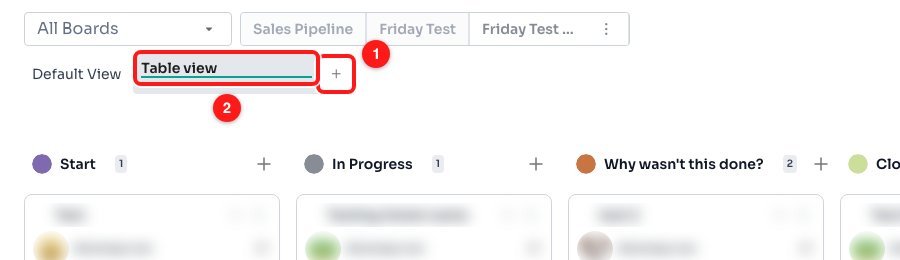
Step 2 — the + adds a view (1); the new tab opens ready for you to type its name (2).
✏️ To rename a view later, double-click its tab, or open View settings and click the name at the top of the panel.
Step 3 — Open View settings
With your new view selected, click the cog at the right-hand end of the view bar. A panel slides in from the right holding everything you can change about this view.
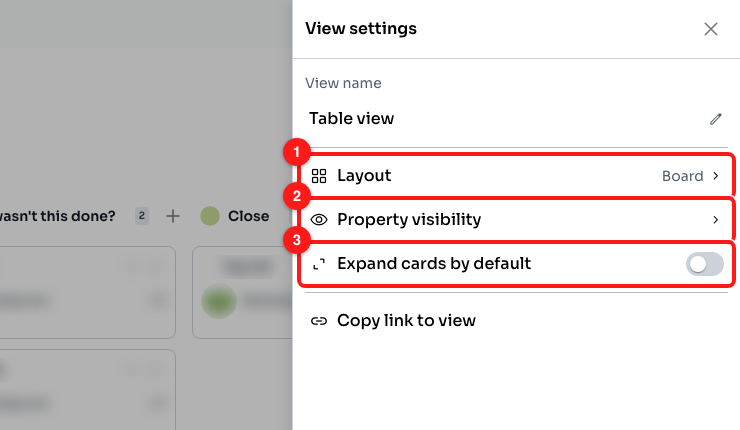
Step 3 — Layout switches between Board and Table (1), Property visibility controls what shows on a card (2), and Expand cards by default decides how much of each card you see (3).
Changes apply the moment you make them — there is no Save button, and nothing you do here changes what your colleagues see.
Step 4 — Choose which details show on a ticket card
Click Property visibility. The list shows every detail that can appear on a card: the standard ones (Client Name, Ticket Name, Tags, Assignee, Phone Number) followed by your board’s own custom fields. Click the eye on any row to move it between Shown in board and Hidden in board. The search box at the top helps on boards with a long list of custom fields.
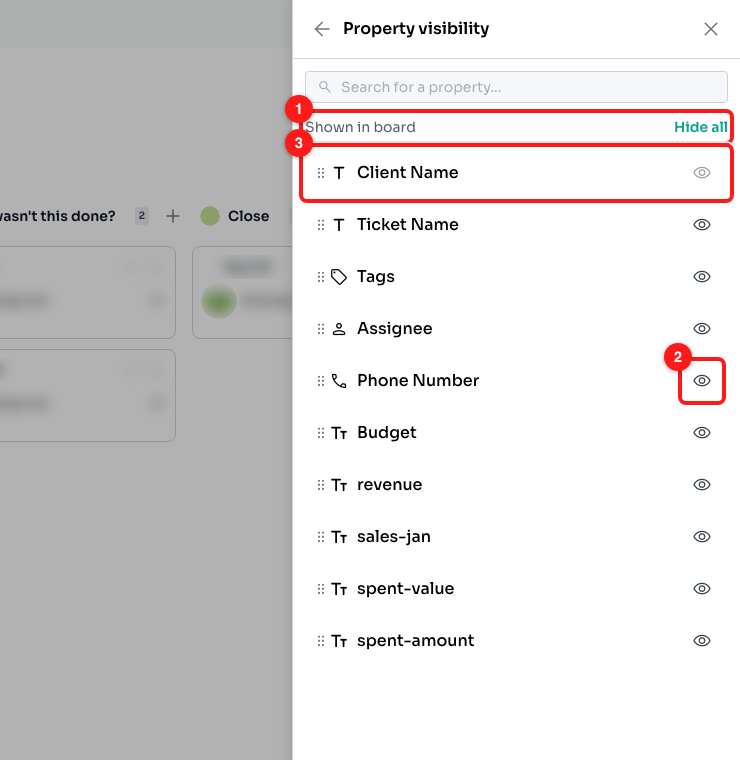
Step 4 — the Shown in board list (1), the eye that hides or shows a detail (2), and Client Name, whose eye is greyed out because it always shows (3).
⚠️ Custom fields behave differently from the standard details. Hiding Tags, Assignee, Phone Number or Ticket Name only affects your own view. Hiding a custom field — or using Hide all / Show all, which include the custom fields — changes the board for everyone on your team. Use those two links with care.
Step 5 — Check what you have hidden
Anything you switch off drops into a Hidden in board section at the bottom of the list, with its eye crossed out. Click that eye again to bring the detail back. If the section is not there at all, nothing is hidden.
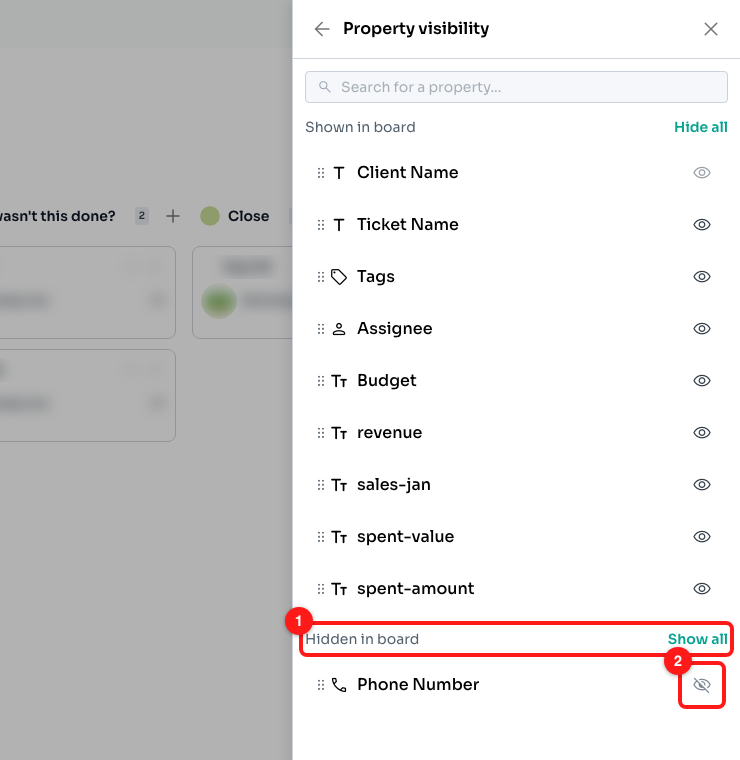
Step 5 — Phone Number has moved into Hidden in board (1); its crossed-out eye puts it back (2).
Step 6 — Show more of each card at a glance
Ticket cards normally show just the client and a chevron you click to see the rest. Switch Expand cards by default on and every card opens with all of its visible details on show. Handy when you are scanning a board for a value; switch it off again when you want more tickets on screen.
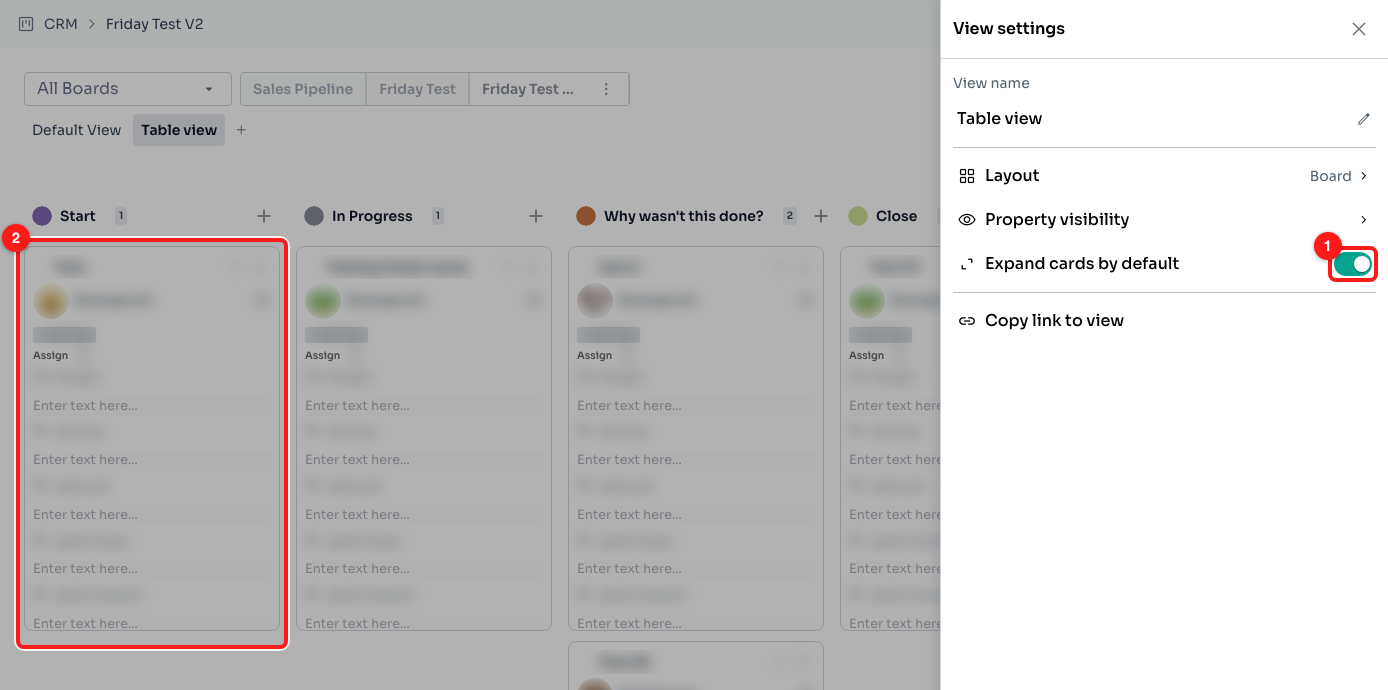
Step 6 — the Expand cards by default switch (1) and a card showing every detail that is switched on (2).
This is where Step 4 pays off: an expanded card shows every detail you left switched on, empty fields included, so hide the ones you never fill in.
Step 7 — Switch the view to the Table layout
Click the Layout row to swap between Board and Table. Board is the drag-and-drop pipeline with a column per stage; Table is a sortable grid with one row per ticket, where you can edit names, assignees, tags and custom fields straight in the cells.
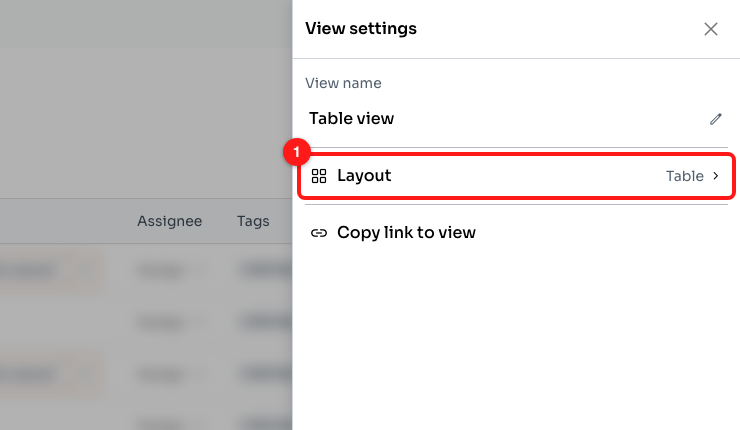
Step 7 — Layout now reads Table (1), and the board behind has become a grid.
ℹ️ Property visibility and Expand cards by default disappear from the panel on the Table layout — they describe cards, and the Table layout has none. Switch the view back to Board and they return, with your choices intact.
Step 8 — Show or hide table columns
The Table layout has its own column control. Hover over any column heading and a ⋮ appears; click it and choose Manage columns. Each column has a switch — turn one off to take it out of the table, or use Hide all and Show all at the bottom. Find column filters a long list.
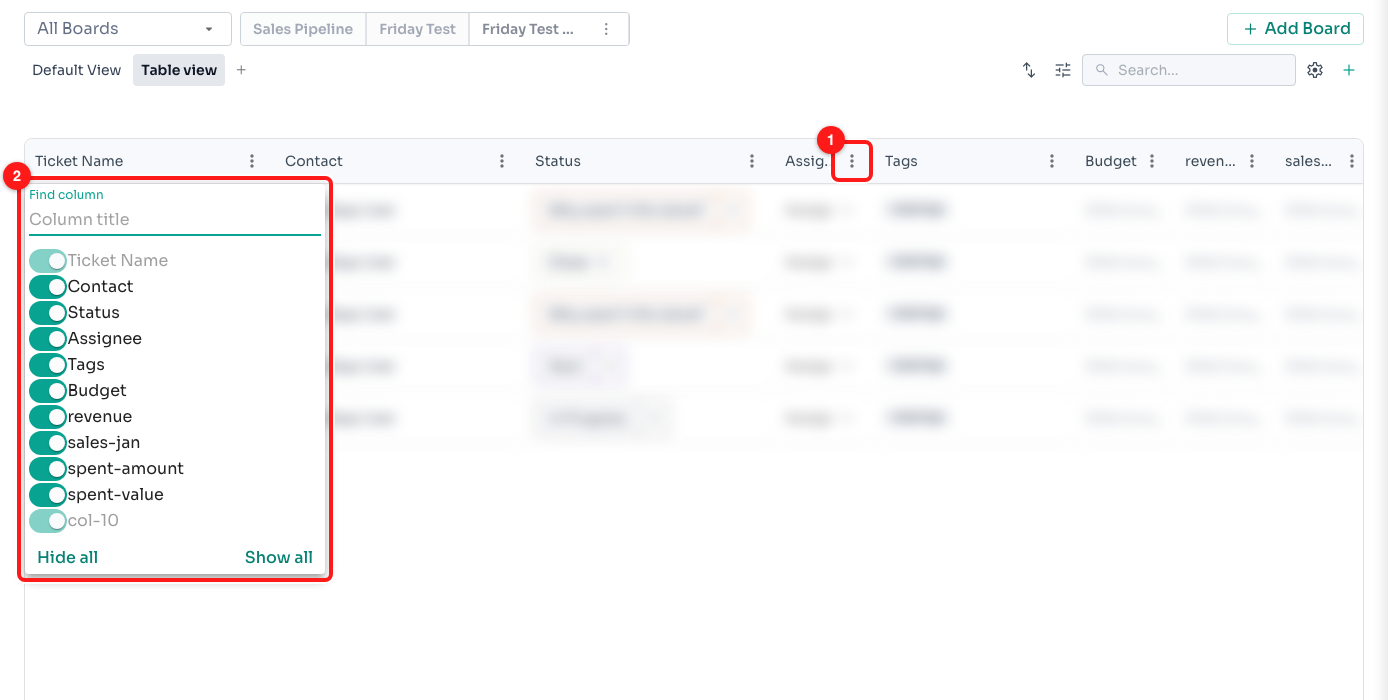
Step 8 — the ⋮ on a column heading (1) and the Manage columns list with a switch per column (2).
💡 Hide all and Show all inside Manage columns only change your own table — unlike the similarly named links in Property visibility, they do not touch the board.
Sharing a view with your team
Copy link to view at the bottom of the panel copies a link to the board. Anyone you send it to lands on the right board, but they see their own view of it, not yours — because views are stored in your browser rather than on the team account. To make sure a colleague sees the same thing, tell them which details to switch on, or make the change to a custom field, which is shared with everyone.
Frequently asked questions
My colleague cannot see the view I set up. Why not?
Views are personal. They are saved in the browser you created them in, so they are not shared with your team, do not appear on the mobile app, and will not be there if you sign in on a different computer. Only the board — its stages, tickets and custom fields — is shared.
My views have disappeared.
Clearing your browser data, using private browsing, or switching to another browser or computer will remove them, and the board falls back to Default View. Nothing else is lost: your tickets and stages are stored on your ChatDaddy account, so you only need to set the views up again.
I hid a custom field and now my colleague cannot see it either.
That is expected. Custom-field visibility belongs to the board, so hiding one hides it for everybody on the team. Switch its eye back on in Property visibility to restore it. The standard details — Tags, Assignee, Phone Number, Ticket Name — are the ones that stay private to your own view.
Can I delete a view I no longer need?
There is no delete button on the view bar yet. You can rename a view by double-clicking its tab, so the tidiest option is to reuse an unwanted tab rather than adding another. Clearing your browser data removes every view on every board and puts each one back to Default View, which is a blunt instrument but does work.
Why can I not hide Client Name?
Client Name is how you tell one ticket from another, so it always shows and its eye is greyed out. You can hide Ticket Name if the client name is enough on its own.
Does a view remember my filters and sorting?
No. Sorting and filtering are set with the sort and filter icons on the same row and apply to the board you are looking at, not to the view — the board sort goes back to Default when you reload the page. Your table column choices and column sort order are remembered in the same browser, the same way views are.