
How to Set the Starting Point of a Message Flow
Every Message Flow needs a first step: either a starting Message you send yourself, or a Trigger that starts the flow automatically. This guide shows how to choose one, how to change it later, and why the preview says "Preview Unavailable" — and the flow never runs — until you do.
Also searched as: How to Set the Starting Point of a Message Flow, Which one do I need?, Open the flow builder, Choose the starting step, Option A — Start with a message, A1. Click Message, A2. Write the message, A3. Save, Option B — Start with a trigger, B1. Click Trigger and pick the event, B2. Check the trigger node, B3. Give the trigger something to do, Changing the starting message later, Preview it before you use it, Using the flow afterwards
A Message Flow is a chain of steps, and the flow builder needs to know which step comes first. That first step is called the flow's starting point, and there are exactly two kinds of it:
- a starting message — the flow begins with a message you send: from the Inbox, from a contact's profile, or as a broadcast;
- a trigger — the flow starts by itself when something happens, such as a customer messaging you, a new contact being created or a ticket changing.
Until a flow has one of the two, it is only a drawing. It cannot be previewed, it cannot be sent, and it will never run on its own — which is why a flow that looks finished can still appear to "do nothing".
🚫 If the preview panel says “Preview Unavailable — No Starting Message or Triggers”, that is this exact problem. The flow has steps, but none of them is marked as the first one. Follow Option A or Option B below.
Which one do I need?
- You want to send the flow to a customer yourself (from the Inbox
/menu, a contact's profile, or a broadcast) → you need a starting message. A flow whose only starting point is a trigger cannot be picked from those lists. - You want the flow to run on its own when something happens → you need a trigger.
- You want both → add a trigger and set a starting message. That is allowed, and the preview will ask you which one to start from.
Step 1 — Open the flow builder
Go to Automation → Message Flows. Click + Create New Message Flow (1) to start a new one, or click the name of an existing flow (2) to open it.
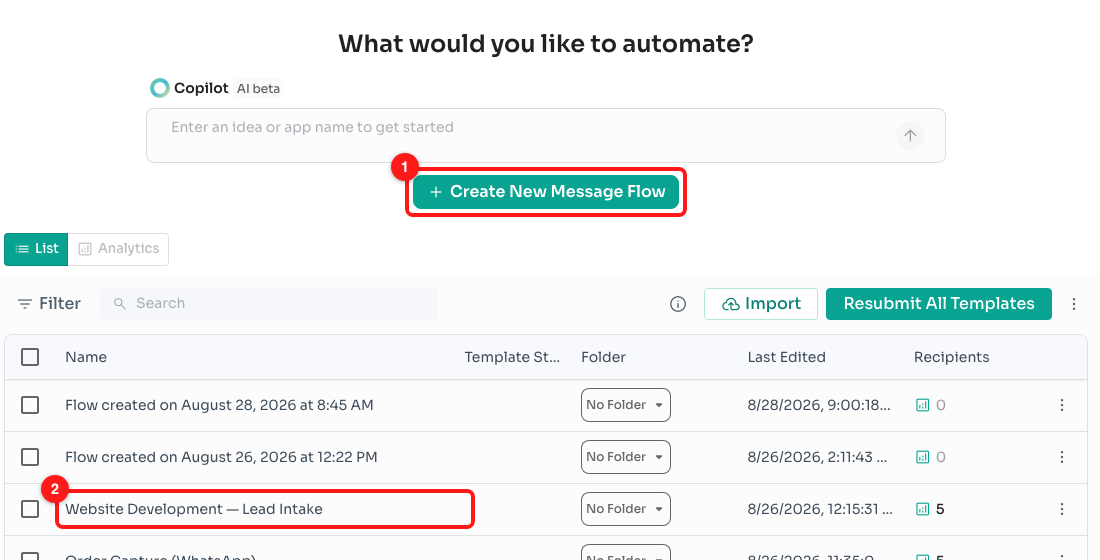
Step 1 — Create New Message Flow (1), or click an existing flow's name to open it (2).
Step 2 — Choose the starting step
An empty flow shows one card in the middle of the canvas: Choose Starting Step. It offers the two starting points described above — Message (1) and Trigger (2). Click the one you need.
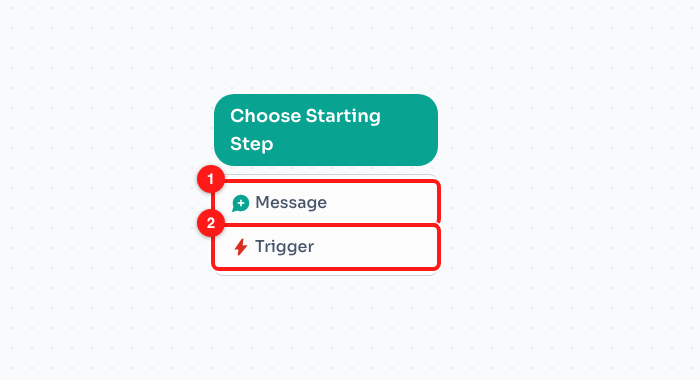
Step 2 — the Choose Starting Step card: Message (1) starts the flow with something you send; Trigger (2) starts it automatically.
💡 The card only appears while the canvas is empty. If your flow already has steps, skip to Changing the starting message later further down — you do not need to start over.
Option A — Start with a message
A1. Click Message
A step called Start appears on the canvas. Two things mark it as the starting point: the green Start pill floating above it (1), and the node itself being named Start (2). The green pill is how you recognise the starting point of any flow at a glance.
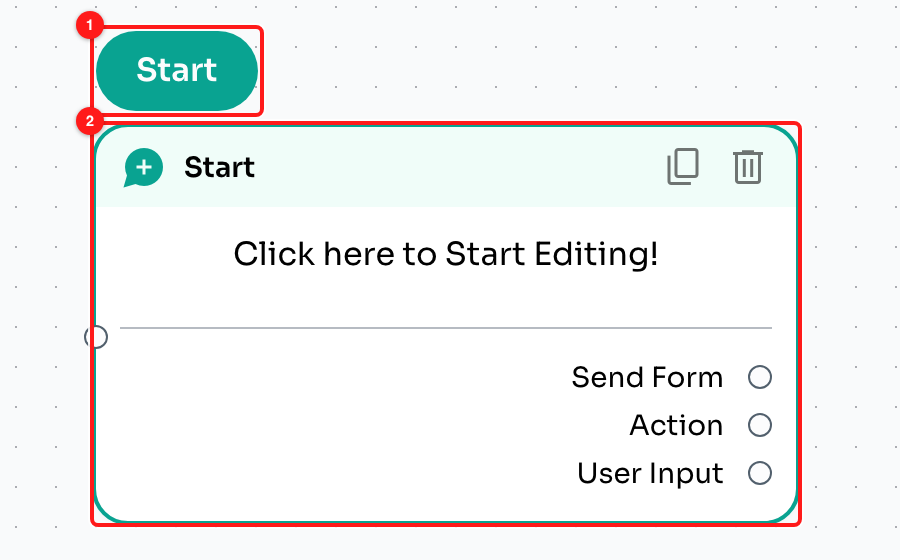
Step A1 — the green Start pill (1) marks the flow's starting point; the Start message step (2) is what will be sent first.
A2. Write the message
Click Click here to Start Editing! inside the step. The editing panel opens on the left. Type what you want to send into the Body box (1) — this is the part that matters: a starting message with an empty body has nothing to send. Header and Footer are optional and only apply to WhatsApp Business API channels. When you are done, click the back arrow (2) to close the panel.
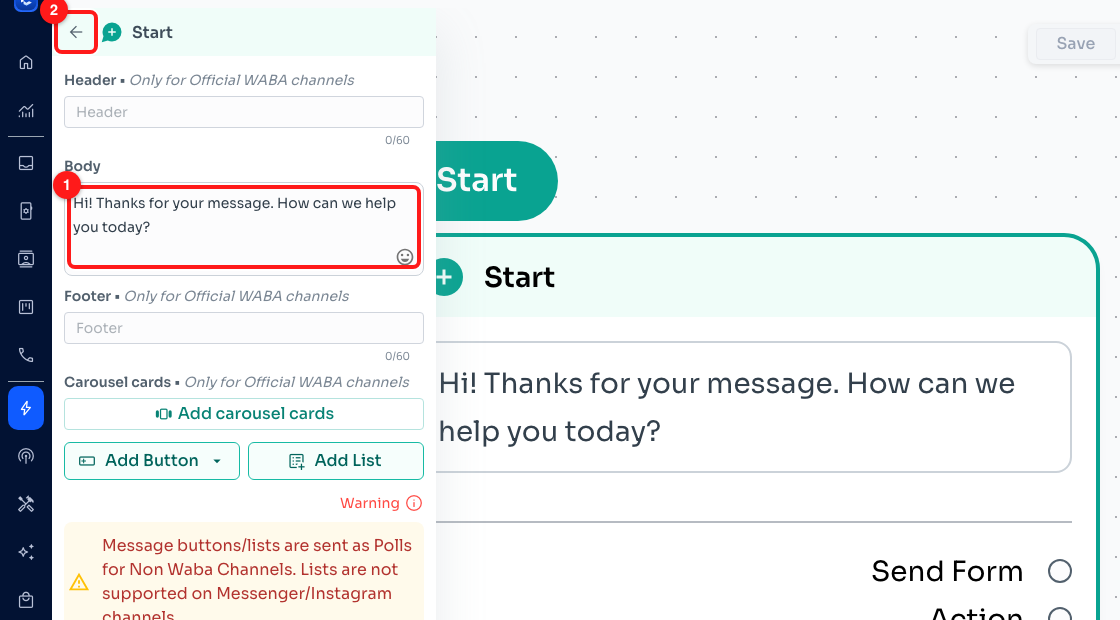
Step A2 — type your message into Body (1), then close the panel with the back arrow (2).
The step on the canvas now shows the text, and the green Start pill is still above it. That is a complete, usable starting point.
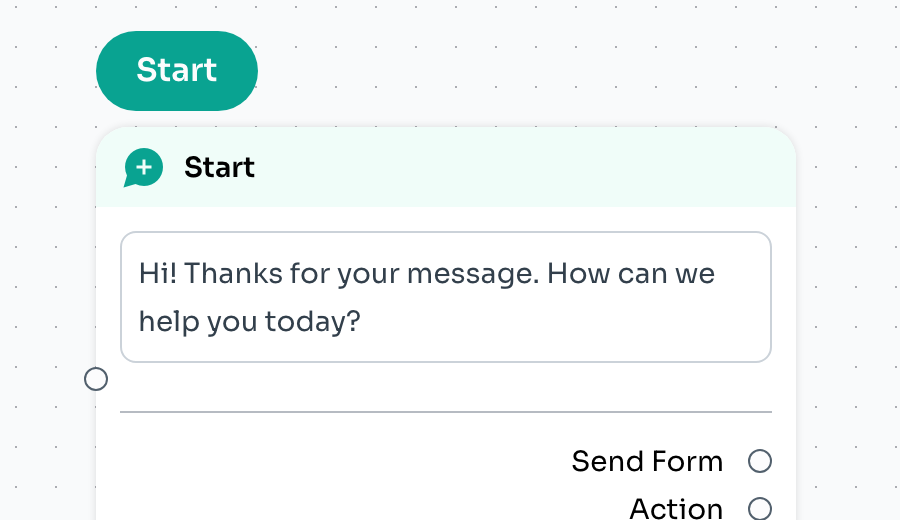
Step A2 — the starting message, filled in and still marked with the green Start pill.
A3. Save
Click Save (1). The other three buttons in that bar are Test (2), which sends the flow for real to a phone number you type; Demo Preview (3), which lays the whole flow out on screen; and Preview Flow (4), which plays the conversation on a phone mock-up. Preview and Test both save the flow before they run, so what you see is always the saved version.
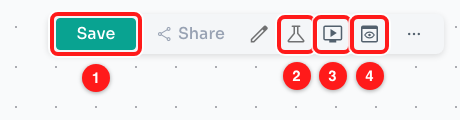
Step A3 — Save (1), Test (2), Demo Preview (3) and Preview Flow (4).
Option B — Start with a trigger
B1. Click Trigger and pick the event
The Add New Node window opens with the Trigger category selected (1). Click the event that should start the flow (2). The events available to every team are Incoming Message, Outgoing Message, New Chat, Contact Updated, New Contact, Ticket Created, Ticket Updated and New Note; App Trigger covers events coming from a connected app.
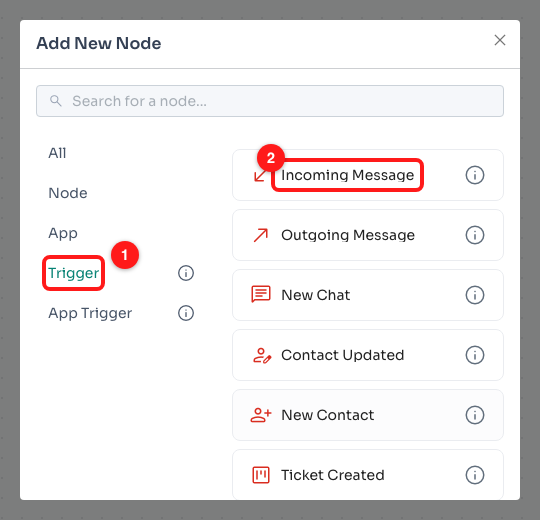
Step B1 — the Trigger category (1) and the event that will start the flow (2).
B2. Check the trigger node
The trigger appears on the canvas with a green Trigger pill above it (1) — the same marker the starting message gets. Underneath is the Next Step row (2), which is still empty.
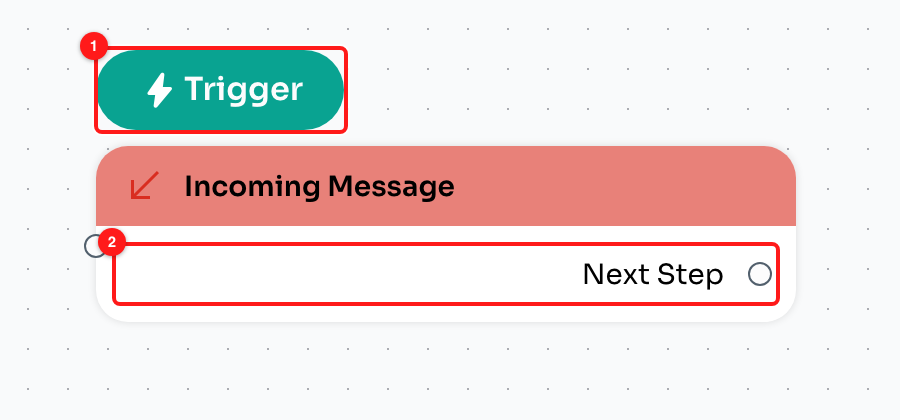
Step B2 — the green Trigger pill (1) marks it as the flow's starting point; Next Step (2) is where the flow continues.
Click the trigger to open its settings. Enabled (1) must stay on — a disabled trigger never fires. Trigger Frequency (2) limits how often the same contact can set this flow off; the default is once per 30 seconds.
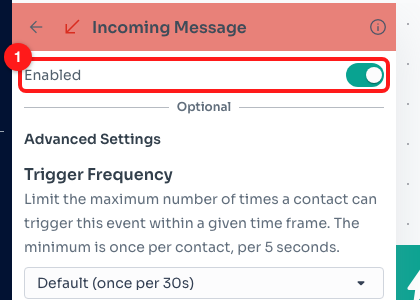
Step B2 — Enabled (1) and Trigger Frequency (2) in the trigger's settings panel.
B3. Give the trigger something to do
This is the step people miss. A trigger only says when the flow starts — on its own it sends nothing. At the bottom of the settings panel click Choose Next Step, then pick Message (1) from the list. (Email, Condition, Start Flow, Delay and HTTP Request are the other options.)
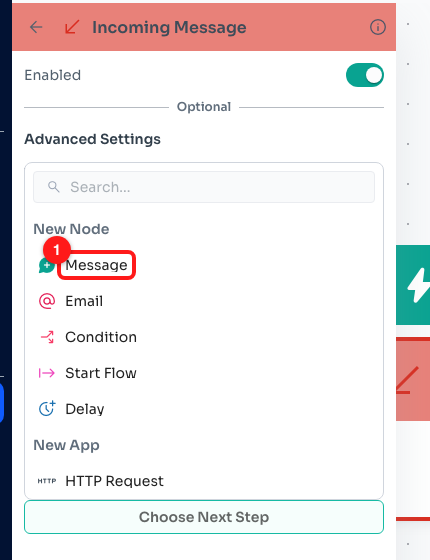
Step B3 — Choose Next Step, then Message (1), so the trigger has something to send.
The message step appears connected to the trigger. Write its text the same way as in Option A, then click Save.
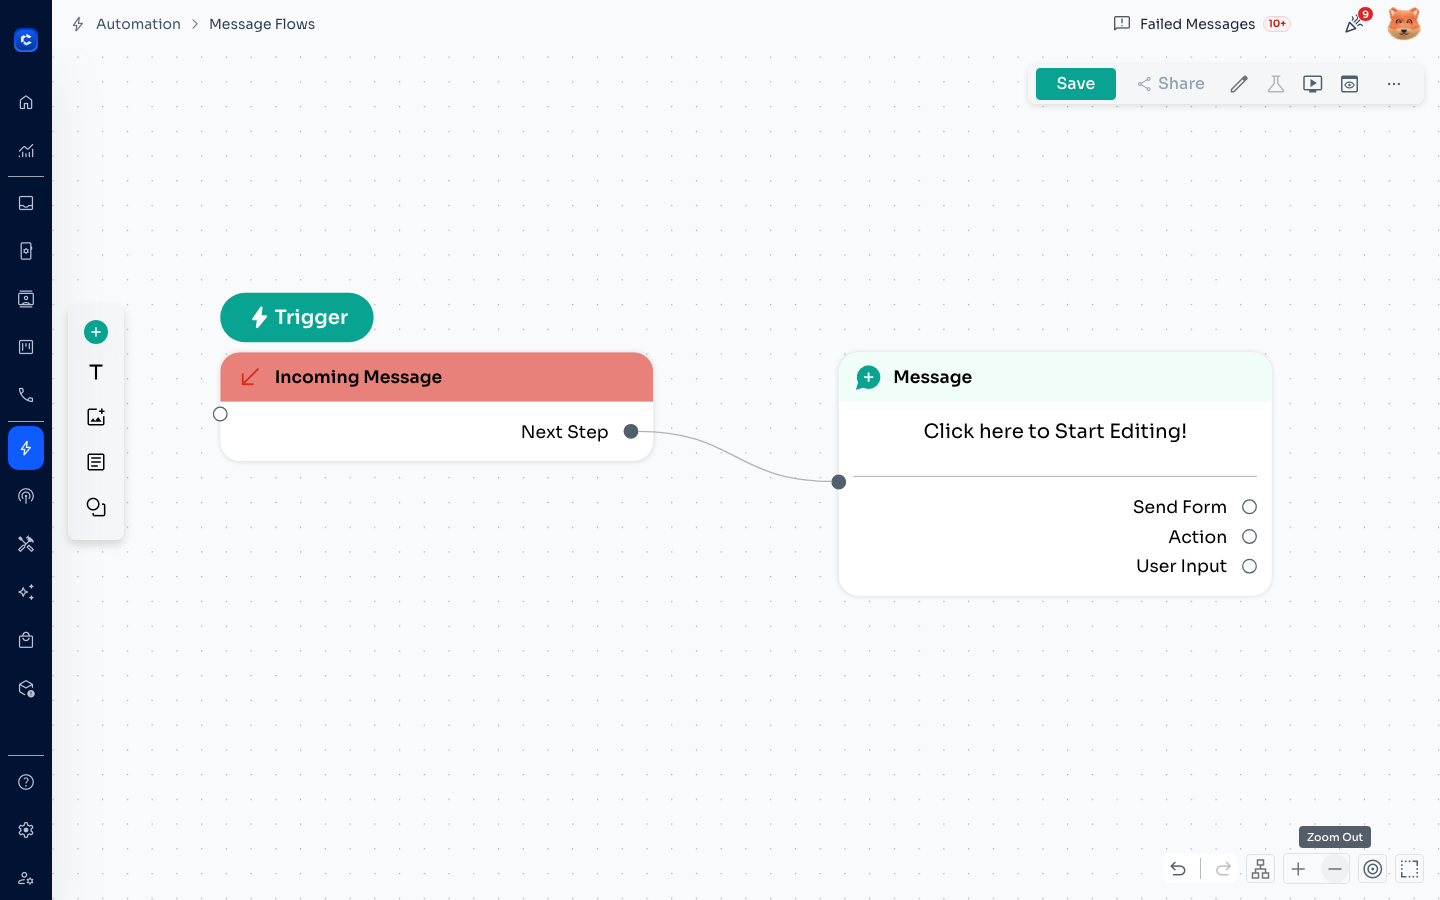
Step B3 — a complete starting point: the trigger, and the message it sends.
🧪 The Test button is greyed out on any flow that contains a trigger — a trigger cannot be started halfway by hand. Use Preview Flow to check that kind of flow instead.
Changing the starting message later
You can move the starting point to a different message step at any time. Hover the step you want to promote and click the small ▶ button in its header (2) — its tooltip reads Set as starting message. The green Start pill (1) moves to that step immediately.
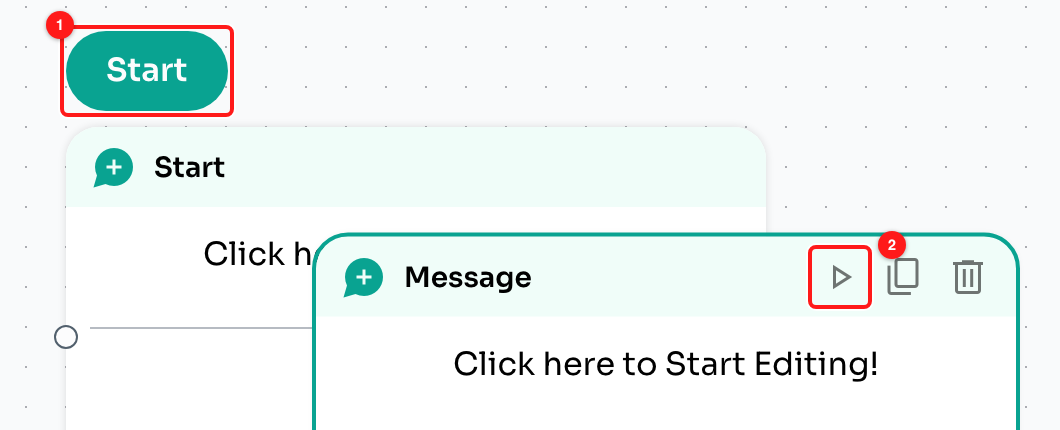
The green Start pill on the current starting message (1), and the ▶ Set as starting message button on another step (2).
🔎 No ▶ button on the step? It only appears on a message step that is not already the starting point and has nothing connected into it. A step that something else already leads to cannot be the first step of the flow — disconnect it first, or promote a different step.
Preview it before you use it
Click Preview Flow in the top bar. A phone-shaped panel slides in on the right and plays the flow as a customer would see it. What it does next depends entirely on the starting point:
A flow with triggers asks where to start: click Preview From Trigger followed by the trigger's name (1). If the flow also has a starting message, Preview From Starting Message is offered alongside it.
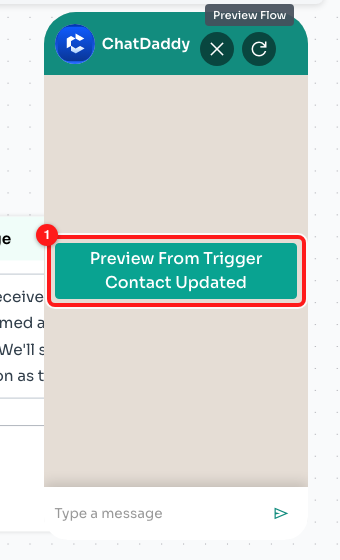
A flow started by a trigger asks which trigger to preview from (1).
A flow with only a starting message does not ask — it plays straight away, beginning with that message.
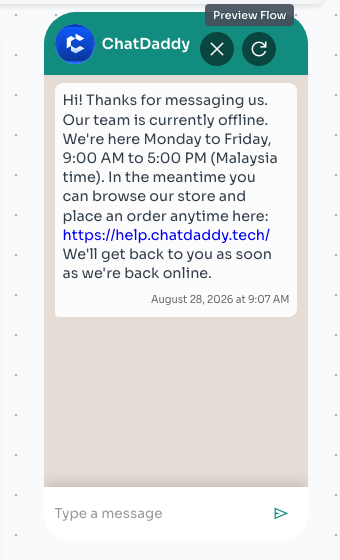
A flow whose starting point is a message plays immediately in the preview panel.
A flow with no starting point at all cannot be played, and says so.
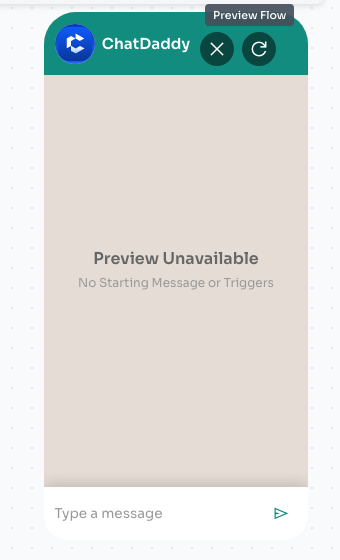
“Preview Unavailable — No Starting Message or Triggers”: the flow has no first step.
For the full tour of Preview Flow, Demo Preview and Test, see How to Test a Message Flow Before It Goes Live.
Using the flow afterwards
When you pick a flow to send by hand — typing / in the Inbox message box, or choosing a flow anywhere else in ChatDaddy — the list shows every flow you have. Any flow without a starting message is listed with the note “No starting point set — open to fix” (1) and cannot be sent. The ⓘ button next to it opens the same instructions in the app.
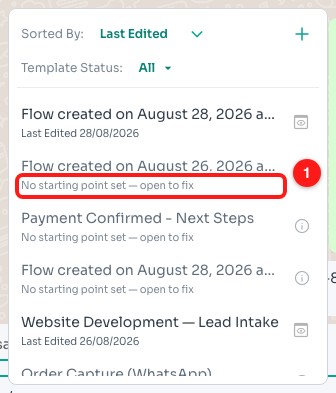
In the flow picker, a flow with no starting message is marked “No starting point set — open to fix” (1).
⚠️ A trigger is not enough to make a flow sendable by hand — that list needs a starting message. A trigger-started flow runs automatically and is meant to; if you also want to send it yourself, give it a starting message as well.
Troubleshooting
The preview says “Preview Unavailable — No Starting Message or Triggers”.
The flow has no first step. Either set a message step as the starting message (the ▶ button in its header), or add a trigger. Both routes are covered above.
Nothing happens when I click Preview Flow or Test.
Both buttons save the flow first and stop if the save would fail — most often because the flow has no name, or two steps share a name. Fix the error and try again; see Why a Message Flow Will Not Save.
The Test button is greyed out.
The flow contains a trigger. Test sends the flow to one phone number on demand, which a trigger-started flow cannot do. Use Preview Flow instead.
I cannot find the ▶ “Set as starting message” button.
It only shows on a message step that is not already the starting point and has nothing connected into it. If the step already carries the green Start pill, it is the starting point. If something leads into it, remove that connection first.
My flow does not appear in the list when I try to send it.
That list only offers flows with a starting message. A flow whose only starting point is a trigger shows “No starting point set — open to fix”. Open the flow, add a message step, and set it as the starting message.
The trigger never fires.
Check three things: the Enabled switch in the trigger's settings is on; the trigger has a Next Step (a trigger with nothing after it does nothing); and the flow has been saved. If it fires less often than you expect, see How to Control How Often a Message Flow Trigger Fires.
The starting message is set, but the flow sends nothing.
Open the starting step and check the Body box has text (or an attachment). A starting message with an empty body is a step with nothing in it — the builder will tell you a message is required in your starting action.