
How to Send a Facebook Messenger Broadcast (Complete Step-by-Step Guide)
The full end-to-end guide to broadcasting on Facebook Messenger with ChatDaddy: get your Page ready, build the audience, pick the flow and channel, choose the speed and timing, send, and track the results.
Also searched as: How to Send a Facebook Messenger Broadcast (Complete Step-by-Step Guide), Part 1: Make sure your Messenger Page can send, Step 1: Check the Messenger channel in Manage Channels, Step 2 (only if you have no Messenger Page yet): Add one, Step 3: Wait for a new incoming chat to appear in ChatDaddy, Part 2: Create the broadcast, Step 4: Open Broadcasts and click Create, Step 5: Get to know the three sections, Step 6: Set Channel Type to Messenger, Step 7: Choose the Facebook Page to send from, Step 8: Select the message flow to send, Step 9: Choose when to send, Step 10: Name the broadcast, Step 11: Choose your audience, Step 12: Check audience health (optional but recommended)
A Messenger broadcast sends one message flow to many of your Facebook Page's contacts at once: a promotion, an event reminder, a restock alert, or a follow-up to everyone who messaged you this week. This guide covers the whole process: checking your Messenger channel, building the audience, setting up and sending the broadcast, and tracking the results.
⏱️ Time needed: about 5 minutes once your Messenger Page is connected and your message flow is ready.
Before you start
- A Facebook Messenger channel connected to ChatDaddy, with sending switched on (Part 1 shows how to check).
- At least one new incoming Messenger chat that shows up in the ChatDaddy Inbox. A connected Page with no incoming chats has nobody to broadcast to (Step 3).
- A message flow that has a starting point and holds the message you want to send. Messenger supports text, images and buttons. WhatsApp templates don't apply here.
- Permission to use Marketing → Broadcasts in your ChatDaddy team.
⚠️ Meta's 24-hour rule decides who actually receives a Messenger broadcast. Meta only lets businesses send automated messages (broadcasts, flows and triggers) to people who messaged your Page in the last 24 hours. ChatDaddy sends to everyone in your audience who is inside that window and skips the rest. A Messenger broadcast is therefore best for re-engaging people who talked to you recently, not for cold outreach. Full details: Understanding Messenger Message Sending Rules.
Part 1: Make sure your Messenger Page can send
Step 1: Check the Messenger channel in Manage Channels
Open Manage Channels from the left sidebar (1) and type Messenger in the search box to list only your Messenger Pages (2). Check the Connection column (3):
- Connected: the Page can send broadcasts. Go to Part 2.
- Send paused (Status shows Receiving only): messages still come in, but ChatDaddy cannot send from this Page. Click Reconnect (4) and sign in again with Facebook.
- Not connected or Disconnected: click Connect with Messenger or Connect in the Quick Actions column.
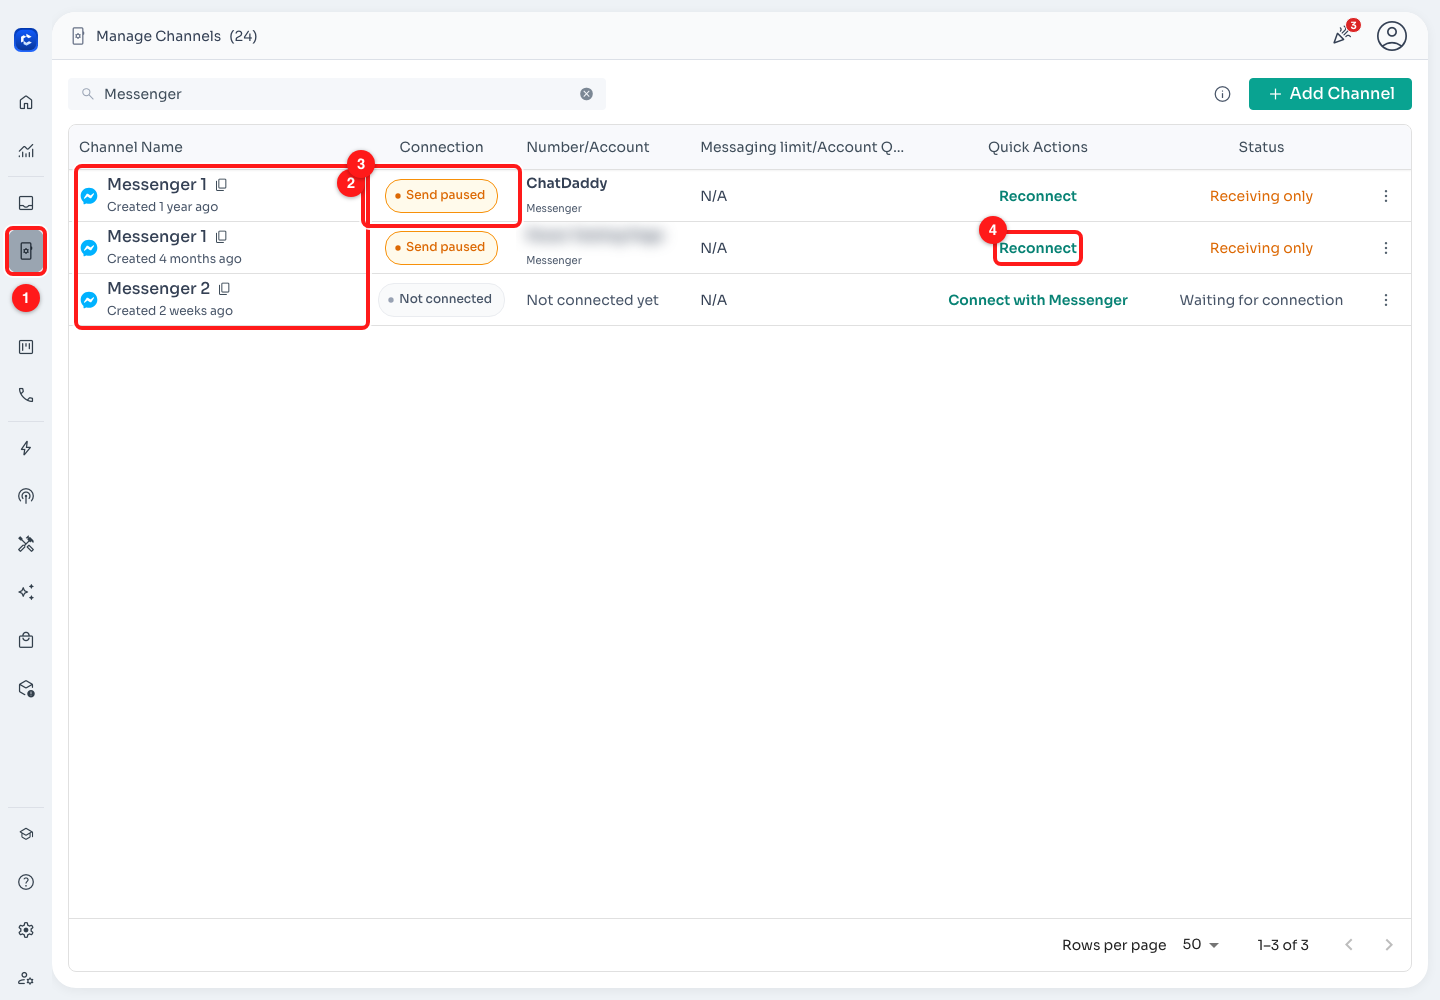
Manage Channels (1), filtered to Messenger Pages (2). The Connection column (3) must show Connected; use Reconnect (4) if it says Send paused.
🔑 Reconnecting keeps your chats, contacts and automations. You must be an admin of the Facebook Page. Step-by-step: Reconnecting Your Messenger and Instagram Channels.
Step 2 (only if you have no Messenger Page yet): Add one
Click + Add Channel at the top right of Manage Channels, then choose FB Messenger Official Meta Integration (1) and click Connect Now!. Sign in with the Facebook account that manages your Page, pick the Page, and approve the permissions. The new Page then appears in Manage Channels.
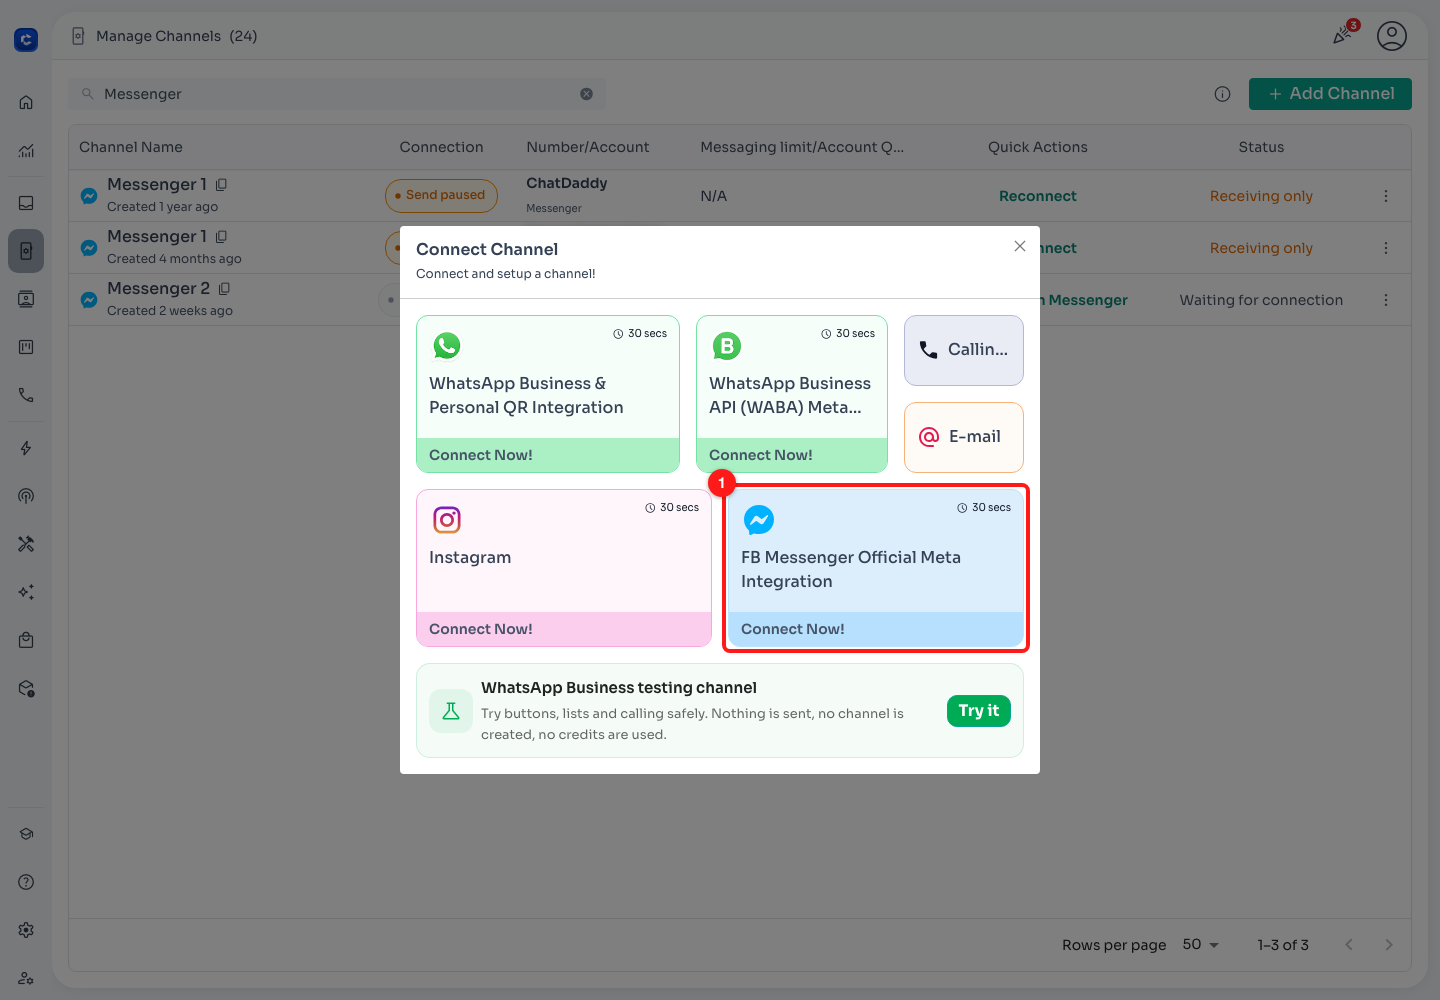
Add Channel → FB Messenger Official Meta Integration (1).
Step 3: Wait for a new incoming chat to appear in ChatDaddy
A Messenger broadcast only works once a new chat has come in and appears in ChatDaddy. Connecting the Page is not enough on its own. In Manage Channels, your Messenger channel (1) can show Connected (2) while its Status says New chats only (3). That means ChatDaddy only picks up conversations that start after the Page was connected. Older Messenger conversations are not imported, so those people are not contacts you can broadcast to yet.
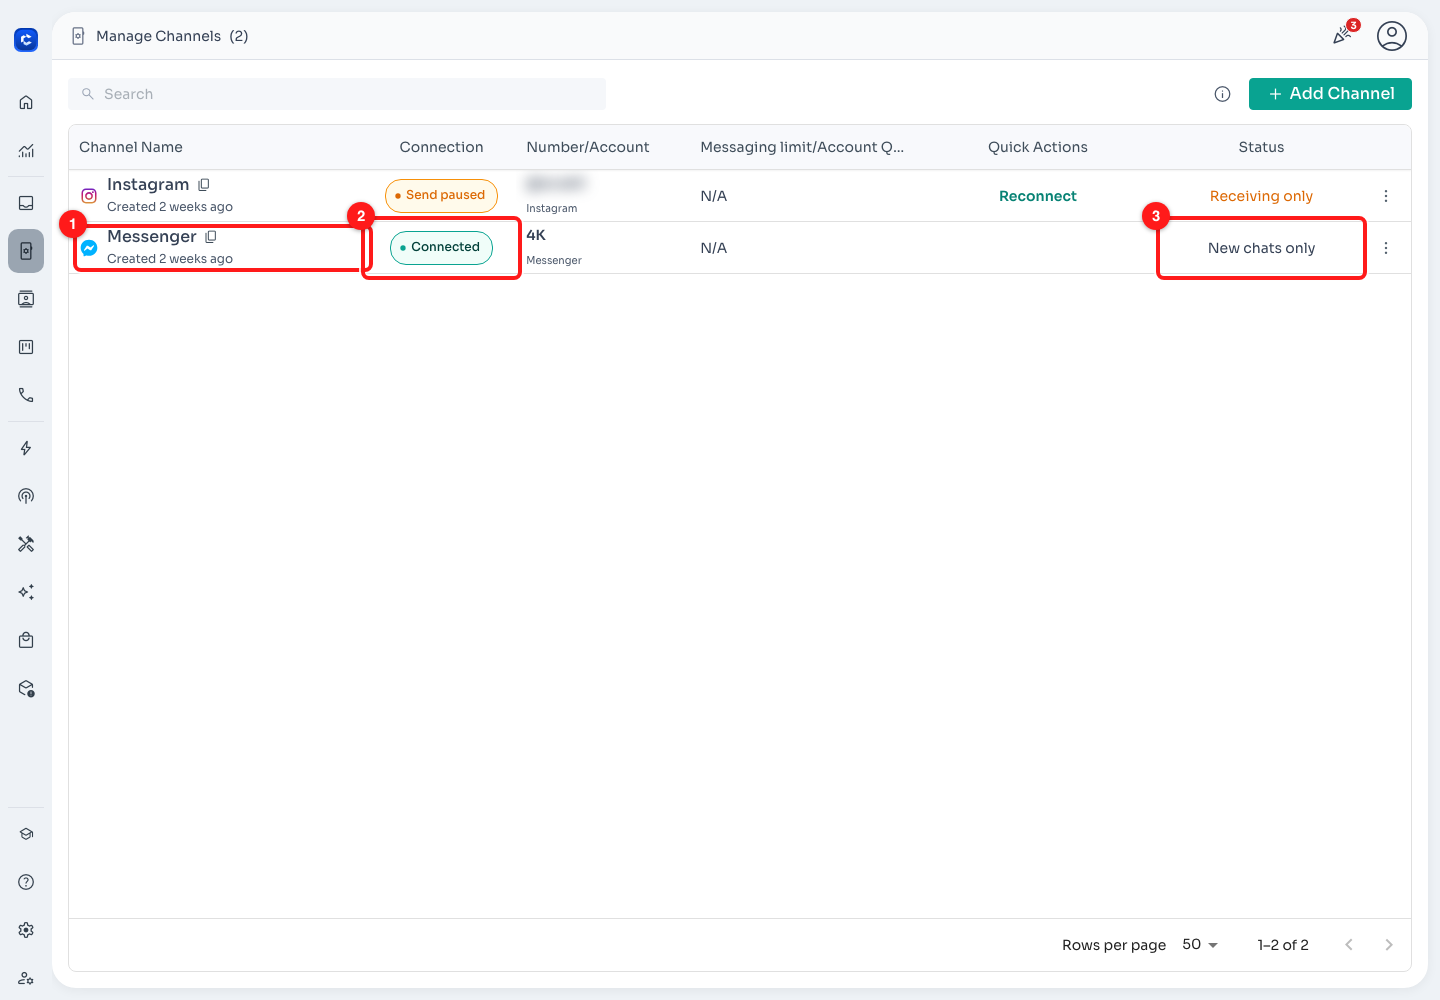
Messenger channel (1) is Connected (2), but New chats only (3): only chats that start after connecting come into ChatDaddy.
Before you create the broadcast, make sure your customers have messaged your Facebook Page and those chats show in the Inbox. Open Inbox and look for chats with the Messenger label (1). Open one and check that the customer's latest message (2) arrived recently.
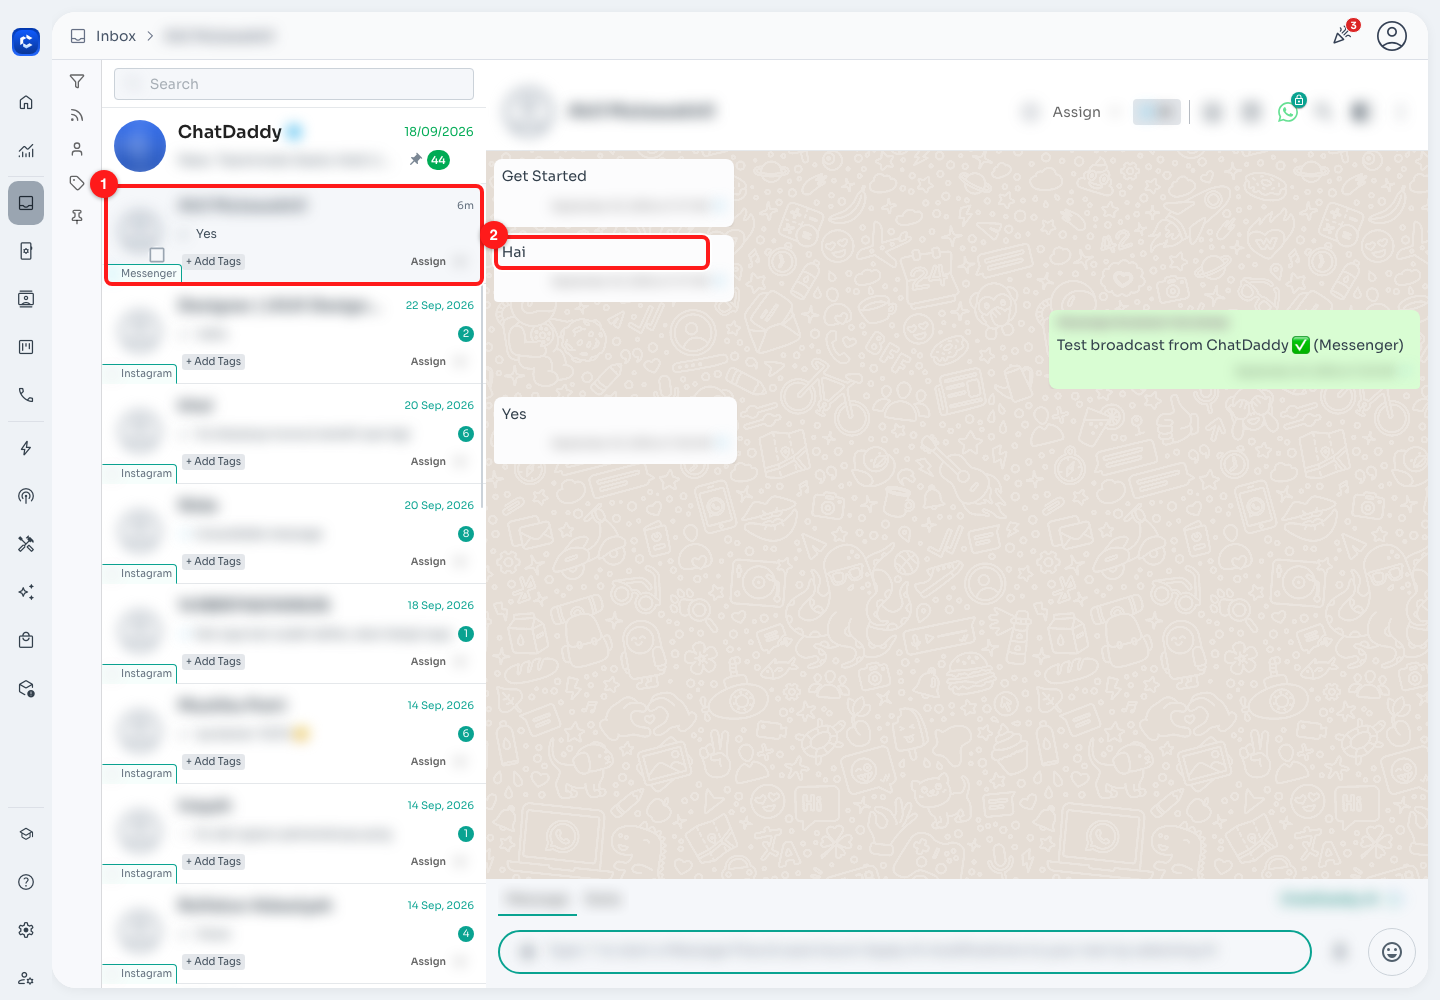
A new Messenger chat in the Inbox (1) with the customer's incoming message (2). Only contacts like this can receive the broadcast.
✅ Rule of thumb: a customer can receive your Messenger broadcast only if (a) their chat appears in the ChatDaddy Inbox with the Messenger label, and (b) their last message to your Page was less than 24 hours ago. If nobody has messaged the Page yet, the broadcast has nobody to send to. Every recipient will show "Cannot send messages until the recipient initiates a new conversation".
🧪 Tip, test it first: send any message (e.g. "hi") to your Page from your own personal Facebook account. Wait for the chat to appear in the Inbox, then run the broadcast with the audience filtered to just yourself (Step 11). If you receive it on Messenger, everything is set up correctly.
Part 2: Create the broadcast
Step 4: Open Broadcasts and click Create
Click the Marketing icon in the left sidebar (1). Make sure the Broadcasts tab is selected (2), then click + Create (3).
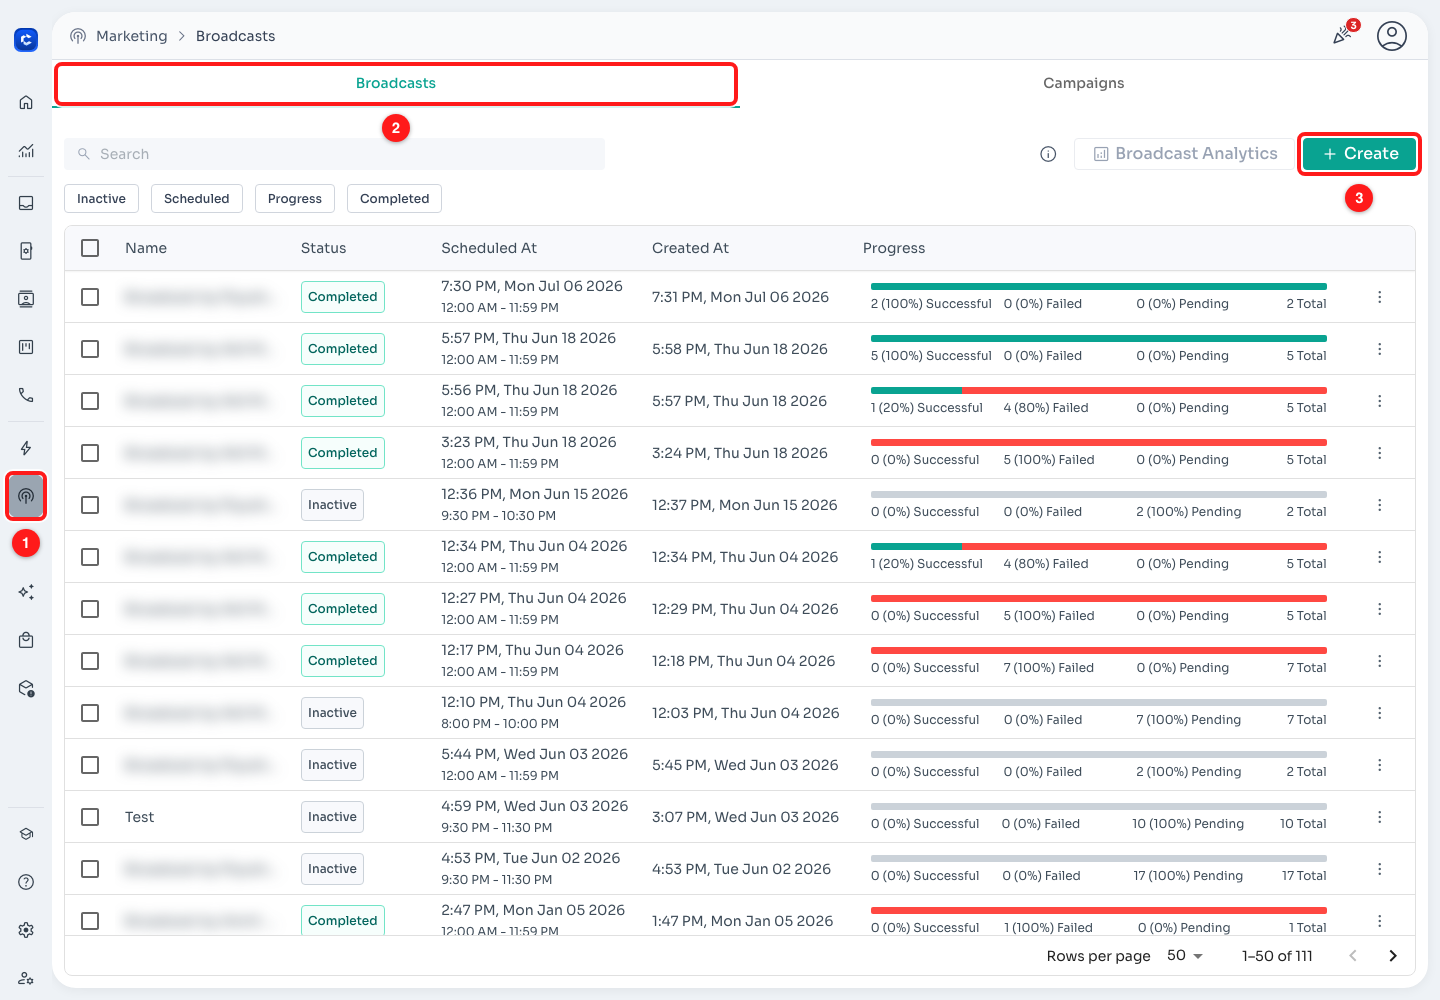
Marketing (1) → Broadcasts tab (2) → + Create (3).
💡 The first time you open Broadcasts you may see a Getting Started guide and a Guide me tour. You can follow them or close them with Skip / ✕. Some Getting Started text only mentions WhatsApp (WABA). That doesn't apply to Messenger: Messenger broadcasts don't need a WABA channel.
Step 5: Get to know the three sections
The broadcast form has three numbered sections: Select Contacts (1) decides who receives the message, Settings (2) decides what is sent and from which Page, and Advanced Settings (further down, shown after you pick a channel) decides how fast and when. You don't have to fill them in order. This guide starts with Settings, because choosing Messenger first makes the rest of the form fit a Messenger broadcast.
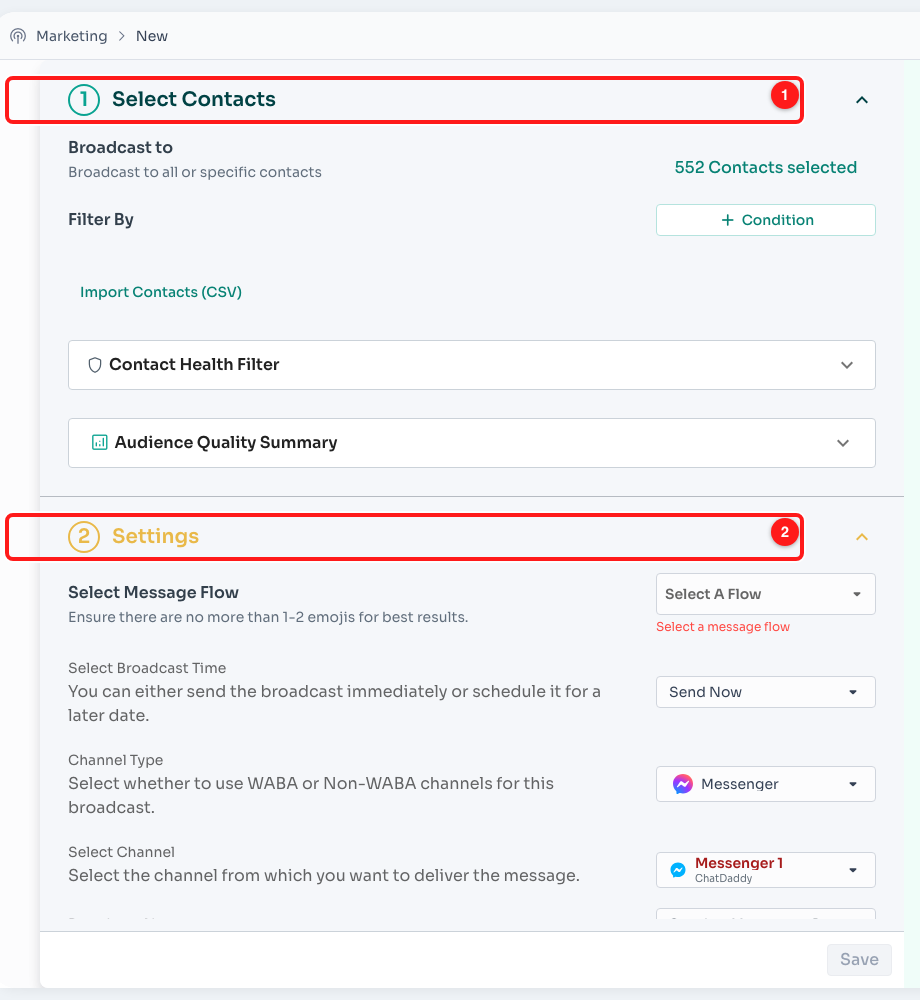
Section 1 Select Contacts and section 2 Settings. Section 3 Advanced Settings is further down the form.
Step 6: Set Channel Type to Messenger
In Settings, find Channel Type and open the Select Channel Type dropdown (1). Choose Messenger (2). The other options are WABA Channel, Non-WABA Channel (regular WhatsApp) and Instagram.
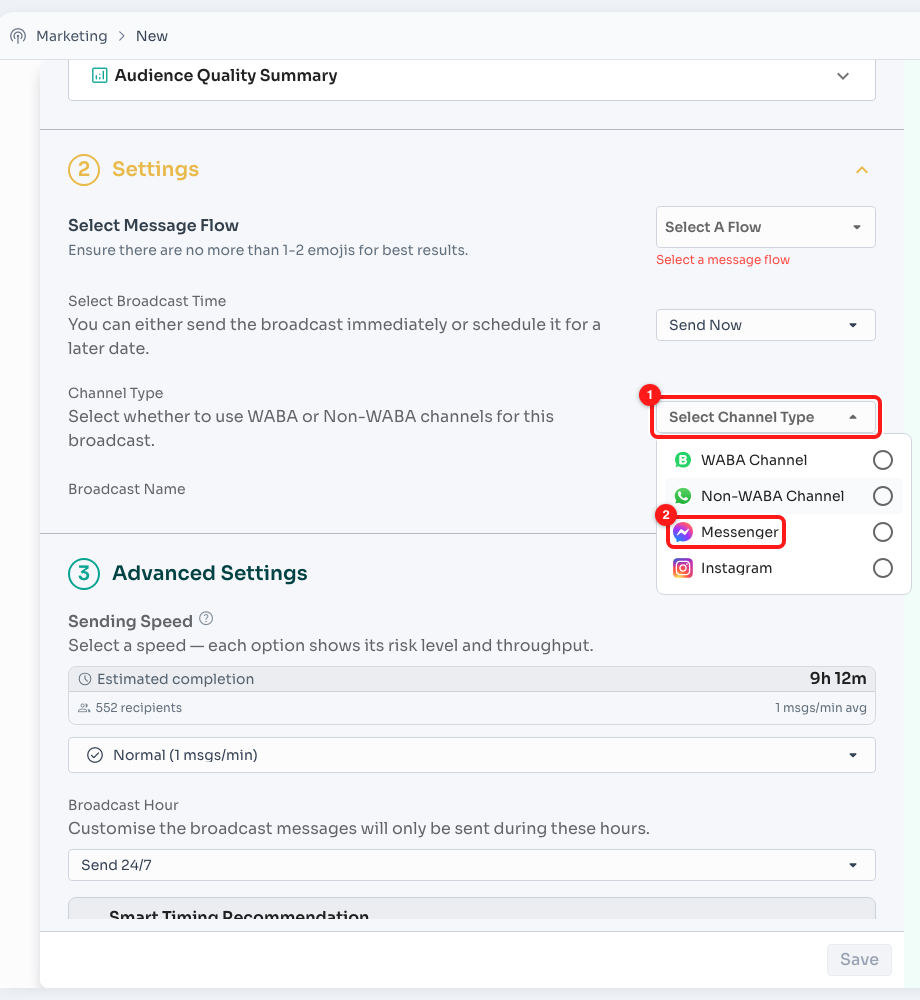
Open Select Channel Type (1) and pick Messenger (2).
Step 7: Choose the Facebook Page to send from
A Select Channel field appears. Open it and choose the Messenger Page you want to send from (1). Each row shows the channel name and, below it, the Facebook Page name.
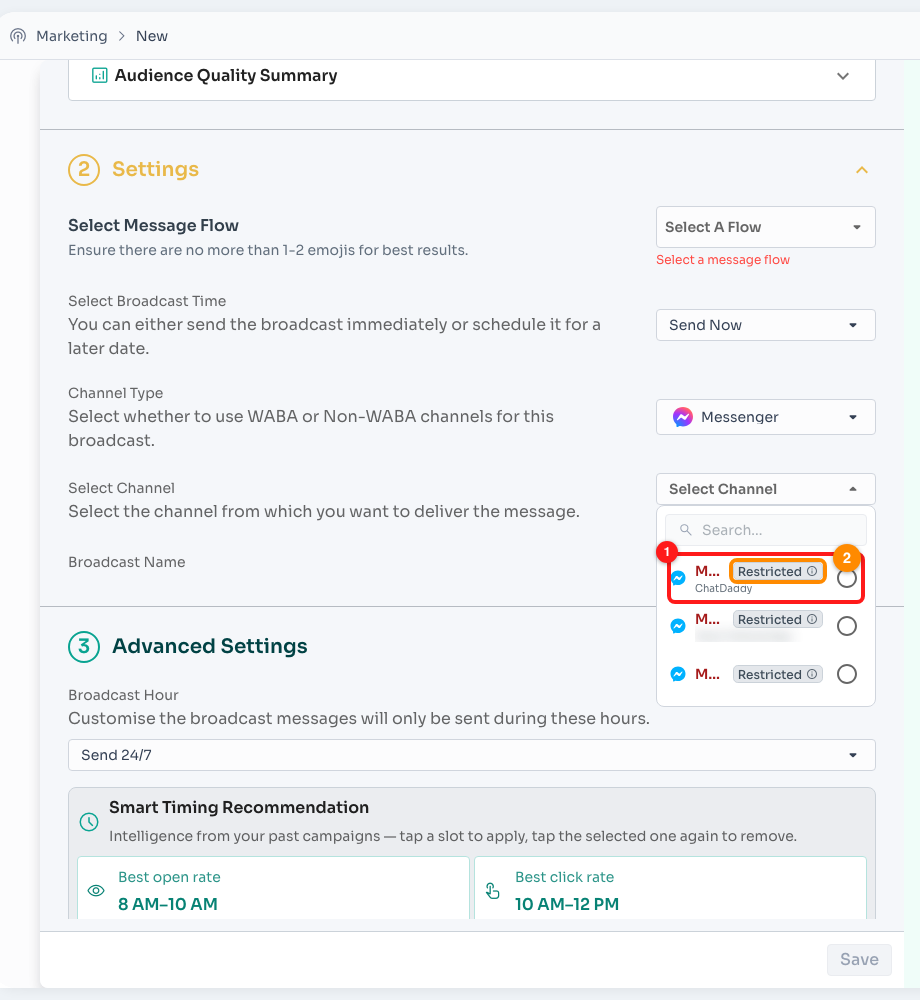
Pick the Messenger Page (1). A Restricted chip (2) means that Page is disconnected and cannot send.
- One Page per broadcast. Messenger contacts belong to a specific Facebook Page, so a Messenger broadcast sends from a single Page. To reach the contacts of two Pages, create two broadcasts.
- Restricted chip (2): hover the ⓘ to see why. For Messenger it almost always means the Page is disconnected. Reconnect it (Step 1) before you send, or the messages won't go out.
Once both are set, Channel Type (1) shows Messenger and Select Channel (2) shows your Page:
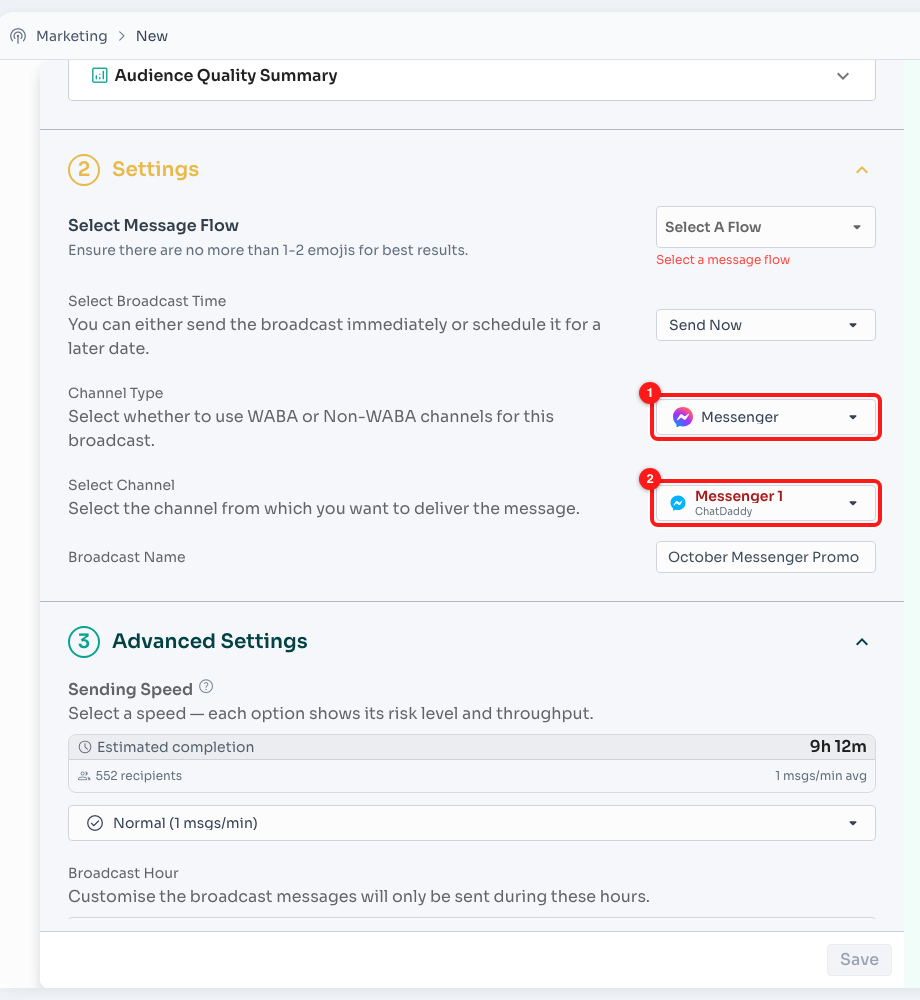
Channel Type = Messenger (1) and the chosen Page (2).
Step 8: Select the message flow to send
Open Select Message Flow. Use the search box (1) to find your flow by name, then click the radio button next to it (2). A preview of the flow appears on the right.
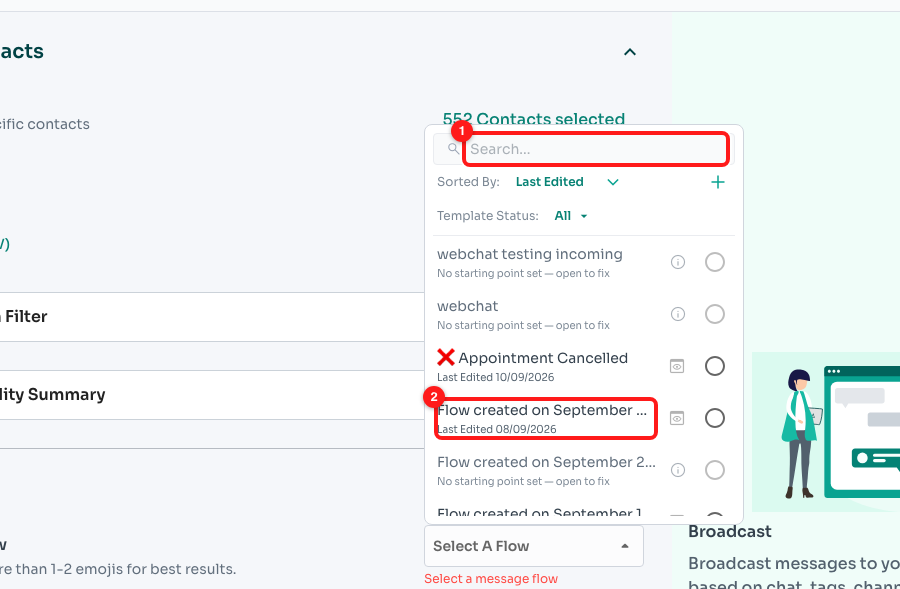
Search for the flow (1) and select it (2).
- Flows marked "No starting point set — open to fix" are greyed out and can't be chosen. Open the flow in the Flow Builder, set its starting point, save, and come back.
- Use Sorted By to sort flows by Last Edited, and + to create a new flow without leaving the page.
- Keep to 1–2 emojis per message, as the hint under the field suggests.
The chosen flow now shows in the field (1):
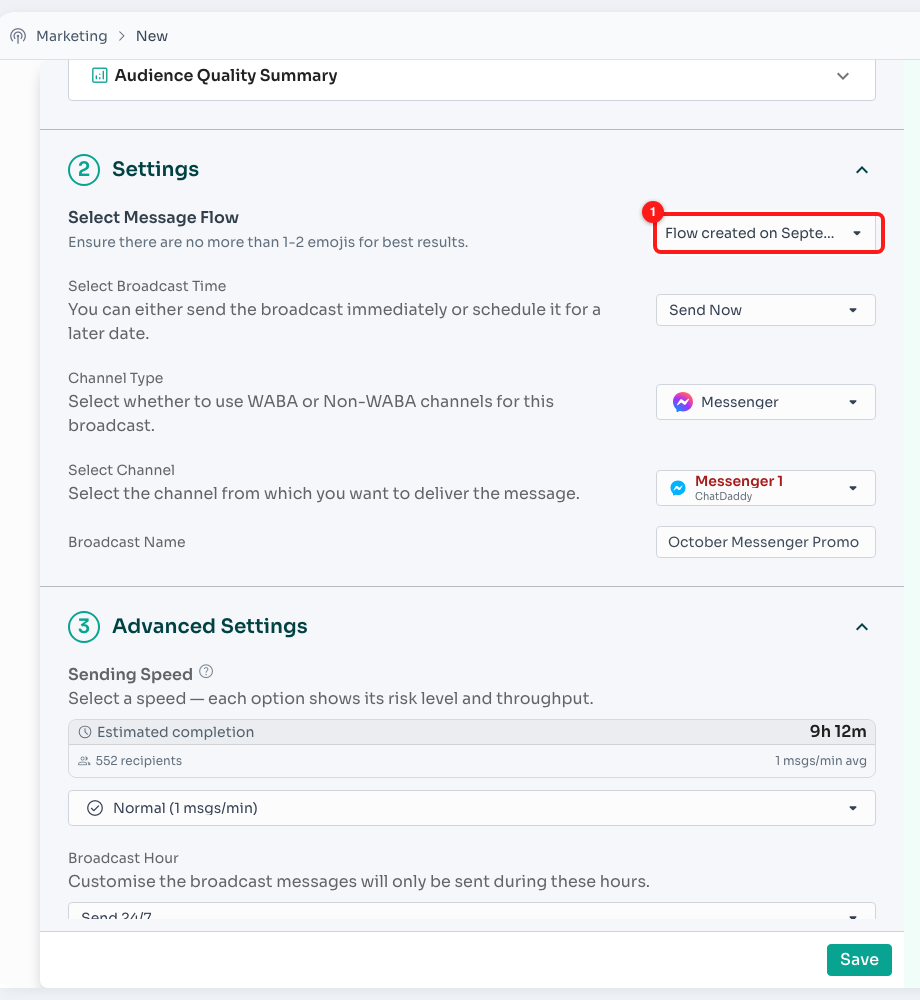
The selected message flow (1).
Step 9: Choose when to send
Open Select Broadcast Time:
- Send Now (1) starts sending as soon as you save.
- Schedule for Later (2) lets you pick a date and time. The 24-hour window is checked when the messages go out, so schedule close to when your contacts are active.
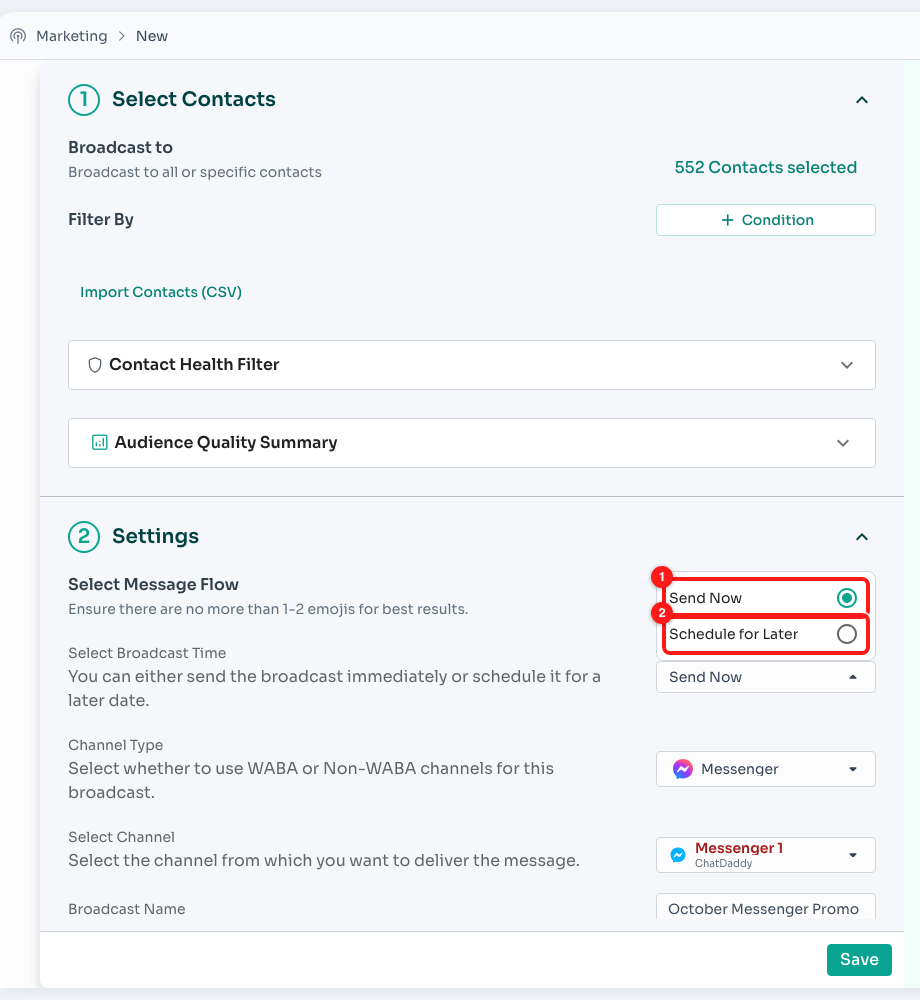
Send Now (1) or Schedule for Later (2).
Step 10: Name the broadcast
ChatDaddy fills Broadcast Name with a default ("Broadcast by October Messenger Promo. The name is only shown to your team, never to customers.
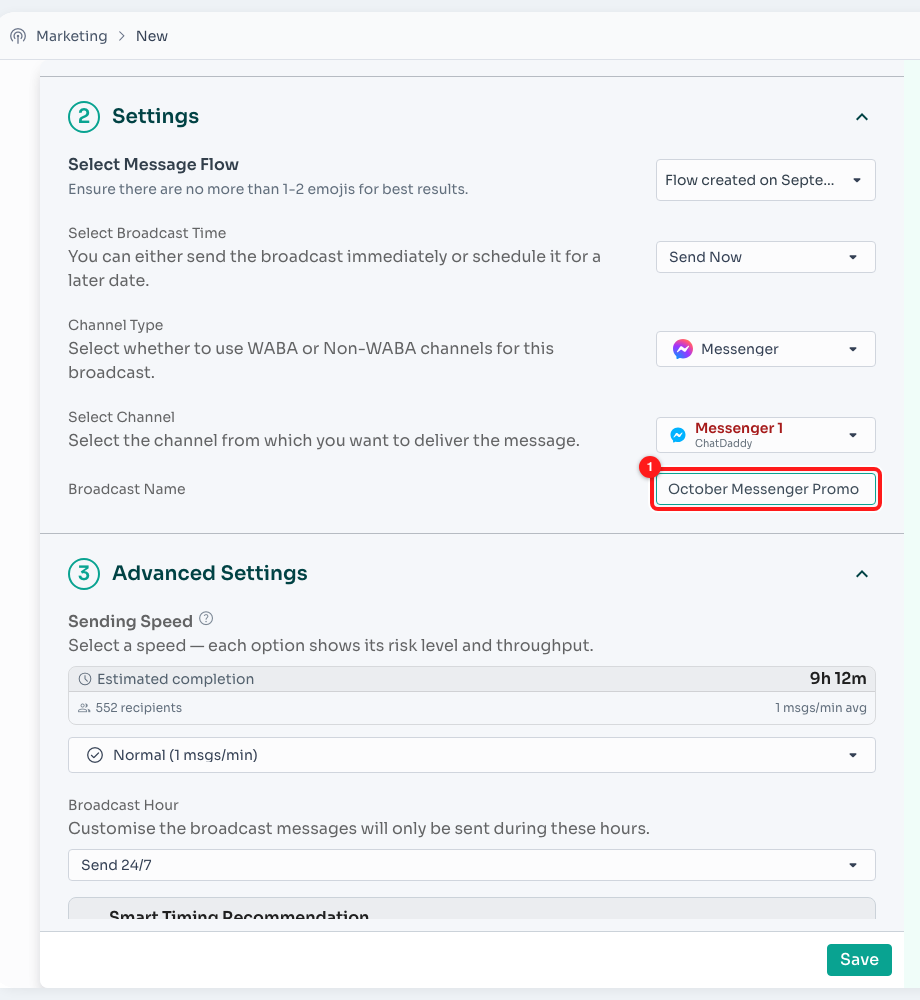
Give the broadcast a clear internal name (1).
Step 11: Choose your audience
Scroll back up to Select Contacts:
- Contacts selected (1): how many contacts match your filters right now. Click it to see the list.
- + Condition (2): narrow the audience with filters.
- Import Contacts (CSV) (3): upload your own list instead of filtering.
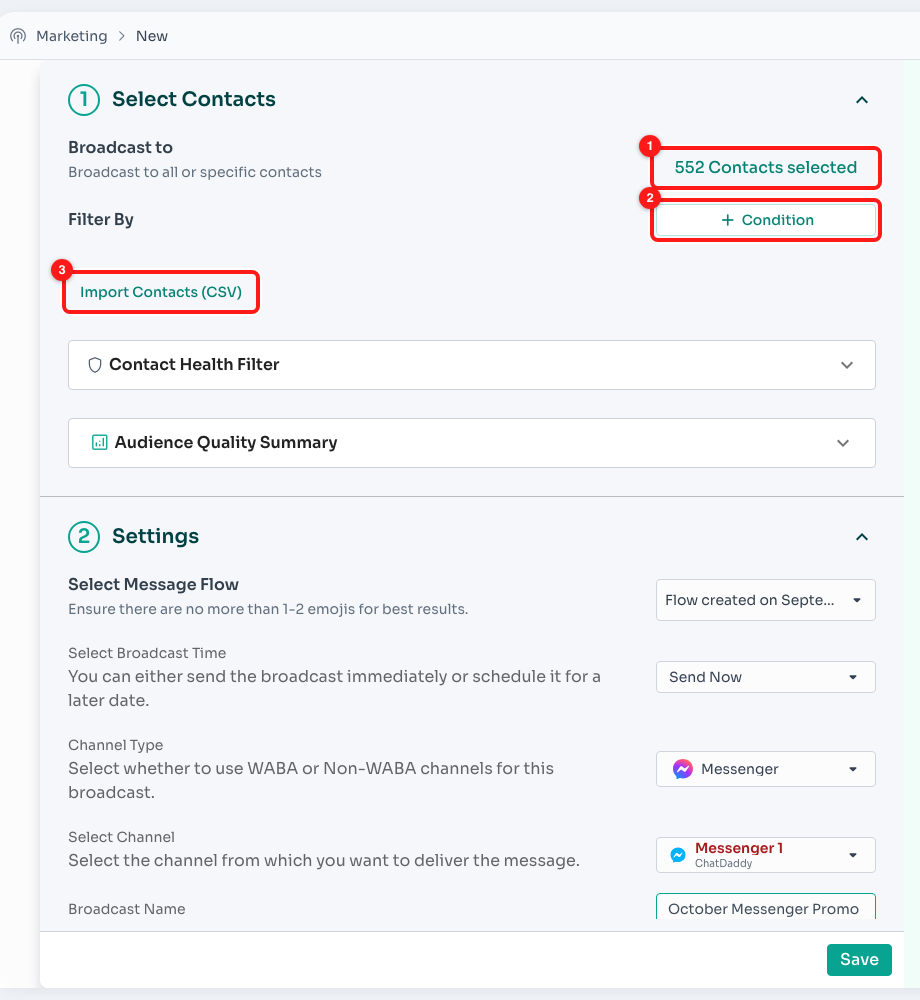
Audience count (1), + Condition filters (2) and Import Contacts (CSV) (3).
🎯 Important: before you add filters, the count covers every contact in your team, including WhatsApp, Instagram and email contacts. Only contacts who have a Messenger conversation with the Page you picked (and messaged within 24 hours) will actually receive the broadcast. Filter by Channel (next step) to get a realistic count.
Click + Condition (1) to see the filter types: Chat, Tag, Custom Fields, Channel, Assignee, Ticket, Messages Received, Messages Sent and Date Filter.
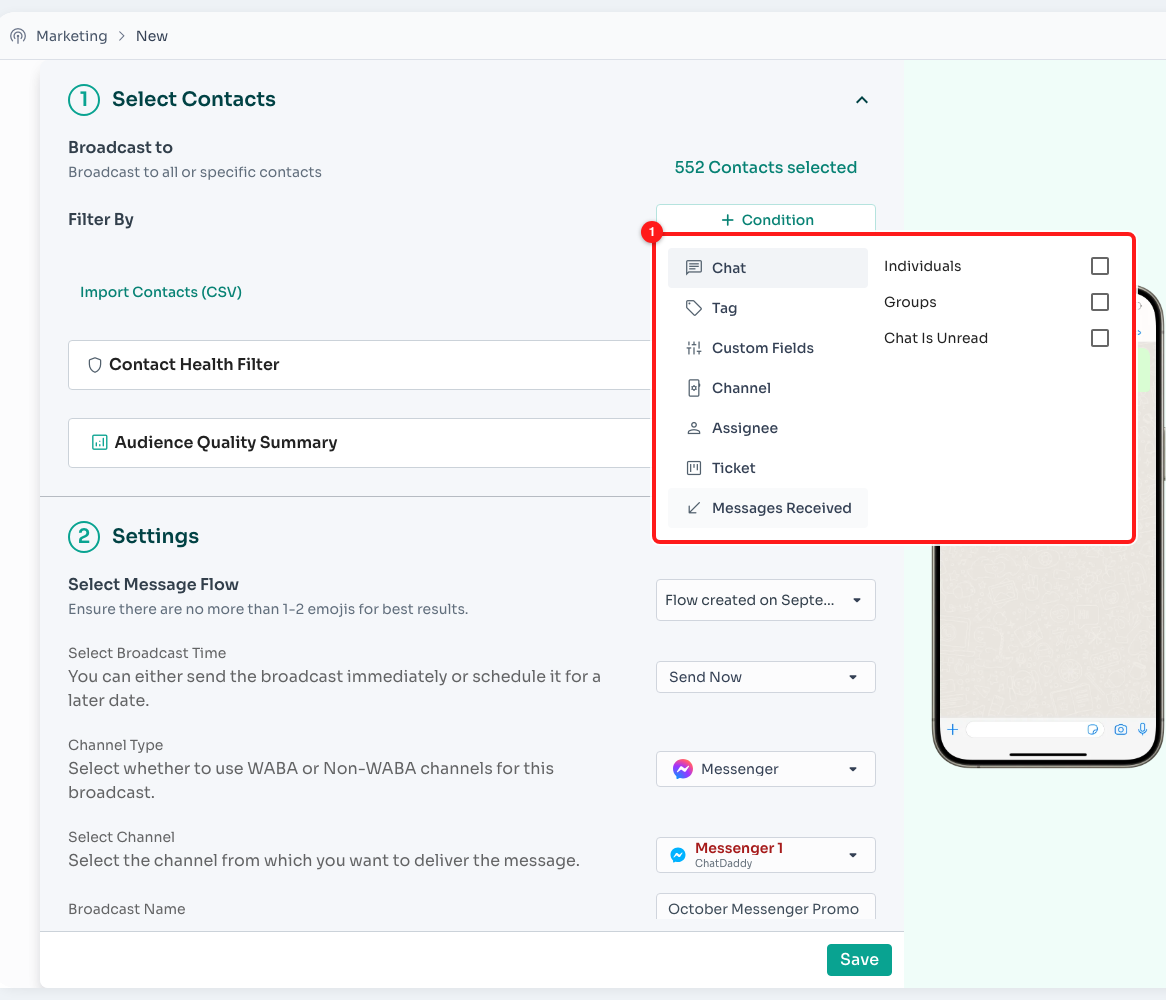
The + Condition filter menu (1).
Choose Channel (1), then tick the same Messenger Page you picked in Step 7 (2). The audience count updates to that Page's contacts. You can add more conditions on top, for example a Tag such as vip, or Messages Received to target people who messaged you recently.
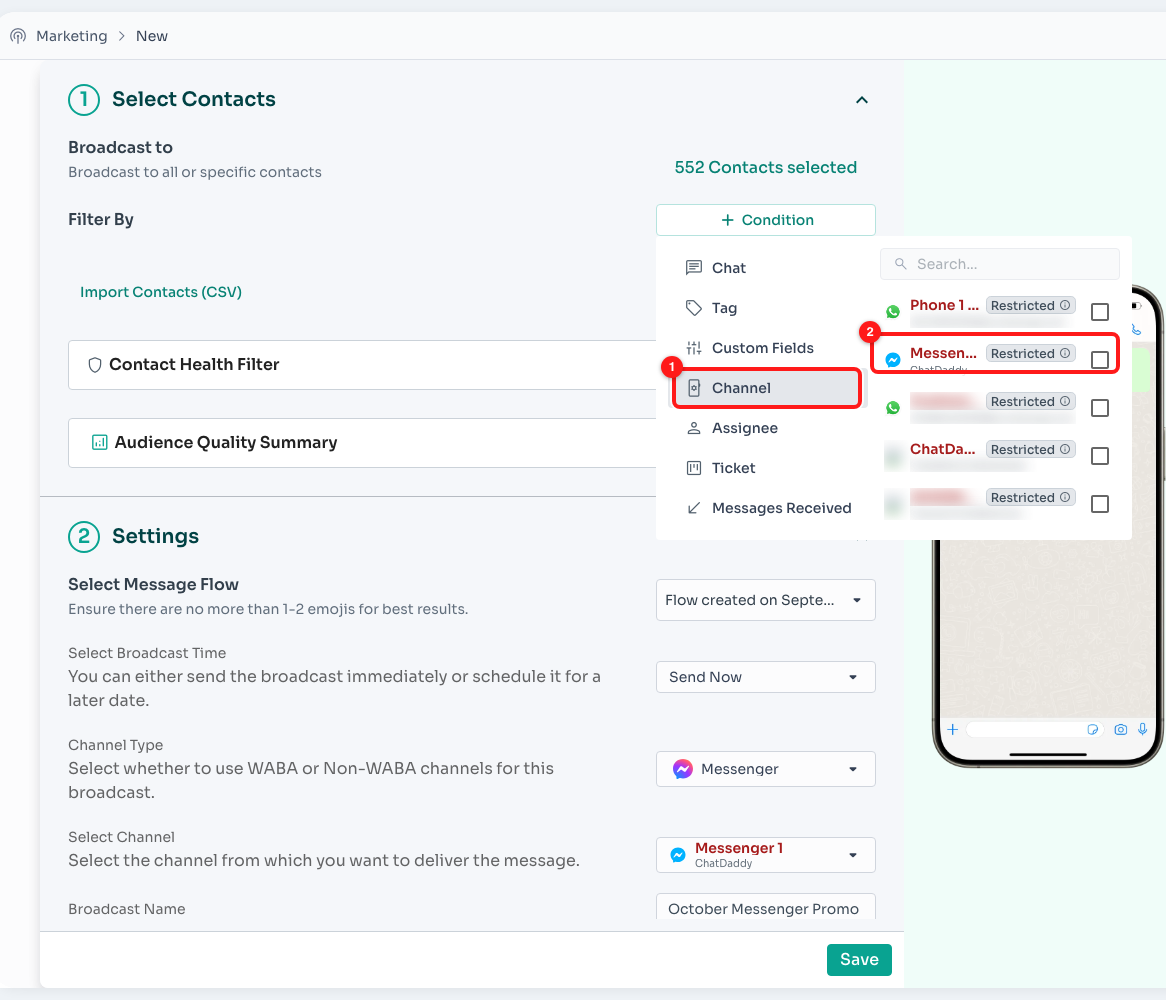
Condition → Channel (1) → tick your Messenger Page (2).
Step 12: Check audience health (optional but recommended)
Expand the two panels under the filters:
- Contact Health Filter (1): tick boxes to exclude contacts inactive for more than 60 days, contacts with no engagement history, and opted-out contacts. Each box shows how many contacts it removes. (The WhatsApp invalid numbers box is for WhatsApp broadcasts and doesn't apply to Messenger.)
- Audience Quality Summary (2): a live health check of the selected audience: total contacts, active in the last 30 days, inactive 90+ days, delivery failures, opted out, no engagement history, plus a summary and suggested actions.
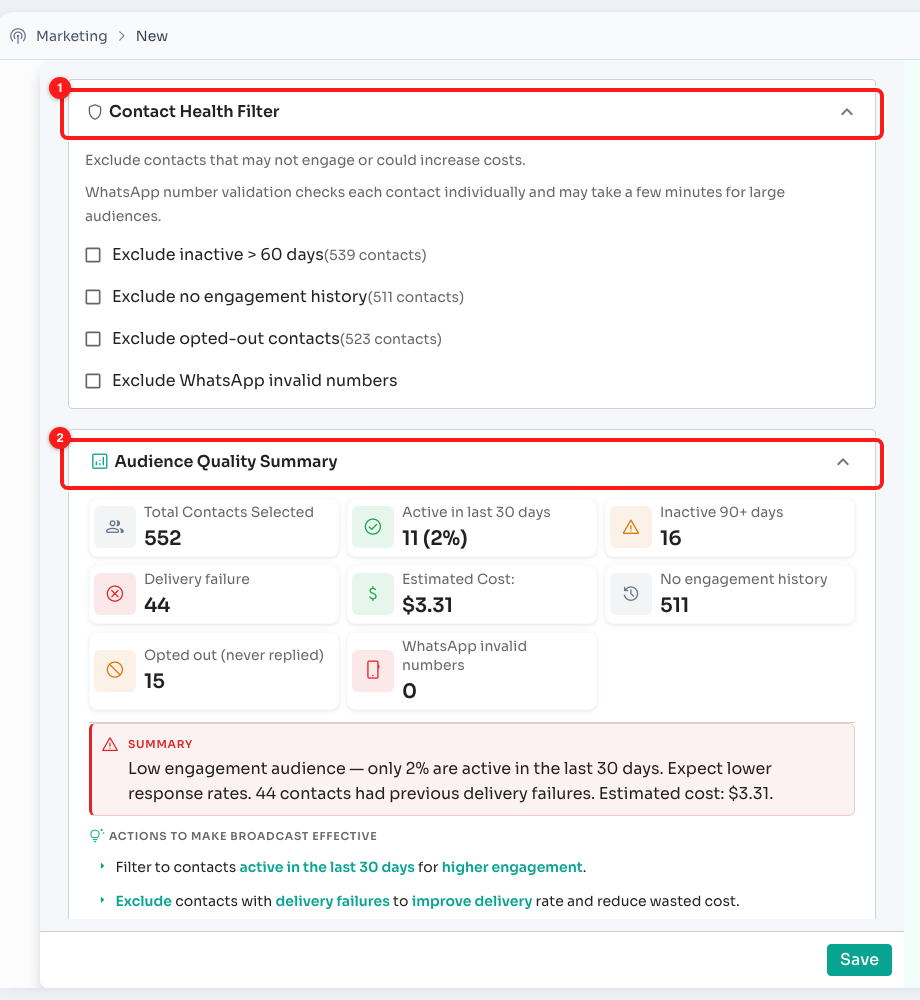
Contact Health Filter (1) and Audience Quality Summary (2).
💡 If Active in last 30 days is low, most of your audience is outside Meta's 24-hour window and won't receive the broadcast. Filter to recently active contacts so your numbers reflect real reach.
Step 13: Set the sending speed and hours
In Advanced Settings:
- Estimated completion (1): how long the broadcast will take for the current audience and speed.
- Sending Speed (2): how many messages go out per minute. Each option shows its risk level and throughput. Slower is safer and looks more natural to Meta.
- Broadcast Hour (3): Send 24/7, or limit sending to certain hours so messages don't arrive in the middle of the night.
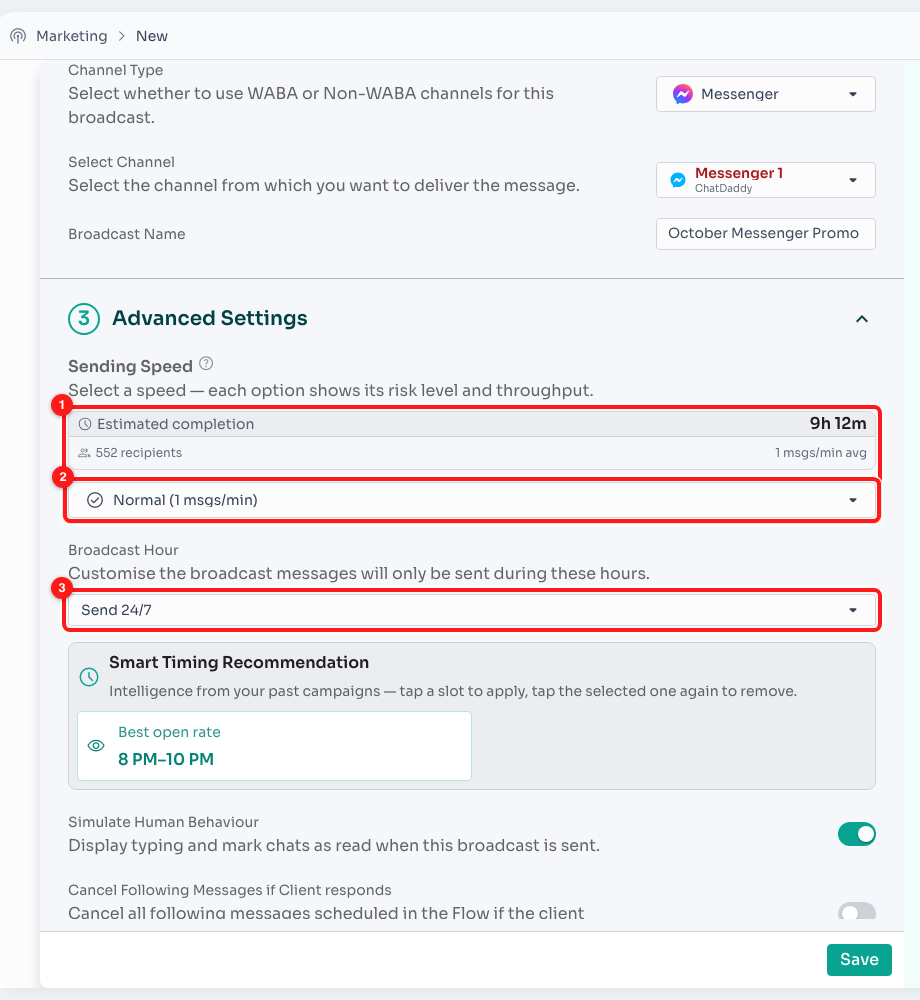
Estimated completion (1), Sending Speed (2) and Broadcast Hour (3).
Below Broadcast Hour, Smart Timing Recommendation suggests your best open-rate (and click-rate) window based on past campaigns. Tap a slot to apply it, and tap it again to remove it.
Step 14: Choose the finishing options and save
- Simulate Human Behaviour (1): shows typing and marks chats as read when the broadcast is sent, so it feels less automated.
- Cancel Following Messages if Client responds (2): if a contact replies to any message in the flow, the remaining scheduled messages in that flow are cancelled for them. Turn this on for multi-message flows so you don't keep sending to someone who is already chatting.
- When everything looks right, click Save (3). It stays greyed out until a flow, channel type and Page are selected.
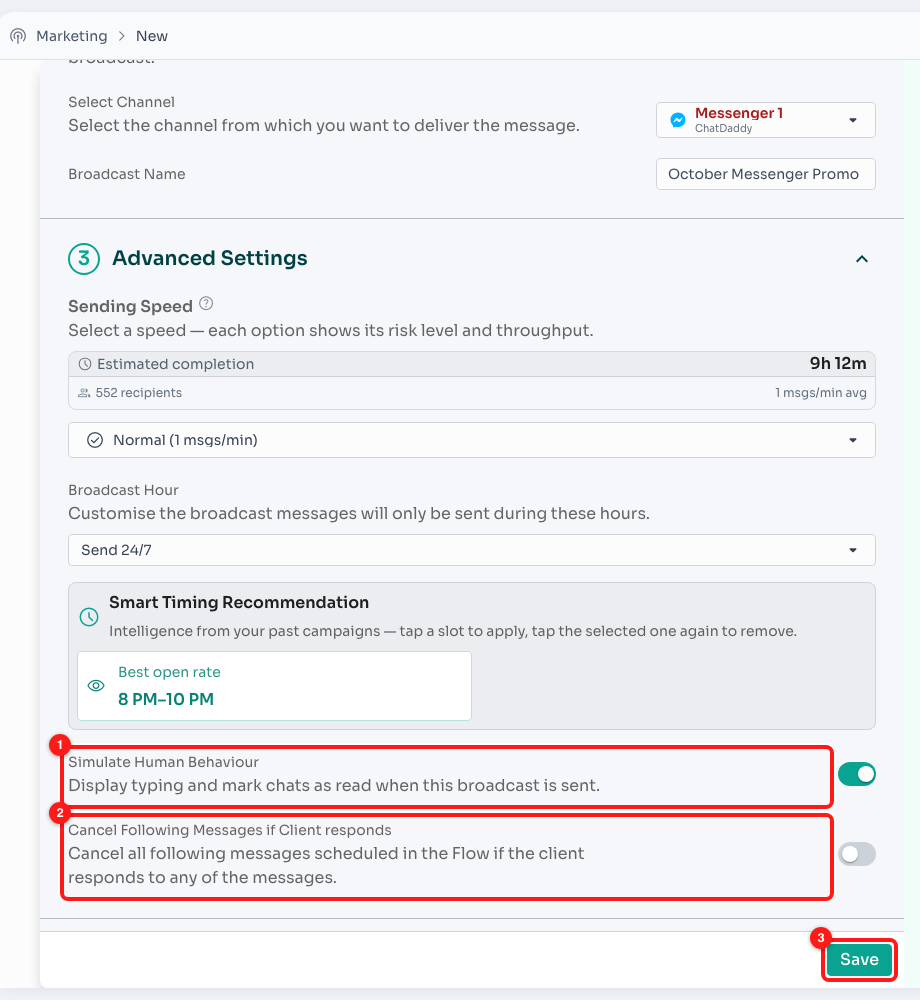
Simulate Human Behaviour (1), Cancel Following Messages if Client responds (2), Save (3).
Step 15: Confirm the Important Notice
An Important Notice appears with tips for avoiding spam reports. Read it and click I Understand (1) to launch (or schedule) the broadcast. Click Cancel (2) to go back and change something.
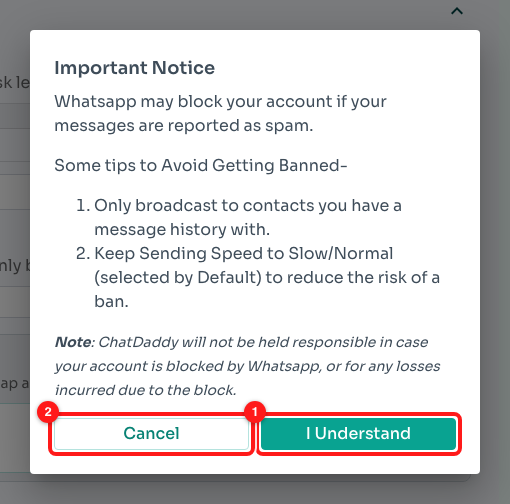
I Understand (1) launches the broadcast; Cancel (2) returns to the form.
ℹ️ The notice says "WhatsApp" because it is shared by all broadcast types. The advice still applies to Messenger: Meta can restrict a Facebook Page whose messages are reported as spam. Your broadcast is sent only through the Messenger Page you selected.
Part 3: Track and manage your broadcast
Step 16: Follow the progress
Back on the Broadcasts list, use the status tabs (1) (Inactive, Scheduled, Progress, Completed) to find your broadcast. The Progress bar (2) shows how many messages were Successful, Failed or still Pending, out of the Total.
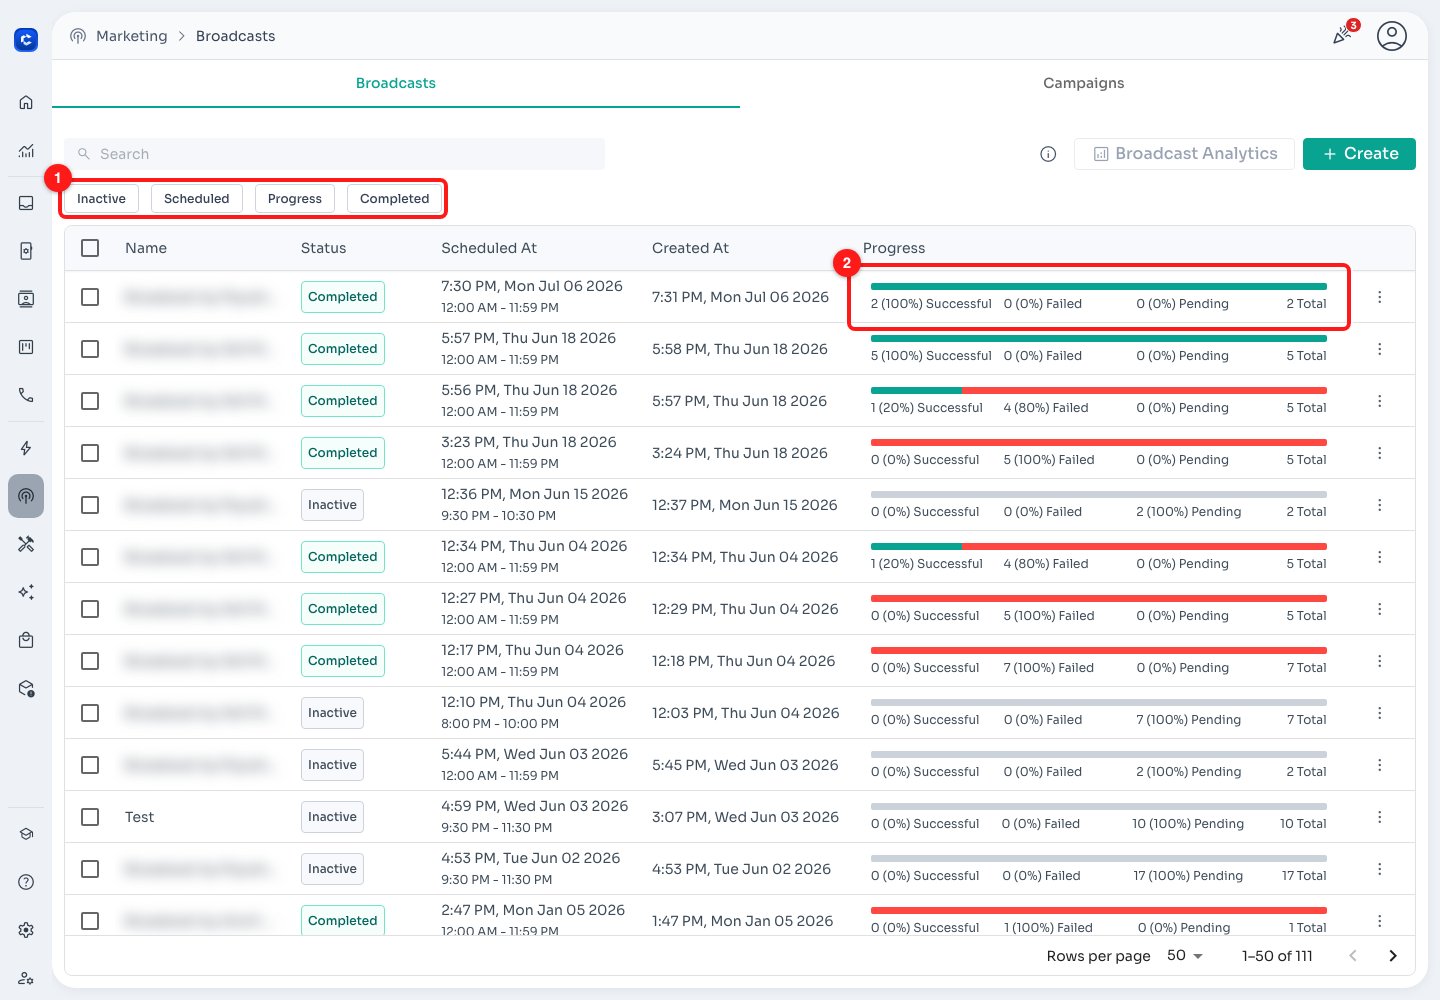
Status tabs (1) and the per-broadcast progress bar (2).
Step 17: View recipients, pause, edit or delete
Click the ⋮ menu at the end of a broadcast row (1):
- View Recipients: see who the broadcast was sent to and each person's delivery status.
- Start / Stop: resume or pause a broadcast that is still sending.
- Edit: change a broadcast that hasn't finished (for example a scheduled one).
- Delete: remove the broadcast.
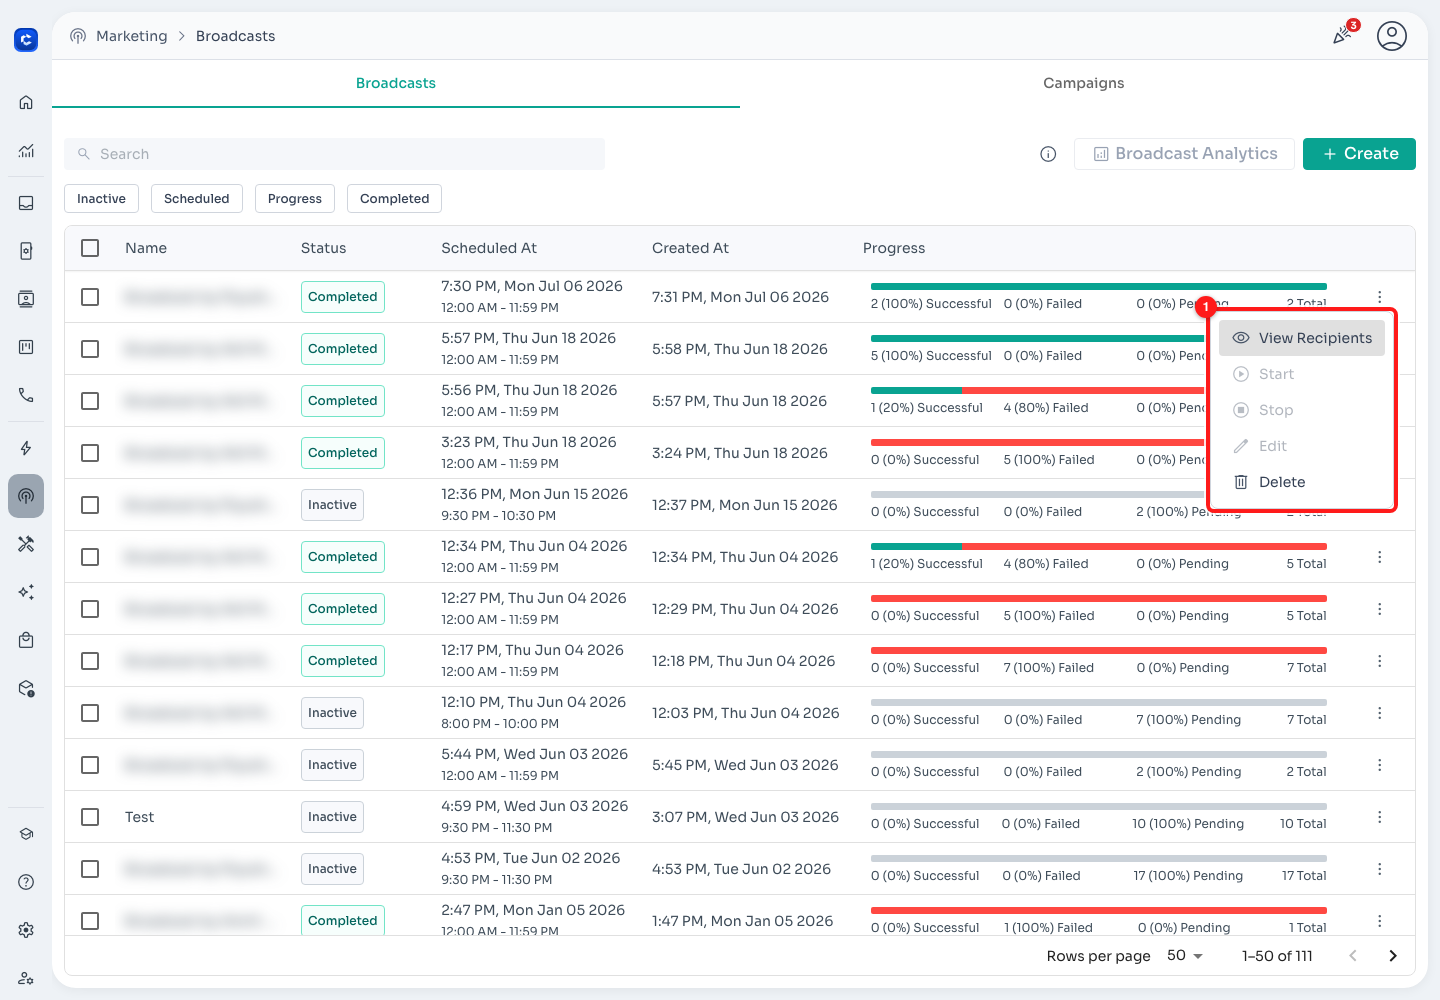
The ⋮ row menu (1).
For an overview across all your broadcasts, use Broadcast Analytics at the top of the list.
Troubleshooting
Most of my Messenger broadcast shows as Failed
This is almost always Meta's 24-hour rule: the contact hasn't messaged your Page in the last 24 hours, so Meta blocks the automated message. Filter your audience to recently active Messenger contacts and send soon after they message you. See Why can't I send triggers or broadcasts on Messenger?.
Messenger isn't in the Channel Type list, or my Page isn't in Select Channel
Connect a Messenger Page first (Step 2). Messenger Pages only appear after you choose Messenger as the Channel Type. WhatsApp and Instagram channels are listed under their own types.
My Page shows "Restricted" or "Send paused"
The Page's connection to Meta has lapsed. Messages can still come in, but ChatDaddy cannot send. Reconnect it from Manage Channels (Step 1). You need to be an admin of the Facebook Page.
I can't select my message flow
The flow has no starting point ("No starting point set — open to fix"). Open it in the Flow Builder, set the starting point, save, then reopen the broadcast.
The Save button is greyed out
Save unlocks once a message flow, a Channel Type and a Page are all selected. Check for red hint text such as "Select a message flow" or "Select a channel" under the fields.
The contact count is much bigger than my Messenger audience
With no filters, the count includes every contact in your team across all channels. Add + Condition → Channel → your Messenger Page (Step 11) to count only that Page's contacts.
View Recipients shows "Cannot send messages until the recipient initiates a new conversation"
That contact is outside Meta's 24-hour window, so Meta refused the message. ChatDaddy still tries each contact in your audience and marks this one Failed. It won't be delivered until that person messages your Page again.
Your own Facebook Page shows up as a contact in the audience
When you connect a Page, ChatDaddy may create a contact with the Page's own name. That contact has never messaged you, so it always fails with the error above. This is harmless and can be ignored, or you can exclude it with a Condition.
My Page is Connected but the broadcast reaches nobody
Check the Page's Status in Manage Channels. New chats only means conversations from before the Page was connected are not in ChatDaddy. Wait for customers to message the Page and for those chats to appear in the Inbox (Step 3), then send within 24 hours of their message.