
How to Use Every Message Flow Trigger, End to End
A trigger is what makes a Message Flow run by itself. This guide covers all of them — from Incoming Message to Webhook — how to add one, what each fires on, what you can filter it by, how to preview and test it, and where to look afterwards to prove it actually ran.
Also searched as: How to Use Every Message Flow Trigger, End to End, Part 1 — Add a trigger, Open the flow and choose Trigger, Pick the event, Or start from an outside system, Part 2 — The trigger node and its settings, Trigger Frequency — the setting that stops runaway flows, Part 3 — Give the trigger something to do, Part 4 — Every trigger, one by one, 1. Incoming Message, 2. Outgoing Message, 3. New Chat, 4. Contact Updated, 5. New Contact, 6. Ticket Created
A Message Flow answers two questions. The steps answer what happens. A trigger answers when — the event that sets the flow off without anyone clicking anything: a customer messages you, a tag is added, a ticket moves, a call ends, another system posts to a webhook.
A trigger on its own does nothing. Three things have to be true before a flow runs by itself: the trigger is Enabled, it has a Next Step, and the flow has been saved. This guide walks the whole path — add, configure, narrow, preview, save, and then check that it really ran.
🧭 A trigger is one of the two ways to start a flow. The other is a starting message, which you send yourself. If you also want to send this flow by hand from the Inbox, see How to Set the Starting Point of a Message Flow.
Part 1 — Add a trigger
Step 1 — Open the flow and choose Trigger
Go to Automation → Message Flows and open a flow. On an empty canvas, the Choose Starting Step card offers Trigger (1). In a flow that already has steps, use the + button on the left toolbar instead — the same window opens.
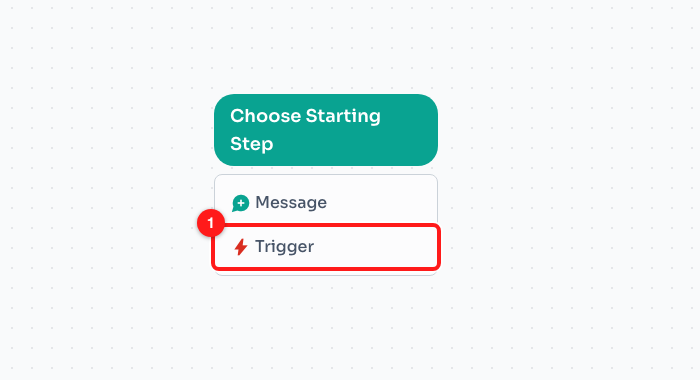
Step 1 — Trigger (1) on the Choose Starting Step card.
Step 2 — Pick the event
The Add New Node window opens on the Trigger category (1). Every event your team can use is listed on the right (2). Click one to add it.
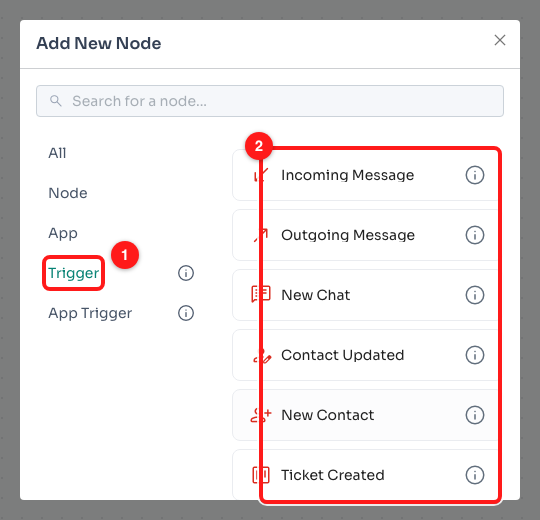
Step 2 — the Trigger category (1) and the events available to your team (2).
The list scrolls — there are more events below the first few. Scroll to the bottom to see the rest (1).
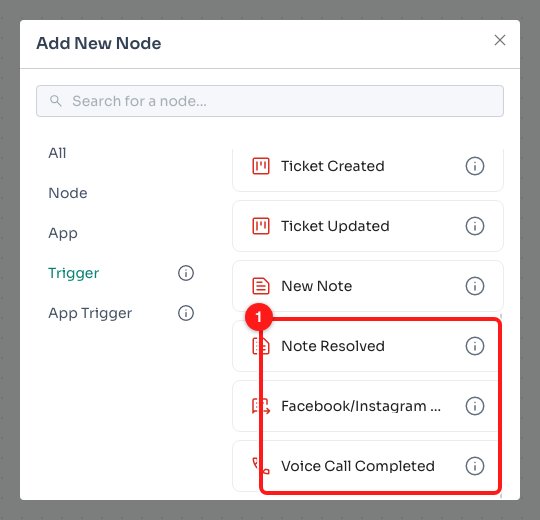
Step 2 — the remaining events: Note Resolved, Facebook/Instagram Comment and Voice Call Completed (1).
ℹ️ The list is built from your own team, so you may see fewer events than the eleven described below — Facebook/Instagram Comment needs a Messenger or Instagram channel, Voice Call Completed needs calling, and so on.
Step 3 — Or start from an outside system
The App Trigger category (1) holds triggers fired by something outside ChatDaddy. Webhook (2) is the general-purpose one: any system that can send an HTTP request can start your flow with it.
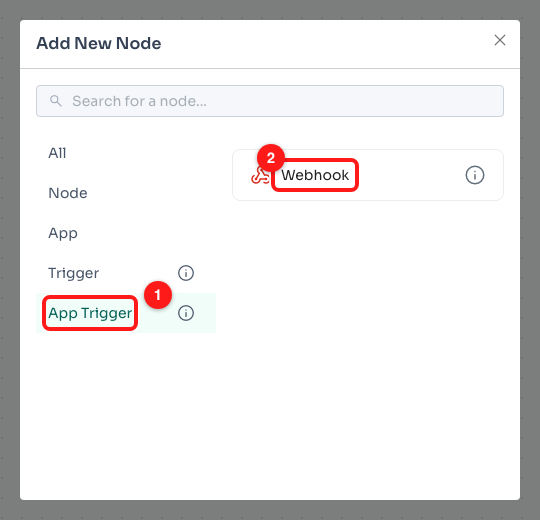
Step 3 — App Trigger (1) and the Webhook trigger (2).
Part 2 — The trigger node and its settings
The trigger lands on the canvas with a green Trigger pill above it (1), which marks it as a starting point of the flow, and a Next Step row (2) that is still empty.
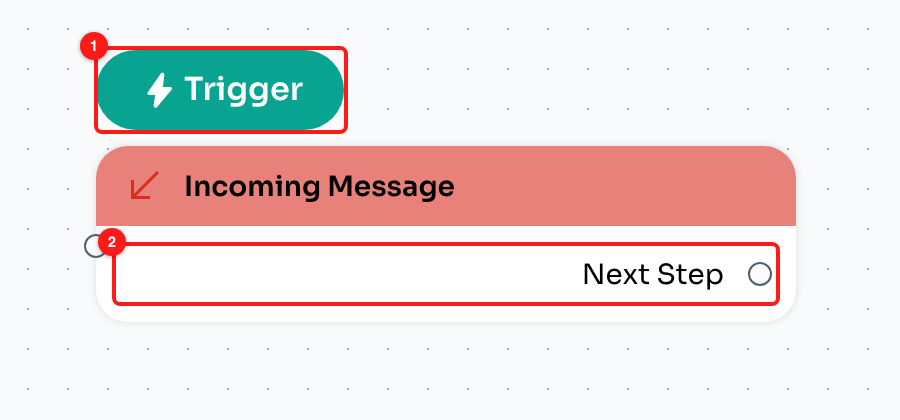
The Trigger pill (1) and the Next Step row (2) on a new trigger.
Click the trigger to open its settings. Enabled (1) is the on/off switch — a disabled trigger never fires, which is the quickest way to pause an automation without deleting it. Below it, Advanced Settings holds Trigger Frequency.
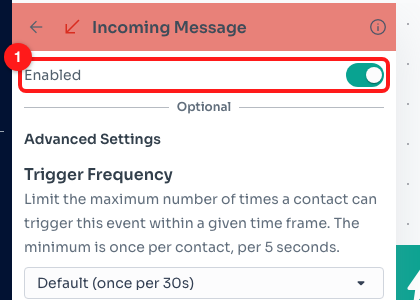
The Enabled switch (1), with Trigger Frequency in Advanced Settings below it.
Trigger Frequency — the setting that stops runaway flows
Trigger Frequency limits how often the same contact can set this flow off. Choose Default (once per 30s), or Once per and then your own number and unit (seconds, minutes or hours). The shortest allowed gap is once per contact per 5 seconds.
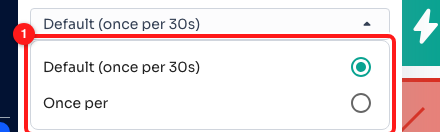
The two Trigger Frequency choices (1): the 30-second default, or your own interval.
⏱️ This limit is per contact, not per team: once per hour does not stop the flow running for a hundred different people in that hour. Separately, each trigger is allowed about 100 runs a minute overall — contact support if you need more. Full detail: How to Control How Often a Message Flow Trigger Fires.
The last control in Advanced Settings is the Mark chat as read if triggered checkbox, which is off by default.
Part 3 — Give the trigger something to do
At the bottom of the trigger's settings panel, click Choose Next Step and pick what should happen — usually a Message. A trigger with an empty Next Step is the single most common reason a flow "does nothing": the event is detected, and then there is nothing to run.
Part 4 — Every trigger, one by one
Each event carries its own data, and that data is what you can filter on later (Part 5). Here is what each one fires on, and what it gives you.
1. Incoming Message
Fires when a customer sends you a message on any connected channel. The workhorse trigger: auto-replies, keyword routing, first-response automations.
Filter on: Text · Time · Channel · Chat ID · Is Button Click (whether the message is a reply to a button, list or poll) · Ad Source (the Facebook or Instagram ad the lead came from — use is for one specific ad, or is not empty for any ad).
2. Outgoing Message
Fires when a message goes out — sent by a teammate or by an automation. Useful for internal follow-ups: log the send, start a timer, notify someone.
Filter on: Text · Time · Channel · Chat ID · Sender (which team member).
♻️ Because automation-sent messages count as outgoing, a flow that sends a message and is started by an outgoing message can feed itself. Always narrow this trigger with a Condition, and leave Trigger Frequency on.
3. New Chat
Fires when a brand-new chat is created — the first-ever conversation with someone, rather than every message in it. The one to use for a welcome message.
Filter on: Chat ID · Channel · First Message Direction (incoming or outgoing) · First Message Text · Is Responded (whether the chat has already been replied to).
4. Contact Updated
Fires when something on a contact changes — a tag added or removed, an assignee changed, a field edited. The trigger carries the fields that changed, which is why every property is named "New …".
Filter on: New Tag · New Assignee · New Ticket Stage · New Name · New Phone Number · New Email · New Country · New Type (group or individual) · New Messages Sent · New Messages Received · New Channel · New Unique ID.
This is the trigger behind most tag-driven automations: when the tag “payment-confirmed” is added, send the next-steps message.
5. New Contact
Fires when a contact is created or imported — including bulk CSV imports, so check the volume before you attach anything that sends.
Filter on: Name · Phone Number · Email · Tag · Country · Assignee · Type (group or individual) · Messages Sent · Messages Received · Ticket Stage · Channel · Unique ID.
6. Ticket Created
Fires when a CRM ticket is created on any board.
Filter on: ID · Title · Stage · Board · Contact ID · Channel · Created At · Created By · Timer Status · Timer Started At · Timer Ends At.
7. Ticket Updated
Fires when an existing ticket changes — most often when it moves to another stage. Everything Ticket Created offers, plus what changed.
Filter on: everything above, plus Previous Stage · Updated At · Updated By.
Filtering on Stage and Previous Stage is how you catch one specific move — for example only when a ticket goes from In Progress to Done.
8. New Note
Fires when a teammate adds an internal note to a contact.
Filter on: Text · Time · Channel · Chat ID · Sender.
9. Note Resolved
Fires when a note is marked resolved — the other half of the note pair, for closing the loop on an internal task.
Filter on: Resolved At · Resolved By · Channel · Chat ID.
10. Facebook/Instagram Comment
Fires when someone comments on one of your Facebook or Instagram posts. Needs a connected Messenger or Instagram channel. This is the comment-to-DM trigger.
Filter on: Text · Time · Channel · Chat ID · Post · Post Caption · Post Type · Live Video Status.
Filter on Post to run the flow for one campaign only, and on Text to require a keyword in the comment.
11. Voice Call Completed
Fires when a voice call ends. Good for post-call follow-ups and summaries.
Filter on: Time · Channel · Phone Number · Receiver Phone Number · Created At · Call Notes.
12. Webhook (App Trigger)
Fires when another system sends an HTTP POST to a URL that ChatDaddy generates for this trigger. Use it for order confirmations, shipping updates, payment events — anything your own systems know about. Part 8 below covers it end to end.
Part 5 — Narrow when the flow runs, with a Condition
A trigger fires on every matching event. To make it run only sometimes, put a Condition step straight after it: Choose Next Step → Condition (1).
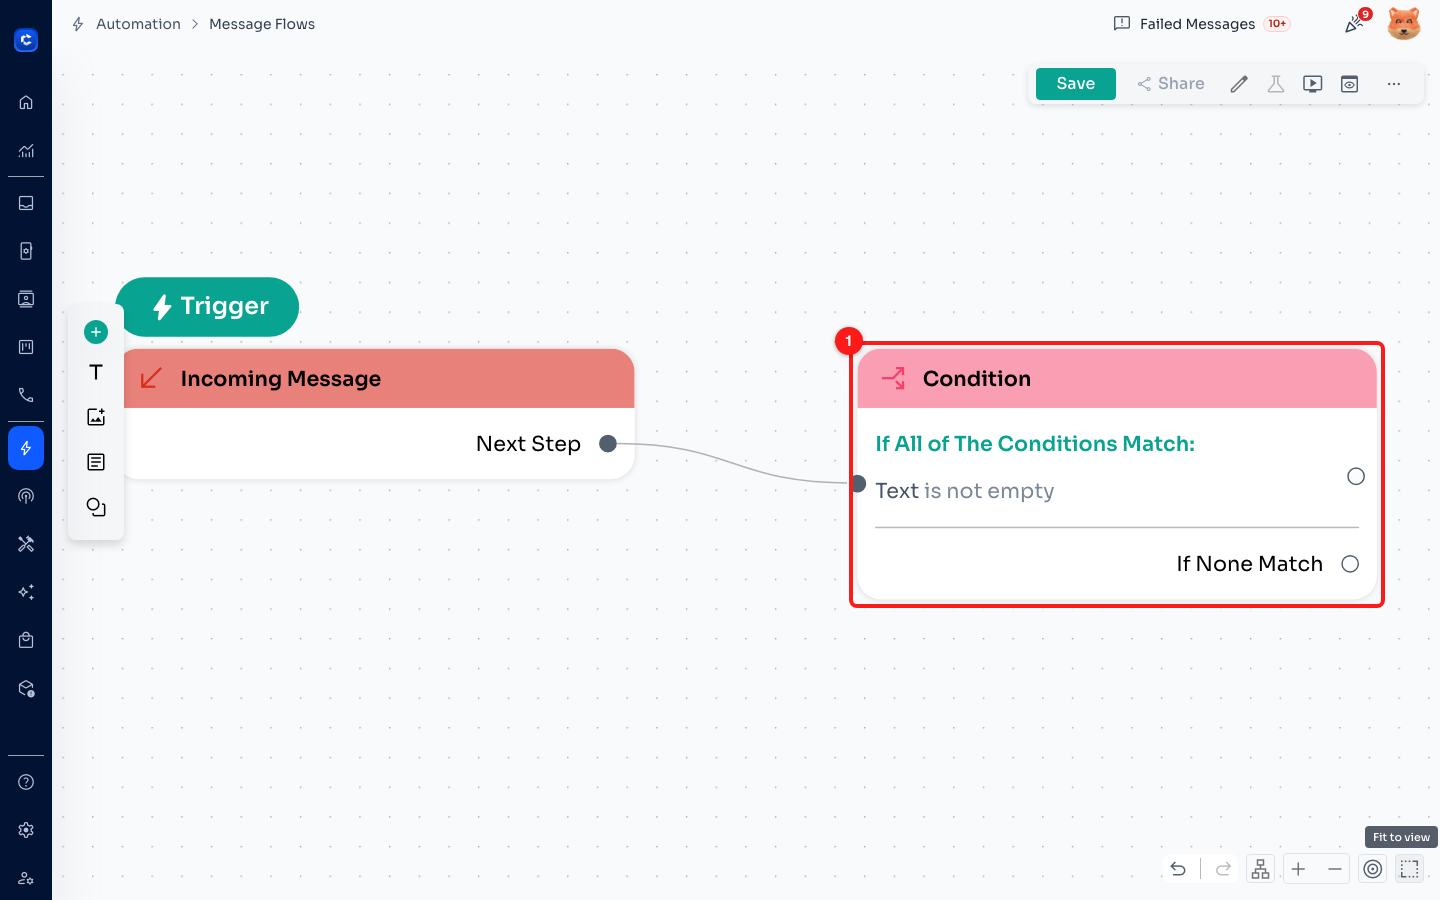
A Condition step (1) placed directly after the trigger filters which events actually run the flow.
Open the Condition and click Add Condition. The list of properties you can test is scoped to the trigger in front of it — a Ticket Updated trigger offers Ticket Updated Properties, an Incoming Message trigger offers the message properties from Part 4. Your contact's own fields (name, tags, country, assignee…) are available too.
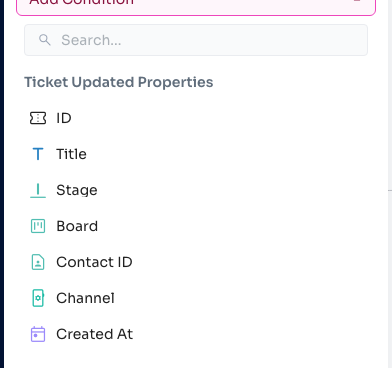
The Condition's property list is named after the trigger it follows — here, Ticket Updated Properties.
🎯 Two branches come out of a Condition: If Yes, Then and If None Match. Leave If None Match empty and the flow simply stops for events that do not match — which is exactly what you want for a filter.
Part 6 — More than one trigger on the same flow
A flow can have several triggers, each with its own next step. Add the second one from the + button on the left toolbar → Trigger. Both carry their own green Trigger pill (1, 2), and each can start the flow independently — a welcome message that runs on a New Contact as well as on an Incoming Message, for example.
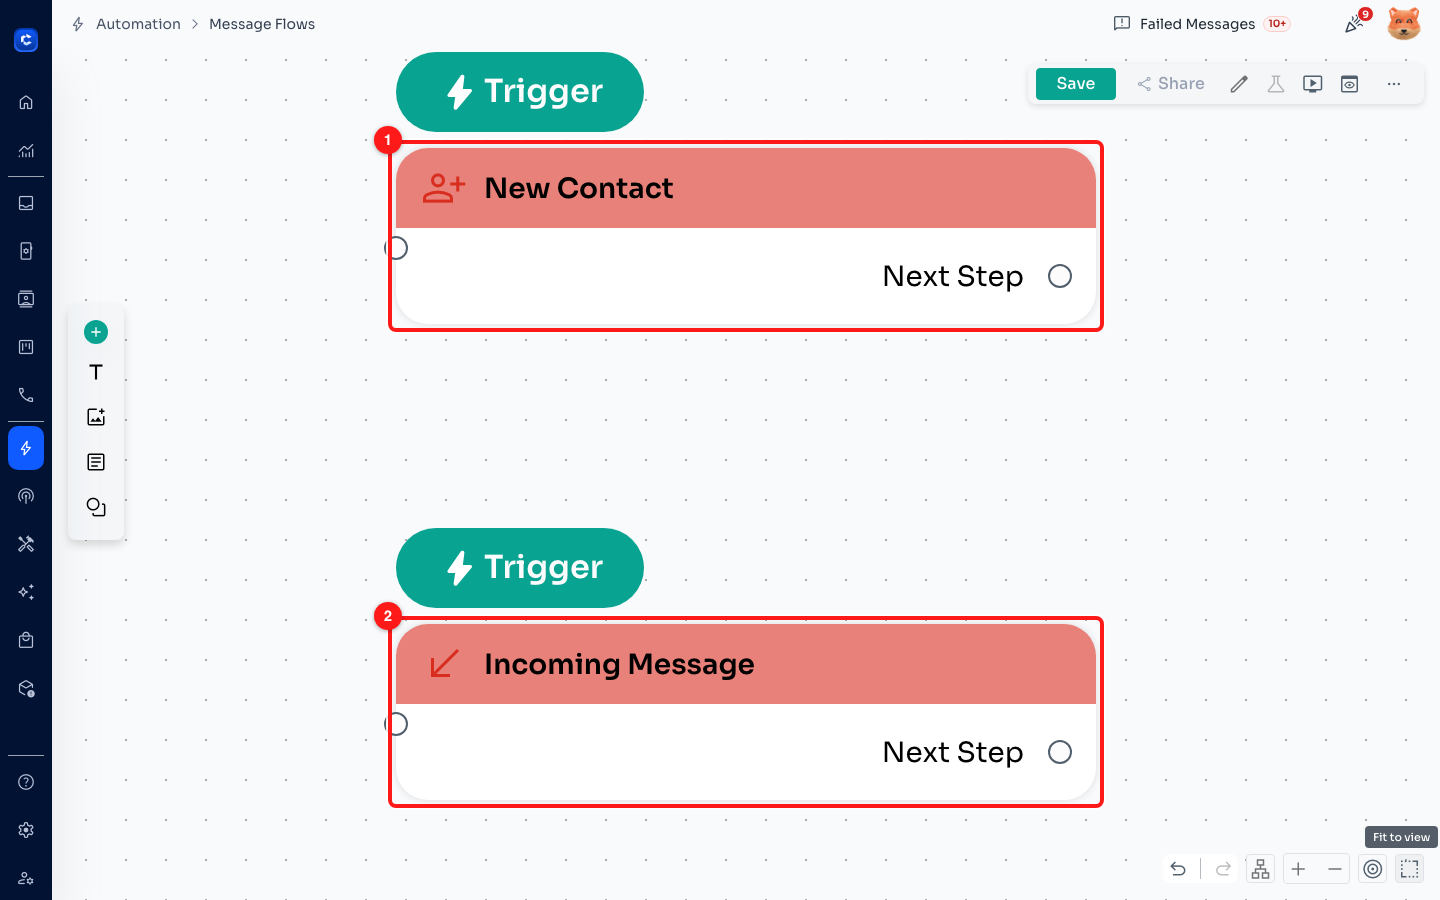
Two triggers on one flow (1, 2). Each starts the flow on its own event.
Part 7 — Test it before you turn it loose
Step 1 — Preview the conversation
Click Preview Flow in the top bar. Because the flow has a trigger, the preview panel asks where to start: Preview From Trigger followed by the trigger's name (1). Click it and the flow plays out on the phone mock-up.
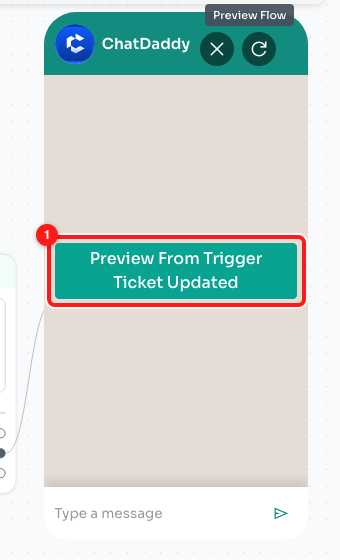
Preview From Trigger (1) — the preview starts from the trigger you choose.
The Test button (1) is greyed out on any flow that contains a trigger: Test sends the flow on demand to one phone number, which a trigger-started flow cannot do. Preview Flow (2) is the one to use.
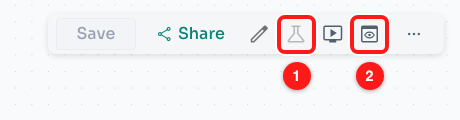
Test (1) is disabled on a flow with a trigger; use Preview Flow (2).
💾 Preview saves the flow first, and quietly does nothing if the save would fail — a flow with no name, or two steps with the same name. If clicking Preview seems to do nothing, see Why a Message Flow Will Not Save.
Step 2 — Do it for real, once
A preview proves the wording; only a real event proves the trigger. Save the flow, check the trigger is Enabled, then make the event happen on purpose — message your own business number, add the tag to a test contact, move a test ticket, post the webhook. Use a contact you own, not a customer.
Step 3 — Check it actually ran
Go to Automation → Trigger History (1). Every trigger run is listed with its name and flow, a Completed / Running / Stopped status, when it started, and a Progress bar (3) counting Sent, Clicks, Delivered, Pending and Failed. Filter (2) narrows the list by flow, status or date, and selecting rows lets you Stop Instances — the emergency brake for a flow that is running away.

Trigger History (1): filters (2) and the per-run Sent / Clicks / Delivered / Pending / Failed counts (3).
For the contact-by-contact record, open the flow's Recipients list from the Message Flows table. Sender (1) shows what started each run — a teammate, or the automation — and Status (2) shows how it ended. A run that shows up here with the automation as its sender is your proof that the trigger fired.
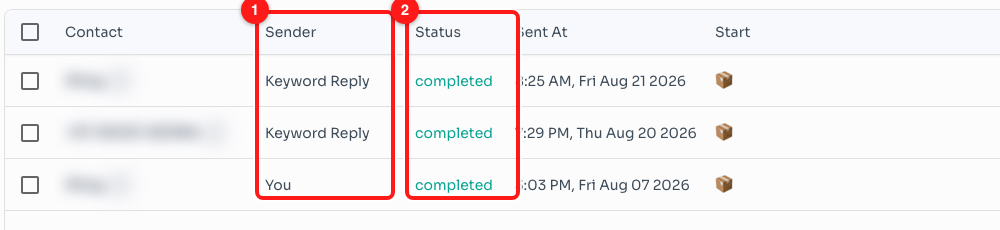
A flow's Recipients list: what started each run (1) and how it ended (2). Contact names are blurred here.
Part 8 — The Webhook trigger, end to end
- Add the trigger: + → App Trigger → Webhook.
- Save the flow. The webhook URL does not exist until the flow is saved — before that the panel only says Save your changes to see the latest configuration.
- Re-open the trigger. Under App Settings you now have the Webhook URL (1) and a copy button. The panel explains it: make a POST request to this URL to trigger the flow, and data from a JSON body can be used later in conditions, apps and messages.
- Set Target Audience — Chat/Contact decides who receives the messages, and Channel decides which of your channels sends them. A webhook has no chat of its own, so without this the flow has nobody to send to.
- Give the trigger a Next Step, save again, and POST to the URL once to test.
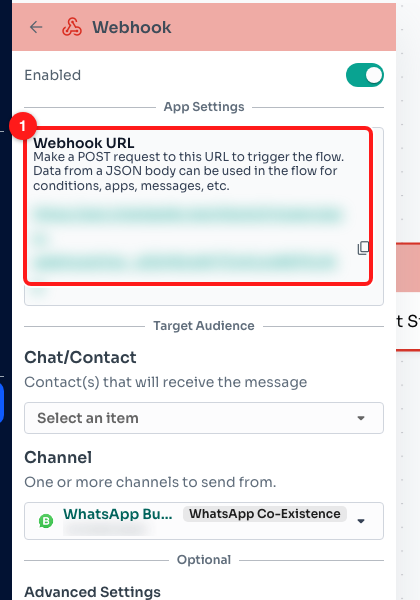
The Webhook trigger after saving: the generated URL (1), then Target Audience. The URL is blurred here — treat yours as a secret.
🔐 Anyone who has that URL can start your flow. Do not put it in a public repository, a screenshot or a support ticket.
Troubleshooting
The trigger never fires.
Work down this list: the Enabled switch is on; the trigger has a Next Step; the flow has been saved since you last edited it; a Condition after the trigger is not filtering the event out; and the event really happened on a connected channel. Then check Trigger History — a run listed there means the trigger fired and the problem is further down the flow.
It fires, but nothing is sent.
Open Trigger History and read the Progress counts. Anything under Failed is a send that was attempted and rejected — the flow ran. See Why a Message Flow Run Failed. On a webhook trigger, an empty Target Audience is the usual cause: there is nobody to send to.
It fires too often, or the same person gets it repeatedly.
Raise Trigger Frequency — it is counted per contact, and the default is only 30 seconds. If an Outgoing Message trigger is involved, check whether the flow's own messages are re-triggering it, and add a Condition that excludes them.
The Test button is greyed out.
That is expected on any flow containing a trigger. Use Preview Flow, then a single real event as described in Part 7.
The event I want is not in the list.
The list comes from your team's own setup: Facebook/Instagram Comment needs a Messenger or Instagram channel, Voice Call Completed needs calling, ticket triggers need the CRM. Connect the channel or feature and re-open the flow. If the event exists nowhere in ChatDaddy, a Webhook trigger driven by your own system is the general answer.
A flow is running away and I need it to stop now.
Two switches, in order: turn Enabled off on the trigger and save, which stops new runs; then in Trigger History select the running instances and click Stop Instances, which stops the ones already going.
The webhook URL is missing.
It is generated when the flow is saved. Save, close and re-open the trigger, and the App Settings section will show it. If you changed the trigger's app since the last save, the panel tells you to save again first.