
How to Create a WhatsApp Form (Complete Step-by-Step Guide)
Build a form that opens inside WhatsApp, collect your customers' answers without them leaving the chat, and continue the conversation automatically once they submit. Covers building, testing and sending, end to end.
Also searched as: How to Create a WhatsApp Form (Complete Step-by-Step Guide), What you will build, Part 1: Create a new message flow, Step 1: Open Message Flows, Step 2: Start from scratch, Step 3: Choose Message as the starting step, Step 4: Write the greeting and add a button, Step 5: Choose a quick-reply Button, Step 6: Name the button, Part 2: Add the WhatsApp Form, Step 7: Pick WhatsApp Form as the next step, Step 8: Find the form on the canvas, Part 3: Set up the form, Step 9: Write the message above the form button, Step 10: Set the button, the form title and the submit button
A WhatsApp Form is a short form that opens inside WhatsApp. Your customer taps a button in the chat, fills in the questions on a WhatsApp screen and taps submit, all without leaving WhatsApp or opening a browser. ChatDaddy saves the answers on the chat and then carries on with your flow, for example by sending a thank-you message.
Use it whenever you need several answers at once: booking a visit or appointment, collecting lead details, a quick survey, a return request, or event sign-ups.
⏱️ Time needed: about 10 minutes. In this guide we build a "Book a showroom visit" form from start to finish. Swap in your own questions as you go.
What you will build
A three-step message flow: a greeting with a Book a visit button, then the WhatsApp Form, then a thank-you message that is sent automatically once the customer submits the form.
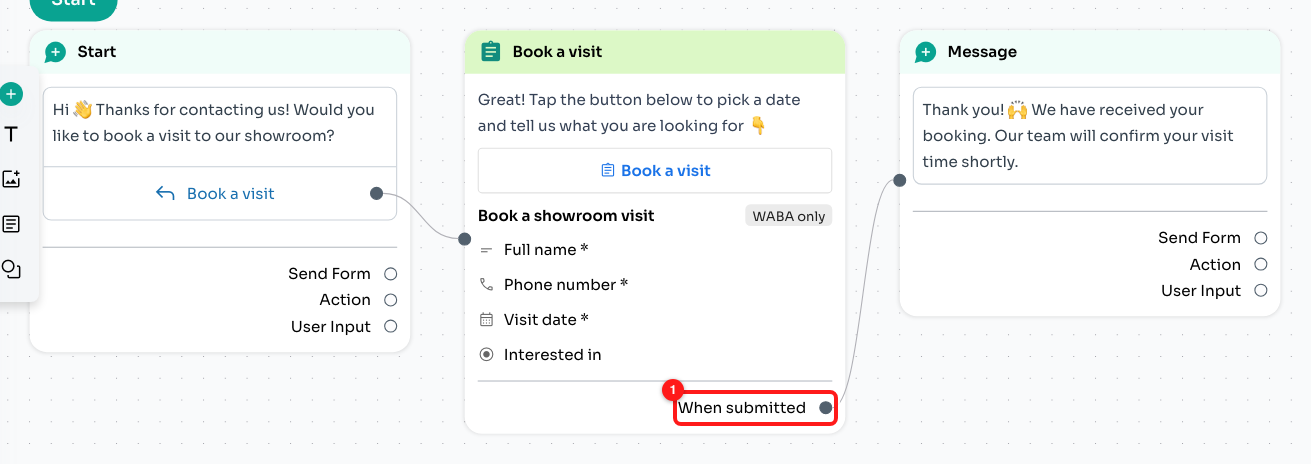
The finished flow: greeting message → WhatsApp Form → thank-you message, linked through "When submitted" (1).
Before you start
- A WhatsApp Business API (WABA) channel connected to ChatDaddy. WhatsApp Forms are a WABA feature: they do not work on regular WhatsApp (WhatsApp Web / Business app) channels, Messenger or Instagram.
- Permission to create message flows under Automation → Message Flows.
- Your questions written out. Keep each question short; see the limits in Part 3.
⚠️ The 24-hour rule. A WhatsApp Form can only be sent within 24 hours of the contact's last message to you. The easiest way to stay inside that window is to send the form as a reply, for example when a customer types a keyword (Part 6) or taps a button in your message, as in this guide. A WhatsApp Form is not a template, so you cannot use it to message cold contacts.
💡 WhatsApp Form vs. the Form node. ChatDaddy has two kinds of forms. The WhatsApp Form in this guide opens inside WhatsApp. The older Form option (the Send Form / Add Form button on a message) sends a link that opens a web page in the browser, and it also works on non-WABA channels. See How to Collect Answers With the Form Node for that one.
Part 1: Create a new message flow
Step 1: Open Message Flows
Click Automation (the lightning icon) in the left sidebar (1) and make sure you are on the Message Flows tab (2). Then click + Create New Message Flow (3).
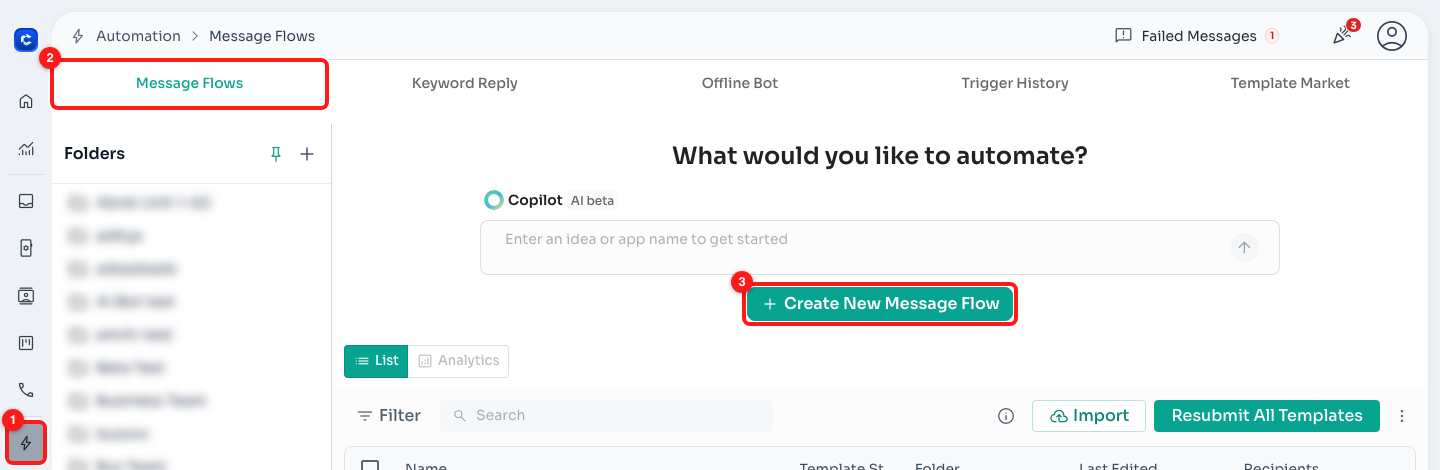
Automation (1) → Message Flows (2) → Create New Message Flow (3).
Step 2: Start from scratch
The Choose your goal window opens. Click Start from scratch (1) at the top right to open an empty flow builder.
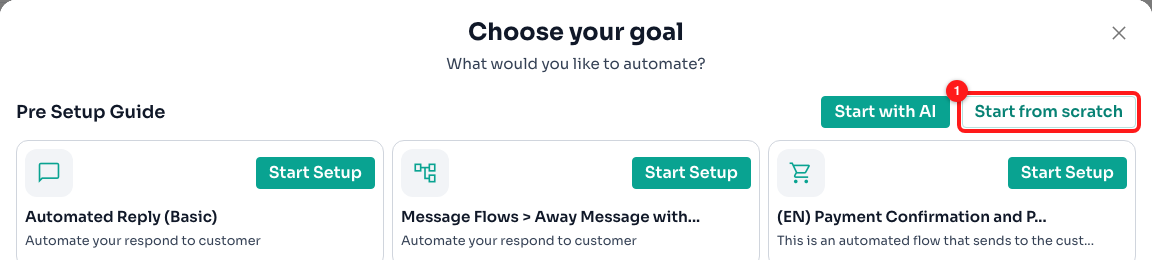
Start from scratch (1).
Step 3: Choose Message as the starting step
In the middle of the canvas, under Choose Starting Step, click Message (1). This first message is what the customer receives when the flow starts.
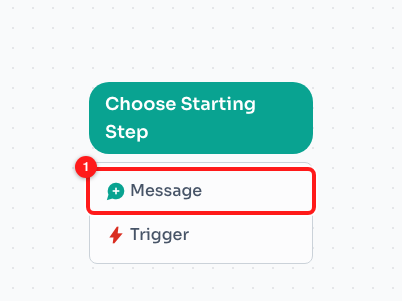
Choose Starting Step → Message (1).
Step 4: Write the greeting and add a button
The message editor opens on the left. Type your greeting in Body (1), for example: Hi 👋 Thanks for contacting us! Would you like to book a visit to our showroom? Then scroll down a little and click Add Button (2).
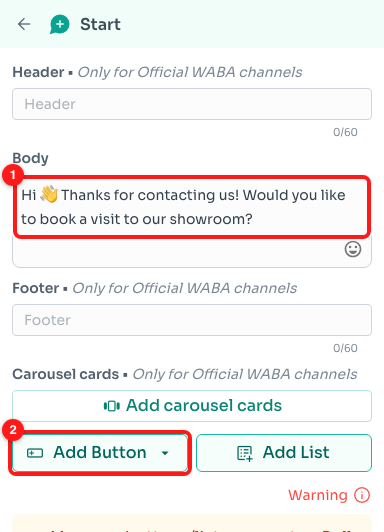
Write the greeting in Body (1), then click Add Button (2).
Step 5: Choose a quick-reply Button
From the Add Button menu (1), choose Button (2). This adds a quick-reply button to the message. When the customer taps it, the flow moves on to the WhatsApp Form. Tapping it also counts as a new message from them, so the form is sent well inside the 24-hour window.
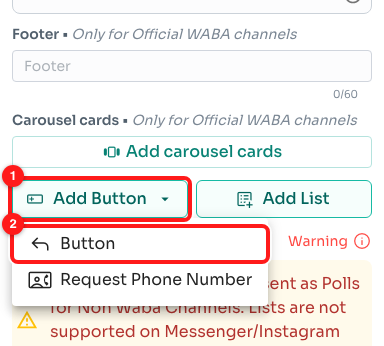
Add Button (1) → Button (2).
Step 6: Name the button
A button called Click Me appears. Click its name and type your own, for example Book a visit (1). Leave the Choose Next Step button (2) for the next part.
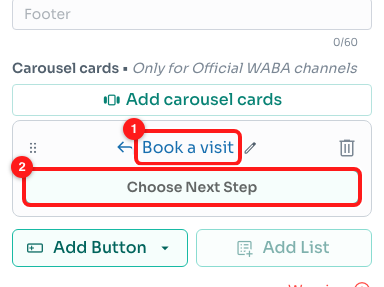
Rename the button (1). Choose Next Step (2) is where you attach the form.
Part 2: Add the WhatsApp Form
Step 7: Pick WhatsApp Form as the next step
Click Choose Next Step under the button. In the list that opens, under New Node, select WhatsApp Form (1).
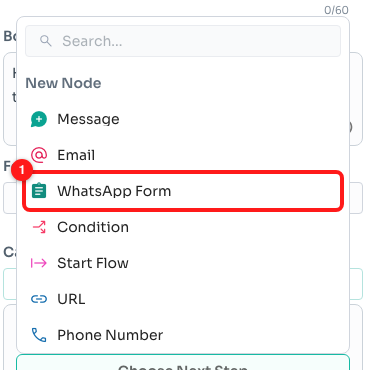
Choose Next Step → New Node → WhatsApp Form (1).
Step 8: Find the form on the canvas
A new WhatsApp Form step (1) appears on the canvas, already linked to your Book a visit button. It starts with a sample message, a Fill in form button and two questions (Full name and Phone number) that you will change next. The WABA only tag (2) is a reminder that it only sends on WhatsApp Business API channels.
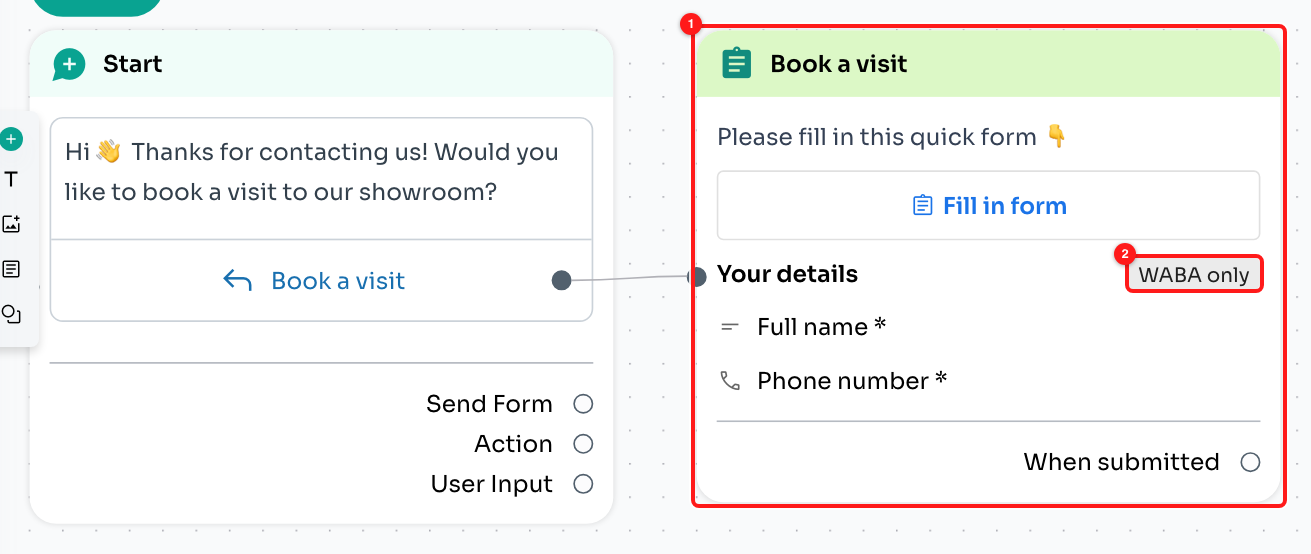
The new WhatsApp Form step (1), linked to the button. WABA only (2).
💡 When you add the form from a button, the step is named after that button (here Book a visit). You can also add a WhatsApp Form from the + (Add Action) button in the canvas toolbar → Node → WhatsApp Form. Just remember to link it to an earlier step, or it will never be sent.
Part 3: Set up the form
Click the header of the WhatsApp Form step on the canvas to open its editor on the left. Work through it from top to bottom.
Step 9: Write the message above the form button
The green note at the top (1) repeats the two rules: WABA channels only, within 24 hours of the contact's last message. In Message (2), write the chat message that goes with the form button, for example: Great! Tap the button below to pick a date and tell us what you are looking for 👇 (up to 1,024 characters).
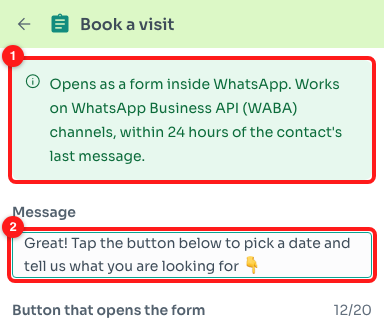
The WABA / 24-hour note (1) and the Message (2).
Step 10: Set the button, the form title and the submit button
Fill in the three short texts. The counter on the right shows how many characters you have left:
- Button that opens the form (1): the button in the chat, for example Book a visit (up to 20 characters).
- Form title (2): the heading at the top of the form screen, for example Book a showroom visit (up to 30 characters).
- Submit button (3): the button at the bottom of the form, for example Send booking (up to 35 characters).
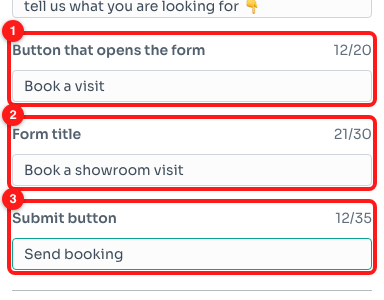
Button that opens the form (1), Form title (2) and Submit button (3), each with a character counter.
Step 11: Edit a question
Scroll down to Questions. Each question is a card; click a card to open or close it. Inside an open card:
- Question (1): the label the customer sees. The counter shows the limit for that answer type.
- Answer type (2): what kind of answer you expect (see Step 12).
- Required (3): switch on if the customer must answer before they can submit. Required questions show a
*. - Save answer to custom field (4): optionally copy the answer into one of your contact custom fields (see Step 13).
- The arrows and bin icon (5) move the question up or down, or delete it.
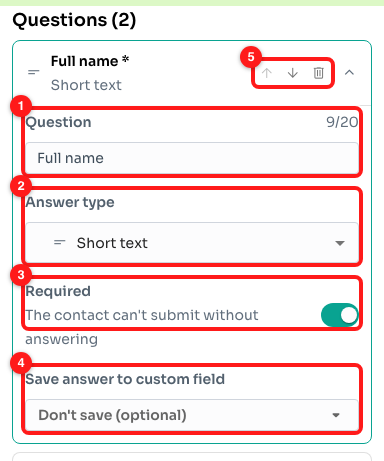
An open question card: Question (1), Answer type (2), Required (3), Save answer to custom field (4), move / delete (5).
Step 12: Choose the answer type
Click the Answer type box to choose one of the 9 types (1):
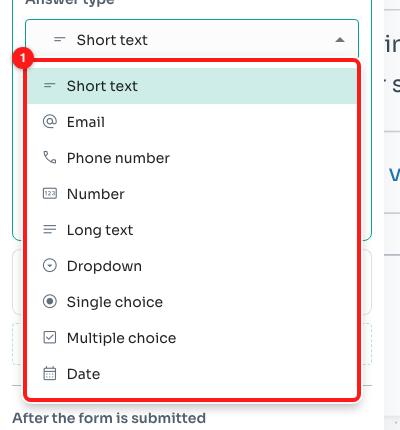
The 9 answer types (1).
| Answer type | Use it for | Max. question length |
|---|---|---|
| Short text | A name, a short reply | 20 characters |
| An email address (checked by WhatsApp) | 20 characters | |
| Phone number | A phone number | 20 characters |
| Number | Quantities, age, budget | 20 characters |
| Long text | Comments, a description of a problem | 20 characters |
| Dropdown | One choice from a long list (up to 200 options) | 20 characters |
| Single choice | One choice from a short list (up to 20 options) | 30 characters |
| Multiple choice | Several choices from a short list (up to 20 options) | 30 characters |
| Date | A date, picked from a calendar | 40 characters |
Step 13: (Optional) Save the answer to a custom field
Open Save answer to custom field (1) and pick a contact custom field from the list (2). When the customer submits, the answer is written to that field on their contact, so you can filter, tag or personalise messages with it later. Leave it on Don't save (optional) if you only need the answer in the chat.
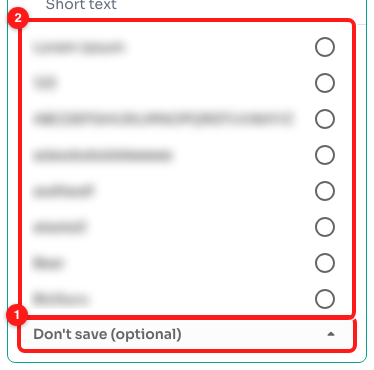
Save answer to custom field (1) lists your team's contact custom fields (2).
Step 14: Add more questions
Click + Add question below the cards. A new card opens, ready to edit. In our example we add:
- Visit date: Answer type Date, Required on.
- Interested in: Answer type Single choice, with options.
For Dropdown, Single choice and Multiple choice, an Options box appears. Type one option per line (3), for example Sofas, Dining sets, Bedroom furniture. Each option can be up to 30 characters and options must not repeat.
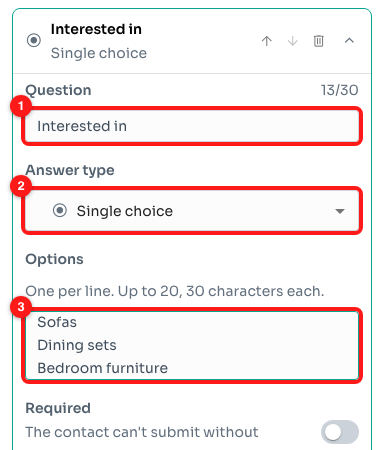
Question (1), Answer type set to Single choice (2), and the Options, one per line (3).
Close the cards to check the full list. Questions (4) (1) shows how many you have (a form can hold up to 49), and + Add question (2) adds another.
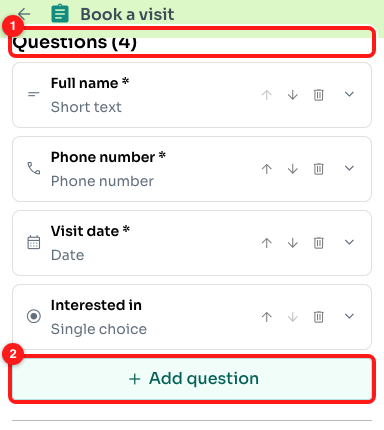
All four questions (1) and Add question (2).
Step 15: Fix anything in "Fix before this can be sent"
ChatDaddy checks the form against WhatsApp's limits as you type. If something breaks a rule, a yellow Fix before this can be sent box (1) lists it, for example a question label that is too long, a choice question with no options, or a missing message. Fix every item until the box disappears. WhatsApp will not accept the form otherwise.
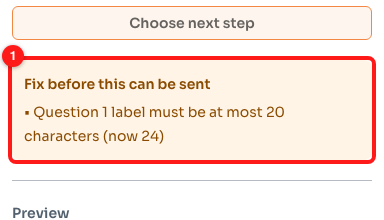
"Fix before this can be sent" (1): here Question 1 is 24 characters long, but Short text allows 20.
Part 4: Decide what happens after the customer submits
Step 16: Choose the next step
Scroll to After the form is submitted (1). The answers are always saved on the chat. Here you choose what the flow does next. Click Choose next step and pick Message (2) to send a thank-you message. You could also pick another WhatsApp Form, a Condition, an Email, or Start Flow to hand over to another flow.
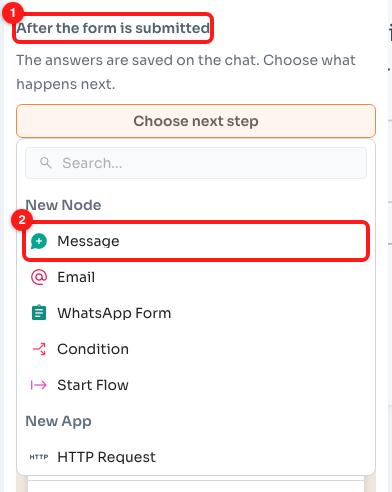
After the form is submitted (1) → Choose next step → Message (2).
Step 17: Check the live preview
At the bottom of the editor, Preview (1) shows the form the way the customer will see it: the chat message with its button (In the chat), and the form screen that opens when they tap it. It updates as you edit.
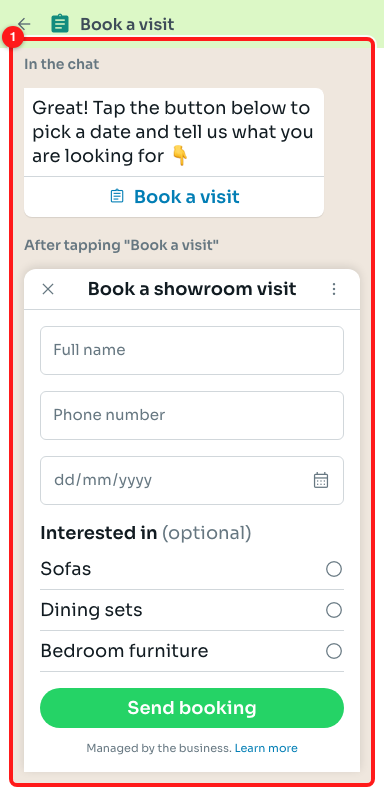
The live preview (1): the chat message and the form screen.
🧩 Below the preview, Show Meta Flow JSON shows the technical form definition that ChatDaddy sends to WhatsApp. You never need to edit it. It is there for developers who want to check exactly what is sent.
Step 18: Write the thank-you message
Go back to the canvas (arrow at the top left of the editor) and click the new Message step linked to When submitted. Type your thank-you text in Body (1), for example: Thank you! 🙌 We have received your booking. Our team will confirm your visit time shortly.
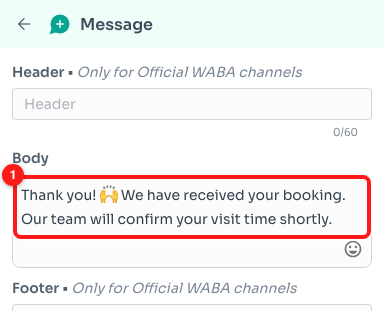
The thank-you message Body (1).
Your flow is now complete: greeting → WhatsApp Form → thank-you, with the thank-you linked to When submitted (see the picture under "What you will build").
Part 5: Name, save and test the flow
Step 19: Name the flow
In the toolbar at the top right, click the pencil icon (1) to name your flow. (Save (2) saves the flow; you will use it in Step 20.)

The pencil icon (1) and Save (2).
In Update Message Flow Details, type a clear Name (1), for example Showroom Visit Booking (WhatsApp Form), and click Save (2).
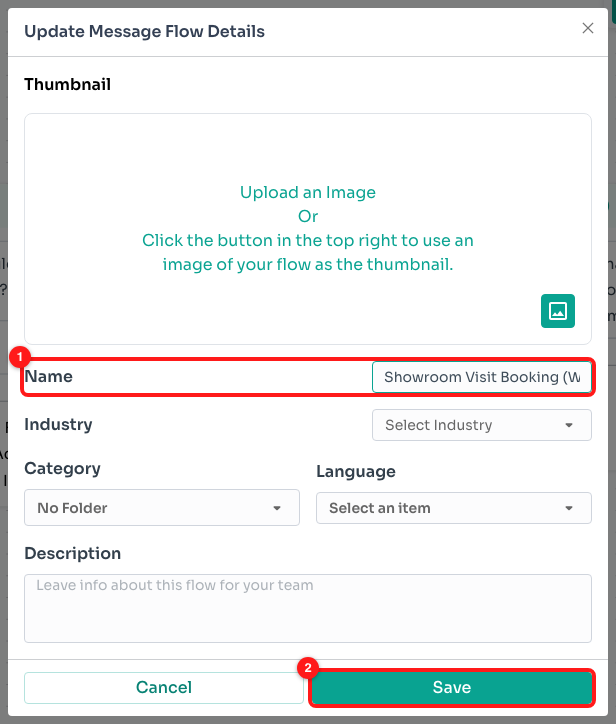
Name (1) and Save (2).
Step 20: Save the flow
Click Save in the toolbar. When there are no unsaved changes, the button turns grey.
Step 21: Test it with Preview Flow
Click the Preview Flow icon (1) in the toolbar. A chat simulator opens on the right. It is a safe rehearsal: nothing is sent to anyone.
Preview Flow (1).
The greeting appears. Tap Book a visit (1) as your customer would.
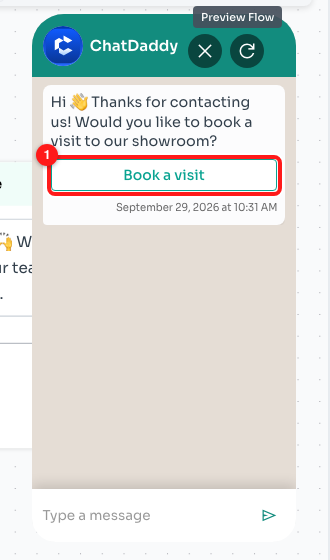
The greeting with its Book a visit button (1).
The form message arrives with its own Book a visit button (1). Tap it to open the form.
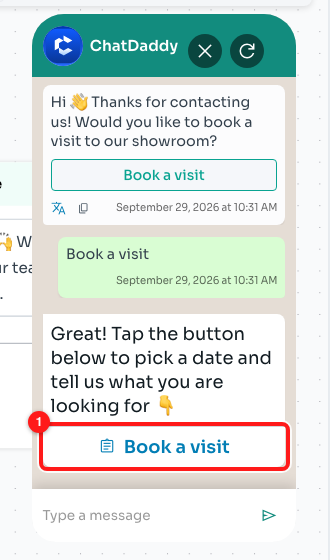
The form message and the button that opens the form (1).
The form screen opens, titled Book a showroom visit. The submit button stays grey until every required question is answered.
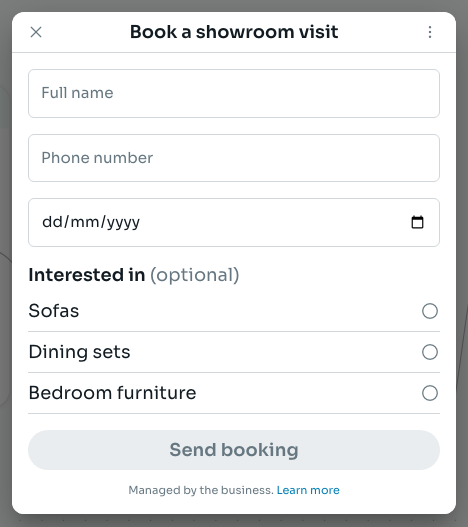
The empty form. The submit button is disabled.
Fill in some test answers and tap Send booking (1).
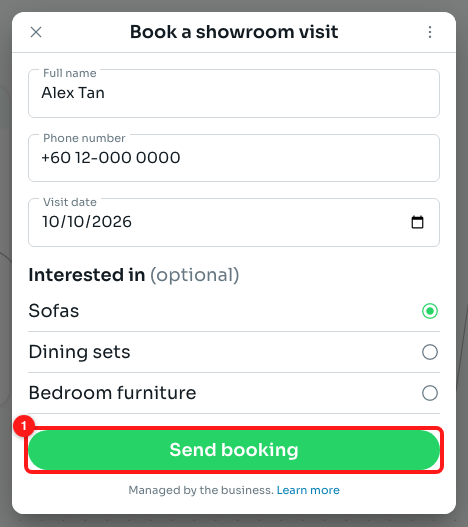
A completed test form and the Send booking button (1). Sample data only.
The chat shows Form submitted (1), then a message listing each answer on its own line (for example Full name: Alex Tan), then your thank-you message (2), sent automatically because it is linked to When submitted.
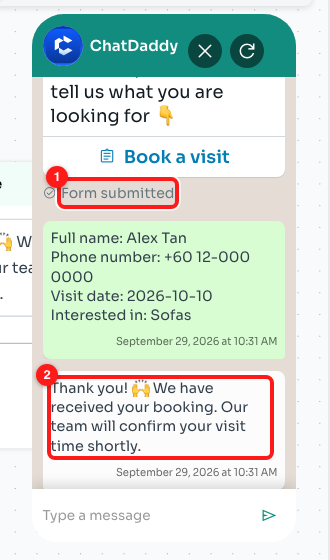
Form submitted (1), the answers, and the automatic thank-you message (2).
🔁 Changed something? Save again and click the refresh icon at the top of the preview to start over. For a real end-to-end check on your own phone, see How to Test a Message Flow Before It Goes Live.
Part 6: Send the form to customers automatically
The simplest way to send the flow is a Keyword Reply: when a customer messages you with a word like "visit", ChatDaddy replies with the flow. They have just messaged you, so the 24-hour window is open.
Step 22: Create a keyword reply
Go to Automation → Keyword Reply (1) and click + Create (2).

Keyword Reply tab (1) → Create (2).
Step 23: Set the keyword and pick your flow
Under Reply to, keep Message Contains Text (1). Type your keyword, for example visit, and press Enter so it appears as a tag (2). Then open Select A Flow, search for your flow and select it (3).
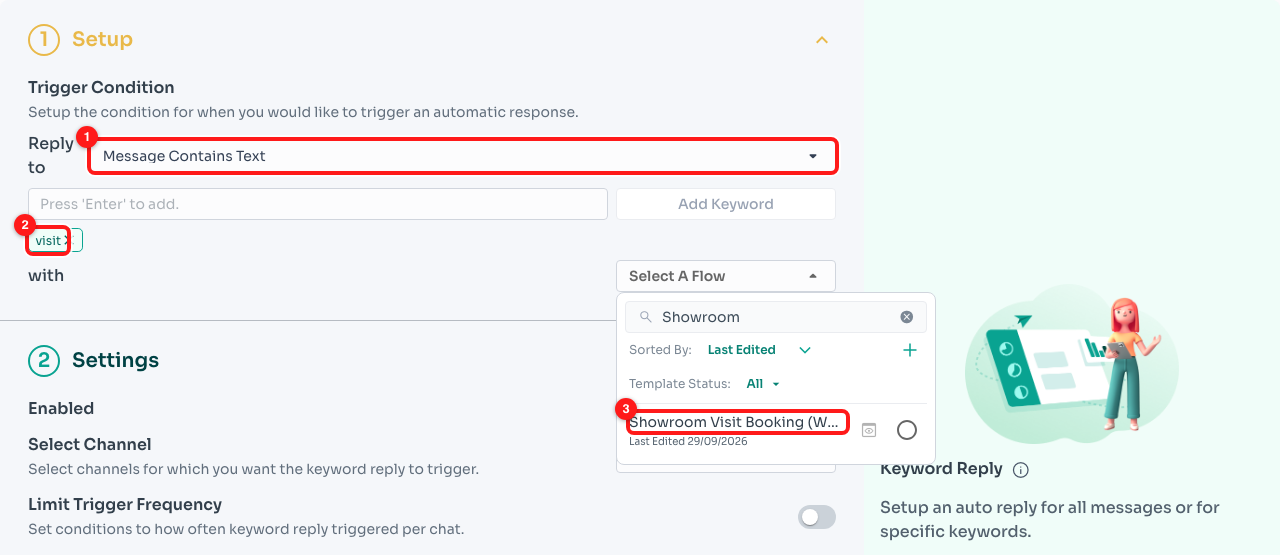
Message Contains Text (1), the keyword "visit" (2), and your WhatsApp Form flow (3).
Step 24: Choose the WABA channel and save
Check that your flow is selected (3). Under Select Channel (4), choose your WhatsApp Business API channel. The form cannot be sent on other channel types, so avoid All Channels if you also have non-WABA numbers. Click Save (5).
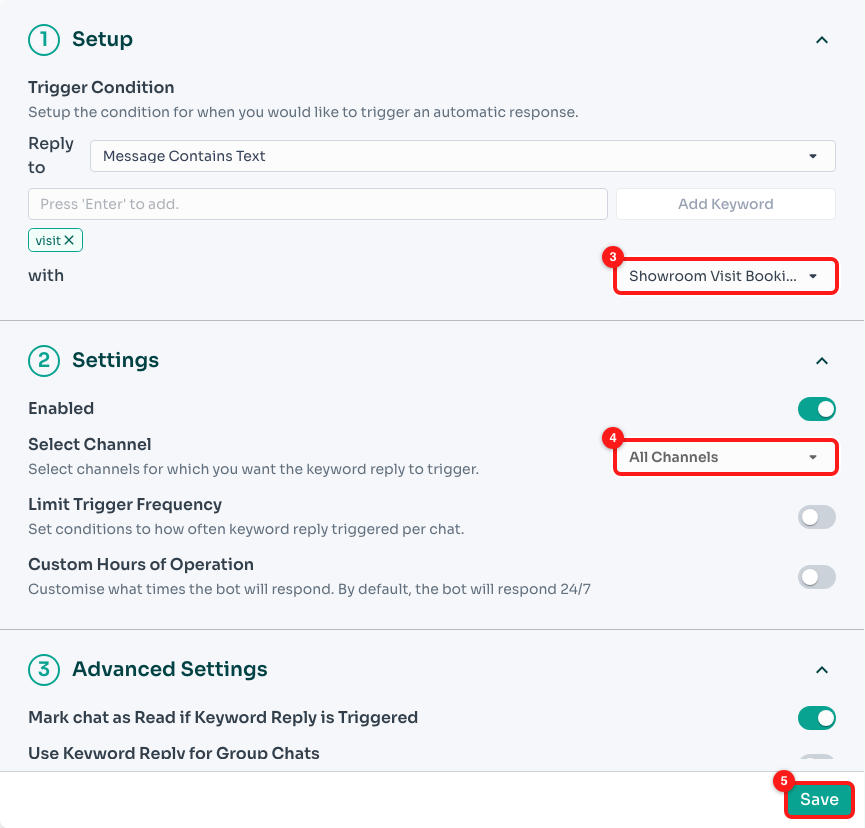
The selected flow (3), Select Channel (4) and Save (5).
That's it. When a customer sends a message containing "visit", they get the greeting, tap Book a visit, fill in the form inside WhatsApp and receive your thank-you message. Full keyword options: How to Setup a Keyword Reply.
📨 Other ways to send it: use the flow as the next step of any other flow or trigger, or send it by hand from the Inbox (How to Send a Message Flow Template From the Inbox). Whatever the route, the contact must have messaged you in the last 24 hours.
Part 7: Where the answers go
- In the Inbox: each submission appears in the customer's chat as a message with one line per answer (for example
Visit date: 2026-10-10), so your team sees it straight away. - On the contact: any question linked to a custom field (Step 13) updates that field on the contact.
- In the flow: the flow continues to whatever you linked to When submitted. If nothing is linked, the flow simply ends after saving the answers.
ℹ️ You do not need to build anything in Meta's WhatsApp Manager. The first time the form is sent, ChatDaddy publishes it to your WhatsApp Business Account automatically. If you later edit the form, the next send publishes the new version. You may see these forms listed in WhatsApp Manager under Flows with names starting with
cd-. Leave them there.
Troubleshooting
The customer never received the form
Check two things. 1) The flow ran on a WhatsApp Business API channel: other channel types cannot send WhatsApp Forms. 2) The customer messaged you in the last 24 hours. Outside that window WhatsApp blocks the message. Send the form as a reply (keyword or button) rather than to cold contacts.
A yellow "Fix before this can be sent" box is showing
One of WhatsApp's limits is broken. Common causes: a question label that is too long for its answer type (20 characters for text-type questions, 30 for choice questions, 40 for dates), a choice question with no options or with the same option twice, an option longer than 30 characters, or an empty Message. Fix each item listed.
The form step shows on the canvas but is never sent
It is not linked to anything. A WhatsApp Form must be the next step of an earlier step (a button, a trigger or another step's next step). Link it, or add it through the button's Choose Next Step as in Step 7.
The thank-you message is not sent after submitting
Open the form step and check After the form is submitted. It must point to your thank-you step. On the canvas, a line should run from When submitted to that step.
The answer did not appear in my custom field
Check Save answer to custom field on that question. It must name a field (not Don't save). Only questions linked to a field update the contact; every answer still appears in the chat.
I cannot select the flow in Keyword Reply
Make sure the flow is saved and has a starting point. A flow showing "No starting point set" cannot be selected. See How to Set the Starting Point of a Message Flow.
The flow will not save
See Why a Message Flow Will Not Save.